How to Use AOMEI Image Deploy for Image Deployment (Secure Boot)
AOMEI Image Deploy Overview
AOMEI Image Deploy is a powerful and easy-to-use image deployment and network cloning software designed to help IT administrators and system integrators deploy system images to multiple computers simultaneously over a local area network (LAN).
Application scenarios
It provides a centralized solution for rapid OS deployment, making it ideal for schools, enterprises, training centers, and other environments where multiple machines require the same configuration:
1. In classrooms or computer laboratories, there are usually dozens or even hundreds of PCs that require the same operating system and software environment. Using deployment tools can quickly restore a batch of uniformly configured system images to all computers, saving time and unifying the environment.
2. When new employees join, the IT department can use pre-configured system images for batch deployment. Avoiding repeated installation of systems and software significantly improves configuration efficiency.
3. If a group of computers crashes or needs to be reinstalled, image deployment allows for quick recovery to a standardized system state. Save maintenance time and improve IT support response speed.
4. For public environments such as internet cafes or libraries, the system usually needs to be reinstalled regularly to maintain cleanliness. Mirror deployment enables one-click recovery and quick reinstallation of multiple computers.
5. In software testing or development, a consistent virtual machine environment is required. By deploying images, multiple consistent testing/development environments can be quickly replicated.
Supported Operating Systems
-
Microsoft Windows 7 (all editions, 32-bit and 64-bit)
-
Microsoft Windows 8/8.1 (all editions, 32-bit and 64-bit)
-
Microsoft Windows 10 (all editions, 32-bit and 64-bit)
-
Microsoft Windows 11 (all editions, 32-bit and 64-bit)
-
Microsoft Windows Server 2008 R2 (all editions, 32-bit and 64-bit)
-
Microsoft Windows Home Server (WHS) 2011 and Windows Small Business Server (SBS) 2011
-
Microsoft Windows Server 2012 and 2012 R2(all editions)
-
Microsoft Windows Server 2016 (all editions)
-
Microsoft Windows Server 2019 (all editions)
-
Microsoft Windows Server 2022 (all editions)
-
Microsoft Windows Server 2025 (all editions)
How does AOMEI Image Deploy work?
1. Set Up the Server and Client Computers
To restore the system to multiple computers simultaneously with AOMEI Image Deploy, you need to select a server computer and decide on all the client computers you want to deploy an image to.
- The server computer can be any PC or server where AOMEI Image Deploy is installed. This machine acts as the deployment console and sends the image to the clients.
- The client computers are the target devices that will receive the system image. These are often new or unformatted machines without an operating system installed.
2. Prepare a System Image
AOMEI Image Deploy only supports images created by AOMEI Backupper. Please use AOMEI Backupper Standard (free version) to create a System Backup or Disk Backup.
Alternatively, AOMEI Backupper Technician or Technician Plus has integrated AOMEI Image Deploy tool. So, you can create backups and deploy images from the same software.
3. Boot Client Computers via PXE
Launch the AOMEI Image Deploy tool on the server computer.
Configure the client computers to boot from Network (PXE Boot) in BIOS or UEFI settings.
Once PXE boot is successful, client machines will connect to the server and wait for image deployment.
4. Deploy the System Image
On the server side, select the backup image you created earlier.
Choose the target client computers.
Start the deployment process.
5. Important Note: SID Conflicts on Domain Computers
If all client computers are part of the same Active Directory domain, using the same deployed system image may cause SID (Security Identifier) conflicts. This can lead to issues with domain joining, group policy application, and network communication.
To avoid SID conflicts, you can try:
Reset the SID After Deployment: After deploying the system image to all client computers, use a tool such as Microsoft Sysprep or third-party SID reset utilities on each client to generate a new, unique SID.
Remove SID Before Creating Backup: Run Sysprep on the master system to remove the SID before creating the system Backup. After that, create a system backup via AOMEI Backupper under WinPE. So, when deployed, each client will automatically generate a new, unique SID during the first boot.
Detailed Steps to Deploy Image to Multiple Computers
AOMEI Image Deploy allows you to restore or deploy a system image to multiple client computers over a local network. Here's how it works, step by step:
Preparation of Server and Client Computers:
-
Install and launch AOMEI Image Deploy on the server computer. Or, use AOMEI Backupper tech./tech plus. The server computer can be any working PC or server, but it's suggested to use Windows 7 or a higher version as the server computer. Since this software requires Windows AIK/ADK to ensure you can create Windows PE successfully, if you use a previous version of Windows 7.
-
Connect all client computers to the same physical LAN segment as the server via network cables.
-
Make sure and verify the network cards on client computers support PXE (Preboot Execution Environment) boot: get into all client computers’ BIOS to open PXE function, set up the first boot as network boot or a similar option.
-
Ensure the target disk number on each client (for system installation) matches the server’s image disk number. If the computer has only one disk, it is typically Disk 0.
-
Remove all the other disks on the client computer in case of mistaken selection and data loss due to it.
Create a System Image on a Well-Configured Computer
1. To minimize the follow-up work of image deployment, you can configure a clean system with the OS, drivers, applications, and settings you want to deploy. This doesn’t have to be the same as the server computer.
2. Download and install AOMEI Backupper Standard or any paid edition (if you have one) on the well-configured computer.
3. Use System Backup to back up the OS partition, or Disk Backup to back up the entire system disk. This image will later be restored to all client computers via the deployment tool.
4. Save the backup image to a NAS path or shared network location. So, the client computers can access the network location to read the backup image.

(Optional) Remove SID Before Backup
If you are deploying to computers in the same domain or want each client to have a unique SID, you can remove the SID before creating a backup. For more detailed steps for removing SID, please refer to here.
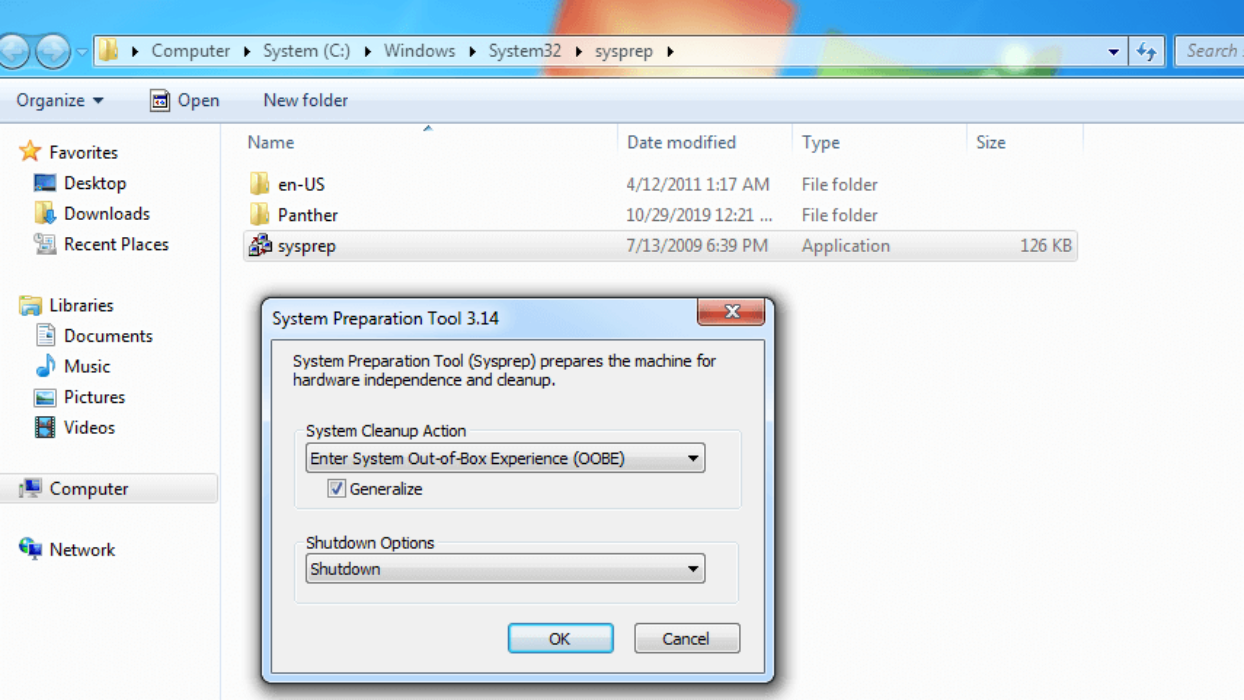
1. Press "Win + R" and enter "sysprep" in the textbox to find Sysprep.exe.
2. Run it and choose Enter System OOBE, tick the Generalize option, and select Shutdown.
Tips: After Sysprep shuts down the system, do not reboot it before backing up. Rebooting will generate a new SID.
3. Create a WinPE bootable USB with AOMEI Backupper before running Sysprep, or on another PC. Boot the system (without SID) from this WinPE USB and perform the system backup.
Step 1: Launch AOMEI Image Deploy
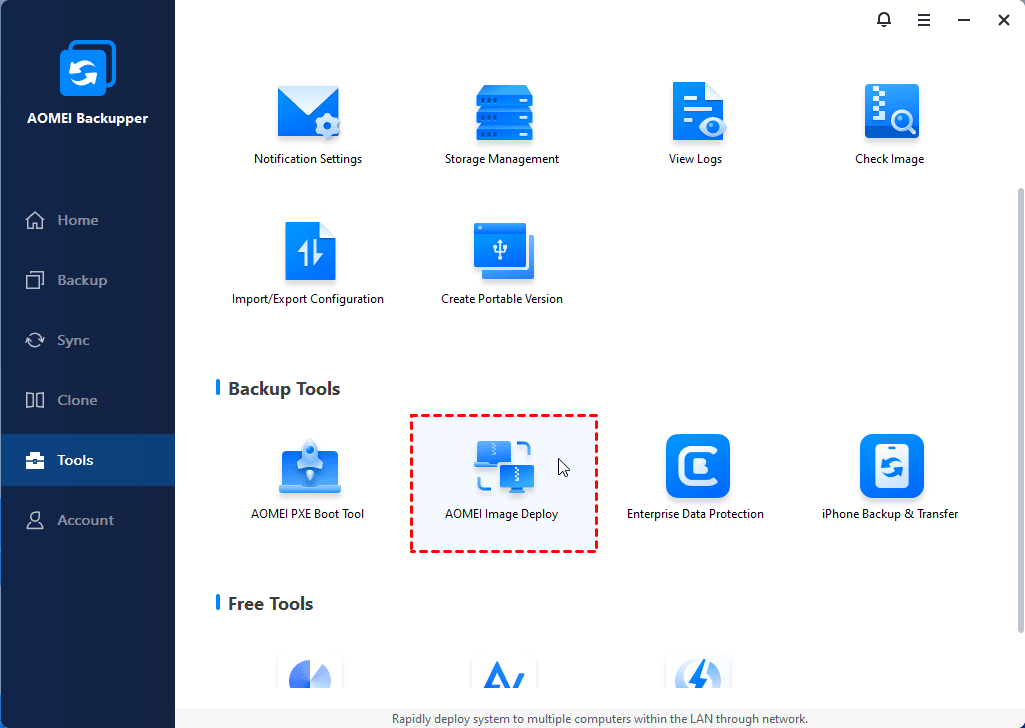
Download, install, and launch AOMEI Image Deploy Free edition. Also, you can launch this program in the AOMEI Backupper Technician or Technician Plus edition by selecting "Tools" > "AOMEI Image Deploy".
The free deploy image tool allows you to deploy an image on unlimited Windows 11/10/8/7 PCs and only 20 servers. If you have more than 20 servers, please try AOMEI Image Deployment Technician.
Step 2: Create and Boot Bootable ISO
Create and specify an AOMEI bootable Windows PE ISO
In the AOMEI Image Deploy main interface, click "Create bootable WinPE ISO or WIM automatically" or "Create WinPE automatically". This will generate a bootable ISO file used to boot client computers over the network. Click "Next" to proceed to the deployment setup.
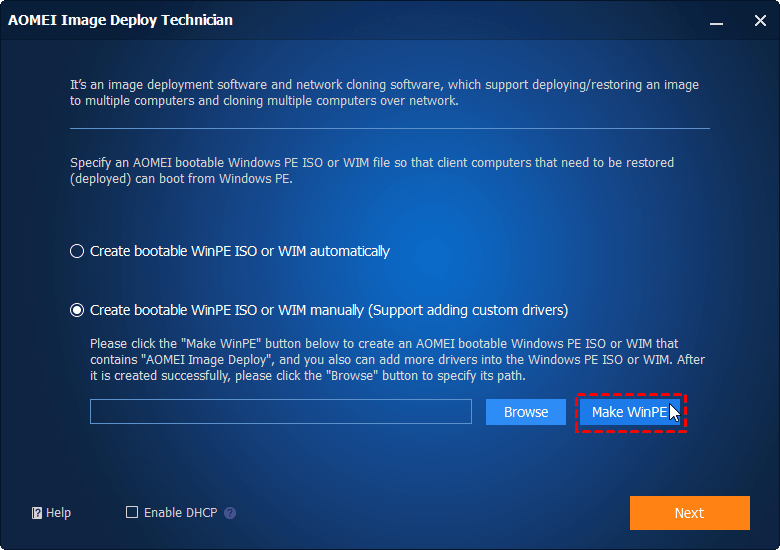
If WinPE fails to boot client computers due to missing or incompatible drivers, you can choose "Create bootable WinPE ISO manually". Click "Make WinPE" on the main screen.
Then, you can choose to "Make ISO file" or "Make WIM file".
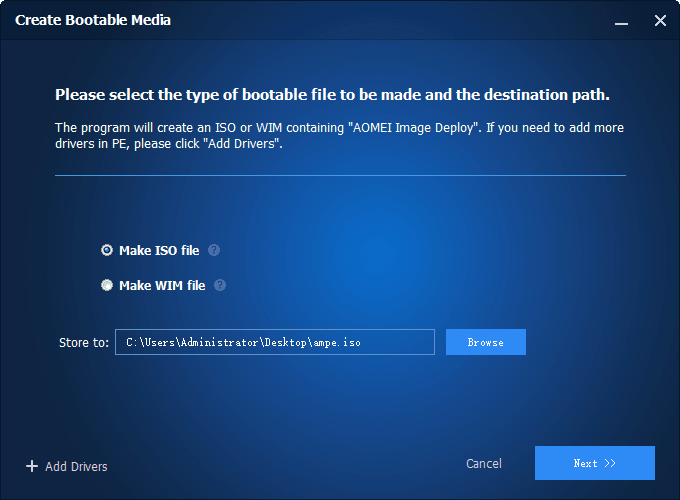
Note:
- Use the "Add Drivers" option to inject necessary network/storage drivers for your client's hardware.
- Save the WinPE ISO file and manually select it using the "Browse" button.
DHCP Server Guidelines:
When client computers boot via PXE (Preboot Execution Environment), they do not have static IP addresses. So, the DHCP server is used to assign IP addresses automatically, allowing clients to communicate with the deployment server.
Both the server and client computers must be on the same subnet and able to communicate over the LAN. Without an IP address assigned by DHCP, client computers cannot receive the boot image, nor connect to the server.
Most home or office routers already have DHCP enabled to assign IP addresses automatically, so you don't need to tick the "Enable DHCP" option. However, if the environment has no default DHCP server, please tick "Enable DHCP" so that it will use the AOMEI DHCP server.
Tips: Only one DHCP server should exist on the LAN to avoid IP address conflicts and unpredictable network behavior.
Step 3: Boot Client within LAN from PXE Boot/Network Boot
After selecting WinPE ISO to boot, AOMEI Image Deploy will display:
"The service has started, waiting for connect…"
Then, please power on all client computers and ensure their boot order is set to PXE Boot/Network Boot in BIOS/UEFI settings.
After booting from the PXE/Network, the client computers will load the WinPE environment.
Loading WinPE successfully, you will see each client listed along with:
Local IP
Server IP
Connection status
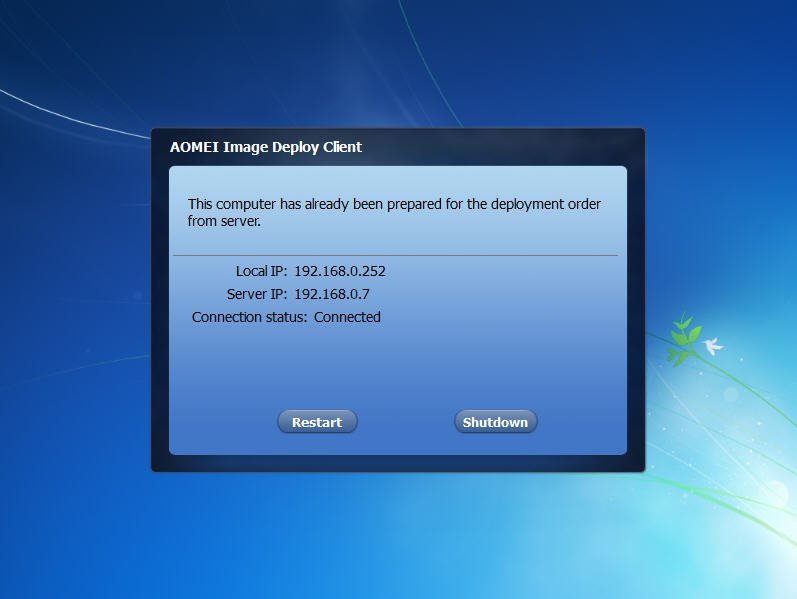
At the same time, you can see the connection status of all the client computers on the server side. Then, click "I confirm all the client computers which need to be deployed are online" and "Next".

Tips:
-
Client computers have to wait to boot till the prompt "The service has started, waiting for connect…". Otherwise, client computers cannot boot successfully.
Step 4: Specify Backup Image and other Settings
1. Click "Browse", then select "Add share or NAS device" to add the network path where the system backup image file is saved. Then, browse to locate the system backup image file (.adi format) created using AOMEI Backupper.
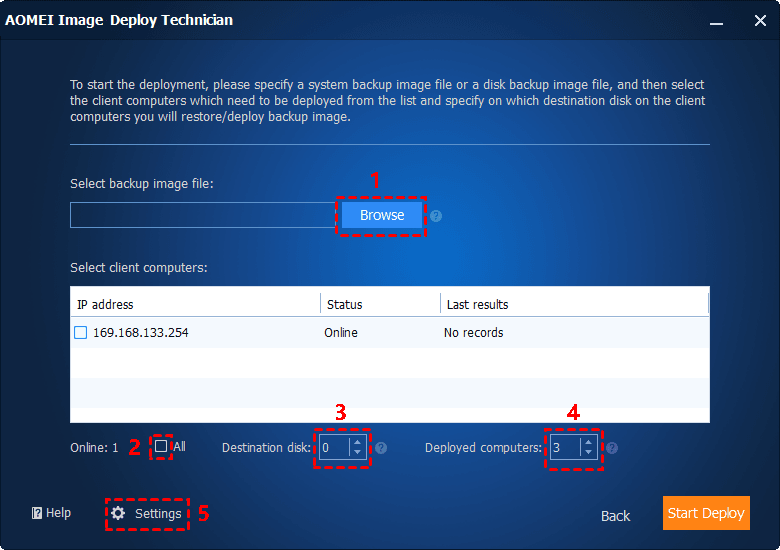
2. Then, select "All" to select all the online client computers or only tick some of the client computers for image deployment.
3. Afterward, enter the Disk Number (e.g., 0) where the system image should be restored on the client computers.
Tips: This should match the disk number used when the image was originally created.
4. Specify the maximum number of client computers to deploy the image to at the same time (based on network bandwidth and hardware capacity). The number of deployed computers is at least 1, and 33 at most. The more computers you want to deploy, the longer it will take to deploy. The suggested number is 5, and in this case, it will restore 5 computers every time and then go for the next 5 computers.
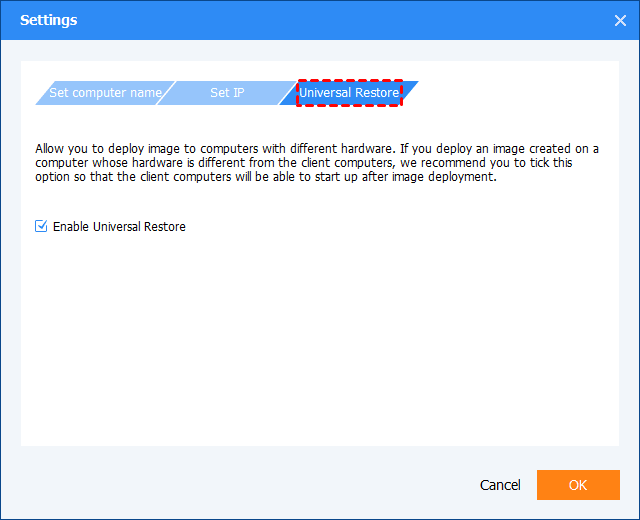
5. Click "Settings" to set the computer name for client computers.
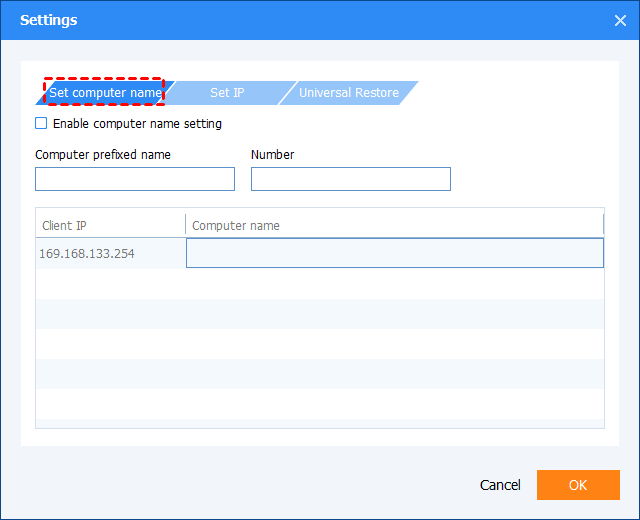
And, the Technician edition also allows you to batch preset IP addresses.
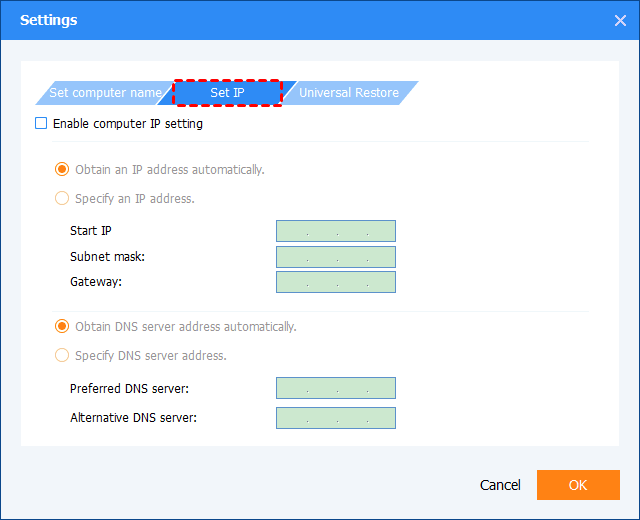
Also, you can perform a dissimilar hardware restore if the hardware of client computers, like CPU, motherboard, is not the same as the computer where you create a system image.
Step 5: Start Deploy
Confirm all the settings and click "Start Deploy" to deploy/clone multiple computers over the network.
You can use "Shut down PC" or "Restart PC" to set whether to shut down or restart the client computers after deploying/restoring the image.
When the deployment is completed, you can boot the client computers from the deployed system.
Conclusion
Through AOMEI Image Deploy, the system deployment process has been greatly simplified into three key steps: "preparing images, configuring networks, and batch recovery". In the face of large-scale device initialization or system environment unification, it can help save a lot of manpower and time costs.
By combining the system backup function of AOMEI Backupper, users can achieve a closed-loop deployment process from system creation to large-scale distribution, truly achieving "one-time configuration, multi-terminal reuse".
FAQs on Image Deploy
Q: Why are the "Local IP" and the "Server IP" shown in the client computer have different network segments, and also the connection status is "None"?
A: Maybe there are multiple DHCP servers in the LAN. Please just keep one DHCP server and Disable others.
Q: Why can you just restore one disk of the backup image, which has several disks?
A: If the one disk backup image has multiple disks, the software only supports restoring the first one of that disk backup image.
Q: Why is the disk format of the client computer sometimes changed from GPT to MBR or from MBR to GPT after restore?
A: When you restore the backup image to the client computer, the software will delete all the data in the destination and then change the disk format of the client computer to be the same as the disk format of the backup image.
For example, if the disk is MBR in the backup image but the target disk is GPT in the client computer, when the software does the restore, the disk in the client computer will be changed to MBR. If the disk format is the same, the software will directly continue to create the partition to do the restore. Therefore, the disk format of the client computer must be the same as the one in the backup image. If not, the software will change it automatically.
Q: How to ensure that the client computer is bootable after restoring the system image or disk backup image?
A: 1. Please check if the boot mode in BIOS is consistent with the restored disk or system. If the restored disk is GPT, the boot mode must be EFI/UEFI. If the restored disk is MBR, the boot mode is legacy.
2. Please ensure that the computer name and the IP address you set for the client computer are not used by another computer in the same LAN. If they are used by another computer and this computer is on, when you boot the client computer, you will get the error message that the computer name and the IP address conflict with another computer that is in the same LAN.
Q: Why can the Windows PE ISO made with the AOMEI Backupper not be used by the AOMEI Image Deploy software to deploy the system?
A: Because only the Windows PE made with the AOMEI Image Deploy software can communicate with the AOMEI Image Deploy server. Please use the AOMEI Image Deploy to create the Windows PE ISO file. In addition, the AOMEI Image Deploy cannot recognize the Windows PE ISO made with other software.
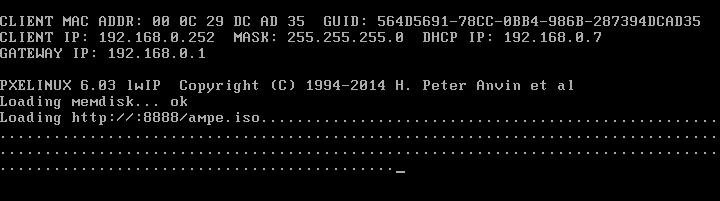
Q: Why does the server show that the client computer information is "Respond to boot request" and the client computer is stuck in this page that "PXELINUX 6.03 lwIP Copyright (c)1994-2014 H.Peter Anvin et al -" all the time?
A: Usually, you encounter this problem because you use the "Enable DHCP" feature, but the IP address of the client computer allocated by the DHCP server is the same as (conflicts with) the one of another computer that is running in the same LAN. We advise you to turn off that running computer or change the IP address of that computer. Then, please reboot the client computer to do the operation again.