How to Use AOMEI PXE Boot Tool Easily
When a computer fails to boot, a common solution is to use a bootable CD, DVD, or USB flash drive containing a recovery environment—typically a Linux-based image or Windows PE (Preinstallation Environment). While effective for individual systems, this approach becomes inefficient and impractical when managing a large number of machines.
For example, if you need to install or run software on 100 computers, manually booting each one from a physical device is time-consuming and resource-intensive. Furthermore, many modern devices may lack CD/DVD drives or even the ability to boot from USB devices.
In such a scenario, AOMEI PXE Boot Tool can provide one solution:
- Install and run the AOMEI PXE Boot Tool on a single computer (ideally a server) connected to the same Local Area Network (LAN).
- Configure the tool with a bootable image (Windows PE or Linux-based).
- Boot all other computers on the LAN via network (PXE) boot, without needing any physical boot media.
About AOMEI PXE Boot Tool
AOMEI PXE Boot Tool is a lightweight and easy-to-use network boot utility that enables users to boot multiple computers into Windows PE or Linux-based system environments over a Local Area Network (LAN)—without the need for physical bootable media like USB drives or CDs. This tool is especially useful for system deployment, recovery, and maintenance in multi-device environments such as schools, offices, or IT labs.
After successful booting, you can perform system backup, restore, partitioning, and other maintenance tasks using the tools embedded within the boot image on the client computers.
IMPORTANT COMPATIBILITY NOTES
To use a PXE boot, each client computer must have:
1. Network Interface Card (NIC) that supports PXE booting.
2. The NIC must support Wake-on-LAN (WoL) mode (for remote wake-up, optional).
3. Client devices must be connected via wired Ethernet (Wi-Fi is not supported for PXE boot).
The Advantages of AOMEI PXE Boot Tool
Compared with standard PXE solutions, AOMEI PXE Boot Tool offers several user-friendly enhancements:
1. AOMEI PXE Boot Tool can directly create a Linux bootable ISO or Windows PE bootable ISO image file. Alternatively, you can create a bootable ISO file by using the AOMEI Backupper -> Utilities -> Create Bootable Media option.
2. For a richer Windows PE environment (including file explorer, taskbar, and additional tools), use AOMEI PE Builder (freeware) to generate a custom WinPE ISO and deploy it via PXE Boot Tool.
3. AOMEI PXE Boot Tool is self-contained. Simply install AOMEI Backupper, and the PXE feature is ready—no need for third-party plug-ins or external PXE services.
How to Use the AOMEI PXE Boot Tool Step by Step
Step 1: Launch AOMEI PXE Boot Service
Install AOMEI Backupper on a server or PC that can boot normally. Select "Tools" and then select "AOMEI PXE Boot Tool".

Step 2: Choose Preboot Execute Environment
Choose one of the Preboot Execute Environments to start your PC.
Three Options:
-
Boot from AOMEI Windows PE system: This is a recommended option, so the tool helps you to easily create a Windows PE system image for network boot.
-
Boot from custom image file: You can load the special micro-system created by AOMEI PE Builder or a third-party PE tool.
Step 3: Start Service
After clicking "Start Service", the AOMEI PXE Boot Tool will configure related data automatically and start the service to wait for target computers.
Step 4: Set Clients within LAN for Network Boot
Power on the client computer while repeatedly pressing the required key to enter the computer's BIOS (usually, the F2 or Del keys, but this depends on the PC manufacturer, so please check the documentation if needed), then enable “Network Boot” in the BIOS setting.
Restart the client computer and enter the BIOS/UEFI screen in the same way as described above.
The following steps describe how to configure PXE network boot.
Boot mode selection
Click Bios Features -> CSM Support -> Boot Mode Selection, and press Enter in "Boot Mode Selection" and a pop-up window will appear, and you should choose "UEFI and Legacy" or "Legacy Only".

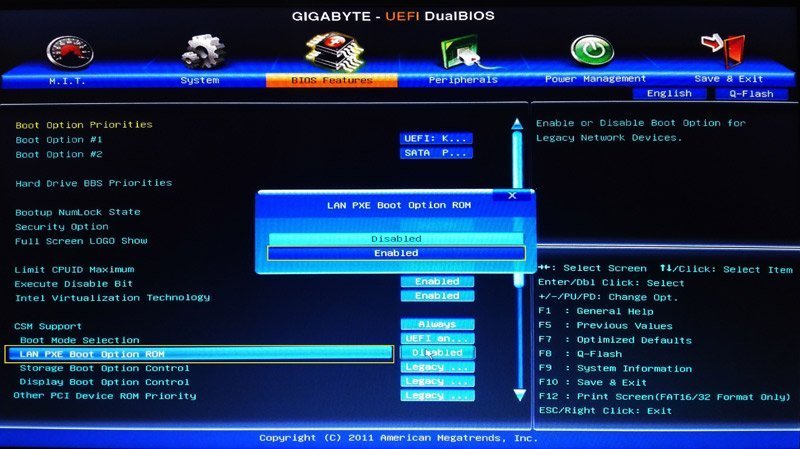
Enable the PXE boot option
Choose "LAN PXE Boot Option ROM" with a down arrow, and turn its status from "Disabled” to “Enabled".
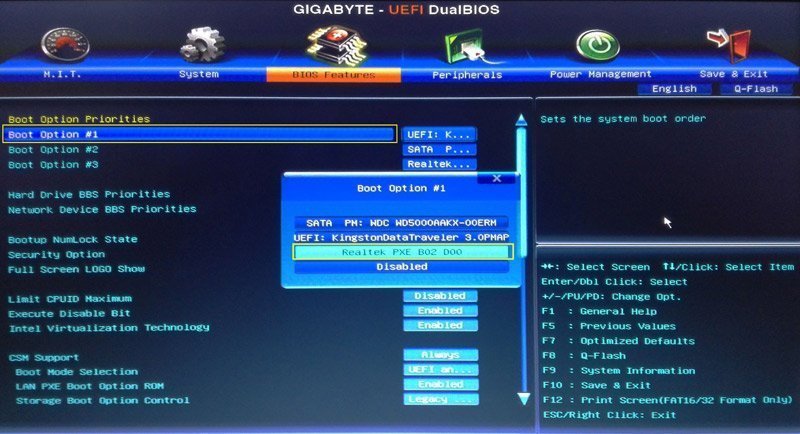
Set the PXE option as the first boot device
You can select "Boot Option # 1" in "Boot Option Priorities", and then select "Realtek PXE B02 D00" as well as press Enter.
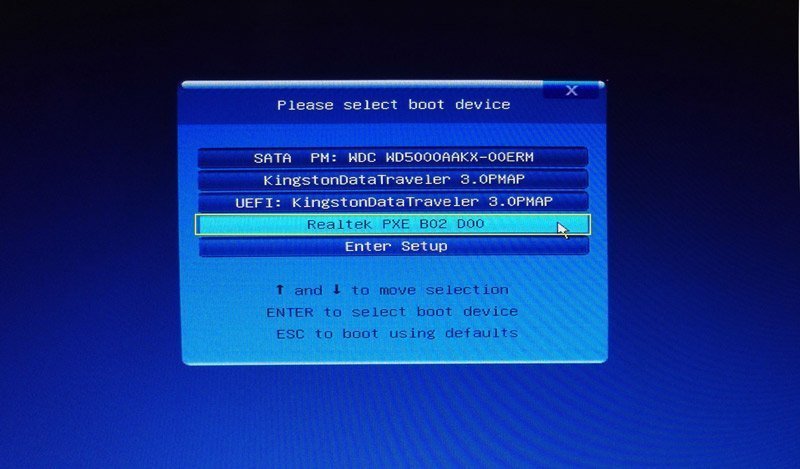
Alternative to setting the first boot device
You can also reboot the computer and hit a key (may be F12 or F11), then a window will pop-up below, and then select the first boot device: “Realtek PXE B02 D00” and press Enter.
Step 5: Boot Clients from PXE over Network
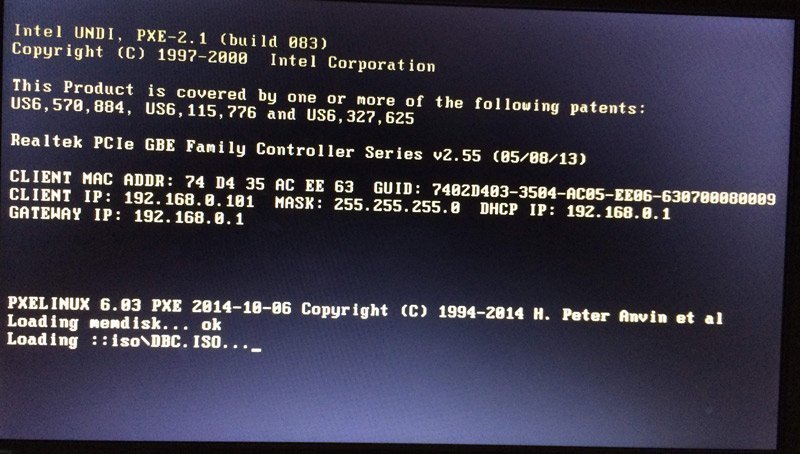
Finally, you can see the following screenshot, which means your computer is booting from PXE over the network. You may need to wait for a few minutes, depending on the speed of the network and the size of the bootable image file.
Notes:
-
It may take a few minutes for the PXE boot process to complete.
-
All computers requiring PXE boot must be on the same network.
-
If there are many computers using PXE boot, the network speed may be impacted. It may be advisable to divide the PXE boot clients into smaller groups to boost network performance.
-
The AOMEI PXE Tool contains a DHCP server that can be used if an existing DHCP server is not available. DHCP is usually offered by the LAN router.
Step 6: Perform Maintenance Operations
Once the client computers have successfully booted via PXE, you can begin performing various maintenance tasks using the tools embedded within the boot image.
In most use cases, AOMEI PXE Boot Tool is used to boot a WinPE image created by AOMEI Backupper. After booting, the AOMEI Backupper interface will automatically launch on each client machine. Then, you can perform backup and restore operations on every client computer.
Conclusion
This greatly improves efficiency and reduces the time required, compared to the traditional method of booting and restoring each machine individually with a recovery disk or USB drive.
For even more streamlined deployment scenarios, AOMEI also offers the AOMEI Image Deploy Tool. Like the PXE Boot Tool, it leverages PXE technology, but with enhanced functionality: it allows you to deploy a system image from the server side directly to multiple client computers in one operation—making it ideal for mass OS installation or cloning environments.
FAQs
Q: How do I configure PXE service on the server side? How to use the PXE function to boot on the client side?
A: 1. Run the program to configure the PXE service. You can choose "Boot from AOMEI Windows PE system", "Boot from AOMEI Linux system", or "Boot from custom image file". Then click the "Start Service" button. If the current system doesn’t have the required environment to create a bootable image file, the program will prompt you to install Windows AIK or ADK.
2. After you have finished configuring the server side, ensure that the client-side and server-side both exist in the same LAN and network segment.
3. Check whether the DHCP server exists in the LAN or not. There must be a DHCP server in the LAN. If you don't have a DHCP server, you can use some software such as TFTPD32 to build one.
4. If the client computer’s motherboard is set to UEFI boot mode, change to legacy BIOS boot mode and enable the PXE boot option in BIOS.
5. Restart the client computer to start up the system through network booting.
Tips:
Optional: Temporarily close all firewalls, including Windows firewall and third-party program firewall, before running the feature.
Optional: You may be prompted that some ports are in use by other programs when starting the PXE service. You may enter the CMD command prompt, and separately type: netstat -aon|findstr "67", netstat -aon|findstr "69", netstat -aon|findstr "4011" to check if the 67, 69, 4011 ports of the server side are in use by other programs. If so, please type tasklist|findstr "PID" to find out which processes are using these ports, and then manually end the processes using these ports.
Q: In a few cases when using PXE, why does it fail to create a Windows PE bootable image file?
A: Causes may be:
1. The environment required to create a Windows PE bootable image file is not present in the current system. In such a case, the program will prompt you to install Windows AIK or ADK, and then restart the program to try again.
2. The program is installed in a directory that includes non-English characters. In such a case, the program will prompt you that it failed to create a Windows PE bootable image file. Please use the "Create Bootable Media" function in AOMEI Backupper to create a Windows PE bootable ISO image file, and then store it in the program installation directory. Alternatively, reinstall the program into the English directory, or install the language pack in the current system related to the non-English characters included in the installation directory.
3. A bug has occurred. Please use the "Create Bootable Media" function in AOMEI Backupper to create a Windows PE bootable ISO image file, and then store it in the program installation directory. Alternatively, use other software to create a bootable ISO image file, such as AOMEI PE Builder, or select a bootable ISO image file you have already created.
4. If the "Create Bootable Media" function in the server-side program is running, creating a Windows PE bootable image file in the PXE function will fail. Please wait until the progress of "Create Bootable Media" in the server-side program is completed, and then continue with the operation in the PXE function.
Q: In a few cases, why does the client-side fail to boot from the network even after they have finished configuring the PXE service on the server-side?
A: 1. If the server-side and client-side do not exist in the same network segment, the server-side neither receives the request from the client-side nor sends data to the client-side. The inability to communicate results in the client-side failing to use the PXE function to boot from the server-side. In such a case, configure the server-side and client-side with the same network segment.
2. If the LAN on which the server-side and client-side exist does not have a DHCP server, the client-side cannot obtain the IP address when booting from the network. To solve this problem, add a router with a DHCP service to the LAN, or use third-party software such as TFTPD32 to configure a DHCP service on another computer.
3. The client-side using PXE function to boot from the network may be affected if the firewall on the server-side is enabled. In such a case, close the firewall on the server side.
4. Boot failure will occur if the client-side uses UEFI boot mode to start up from the network. Currently, the PXE function in the program does not support UEFI boot mode. To correct this, enter into motherboard settings to change the UEFI boot mode to legacy BIOS boot mode.
5. It may be that the logged-in user on the server-side is not an Administrator account. In such a case, the configured PXE service fails to start automatically after logging in. Please run AOMEI PXE Tool with administrator privileges, and then click the "Start Service" button. Restart from the client-side to try again.
6. The client-side using PXE function to boot from the network must connect to the server-side through a wired network. The PXE function does not support communication through the wireless network card.
Q: In a few cases, why does the system startup fail when using the PXE function to boot from the network?
A: 1. The selected bootable image file might have a problem. Please re-create a bootable image file, or use the "Create Bootable Media" function in AOMEI Backupper, or use AOMEI PE Builder.
2. If the selected bootable image file is too large, or the computer’s memory is too small, boot failure may occur because of insufficient memory. Please select a smaller bootable image file.