How to Explore Image with AOMEI Backupper
After you create a backup with AOMEI Backupper, it will generate .afi/.adi image files. Normally, you need to restore the backup to view the backup content. But system/disk/partition restore will overwrite the destination partition/disk. How to view/copy the backup files without overwriting the destination drive?
With the feature "explore image" in AOMEI Backupper, you can easily view/copy individual files/folders from the image file .afi/.adi. You can either directly double-click the backup image .afi/.adi in Windows File Explorer or mount the backup as virtual partitions in AOMEI Backupper to directly view or copy individual files/folders.
In this article, we will describe how to view/copy individual files/folders from the .afi/.adi image files.
Tips: Since it is an important and useful feature, it is only available in the paid version. If you are a free user, you can also download and install the Trial version to utilize the feature.
View Files in Windows File Explorer
1. Locate the backup destination location in Windows File Explorer and find the .afi/.adi image file. Double-click the image file to open it, and then you can view the backup files/folders and copy the needed data.
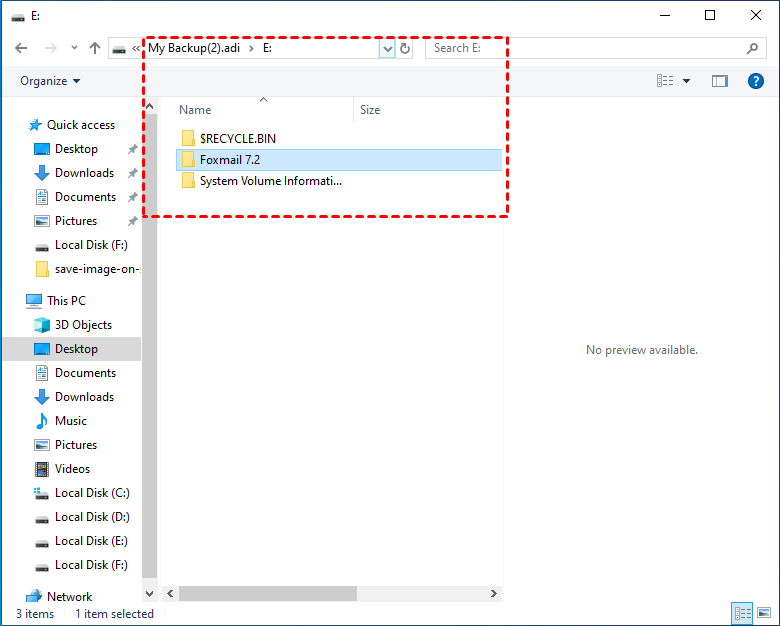
2. You can directly close the window to end the viewing process.
Tips: This way is only available in V7.4.0 and later versions.
Mount System/Partition/Disk Backup as Virtual Partitions
For a system/disk/partition backup .adi image file, you can mount it as a virtual partition and then view/copy individual files/folders from it. For the file backup .afi image file, it is unable to mount as a virtual partition.
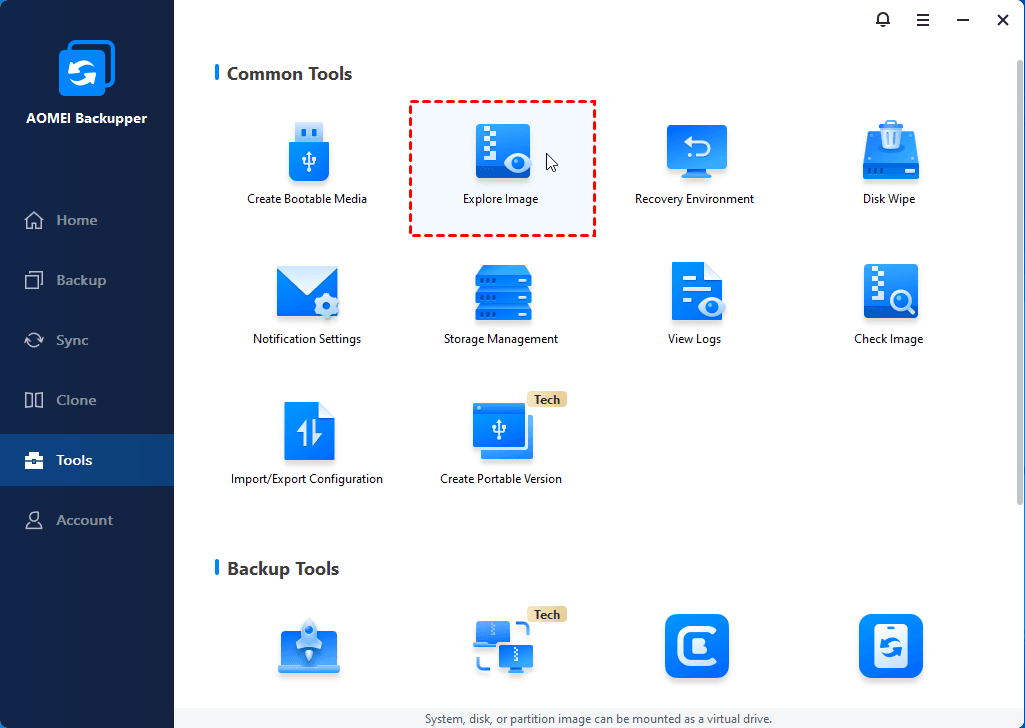
Step 1: Initialize Explore Image Tool
In the main Tab page, select Tools and then select Explore Image.
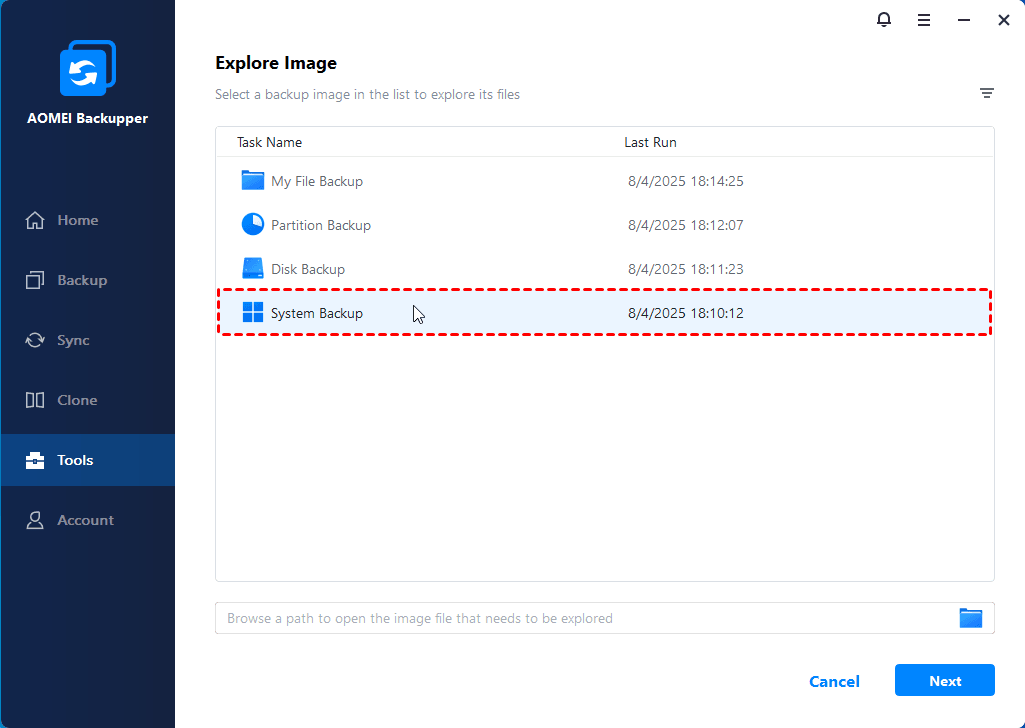
Step 2: Select Backup Image to Explore
Select the backup image that you want to explore from the list box, and click Next to continue.
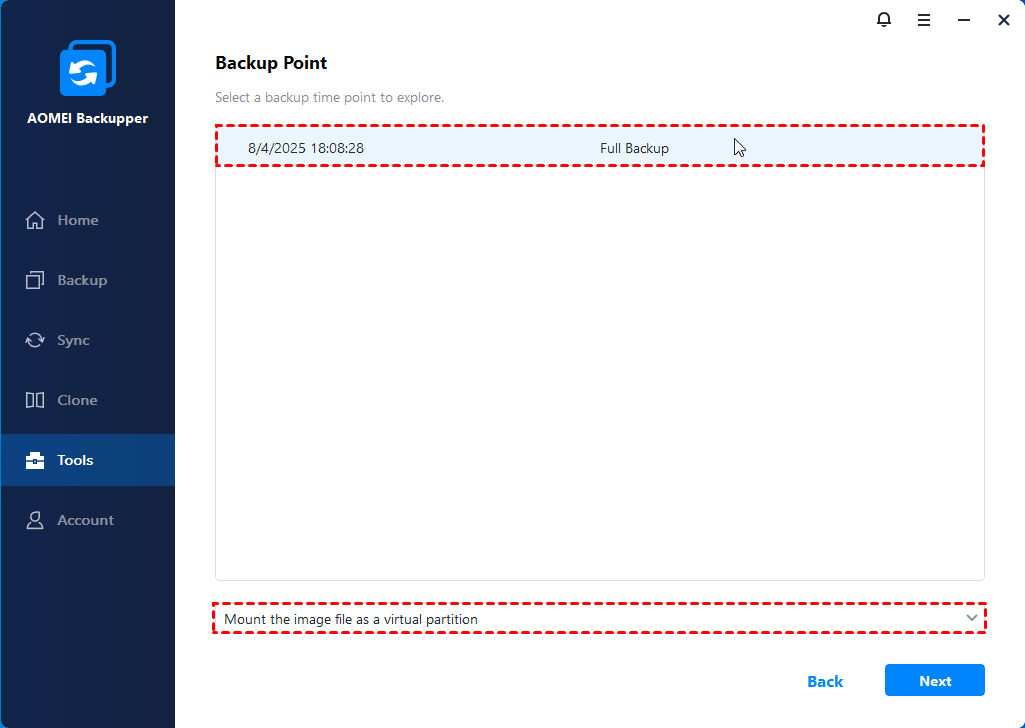
Step 3: Select a Backup Point
For system, partition, and disk backup images, there are two options available: View Files in Windows File Explorer and Mount the image file as a virtual partition. Select either way as per your need and click "Open".
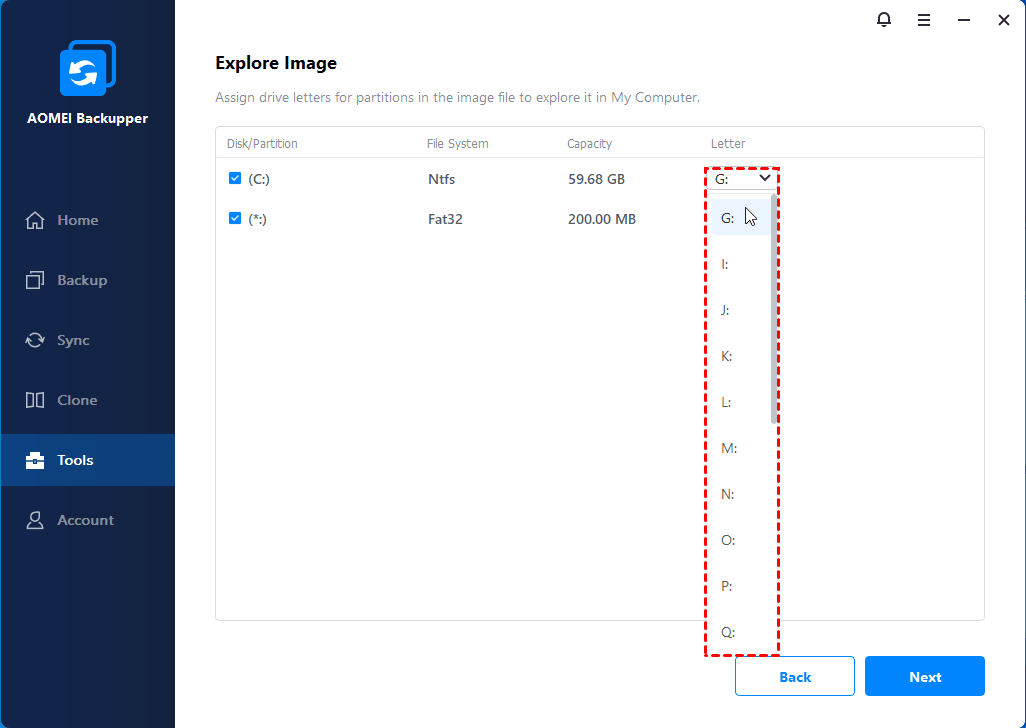
Step 4: Assign Drive Letters for Partitions
If you select Mount the image file as a virtual partition, you can assign a drive letter for the partition and click Next. (Here, we take G as an example.)
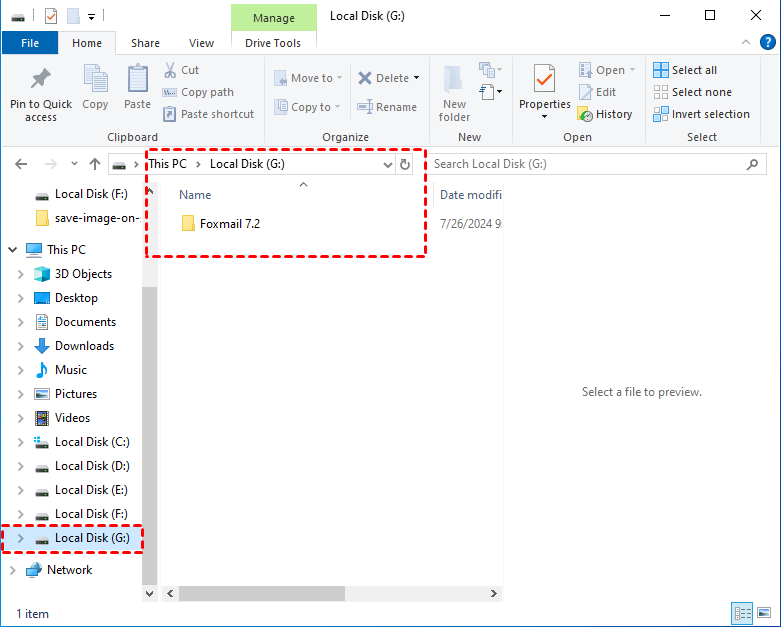
Step 5: Check Mount Result
After the image is mounted successfully, you will find a virtual drive letter G: in Windows File Explorer, and you can also directly view data on it.
Tips: If you select View Files in Windows File Explorer, it will open the backup image in Windows File Explorer, and you can directly view data on it. It is just the same result as if you double-click the .adi image file in Windows File Explorer.
For file backup images, there are also two options available: View Files in Windows File Explorer and View Files in AOMEI Backupper.
Tips: If you select View Files in Windows File Explorer, it will display the files/folders in Windows File Explorer, and you can directly view data. It is just the same result as if you double-click the .afi image file in Windows File Explorer.
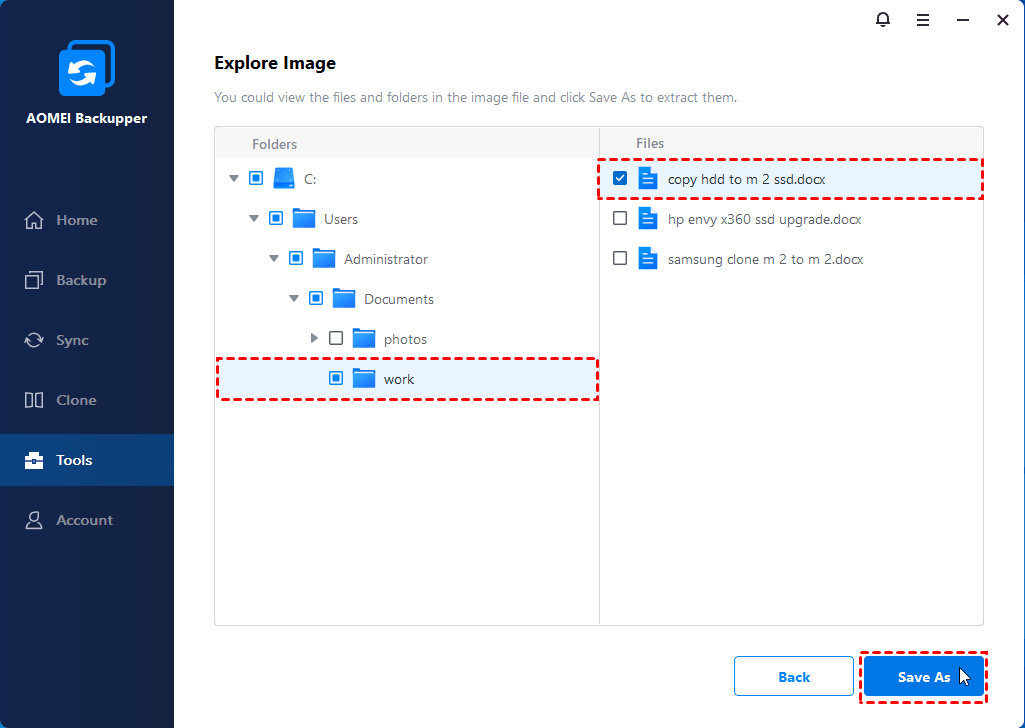
If you select View Files in AOMEI Backupper, you can directly check the file structure in AOMEI Backupper. By ticking boxes of certain files, you can choose individual files and folders to be explored according to your requirements and click "Save As" to choose a location to save files and folders. After that, you can also view the files/folders in the location directly.
Tips: For file backup .afi image, please manually delete the mounted folder if you do not want to access it.
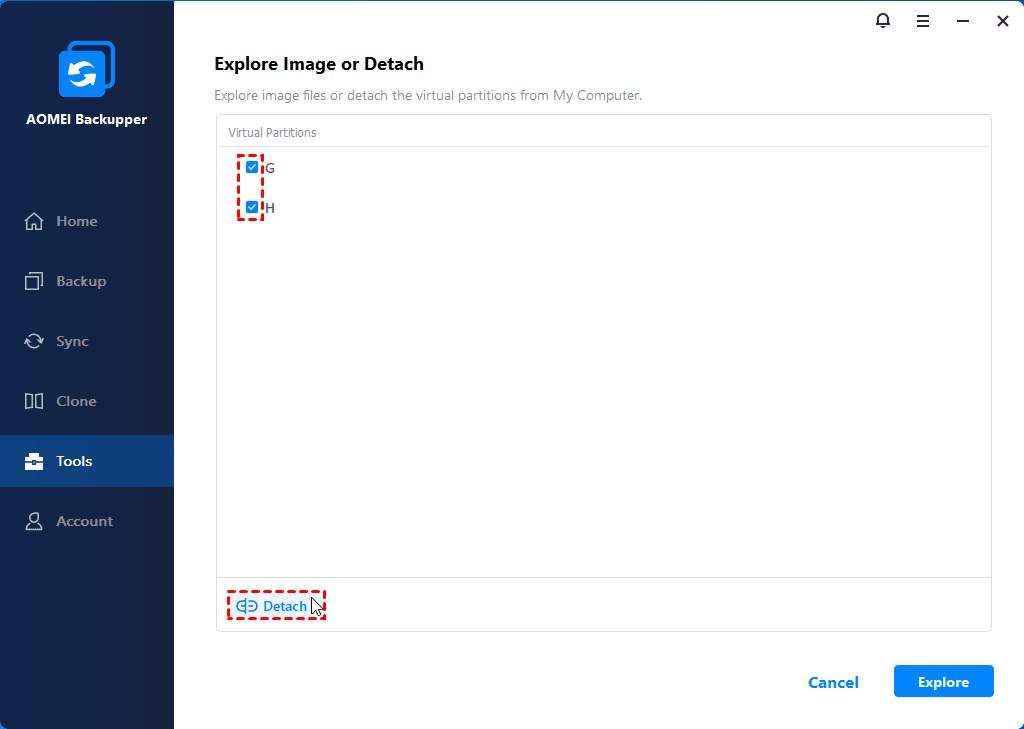
How to Detach the Mounted Virtual Partitions
After a system, partition, and disk backup is mounted, it will generate virtual drive letters.
By default, the virtual drive letters will be removed automatically after you restart the computer.
Or, you can remove the mounted drive letters in the following steps:
1. In the main Tab page, select "Tools" followed by "Explore Image".
2. All current virtual drives will be listed. Select the appropriate virtual drives, followed by clicking "Detach" for the virtual drives to be removed.
Notes:
-
You can copy files or folders in the mounted virtual partition to a physical drive after a system, partition, or disk backup image is mounted. However, it is unable to add files or folders to the virtual drive as you do in a physical drive.
FAQs
Q: Why does the message "Only supports browsing files in FAT or NTFS partitions in AOMEIBackupper" pop up when exploring/double-clicking the backup image?
A: The reason is that you backed up a non-NTFS or FAT partition, for example, exFat. It is unable to directly mount or double-click the partition to view. If you back up a non-NTFS or FAT partition, please restore the backup to view the backup content.