How to Transfer System Image to New Drive on Windows: 3 Easy Ways
This article provides users with 3 practical methods to transfer system image to new hard drive or PC. Go for it and get detailed steps.
By Lily Updated on August 28, 2025
Why Transfer System Image to New Hard Drive?
Windows allows users to create a system image backup that includes all the necessary data and applications for Windows to run, including settings, programs, and files. You may want to transfer a system image to a new hard drive (or SSD) for the following reasons:
- Disaster recovery: If your current hard drive fails, you can restore the system image to a new drive and resume normal operation without reinstalling everything.
- Hard drive upgrade: Transfer OS setup from the old HDD to a larger HDD or a faster SSD without Windows reinstallation.
For Windows 11/10/8 users, you can create a recovery drive with a common USB flash drive and then restore Windows image backup to another drive. Windows 7 users will need to prepare a CD or DVD to create a system repair disc for booting the computer normally. Alternatively, you can use third-party software to help with the transfer process.

3 Easy Ways to Transfer Windows System Image
To copy Windows image to another drive or another computer, you can make use of a versatile software AOMEI Backupper Professional or the built-in tool Backup and Restore. There are three available solutions for system migration. Continue reading to learn more about them.
|
|
How to Operate |
Ease of Operation |
|
⭐⭐⭐ |
|
|
Use the “System Clone” feature |
⭐⭐⭐⭐⭐ |
|
|
⭐⭐ |
Way 1. Copy Windows Image to Another Drive via Bootable Media
AOMEI Backupper has a simple and easy-to-use GUI, so anyone, even non-technical users, can move system image to new hard drive without effort. Here are some advantages of it.
- High Compatibility: It is compatible with a wide range of Windows operating systems, including Windows 11/10/8.1/8/7/Vista.
- Versatile Backup and Restore Solutions: You have the flexibility to choose from various backup and restore options. Whether you want to back up the entire system, disk, files, or partitions, it has got you covered.
- Flexible Backup Scheduling: Customize your backup schedule to your preferences. You can set up daily, weekly, or monthly backups, or take advantage of advanced features like USB plug-in or Event triggers. Additionally, it allows you to perform incremental or differential backups, saving only the changes made to your files.
- Support for Various Storage Devices: Rest assured, it supports a wide array of storage devices, such as external hard drives, USB drives, network drives, NAS, and popular cloud drives like Google Drive, or AOMEI Cloud.
💛 Preparations
- Prepare an external hard drive to store backup image and a USB drive to create bootable media.
- Download and install AOMEI Backupper Professional.
Then, follow the steps below to copy system image to new hard drive in a few clicks. Here take Windows 10 as an example.
Step 1. Launch AOMEI Backupper. First create a system image to external hard drive and then create a bootable media for booting your computer.

Step 2. Replace the old hard drive with the new drive. Insert the bootable media and enter the BIOS mode to select where to boot from.

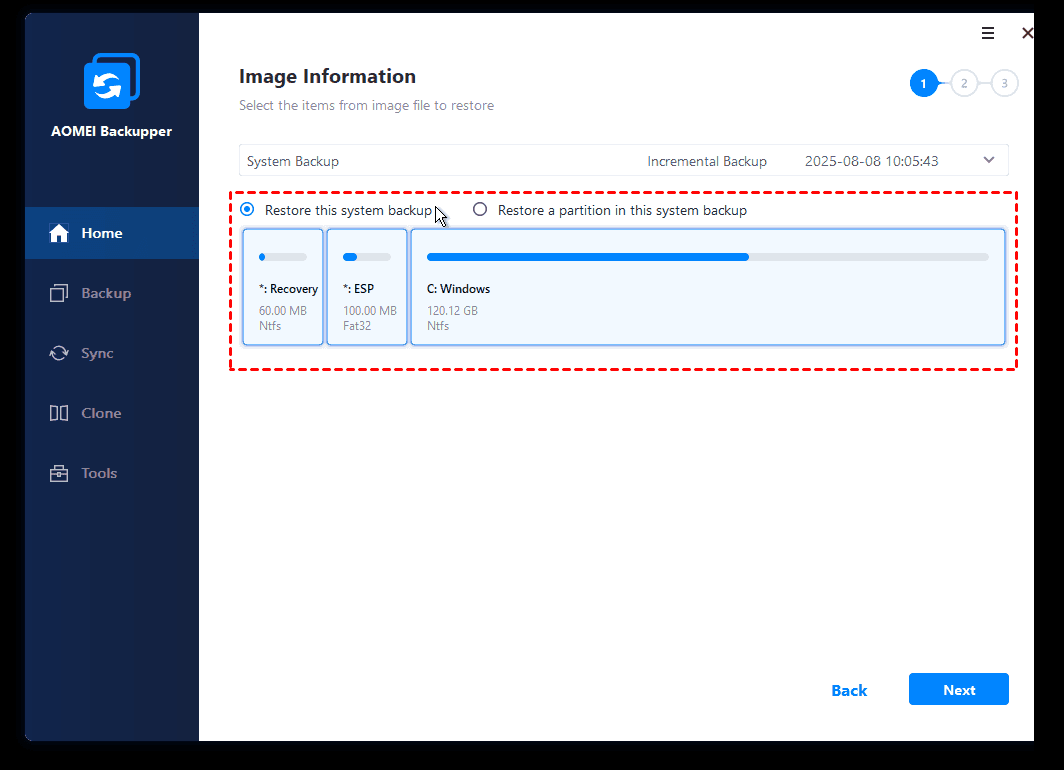
Step 3. You will get into the interface of AOMEI Backupper after booting. Click Home > Restore > Select image to restore to find your backup image and select it.

Step 4. Select Restore this system backup and click Next.
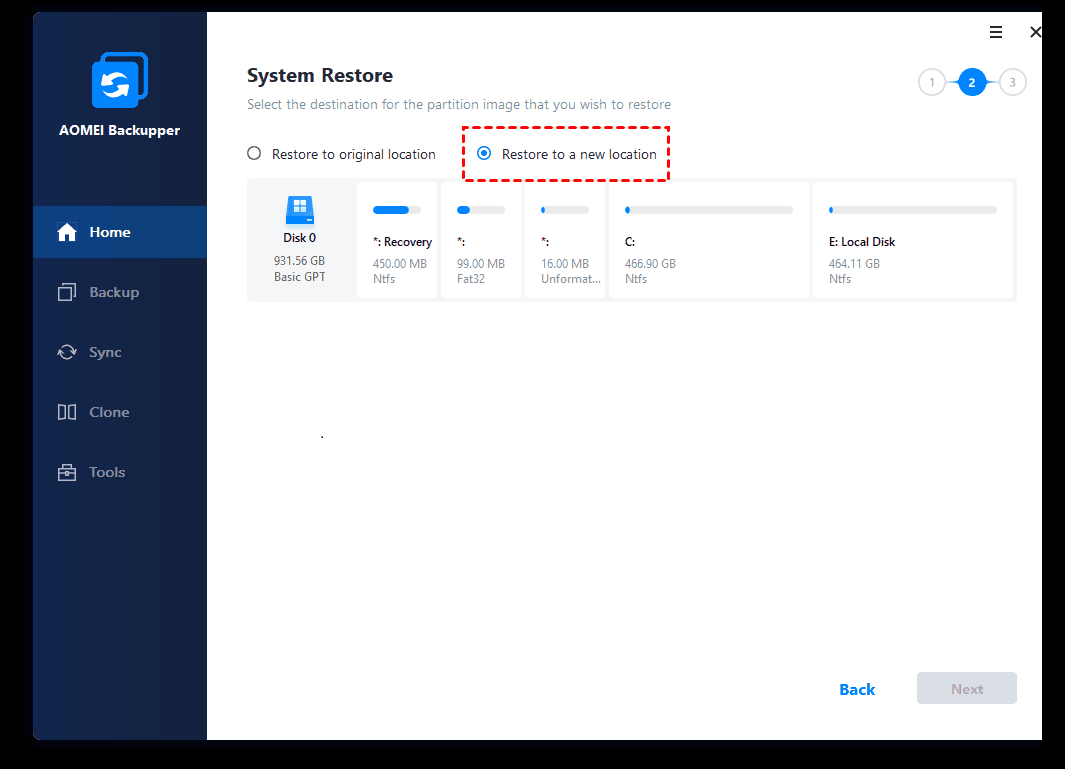
Step 5. Tick Restore to a new location and select the new hard drive as the destination path to receive the restored system. Then, click Next.
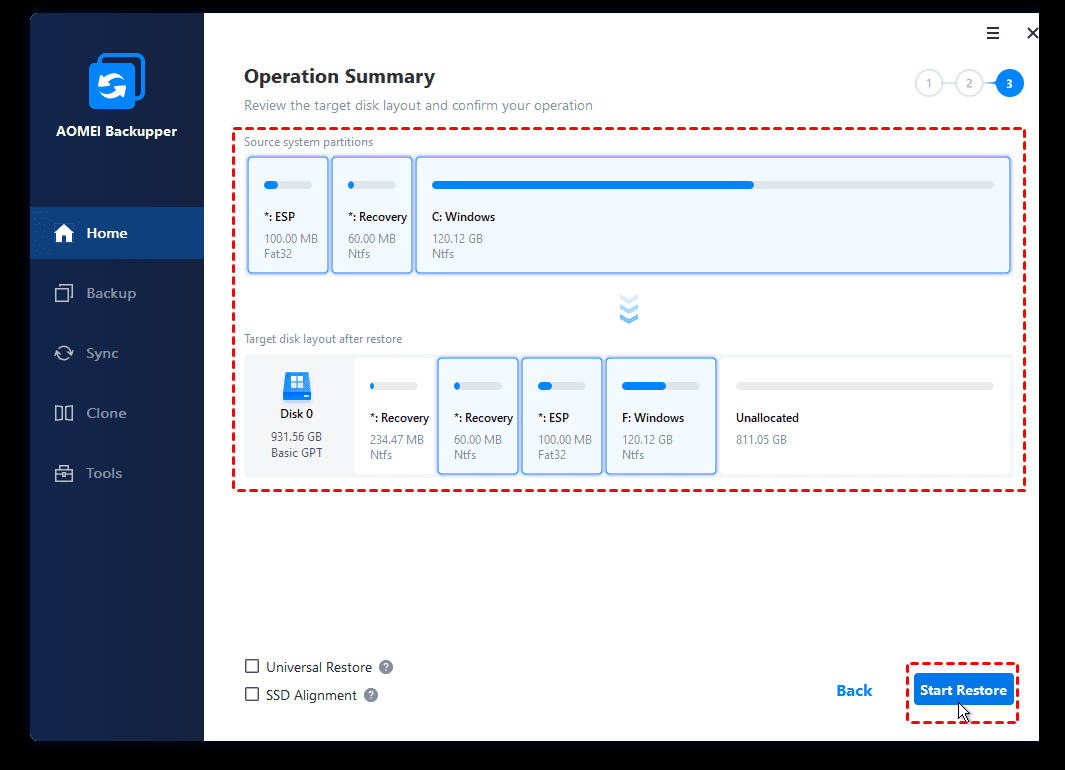
Step 6. Confirm the operation and click Start Restore to restore Windows 10 system image to new hard drive.
Notes:
❤ The above steps also apply to restoring Windows 11, 8, or 7 system image to new hard drive.
❤ If you want to copy Windows image to another computer, it's suggested to check "Universal Restore" feature. Or, your computer may fail to boot owing to incompatible drivers' issue.
Additionally, this software still allows you to clone hard drive in Windows 10/11, clone Windows 10/11 to external hard drive, copy data from one SSD to another SSD, clone NVME to another NVMe, etc., to upgrade hard disks.
Way 2. Move System Image to New Hard Drive Directly (Easiest Way)
Out of the three methods, this is the most straightforward approach to clone system image to new hard drive. Wondering why? Let's delve into the process and see how it operates, using Windows 11 as our illustrative example.
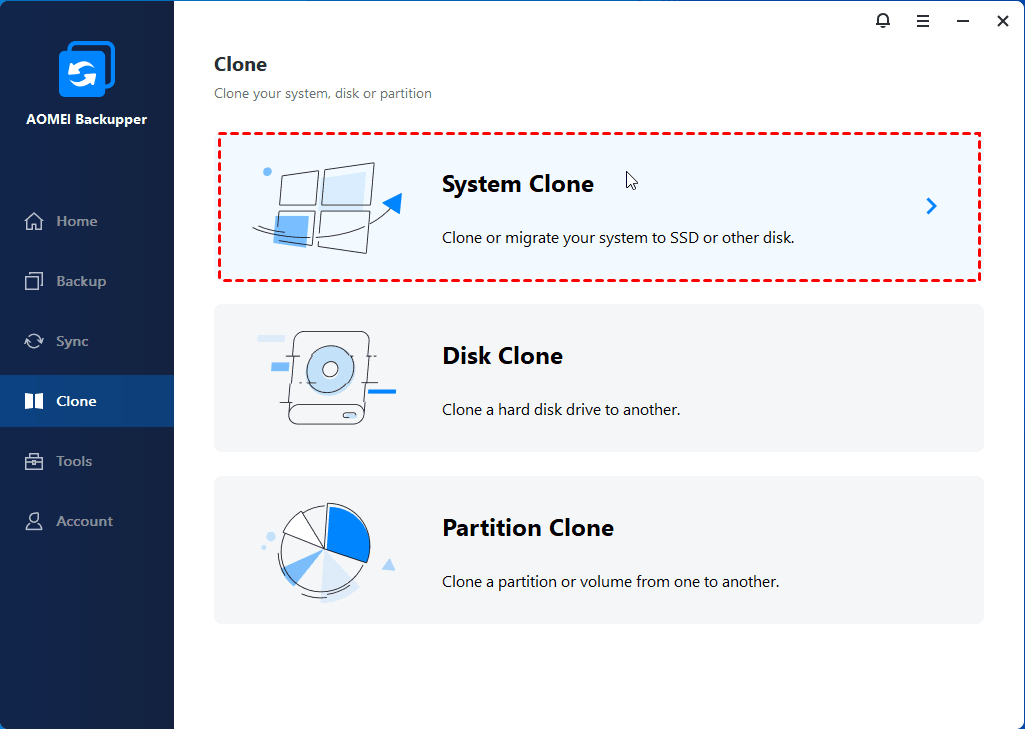
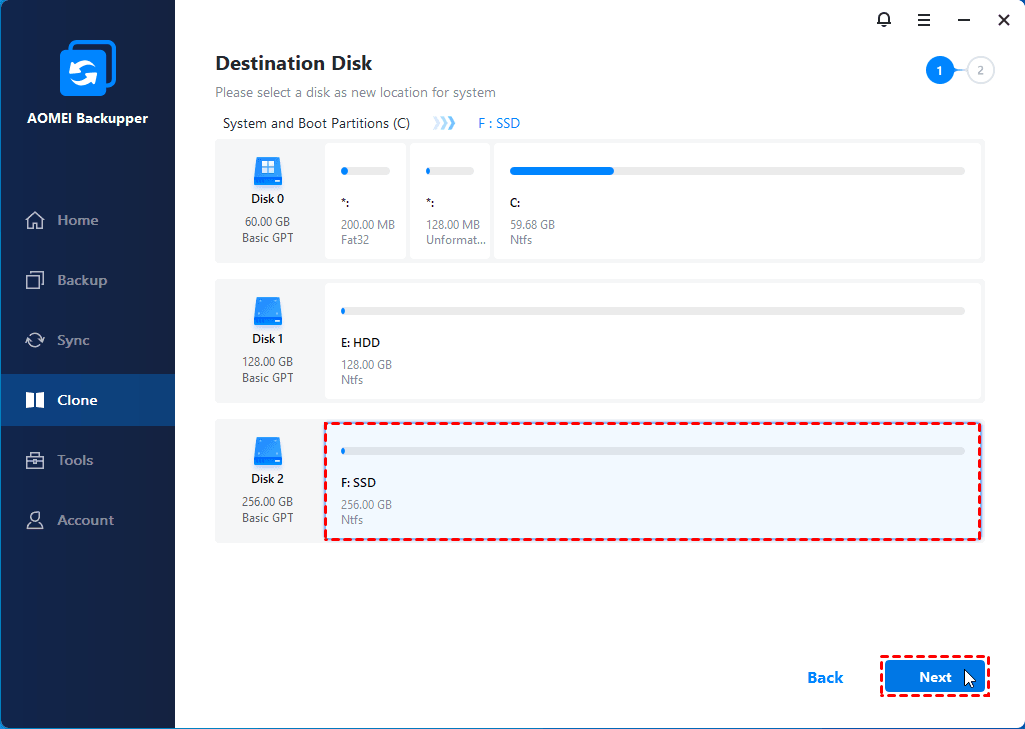
Step 1. Connect your new hard drive to your PC. Launch the tool and click Clone and then choose System Clone to migrate Windows 11 to new hard drive.
Step 2. The related system partitions are selected by default. Select a partition of the new hard drive as the new location. Then click Next to continue.
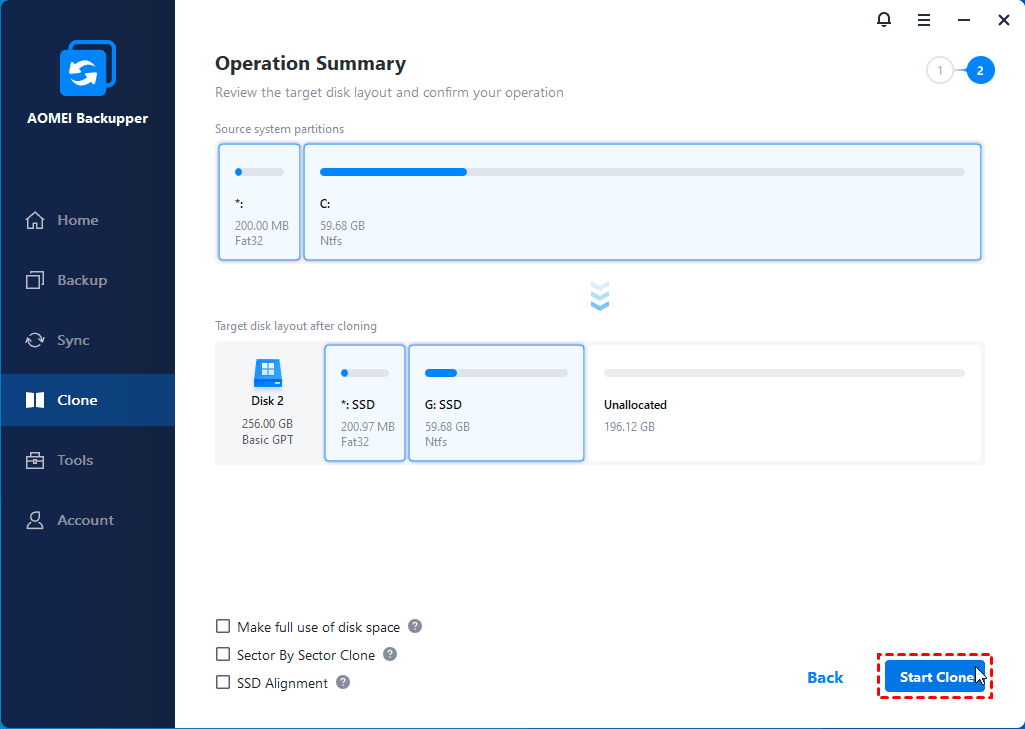
Step 3. Confirm the operation and click Start Clone to make it.
Notes:
• If you choose Sector by sector clone, it will clone all sectors whether they are used or not. Please make sure the destination partition is equal to or larger than the space of the system.
• If your target disk is an SSD, you can click SSD Alignment to accelerate the reading and writing speed of the SSD.
• If you want to gain the best performance from the cloned drive, you can transfer Windows 11 to NVMe SSD. This also applies to other operating systems.
Step 4. Once the cloning process is complete, you have two options: access the BIOS and designate the new hard drive as the primary boot disk, then proceed to boot your computer from it. Alternatively, you can directly replace the old hard drive with the newly cloned one.
Way 3. Copy System Image to New Drive via the Built-in Tool (Free)
Want to install system image on new hard drive? You should first create a system image of your old hard drive and save it to external hard drive. Then, restore the Windows 11 or 10 image backup from external hard drive to the new drive.
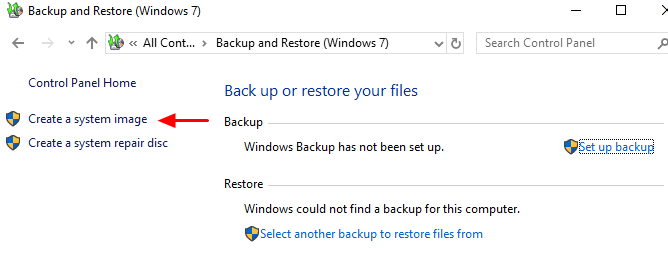
Step 1. Search Backup and Restore in the search bar and click it. Click Create a system image on the left side. Choose the destination to save the backup. You can choose to save the system image to the DVD if you have one. Or you can save it on one external hard drive.
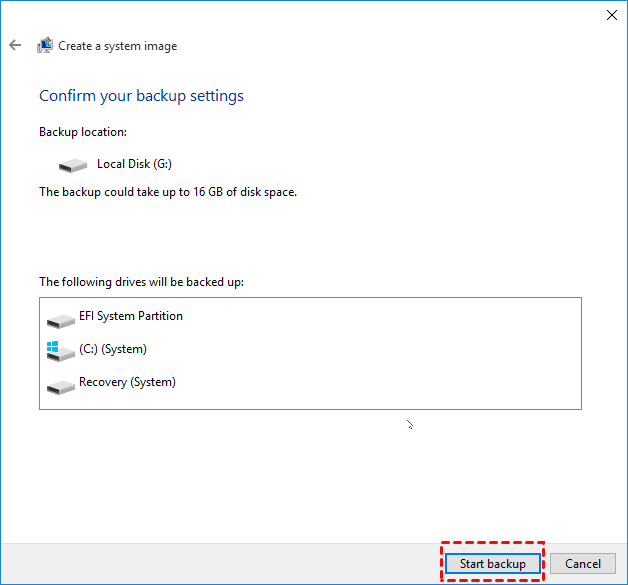
Step 2. Confirm the backup settings and click Start backup to start. When the process completes, you will be asked if you want to create a system repair disc that can help to boot your computer. Please click Yes to make one if you have a CD/DVD. Or you can create bootable disc with your USB flash drive.
Step 3. Shutdown the computer and replace the old hard drive with the new one and boot computer from the system repair disc. Follow the guide to restore Windows 10 system image to new hard drive.
Indeed, copying Windows image backup to a new hard drive using the built-in tool can be somewhat complicated. However, if you're willing to go through the trouble, it's a viable method that is worth trying.
FAQs on Transferring Windows System Image
1. Can I transfer a system image to a new hard drive?
2. Is it possible to restore a system image to another computer?
3. What does a system image include?
4. Which is better: cloning or imaging a hard drive?
5. Can I use a system image to upgrade to a larger hard drive or SSD?
Conclusion
In conclusion, transferring a system image to a new hard drive can be accomplished using the Windows built-in tool. However, it may be a complex and time-consuming process.
For those seeking more advanced features and a simpler, faster solution, AOMEI Backupper Pro is the recommended choice. This software can efficiently transfer system images and serve as your dependable backup assistant for future needs. For instance, it allows you to backup Windows 11 to external hard drive at a regular basis.
For businesses looking to protect multiple computers, AOMEI Backupper Technician Plus is the ideal option. It includes the powerful AOMEI Image Deploy tool, enabling the deployment and restoration of system image files on multiple client-side computers over the network.
It also offers the ability to create a portable version of the software for backup, restore, and cloning operations on different computers without requiring installation. This comprehensive package ensures a seamless and effective backup solution for your company's needs.

