How to Create Disk Image in Windows 10/11 [3 Free Ways]
Looking for a freeware to create disk image for Windows 10, 11? Try AOMEI Backupper, AOMEI Cyber Backup or Windows backup utility to create image backup from your hard drive.
By Lily Updated on September 5, 2025
How to create a disk image in Windows 10/11
There are different methods to create disk image. In Windows 10/11, you can use the built-in Backup and Restore, which is inherited from Windows 7. However, due to its longevity, this tool is relatively cumbersome and error-prone. You may receive errors such as:
- The drive is not a valid backup location
- There is not enough disk space to create the volume shadow copy of the storage location
- No disk that can be used for recovering the system disk can be found
Therefore, it's recommended to use a robust and up-to-date disk imaging program for better efficiency. This article will introduce how to create image of hard drive with both third-party tools and Windows inbuilt tool.
👉Way 1. Download free creator to make disk image🔥
👉Way 2. Try enterprise backup software to create disk image👍
👉Way 3. Use Windows built-in utility to create disk image
Way 1. Download free creator to make disk image
To image the entire disk including Windows OS, settings, etc., you need to use specified disk imaging utilities.
AOMEI Backupper Standard, the best free Windows 10 disk imaging software, can image hard disk including hidden partitions in Windows 11, 10, 8.1, 8, 7 effortlessly. AOMEI Backupper supports:
| 📁Many file systems | NTFS, FAT32, FAT16, EXT2, EXT3, etc. |
| 💾Various storage devices | External hard disks, solid state drives (SSD), USB flash drives, thumb drives, network attached storage (NAS), hardware RAID, dynamic disks, discs (CD/DVD), etc. |
| 🔰Complete backup options | It is not only a disk image creator of Windows 10, but also an effective backup tool for files/folders, partitions and operating system. |
| 💿Bootable media creation | It enables you to create a bootable media which can boot your computer into WinPE and perform offline system restore. |
Hit the button below to download the free disk image creator:
Best free Windows backup software for personal use.
How to create Windows 10 disk image with free tool
For the concise design of AOMEI Backupper, even a computer novice can create a hard disk image in Windows 10 without needing any help. And this is a guarantee for data security in Windows 10 or when you want to upgrade Windows 10 to Windows 11 without losing files. Let’s see how it works:
1. To create image backup from a disk, launch the main interface and select Disk Backup under Backup tab.
If you want to create complete system image (only OS) in Windows 10, then System Backup is what you need.

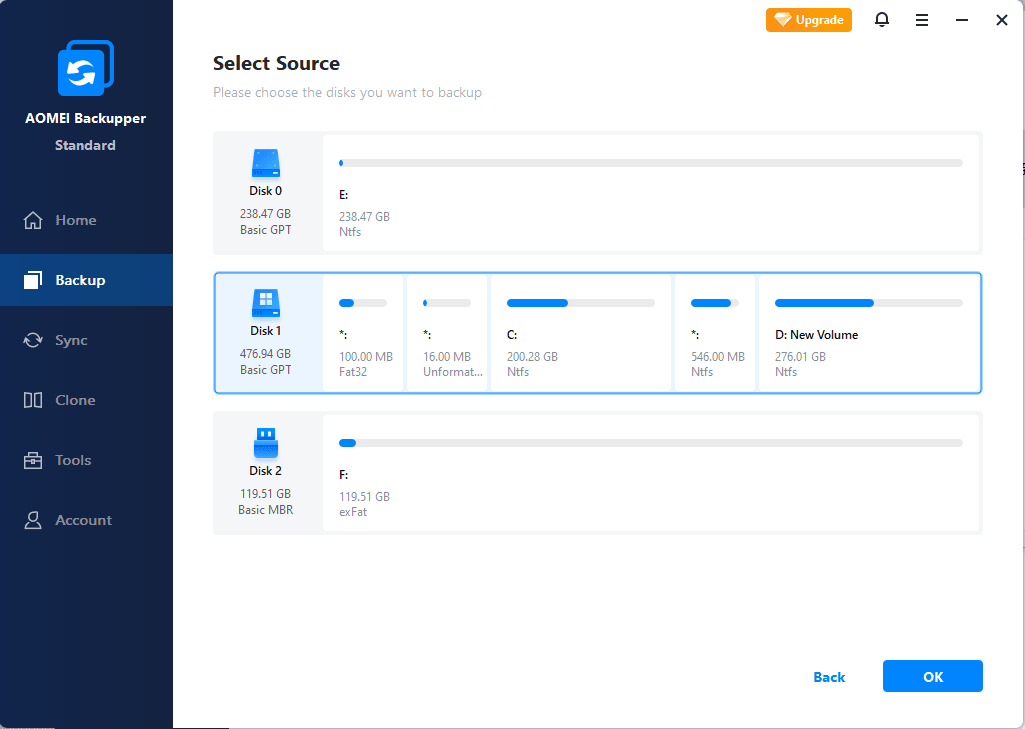
2. Click Select Source. In the next window, choose the disk to be backed up and click OK.
3. Select a location to store the disk image file. Although it supports backing up to critical volume, it’s recommended to keep the backup offsite.

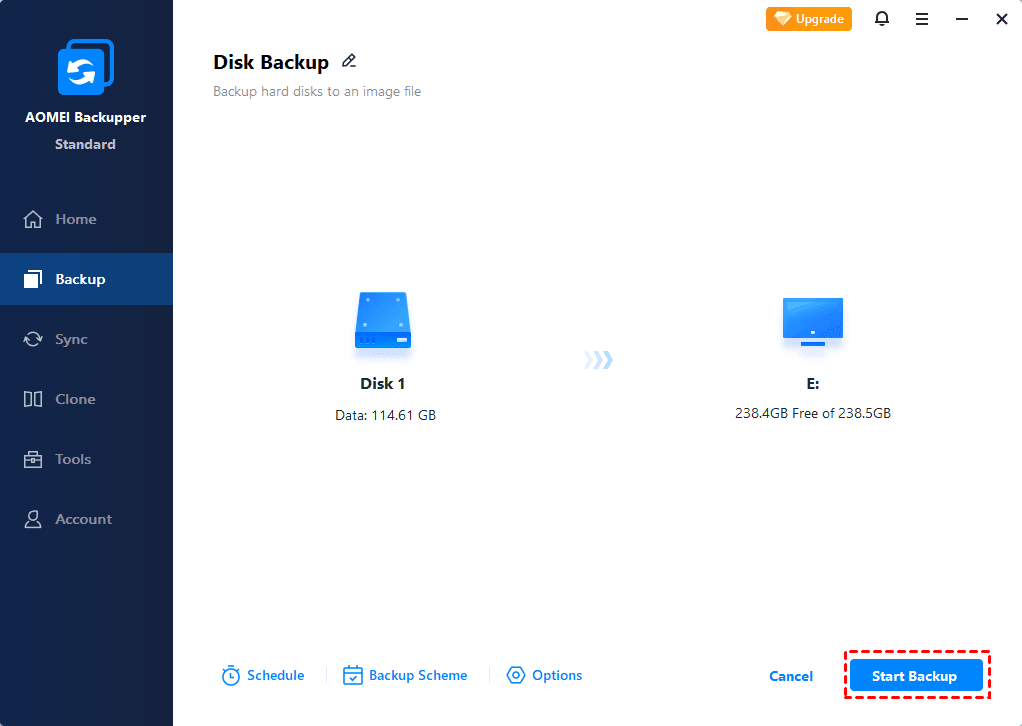
4. View the backup settings. If no problems, click Start Backup to execute the backup. The process won’t affect your current operation.
▪ Options: email notification, compression level, intelligent sector or sector-by-sector backup, etc.
▪ Schedule: set the backup task to run automatically based on Daily, Weekly, Monthly, or Event triggers, etc.
▪ Backup Scheme: choose full/incremental/differential backup, and create a retention policy for automatic backup cleanup (you need to upgrade to advanced editions to enjoy this feature).
✍ Helpful tips:
- Create Recovery Environment: you could consider using a self-booting recovery environment to access Windows recovery environment and then easily perform system backup restore or other backups restore operations when the system crashes (available in advanced editions).
- Create Bootable Media: the recovery environment created by AOMEI Backupper is kept under the path C:\Aomei Recovery. If your C drive is wiped or damaged, you can create a bootable USB/CD/DVD to boot a problematic PC into WinPE and then perform a full disk restore. With this bootable media, you can also restore Windows 10 image to different hardware by ticking Universal Restore (available in advanced editions) when restoration.
Way 2. Try enterprise backup software to create disk image
If you want to backup hard drives on multiple computers, the best enterprise backup software - AOMEI Cyber Backup can give you a hand.
- It enables you to create system/disk/partition backup for a bunch of Windows PCs from one central console.
- You are allowed to save backup images on a local disk, external hard drive, network share or NAS device, etc.
- You can schedule a backup task to run every day/week/month using the full/incremental/differential backup method.
Download this powerful enterprise backup software now to have a try!
To backup hard drives on client computers, follow these steps:
1. Install and run AOMEI Cyber Backup. The default username and password for AOMEI Cyber Backup are both "admin". Enter them and click Log in.
2. Click Source Device > Windows > Add Windows Device to add the Windows device that you want to backup. You need to enter the IP address, username and password of it.
3. Create a disk backup task.
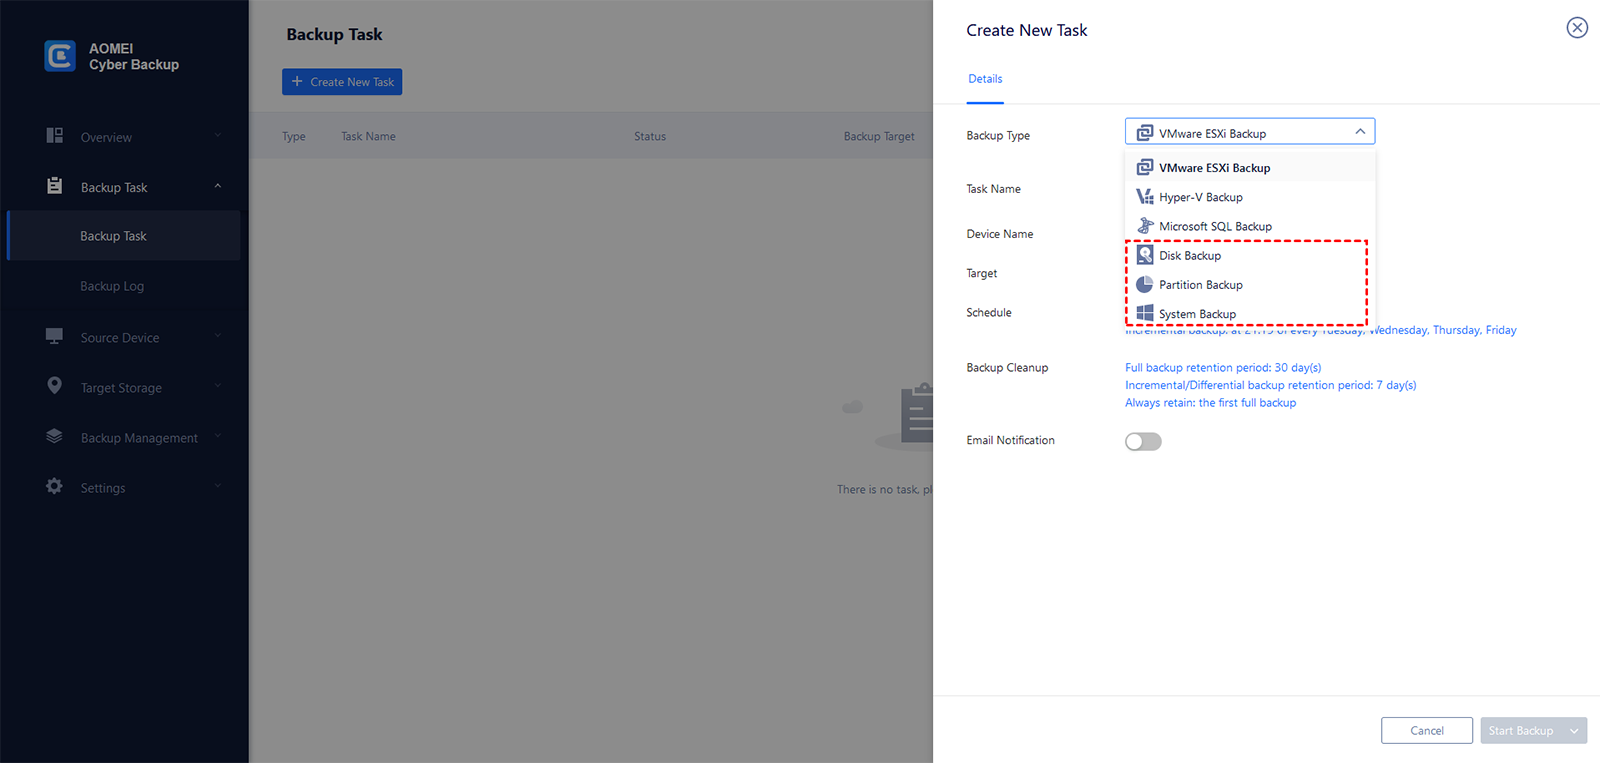
- Click Backup Task on the left menu bar and select Backup Task > Create New Task.
- Choose Disk Backup as the Backup Type.
- Edit Task Name based on your need.
- In the Device Name field, click Select + to select the device you just added.
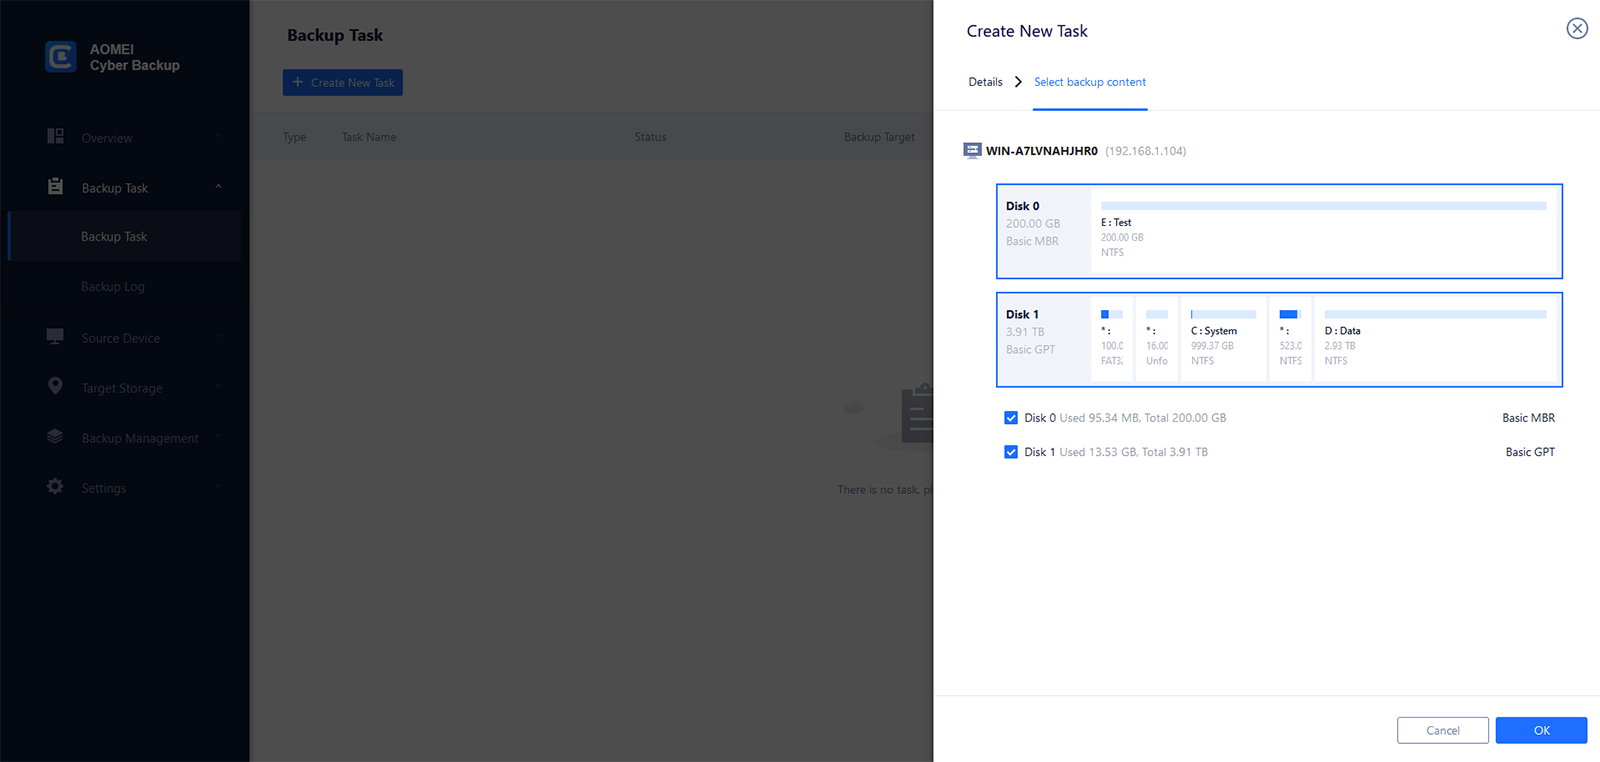
- In the Backup content field, click Select + to select one or multiple disks for backup.
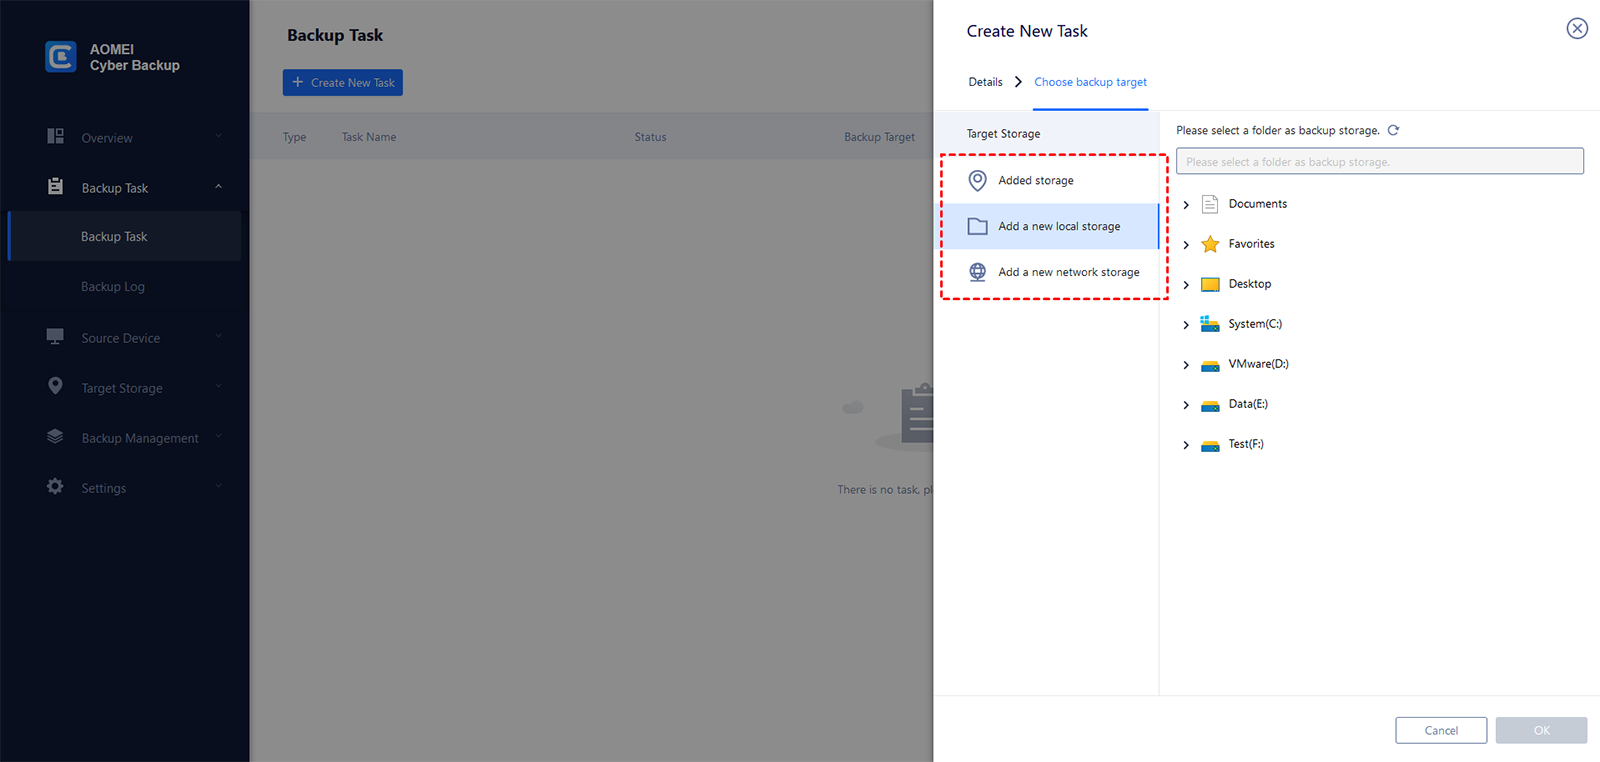
- In the Target field, click Select + to add a local or network storage.
- Change the default schedule settings in the Schedule field.
- Click Start Backup > Add the schedule and start backup now to begin creating disk image.
Way 3. Use Windows built-in utility to create disk image
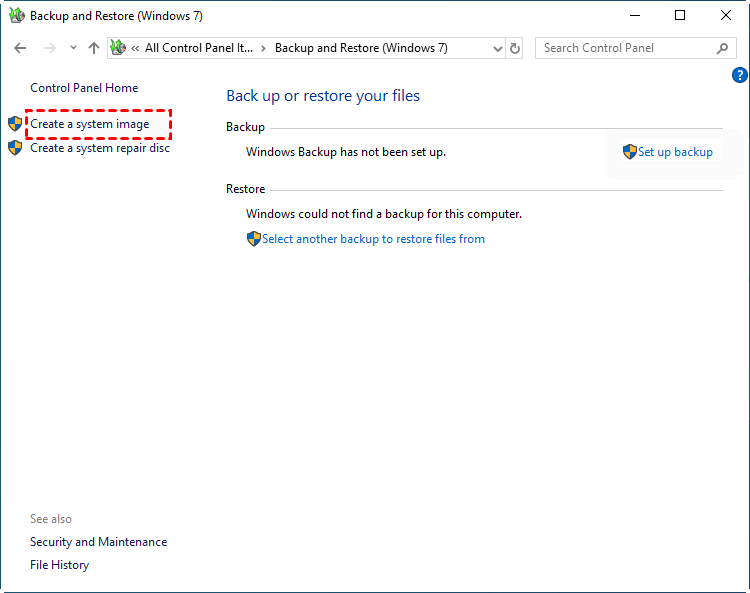
1. Search for "backup" and open Backup settings from the result, then click Go to Backup and Restore (Windows 7).
2. In the pop-up window, click Create a system image to get started.
3. Choose a destination for the disk image, such as external hard drive.

4. It will auto select all the drives required by Windows 10/11 to run. To create an image of the entire hard disk, just tick all the drives displayed.
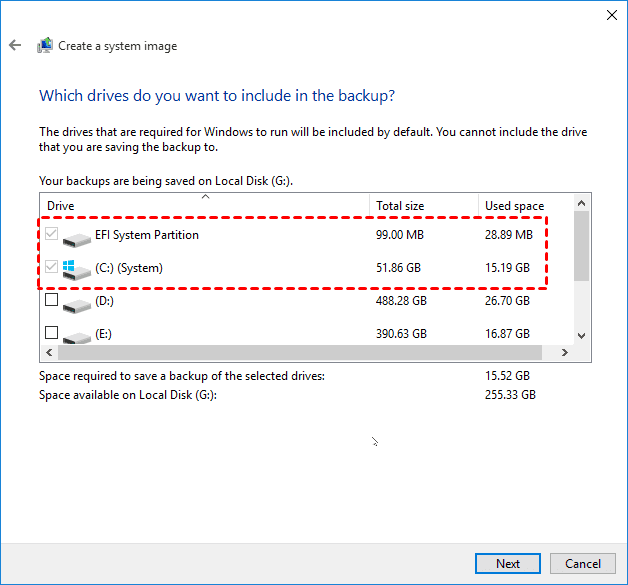
5. Click Start backup to create a disk image in Windows 10/11.
What is disk image and why it important?
A disk image is an exact copy of a disk including all the files and the file system, boot sector, other metadata, etc. Creating a disk image makes a full backup of the hard drive with Windows 10/11 installed, and saves it as a single file that can be stored on internal/external drives or network locations.
There are some specific reasons why you might want to create a disk image:
✔ Data backup and recovery: Creating an image ensures that the original data on the disk is preserved. With a bit-by-bit copy, you can extract the desired data from the disk image anytime you need.
✔ Reducing downtime: A disk image serves as a backup in case of hardware failure or disaster recovery scenarios. By regularly creating disk images, you can restore computer to earlier state even after a severe failure.
✔ System deployment and cloning: Disk images are often used to deploy or clone a pre-configured OS and APP setup across hard drives or even computers/servers. For example, when you want to upgrade HDD to SSD, you can directly restore the disk image to the new drive without reinstalling.
Some FAQs on Disk Image in Windows
Is ISO the same as disk image?
What is the difference between disk image and disk clone?
Why is a disk image corrupted?
Summary
You see it’s quite easy to create disk image in Windows 10 via AOMEI Backupper. With a disk image at hand, disk recovery can also be realized with a few clicks. Besides, you can use Disk Clone to create a copy of your hard disk without performing disk imaging in Windows 10.
If you want to protect unlimited computers within your company, you can pick AOMEI Backupper Technician. With the inbuilt AOMEI Image Deploy tool, you are also allowed to deploy/restore system image file on server-side computer to multiple client-side computers over network. Why not try it now?

