How to Backup Windows Server 2019 to NAS (4 Methods)
NAS is an ideal backup storage for Windows Server 2019, 2016, 2012, etc., but many people fail to select it as destination in Windows Server Backup. This post will show you how Windows Server backup to NAS successfully.
By Lily Updated on May 29, 2026
If you're running a Windows Server system, configuring backups to a Network Attached Storage (NAS) device offers a flexible, cost-effective, and scalable way to protect your files and system state. In this guide, we’ll walk you through step-by-step instructions to set up Windows Server 2019 backup to NAS.
🌟 To check more scenarios about backing up Windows Server, please refer to this complete guide: Backup Windows Server.
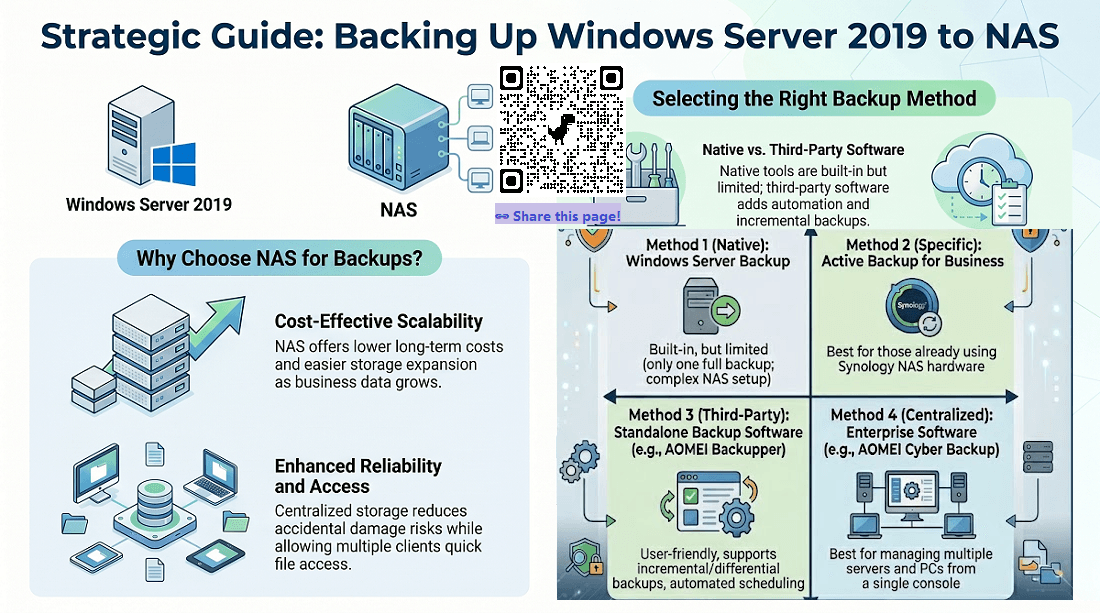
4 Methods for Windows Server backup to NAS
Since there are so many benefits to backing up Windows Server to NAS, how to achieve it? Here I compiled 4 methods and hopefully one of them could suit your case.
☛ Method 1. Windows Server Backup
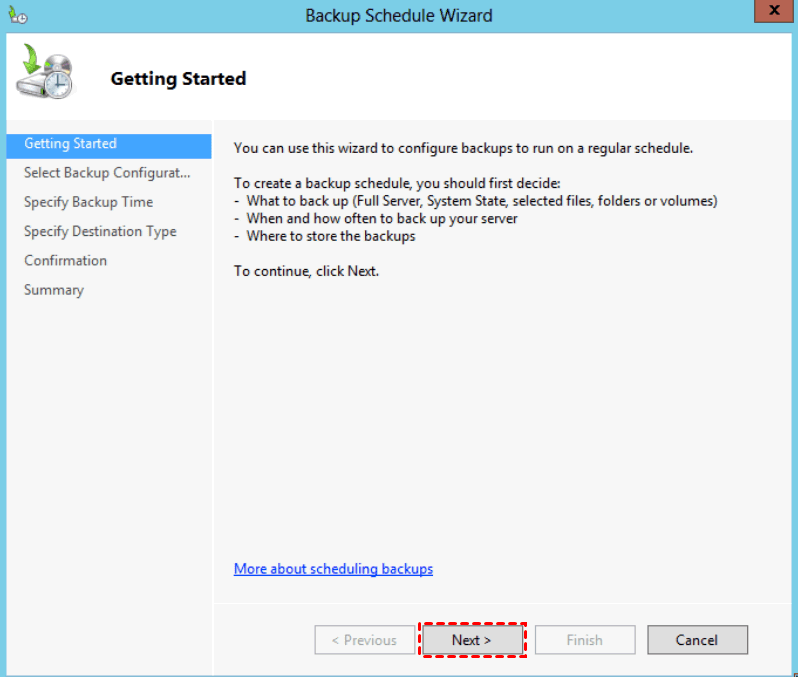
Windows Server Backup is the built-in backup solution for Windows Server, including the latest system Windows Server 2019 and 2022. It did not have the ability to back up to the network in the early days, and only since 2012 has it added “Remote shared folder” option.
But there are still some functional limitations of Windows Server Backup, like the latter backup will overwrite the former one, so it can only keep one full backup. And even with the remote backup feature, there are many users reported errors when specifying NAS drives as destination.
To perform Windows Server backup to NAS successfully, it's recommended to create a VHD or iSCSI Target on your NAS drive beforehand, then select the created volume as the backup destination in Windows Server Backup.
The steps are honestly quite complicated. You could refer to following tutorials with detailed screenshots.
>> Create a virtual hard disk and attach it to NAS
>> Create an iSCSI Target on NAS device
Then you can create the backup task in Windows Server Backup, and select the NAS as select an additional drive.
If you are not sure how to access and use the utility for image backup, please read Windows Server Backup guide.
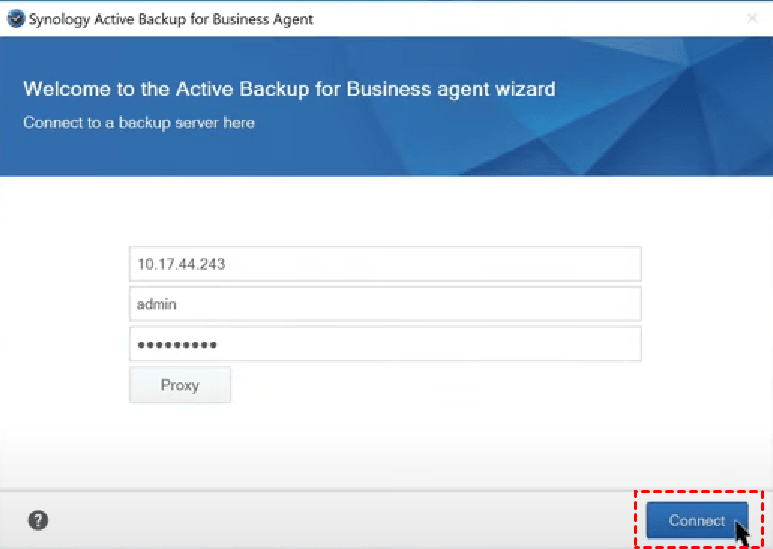
☛ Method 2. Active Backup for Business
If you are trying to perform Windows Server backup to Synology NAS, then Active Backup for Business could be backup solution for Windows physical server, PC, rsync/SMB file server, and VMware vSphere/Microsoft Hyper-V virtual machine. Here are 2 official tutorials about it:
>> Backup full Windows PC/Server
>> Backup individual folders on Windows Server
☛ Method 3. Standalone server backup program
As you can see from above, there are some must-do configurations before Windows Server 2019 backup to NAS, and different NAS may also have different scenarios. If you don't want to spend time on these steps, and prefer a direct solution with higher success rate, you can try a professional backup program.
AOMEI Backupper Server is a specialized backup & restore program for Windows Server. It comes with a user-friendly interface, so even a computer novice can handle the backup task without hassle.

-
You can directly backup Windows Server 2019/2022/2025 to NAS/network share/cloud in several clicks.
-
Unlike Windows Server Backup, Backupper enables you to schedule incremental or differential backup and keep multiple backup images for an accurate restore.
-
It offers you the option to customize retention policies for auto deletion.
What’s more, AOMEI Backupper supports various Windows systems and devices. Feel free to download it now!
|
Supported OS |
Windows Server 2025, 2022, 2019, 2016, 2012, 2011 (including R2) Windows SBS 2003, 2008, 2011 Windows 11, 10, 8.1, 8, 7 |
|
Supported Devices |
All devices recognized by Windows, such as IDE, SATA, iSCSI, SCSI disk, IEEE1394 (Firewire). Hard disk drive (HDD), solid-state drives (SSD) and SSHD. Network-Attached Storage (NAS), Shared Network and cloud drive. External hard drives (USB 1.0/2.0/3.0), PC card, all removable flash drives and thumb drives. Hyper-V, Virtual box, VMware virtual disk and other virtual systems, etc. |
☛ Method 4. Centralized server backup software
AOMEI Cyber Backup provides a convenient and reliable solution for centralized backup management of all Windows operating systems.
- It enables you to create a system image, disk image or partition image for client Windows PCs and Servers.
- You are allowed to save backup images on a local disk, external hard drive, network share or NAS device, etc.
- You can schedule a backup task to run every day/week/month using the full/incremental/differential backup method.
Download this powerful enterprise backup software now.
How to backup Server 2019 to NAS/network share step by step
Here I’ll show you how to backup Windows Server 2019 files and OS to NAS or network share in detail.
# 1. Backup Server 2019 files to NAS via AOMEI Backupper
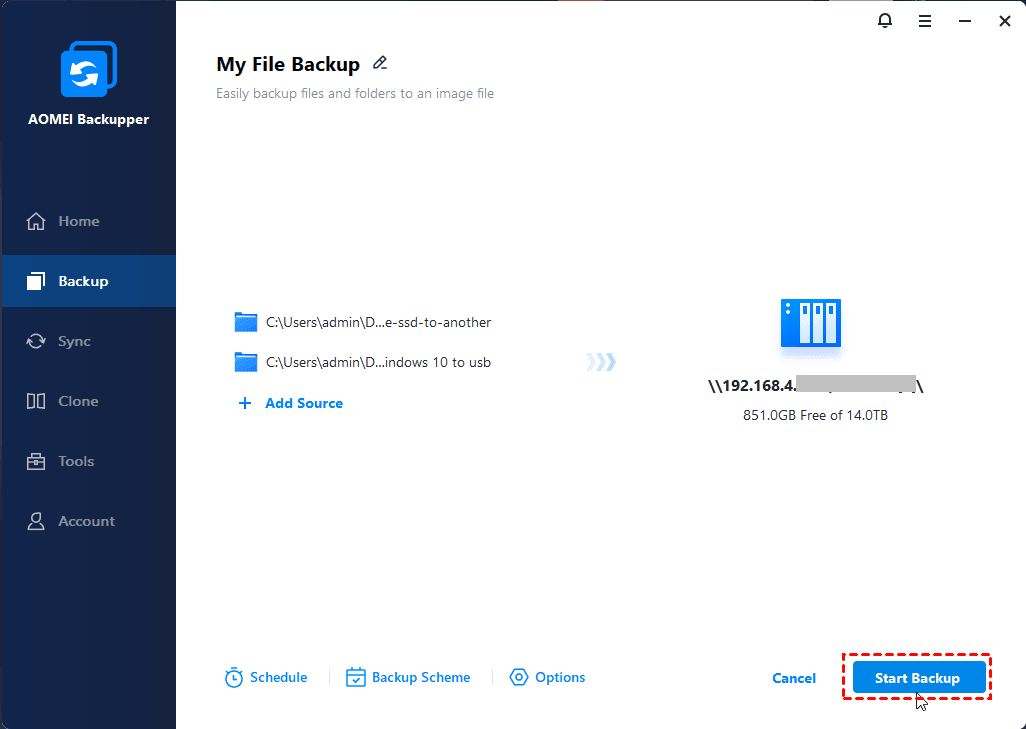
1. Make sure you can connect to your NAS, launch the software and select Backup > File Backup. You can also choose System Backup to protect the OS of Windows Server 2019.

2. Click Select Source to select the data you want to backup. If you choose System Backup in the last step, the operating system will be automatically selected.

Note: You can click Options > Filter to customize the file inclusion or exclusion.
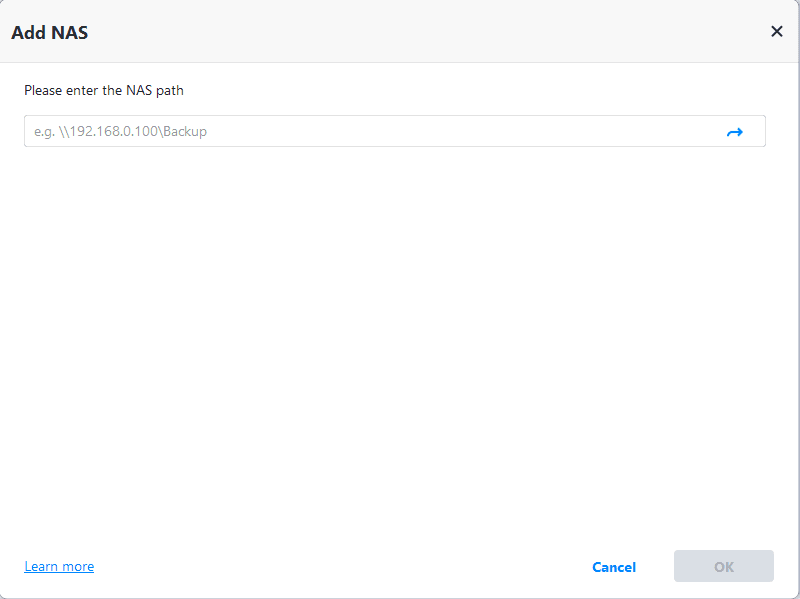
3. To make Windows Server backup to network share/NAS, click the destination box > NAS > Add NAS. In the pop-up window, enter the IP address to add it as target, then select a folder to receive the backup.
4. Before clicking Start Backup, you can click Schedule to set up automatic backup (daily/weekly/monthly/event triggers, etc.). To save storage space in NAS, it’s also a good idea to create a retention policy for obsolete backups auto deletion.
In Options, you can manage compression level, image splitting, encryption, email notification, etc.
👉 Related tips:
-
If you are worried that your server system will suddenly crash and not start properly, it’s best to create a system backup task on a regular basis and create a bootable media for system restore in WinPE.
-
If you want to replicate folders from Windows Server to NAS and keep the original format & structure, please use Sync features. AOMEI Backupper supports multiple synchronization modes, including one-way sync, two-way sync, real-time sync, and mirror sync. You can even sync files between 2 Windows Servers.
-
If you create an AOMEI account, you are able to backup files to AOMEI Cloud. It offers you 1TB of free storage for 15 days after you sign up for an AOMEI account.
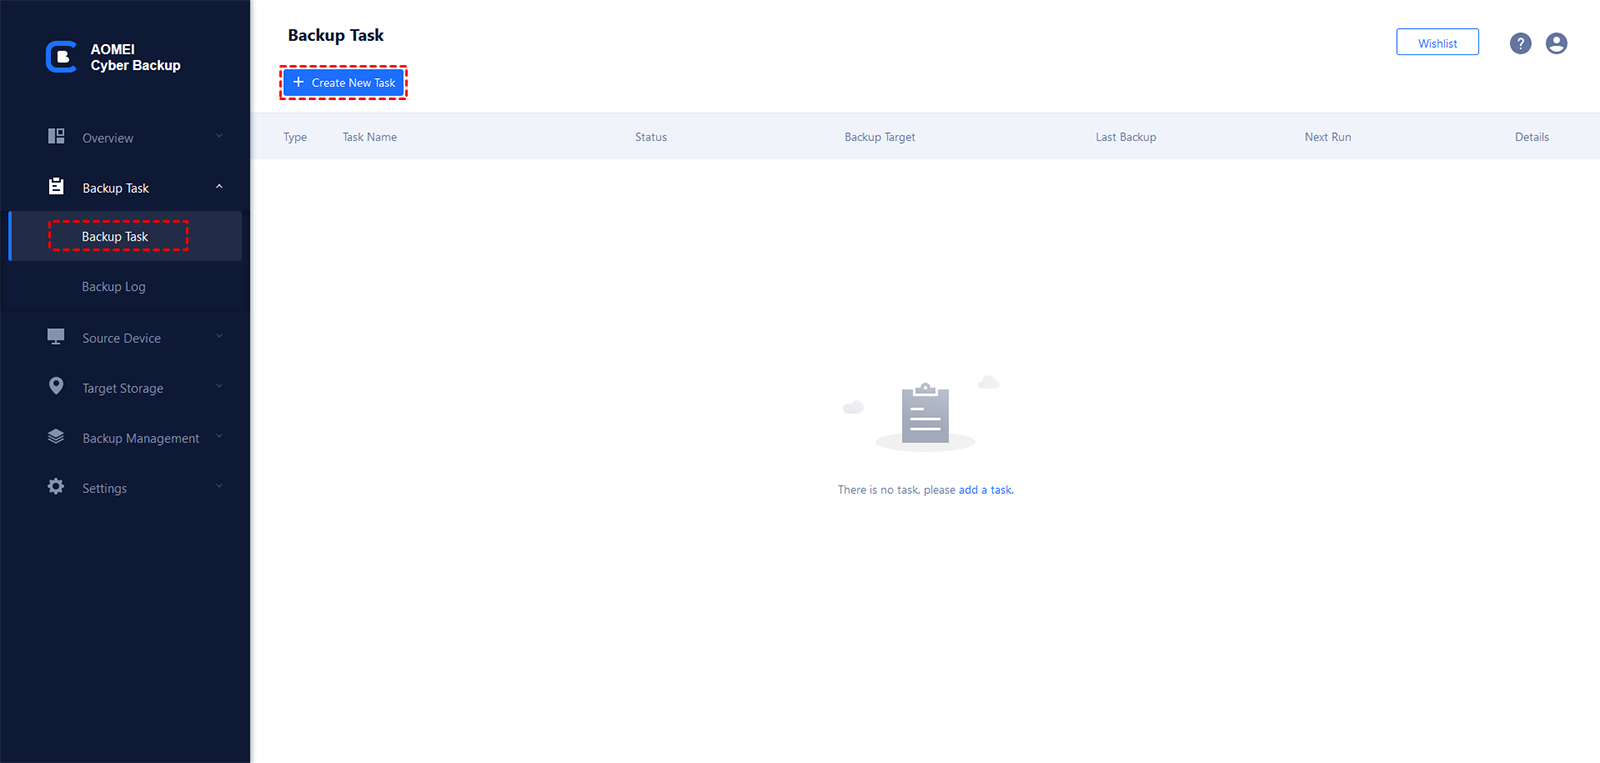
# 2. Backup Server 2019 OS to NAS via AOMEI Cyber Backup
1. Install and run AOMEI Cyber Backup. The default username and password for AOMEI Cyber Backup are both "admin". Enter them and click Log in.
2. Click Source Device > Windows > Add Windows Device to add the Windows Server 2019 device that you want to backup. You need to enter the IP address, username and password of it.
3. Create Windows Server 2019 system backup.
- Click Backup Task on the left menu bar and select Backup Task > Create New Task.
- Choose System Backup as the Backup Type.
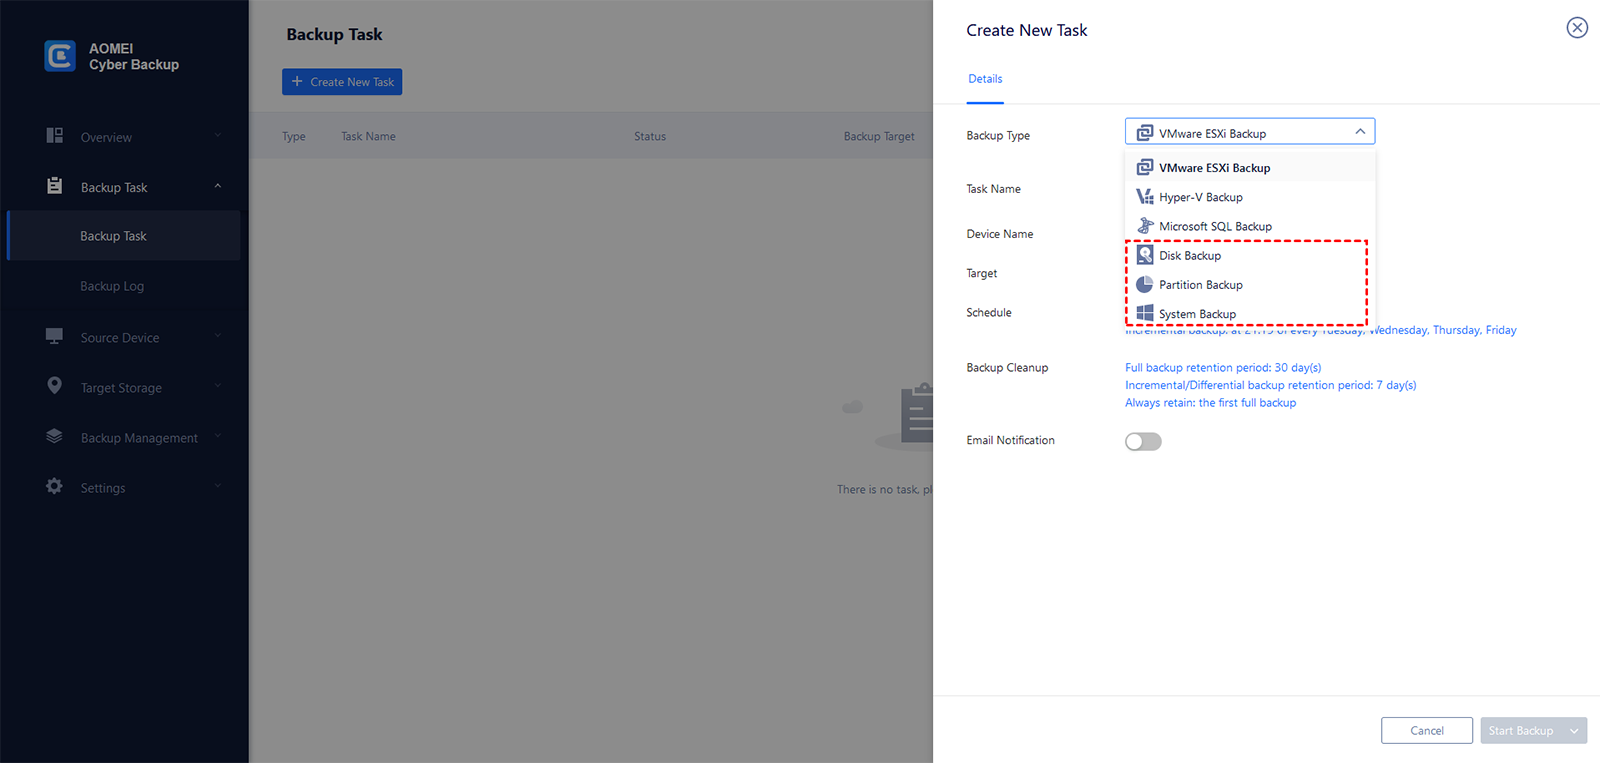
- Edit Task Name based on your need.
- In the Device Name field, click Select + to select the device you just added.
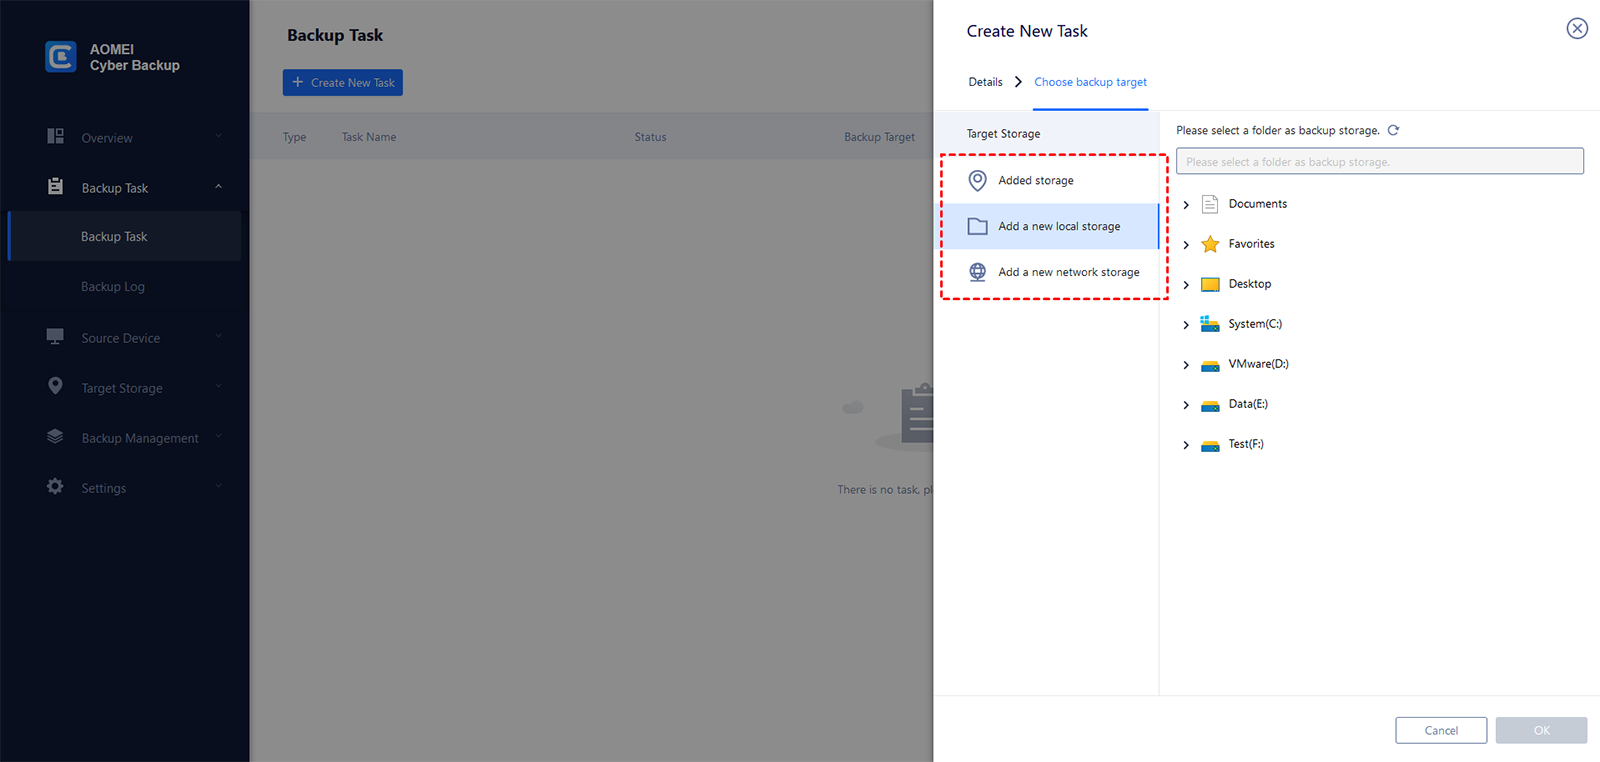
- In the Target field, click Select +. If you want to backup to a local directory of the computer with AOMEI Cyber Backup installed, click Add a new local storage. If you want to backup to a network share or NAS, click Add a new network storage.
- Change the default schedule settings in the Schedule field.
- Click Start Backup > Add the schedule and start backup now to begin creating a system state backup for Windows Server 2019.
🌟 Notice: If you don’t know how to choose between AOMEI Backupper and AOMEI Cyber Backup, check the comparison table on page Windows Server Backup.
Bonus: Why backup Windows Server 2019 to NAS?
Windows Server enables a computer to manage network roles (print server, domain controller, web server, file server) and provide services for other networked computers. It’s used in business settings under most conditions and involves a lot of important data & information.
NAS (Network Attached Storage), also popular with companies, enables multiple clients to store and share files with fast data access and easy administration. If you are considering backing up Windows Server like 2019, NAS could be an ideal destination for the following advantages:
• It offers you a considerable storage space to back up Windows Server, and costs lower in the long term.
• Data stored in NAS could be accessed and shared with multiple clients on the network.
• With NAS, it’s able to stream media like movies, TV shows, music, and photos on multiple computers.
• Compared with PC, NAS storage is less likely to be damaged by accidents.
• Some NAS drives have RAID options to duplicate data on multiple drives as NAS disaster recovery strategy.
FAQs about Windows Server backup to NAS
🧐 1. What is the best NAS format for Windows Server backups?
SMB/CIFS shared folders are the most commonly used and compatible formats for Windows Server backups. Most NAS brands support SMB sharing for seamless integration with Windows environments.
🧐 2. Is it better to back up Windows Server to NAS or an external drive?
A NAS is usually better for centralized storage, remote access, multi-device backups, and scalability. External drives are simpler and cheaper but offer less flexibility and are more vulnerable to physical damage or theft.
🧐 3. How much NAS storage do I need for Windows Server backups?
A good rule is to have at least 2–3 times the size of the data being protected. This allows room for multiple backup versions, incremental backups, and future data growth.
🧐 4. Can multiple Windows Servers back up to the same NAS?
Yes, multiple Windows Servers can be backed up to the same NAS. Most NAS devices support multiple shared folders or separate backup directories, allowing several Windows Servers to store backups on the same NAS safely.
🧐 5. How to avoid network congestion during Windows Server backup to NAS?
To avoid network congestion during Windows Server backup to NAS, schedule backups during off-peak hours, use incremental or differential backups instead of full backups every time, and limit backup bandwidth if your software supports throttling. Using a Gigabit or faster Ethernet connection can also improve backup performance and minimize impact on other network activities.
Conclusion
Want to backup Windows Server 2019 to NAS like Synology or QNAP? AOMEI Backupper Server and AOMEI Cyber Backup work better than Windows Server Backup with their high compatibility and complete features. No matter you want to perform Windows Server 2019 or Windows Server 2016 backup to NAS/network share, the operation can be completed in several clicks. Simple and quick.
The restore function of AOMEI Backupper is also powerful, you can even perform Windows Server system restore to different hardware. And with the Clone feature, you can migrate Windows Server to SSD without reinstalling.

