Top 4 Ways to Image Backup Windows Server (2026)
In this post, you will get 4 effective methods to create image backup in Windows Server, which apply to Windows Server 2012 (R2), 2016, 2019, 2022, 2025, etc. Let's get started!
By Ivy Updated on May 28, 2026
Why Backup Windows Server?
The Microsoft Windows Server operating systems, including Windows Server 2003/2008/2012/2016/2019 (R2)/2022/2025, is designed for enterprise-level management, data storage, applications, and communications for multiple clients.
In the following, I'll introduce you to 4 server backup solutions 👇 and how to create a Windows Server image backup step by step.
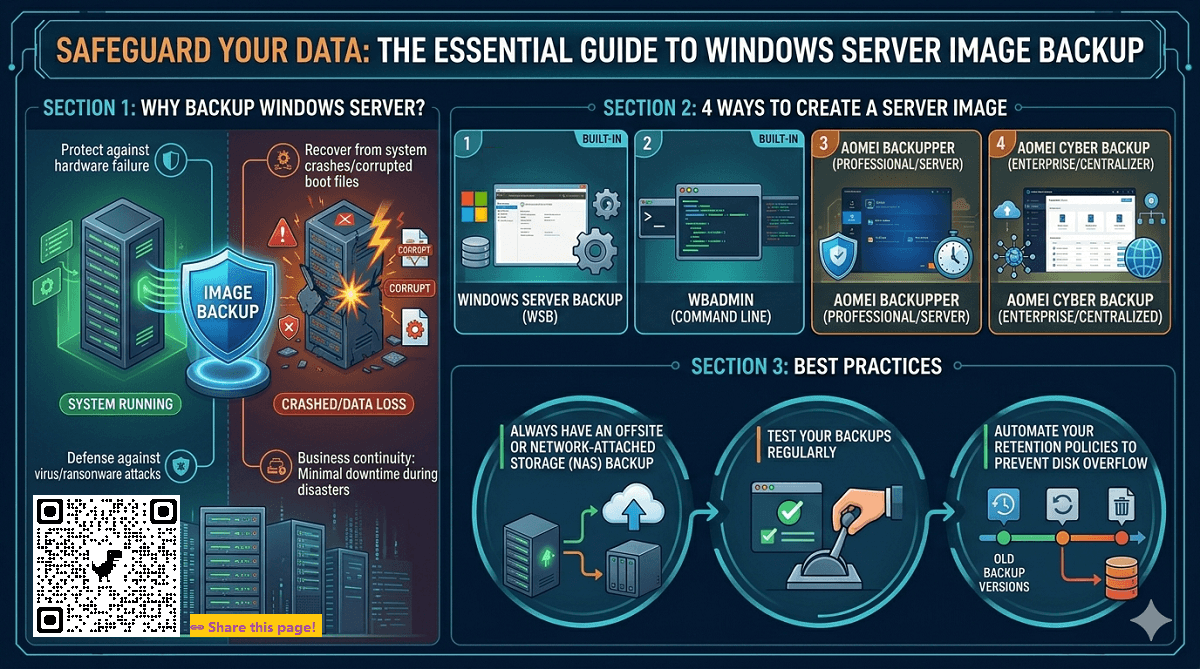
Which Method Should You Use in Windows Server?
This article provides you with 4 useful ways to image Windows Server, not only Server 2008, but also other systems, such as Server 2012, 2016, 2019, 2022, 2025, etc.
2 built-in tools
Windows Server Backup and Wbadmin are built-in free server backup software that is able to backup and restore the full server (all volumes), selected volumes, the system state, or specific files or folders. And you could create a server image backup for bare metal recovery in case of hard disk failure.
2 third-party tools
AOMEI Backupper Server is one of the best server backup software. It is capable of creating Windows Server image backup in almost all operating systems and is more flexible. It supports schedule backup from daily to weekly, monthly, etc. The shortest interval is the hourly backup.
By default, it will backup only changed files after the first full backup, greatly saving backup time and disk space. In addition, you can set backup scheme to delete old backup images in Windows Server automatically. Thus, your backup disk always has enough space for new data.
Windows Server Image Backup Software for All Systems.
AOMEI Cyber Backup, the best enterprise backup software, provides a convenient and reliable solution for centralized backup management of all Windows operating systems. You are allowed to create backup tasks for a bunch of Windows PCs and Servers and manage them from one central console.
Centralized Server Backup and Recovery Solution.
After selecting one of them, swap to the corresponding way and follow the stepwise guide to complete the backup process.
|
Feature / Aspect |
||||
|
Type |
Built-in GUI backup tool |
Built-in command-line tool |
Professional server backup software |
Centralized enterprise backup solution |
|
Best For |
Small businesses and beginners |
Advanced admins and scripting |
SMBs needing flexible backup |
Enterprises managing multiple devices |
|
Supported Backup Types |
Full server, system state, volumes |
Full server, system state, volumes, files |
System, disk, partition, file backup |
Centralized system and data backup |
|
Automation |
Basic scheduled backups |
Scriptable with Task Scheduler |
Flexible scheduling options |
Centralized automated policies |
|
Incremental / Differential Backup |
Incremental only |
Incremental only |
Incremental & differential |
Incremental & differential |
|
Backup Destinations |
Local disk, external drive, network share |
Local disk, external drive, network share |
Local, NAS, network, cloud, external drive |
Local & network storage |
|
Restore Options |
Bare-metal recovery supported |
Bare-metal recovery supported |
Flexible recovery and cloning |
Centralized restore management |
Way 1: Create Server Backup Image with Windows Server Backup
The Windows Server Backup is not installed by default, so you need to install it on your selected computer with the steps: Go to Server Manager -> Dashboard -> Manage -> Add Roles and Features, and then follow the wizards to install.
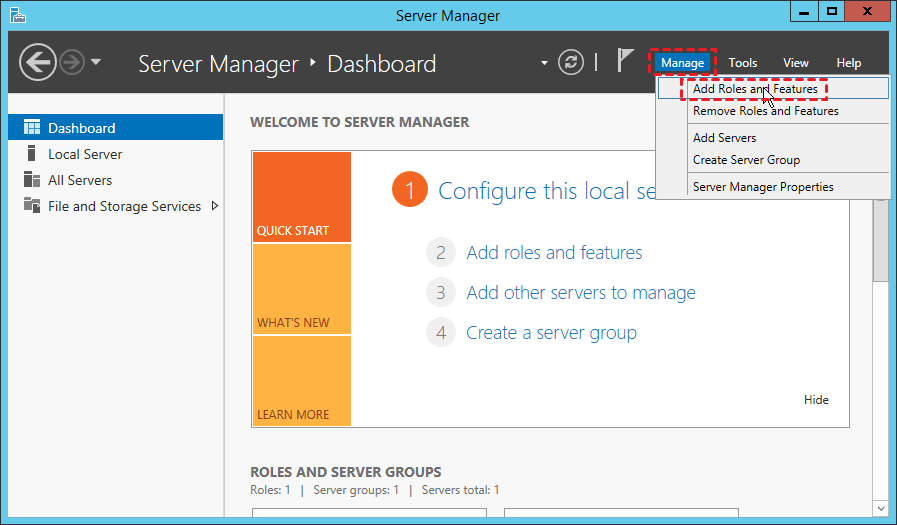
After installing, you can open Windows Server Backup and create Windows Server 2012/2016/2019/2022 backup with it:
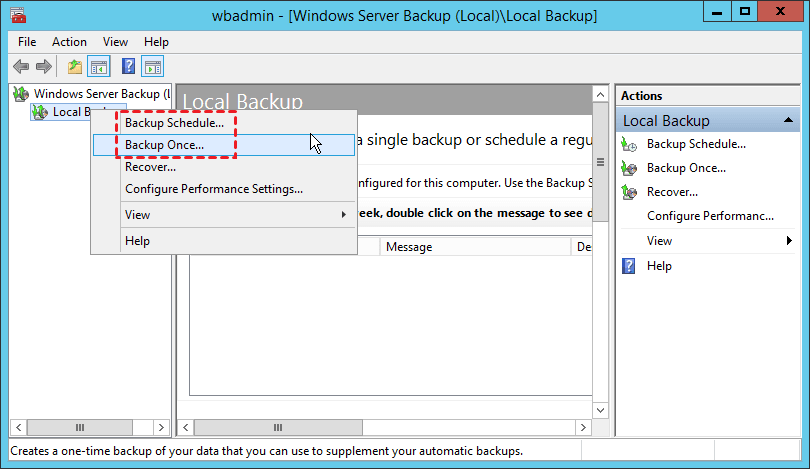
1. Please go Server Manager -> Tools -> Windows Server Backup, right-click Backup Once under the Local Backup tab. To schedule backup Windows Server, click Backup Schedule, you can choose daily or more frequently.
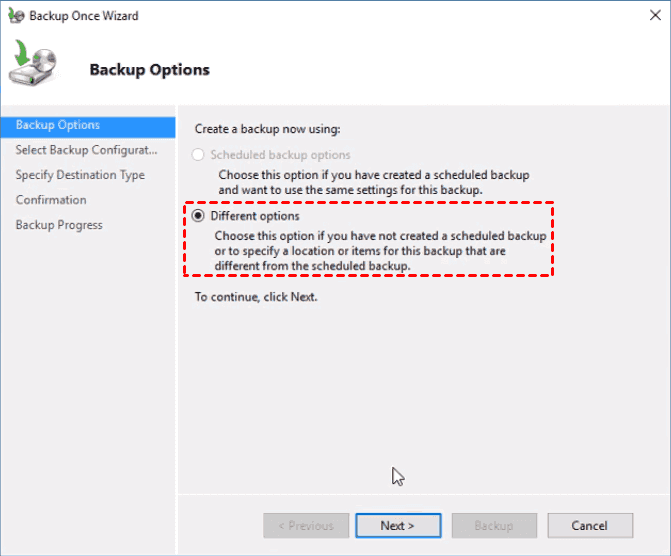
2. Choose the backup options: Different options, and hit Next.
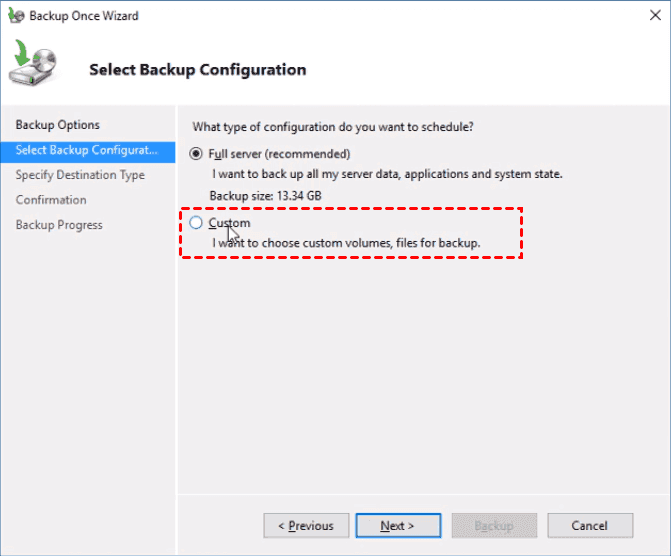
3. Select the Custom type to choose the data you want to create image backup for Windows Server.
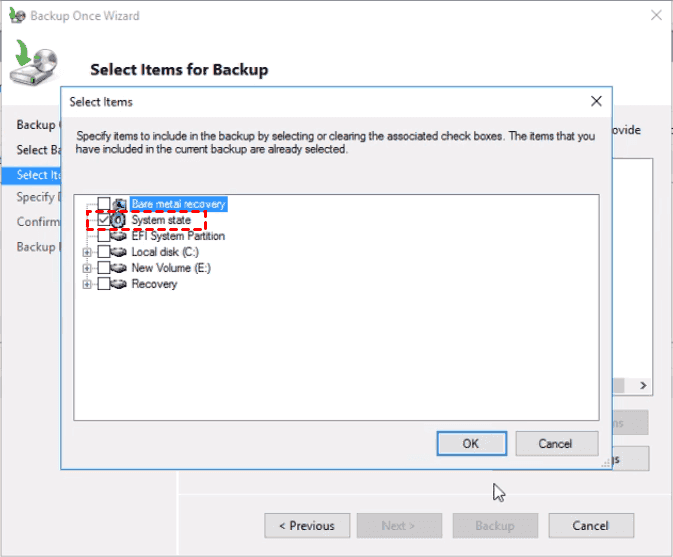
4. And then click Add Items, choose System state to create system image backup for Windows Server 2016. Besides, you could select Bare metal recovery, and other partitions you would like to image.
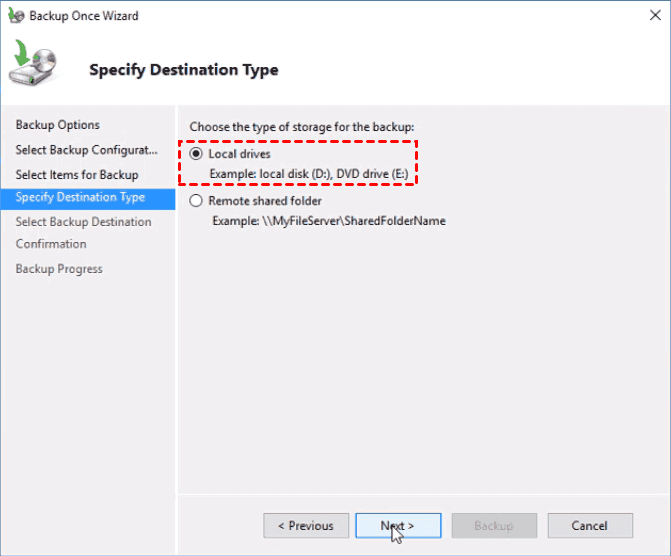
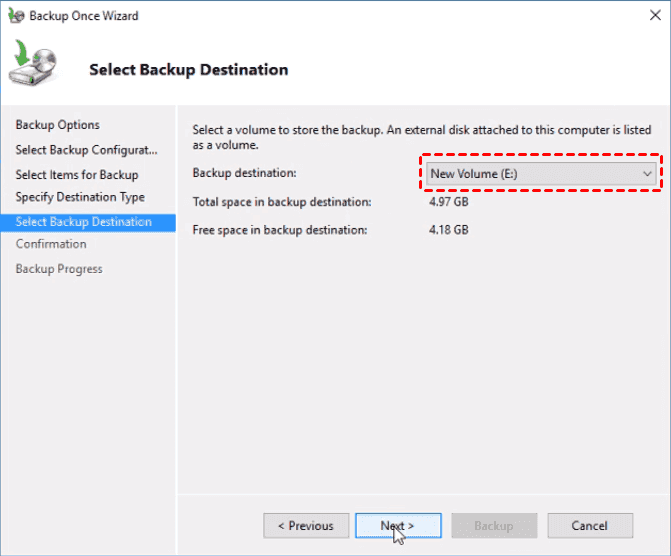
5. Now choose a backup destination: select Local drives, and press Next. Now, choose a backup destination for your Windows Server image backup, and click Next.
6. Preview the settings and click Backup to backup Windows Server.

Way 2: Create Windows Server Backup Image with WBAdmin
You can create an image backup in Windows Server with Wbadmin as well. Before that, you need to learn all the commands you will use by typing wbadmin /? and you will see all of them with corresponding meanings. Below are the most common used commands:
-
WBADMIN ENABLE BACKUP: Creates or modifies a daily backup schedule.
-
WBADMIN DISABLE BACKUP: Disables the scheduled backups.
-
WBADMIN START BACKUP: Runs a one-time backup.
-
WBADMIN STOP JOB: Stops the currently running backup or recovery operation.
-
WBADMIN GET VERSIONS: Lists details of backups that can be recovered from a specified location.
-
WBADMIN GET ITEMS: Lists items contained in a backup.
-
WBADMIN START RECOVERY: Runs a recovery.
-
WBADMIN GET STATUS: Reports the status of the currently running operation.
-
WBADMIN GET DISKS: Lists the disks that are currently online.
-
WBADMIN GET VIRTUALMACHINES: Lists current Hyper-V virtual machines.
-
WBADMIN START SYSTEMSTATERECOVERY: Runs a system state recovery.
-
WBADMIN START SYSTEMSTATEBACKUP: Runs a system state backup.
-
WBADMIN DELETE SYSTEMSTATEBACKUP: Deletes one or more system state backups.
-
WBADMIN DELETE BACKUP: Deletes one or more backups.
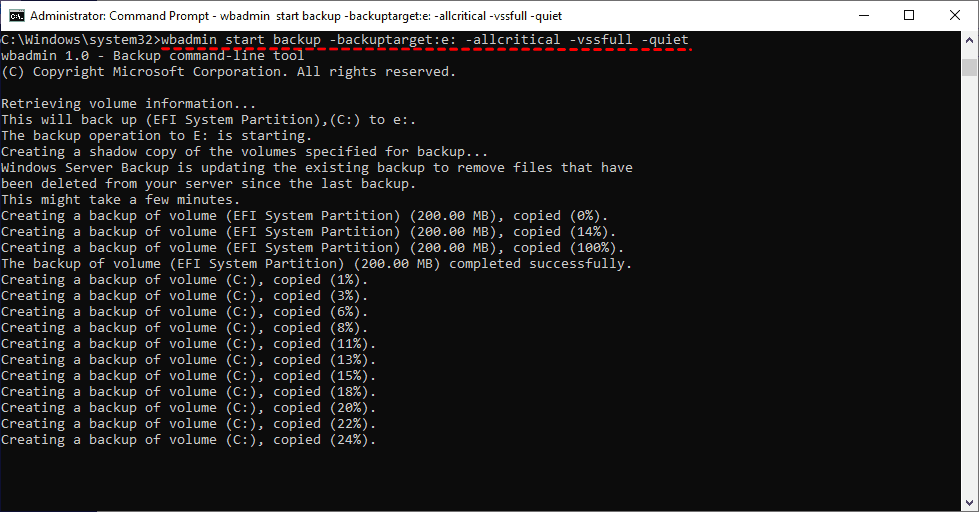
After learning all the commands, you can create a server image backup with it. To create bare metal backup in Windows Server 2012/2016/2016/2019/2022, etc., you can type the following command.
wbadmin start backup -backuptarget:e: -allcritical -vssfull -quiet
-
-allcritical: Creates a backup that includes all critical volumes.
-
-vssfull: run a full backup using Volume Shadow Copy service (VSS).
-
-quiet: run the command with no prompts to the user.
The bare metal backup contains the system state backup by default and includes other critical partitions like C partition, recovery partition, EFI System partition, etc.
After the bare metal backup is finished, you can perform bare metal recovery anytime to protect your Windows Server from data loss.
Way 3: Create Image Backup in Windows Server with AOMEI Backupper
AOMEI Backupper Server works well in backing up entire disks, systems, partitions, or individual files. You can choose them depending on the items you want to backup and the disk space of the destination disk. You can enjoy the following advantages during this process:

Best Software to Image Backup Windows Server
- Image backup Windows Server automatically, e.g., daily, daily (by interval), weekly, monthly(by week/by date), one time, or event triggers.
- Backup only changed files with incremental or differential backup. Both options use less backup time and disk space.
- Delete old backup images automatically, e.g., by quantity, by time, by daily/weekly/monthly, or by space. It ensures your backup disk always has enough space to save important data.
- Server & PCs compatibility: It supports Windows Server 2012/2016/2019/2022/2025, including (R2), as well as Windows 11/10/8/7.
Please download the Windows Server backup software - AOMEI Backupper Server. For unlimited servers and PCs, try its TechPlus edition.
After installing this software, open it and learn how to take an image backup of Windows Server 2012 R2 with the following steps. You can also create a Windows Server 2012 image backup or other systems like 2016, 2019, 2022, 2025, etc.
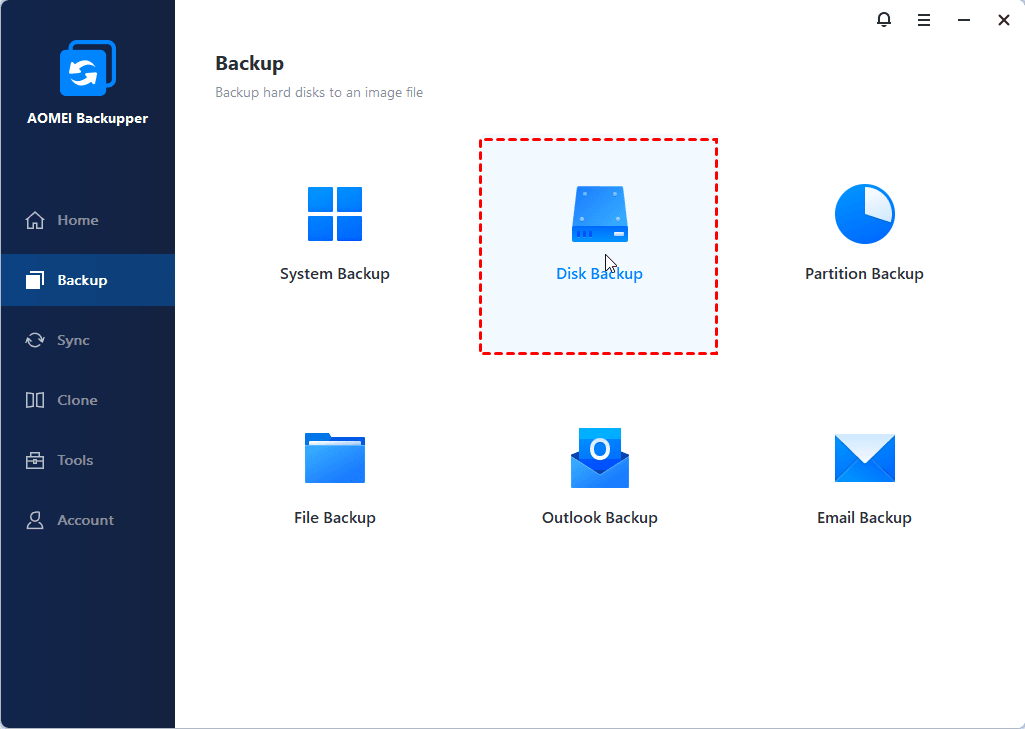
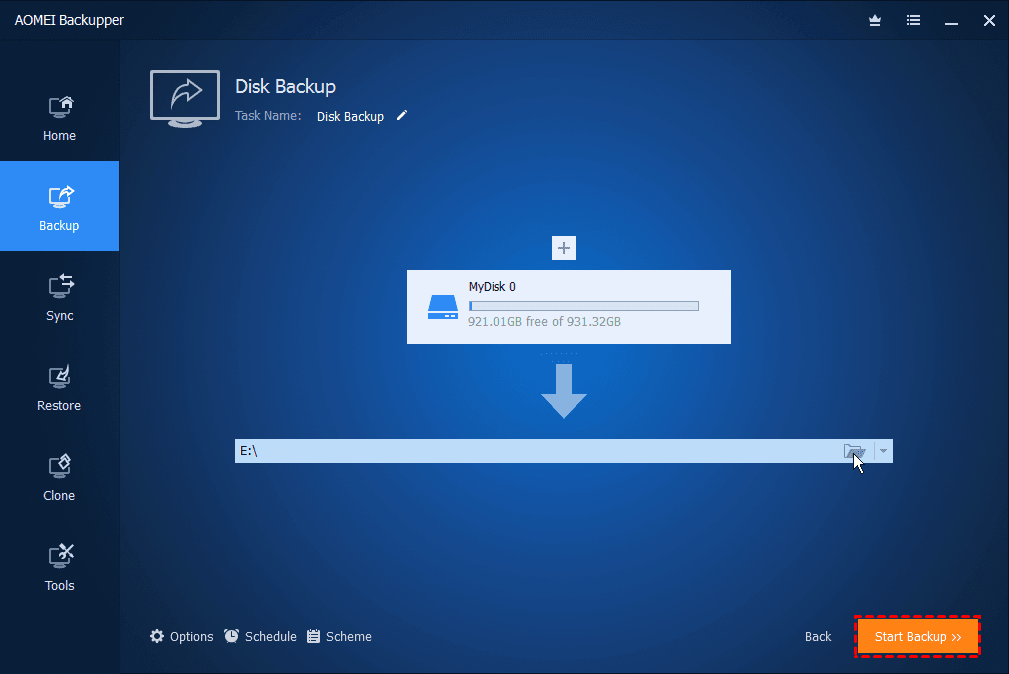
1. Click Backup -> Disk Backup on the main window. To only backup Windows Server OS, choose System Backup instead.
2. Edit the Task Name to distinguish from other backups if required. Tap Select Source to add your Windows Server hard disk to backup.
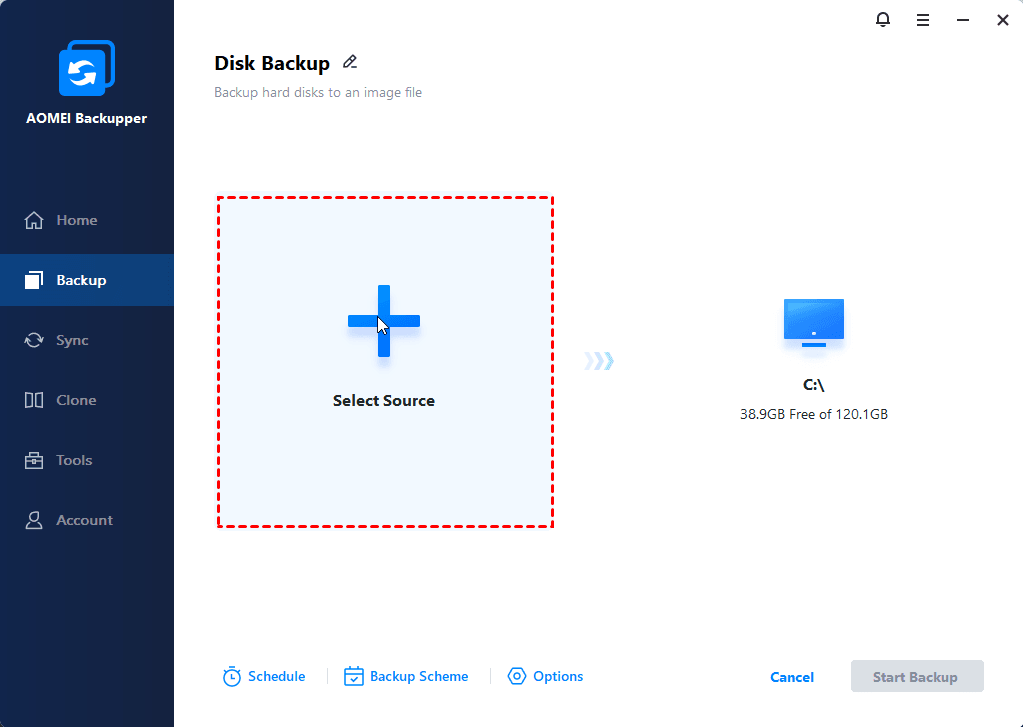
3. Click the PC icon to choose a backup destination. It can be an external disk, USB flash drive, CD/DVD, share, or NAS device.
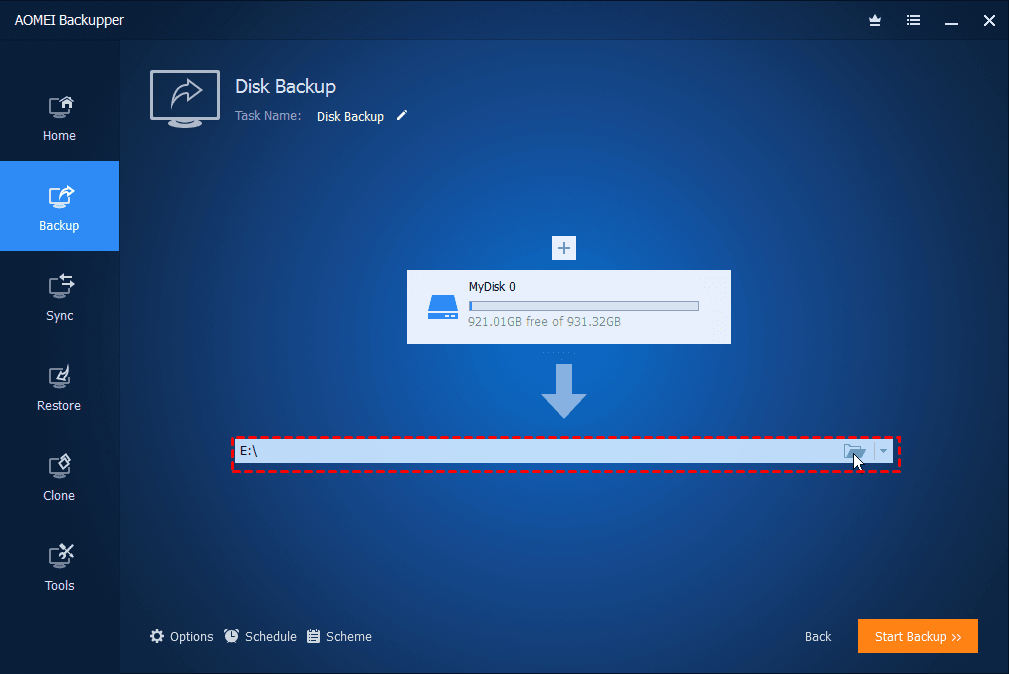
4. Click Start backup >> button to create Windows Server 2012 image backup.
⚠️Notes:
- ✔ Try the safest backup method - differential backup. It backs up only changed files since the last full backup, making it easier to restore Windows server image backup.
- ✔ Backup Scheme - delete old backups to free up more space. You have 4 options, namely, by time, by quantity, by daily/weekly/monthly, and by space, depending on the selected backup method.
- ✔ Options - other backup options like comment, compression, splitting, encryption (require an upgrade), and email notification (check this if you want to get notification of backup results timely ).
Wait for a while, and it will be finished quickly. The backup time depends on the data size on your source disk, the larger the data, the longer the backup time. You can then easily restore Windows Server Image Backup in the Home tab. Below are the overall steps:
- Go to Home -> Disk Backup (the task name you specified) -> three dots icon -> Restore. (Or click Restore on the Home page and select a task or browse an image to restore.)
- Choose Restore the entire disk. Then, click Next >>.
- Choose a destination path (original or new location) to save your backup image. Then, click Next >>.
- Press Start Restore >>. Tick Universal Restore if you want to restore Windows Server 2012 backup to another machine.
Way 4: Make Windows Server Image Backup with AOMEI Cyber Backup
AOMEI Cyber Backup enables you to backup a bunch of Windows PCs and Servers from one central console.
- It allows you to create system/disk/partition backup for client PCs and Servers, supporting Windows 11/10/8.1/8/7 and Windows Server 2022/2019/2016/2012 (R2)/2008 (R2).
- You are allowed to save backup images on a local disk, external hard drive, network share or NAS device, etc.
- You can schedule a backup task to run daily/weekly/monthly using the full/incremental/differential backup method.
Take creating disk image in Windows Server as an example. Follow the instructions below:
1. Install and run AOMEI Cyber Backup. The default username and password for AOMEI Cyber Backup are both "admin". Enter them and click Log in.
2. Click Source Device > Windows > Add Windows Device to add the Windows Server device that you want to backup. You need to enter the IP address, username and password of it.
3. Create a disk backup task.
- Click Backup Task on the left menu bar and select Backup Task > Create New Task.
- Choose Disk Backup as the Backup Type.
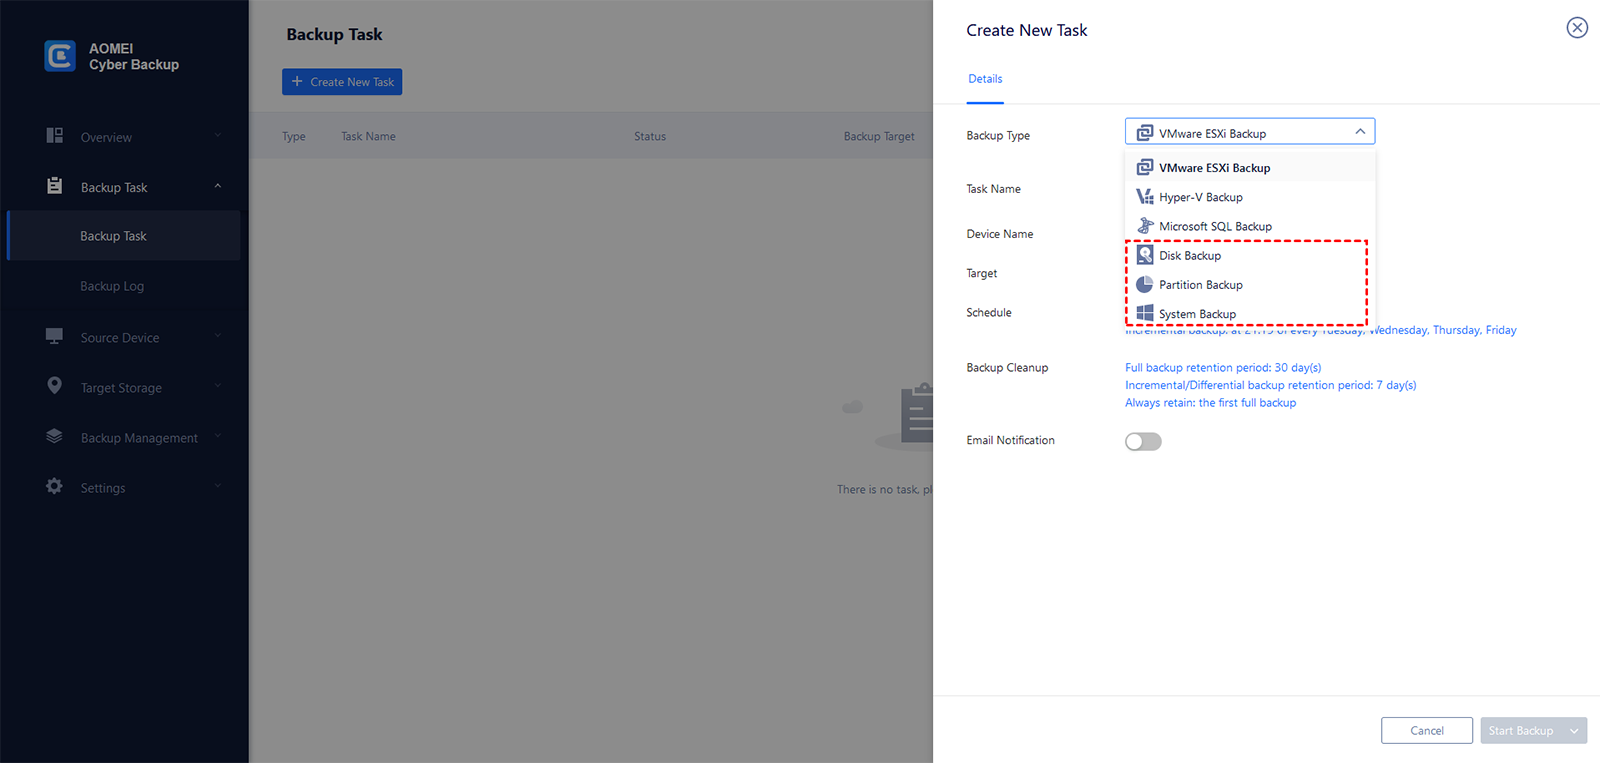
- Edit Task Name based on your need.
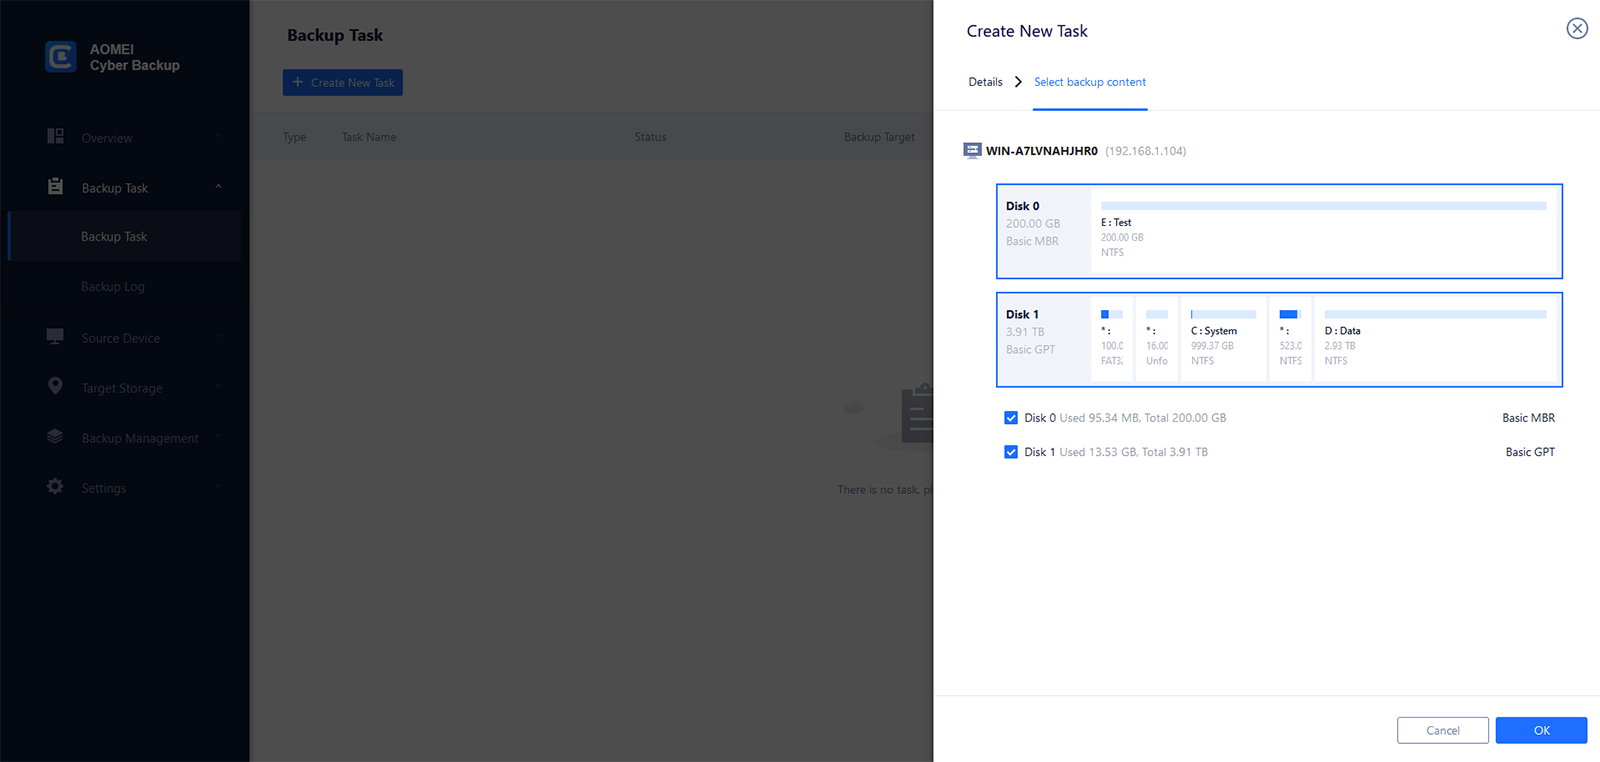
- In the Device Name field, click Select + to select the device you just added.
- In the Backup content field, click Select + to select one or multiple disks for backup.
- In the Target field, click Select + to add a local or network storage.
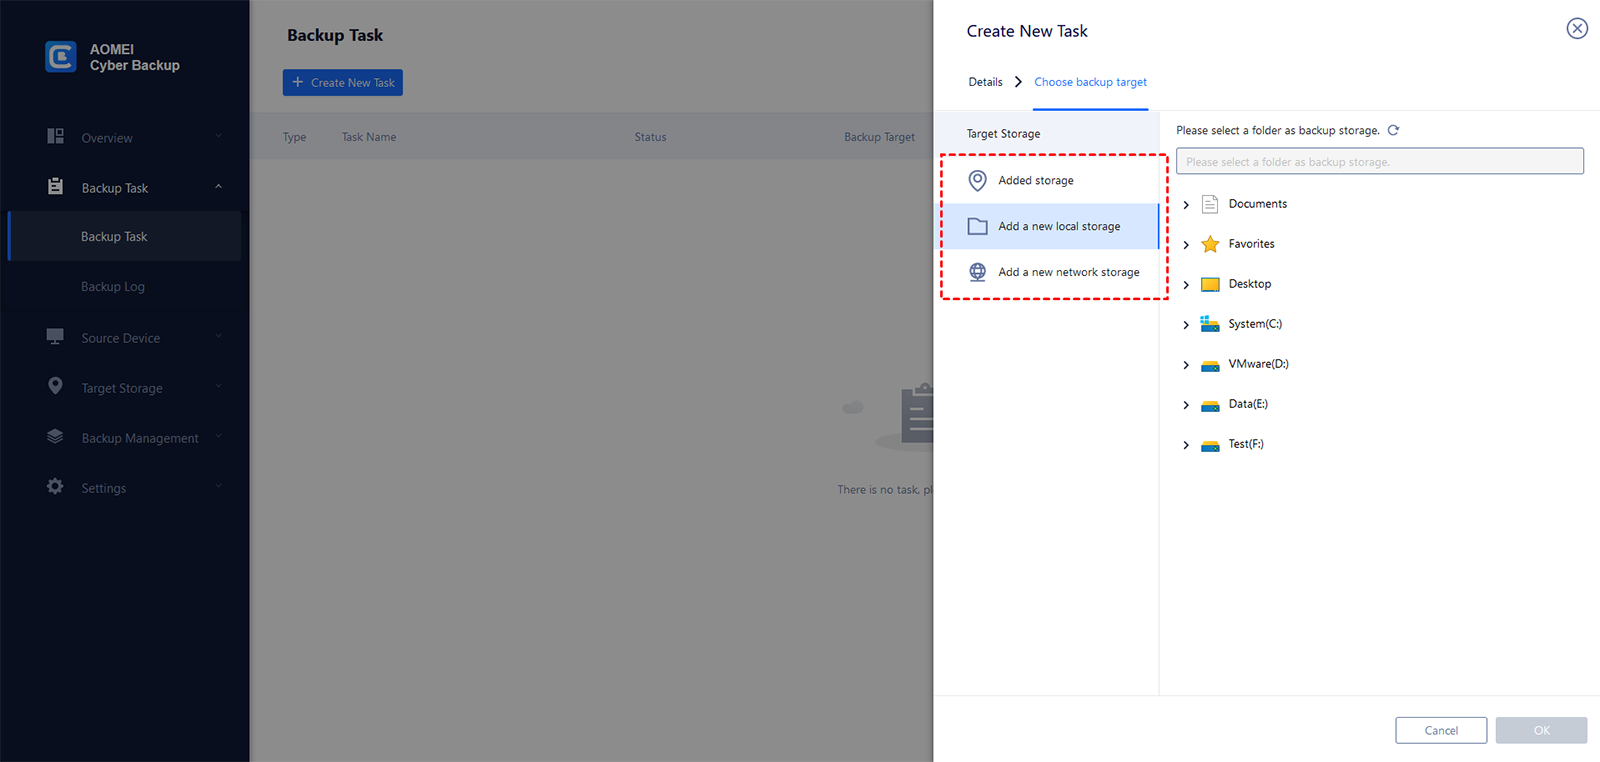
- Change the default schedule settings in the Schedule field.
- Click Start Backup > Add the schedule and start backup now to begin creating disk image.
Related Guides to Backing Up Windows Server
Windows Server backup requirements can vary depending on your environment, storage setup, and recovery goals. To help you choose the right strategy, the following guides cover the most common Windows Server backup scenarios.
🚩 Windows Server System Backup
If your priority is disaster recovery, a full system backup is one of the most important protections you can create. A system backup includes the operating system, boot files, installed applications, system settings, and critical partitions, allowing you to restore the entire server after hardware failure, ransomware, or boot issues.
Not every backup task requires a full server image. If you mainly need to protect shared folders, business documents, databases, or user data, file-level backup can save storage space and simplify recovery. This guide shows you how to back up selected files and folders in Windows Server.
🚩 Windows Server Backup to NAS
Backing up Windows Server to a NAS device provides centralized storage, larger capacity, and easier remote access compared to local disks. Explore how to configure Windows Server backups to NAS, improve backup reliability, and secure backups across the network from this guide.
🚩 Windows Server Backup Once a Week
For servers with relatively stable data, weekly backups can provide a balance between protection, storage usage, and system performance. This strategy is often used in smaller environments or for secondary servers that do not change daily. Learn how to configure weekly automatic backups and ensure your server remains recoverable without excessive backup storage consumption.
FAQs about Backing Up Windows Server
1. What should I back up on a Windows Server?
Important items typically include:
- Operating system and boot partitions
- Business files and shared folders
- Applications and databases
- Active Directory and system state
- Virtual machines
- User profiles and configuration settings
A complete backup strategy usually combines both system and file-level protection.
2. Does Windows Server have built-in backup tools?
Yes, Windows Server has built-in backup tools. You can use Windows Server Backup and Wbadmin to create system image backups, file backups, and scheduled backup tasks without installing third-party software.
3. What are the limitations of Windows Server Backup?
The limitations of Windows Server Backup include:
-
Backup of volumes greater than 2 TB was not supported, and 512-byte sectors were required in Windows Server 2003 (R2) and 2008 (R2).
-
The schedule backup is limited to daily or more frequent.
-
Deletion policy (manage backup versions and backup retention)was not available in Windows Server 2003 (R2) and 2008 (R2). This is available since Windows Server 2012.
-
Removable media is not supported, such as tape, CD, USB flash drive, etc.
-
You could not recover individual files, folders, or application data from backup DVDs.
-
The previous backup will be overwritten. There will only be one of the latest backup if you would like to schedule backup Windows Server to shared network folder.
-
The Wbadmin command line tool is quite more complex to operate for most users.
4. Can I restore Windows Server to different hardware?
Yes, you can restore Windows Server to different hardware. Both AOMEI Backupper and AOMEI Cyber Backup allow you to restore a Windows Server image to new hardware with different drivers and components.
Conclusion
With the above methods, you can easily create image backup in Windows Server 2012 (R2), 2016, 2019, 2022, 2025, etc., and Windows PCs. Among them, professional Windows Server image backup software - AOMEI Backupper Server and AOMEI Cyber Backup are recommended. They have an intuitive interface and rich features, not only suitable for all users but also meet their different needs.
What’s more, AOMEI Backupper offers a real-time sync feature to sync all the changed files as soon as possible. Thus, you don't need to worry about data loss any because of no instant backup. In addition, you still can use it to backup files to cloud drive, transfer everything from one computer to another, clone a Windows Server 2012 drive, etc.
If you have problems using Windows Server Backup and Wbadmin, try professional server image backup software - AOMEI Backupper Server. For business users, try AOMEI Cyber Backup.

