Fixed: TPM Could Not Be Initialized in Windows 11 -7 Solutions
How to fix TPM could not be initialized in Windows 11? Learn the reasons for this error and 7 effective ways to fix it. Then master a way to prevent data loss with this article.
By Maggie Updated on November 30, 2023
User case: TPM could not be initialized in Windows 11
How to fix the inability to initialize TPM in Windows 11?
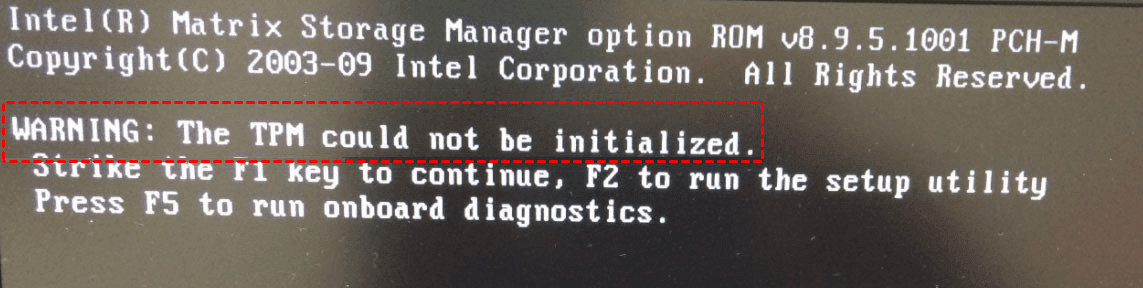
"When I boot up my computer, I get an incredible error message: Warning: The TPM could not be initialized. My PC has been running fine for almost four months after upgrading to Windows 11 without any issues during that time, this error seems to have happened out of nowhere. I want to fix this error asap, can anyone offer some valid suggestions?"
Introduction to TPM in Windows 11
Windows 11 is Microsoft's new operating system with new user interface and features, among which Trusted Platform Module (TPM) 2.0 is one of the minimum requirements for a computer to upgrade to Windows 11. TPM an international standard for a secure cryptoprocessor, a dedicated microcontroller designed to secure hardware through integrated cryptographic keys. Compared with the TPM 1.2 that was common in Windows systems in the past, the TPM 2.0 required by Windows 11 is better in terms of security. For example, it supports a wider range of encryption methods and encryption agility, etc.
During Windows 11 startup, the system will automatically initialize TPM and control related devices to improve security. But in some cases, TPM initialization may fail and further affect the normal startup of Windows 11, as described in the above case. So, how can we effectively fix the error of not being able to initialize TPM in Windows 11? First, we need to understand the cause of the error.
The cause of the “TPM could not be initialized” in Windows 11
Any problem or error does not appear out of thin air, it is usually caused by some other problem, and the error of unable to initialize TPM in Windows 11 is no exception. The following are the common causes of this error, and knowing them will help you fix the error next.
✡ BIOS is out of date or not compatible after update
✡ Problems with TPM services or programs
✡ Windows Defender firewall blocks
✡ There is a hardware failure on the motherboard
7 ways to fix “TPM could not be initialized” in Windows 11
After understanding the cause of the error, please try the following 7 methods in order. I believe these methods can help you effectively fix the error that the TPM could not be initialized after BIOS update in Windows 11.
Method 1. Disable TPM in the BIOS
When encountering the error of not being able to initialize TPM in Windows 11, the first thing you should try to fix this error is to disable TPM in the BIOS, which is a worthwhile method.
- Restart your computer and enter the BIOS by pressing the appropriate key during the process. Please note that different brands of motherboards have different methods of entering the BIOS.
- Find and expand the Security tab in the left panel, and then select the TPM 2.0 Security option. Select Disable in the right panel and tap the Apply button in the lower right corner.
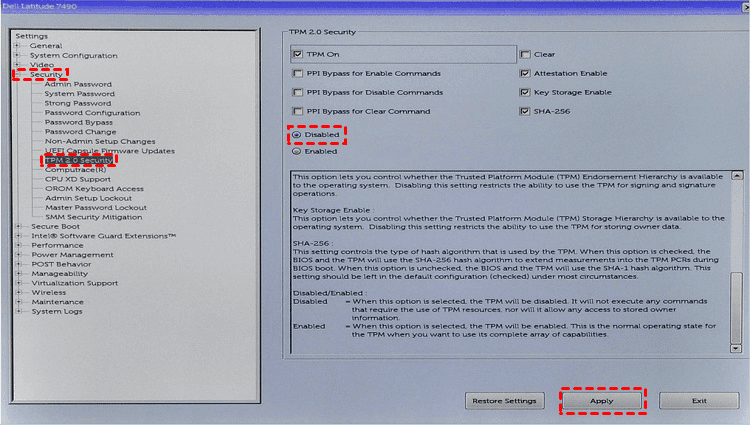
✍ Note: If you want to restart TPM, just follow the same steps to switch to the Enable option.
Method 2. Update or roll back the BIOS
As it turns out, outdated BIOS are also a major cause of the warning error: The TPM could not be initialized in Windows 11. If this is your situation, you can try to update the BIOS to fix it. Conversely, if you encounter this error after BIOS update, you may choose to roll back the BIOS to a previous version to fix it.
✽ Update BIOS
- Enter the Windows Recovery Environment (Windows RE) by forcing the computer to shut down and then reboot twice.
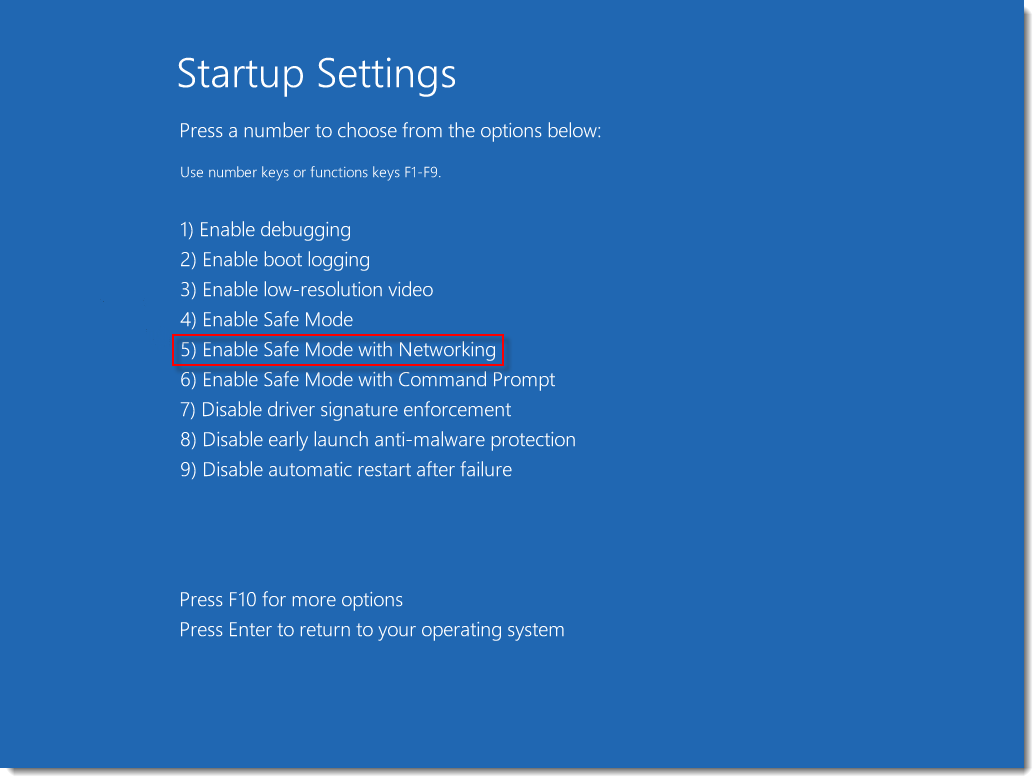
- Click Troubleshooting -> Advanced Options -> Startup Settings -> Restart.
- After the computer restarts, press F5 or the number key 5 to Enable Safe Mode with Networking.
- Open your browser and visit the official website of your computer's motherboard manufacturer to find and download the BIOS update file.
- Copy the previously downloaded BIOS update file to a USB flash drive and reboot your computer.
- Press the corresponding button to enter the BIOS interface, select the Update BIOS From Drive option. Then select the BIOS update file downloaded in the USB drive, confirm this operation, and wait for the update to complete.

✍ Note: During the BIOS update process, never power down or interrupt the update to avoid update failure and damage to the motherboard.
✽ Rollback BIOS
- Enter the Windows Recovery Environment and press F5 or the number key 5 to Enable Safe Mode with Networking.
- Download the old version of the BIOS update file to the USB flash drive from the official website of your computer's motherboard manufacturer, then install the old version of the BIOS update file and wait for the update process to complete.
- Reboot the computer and confirm if the problem of not being able to initialize TPM has been fixed, if it is still not fixed, please go to the next method.
Method 3. Disable Windows Defender Firewall
Network connectivity issues can arise when your computer's firewall is separate from the domain and further lead to the error that TPM could not be initialized in Windows 11. Therefore, to fix the above error, please disable Windows Defender Firewall in Windows 11.
- Enter the Windows Recovery Environment and press F5 or the number key 5 to Enable Safe Mode with Networking.
- Use Windows + S to open the search box, type control panel and press Enter.
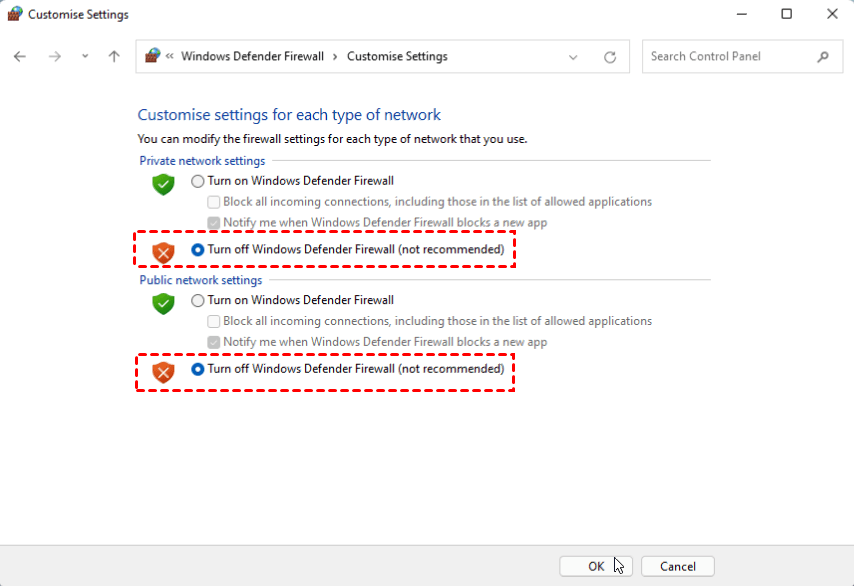
- Find and click System and Security, and then select Windows Defender Firewall.
- From the left menu, find and click Turn Windows Defender Firewall on or off.

- In the Private network settings and Public network settings sections, select Turn off Windows Defender Firewall (not recommended), and then click the OK button to save the changes.
Method 4. Restore Windows 11 system
If you created a system restore point before the TPM could not be initialized error in Windows 11, then you can directly restore the Windows 11 system to fix this error.
- Enter the Windows Recovery Environment and press F5 or the number key 5 to Enable Safe Mode with Networking.
- Use Windows + S to open the search bar, type control panel and press Enter.
- Type recovery in the search box in the upper right corner and press Enter.
- In the new window, click Open System Restore and select the suggested restore or choose another restore point option according to your needs and click Next.
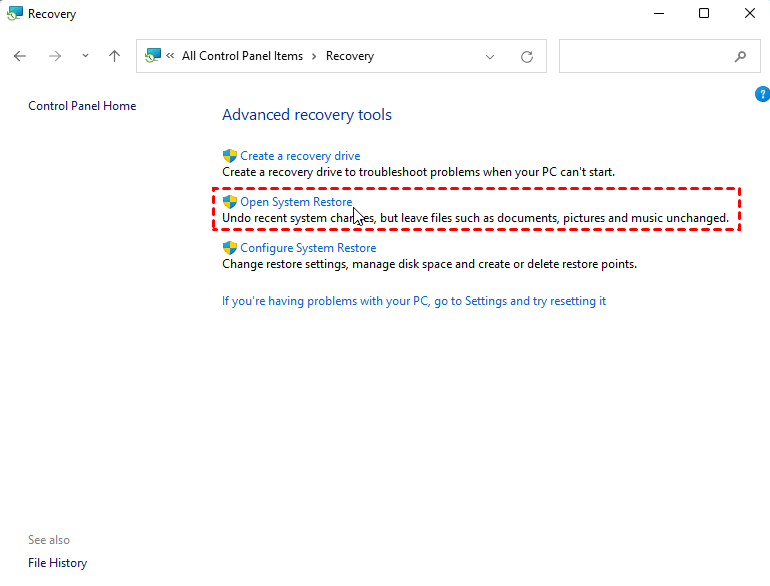
- Confirm the restore point condition and tap the Finish button and wait for this process to complete.
Method 6. Clear TPM from BIOS
If the above methods fail to fix the error that the TPM could not be initialized in Windows 11 and you do not want to restore the system, you can choose to clear the TPM from the BIOS.
✍ Note: Clearing the TPM may result in data loss, it is recommended that you make a backup before clearing.
- Enter the Windows Recovery Environment and press F5 or the number key 5 to Enable Safe Mode with Networking.
- Use Windows + S to open the search bar, type Windows Security and press Enter.
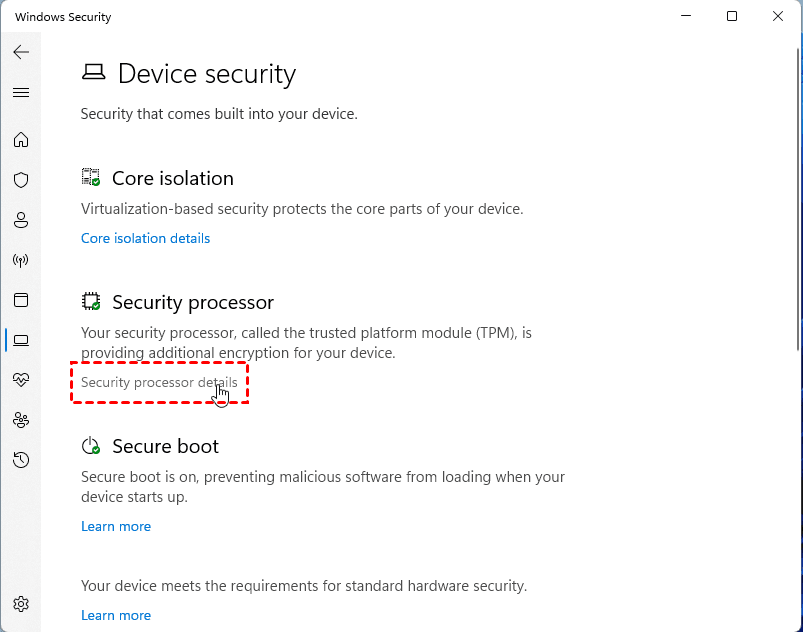
- Switch to the Device Security, and then click Security processor details.
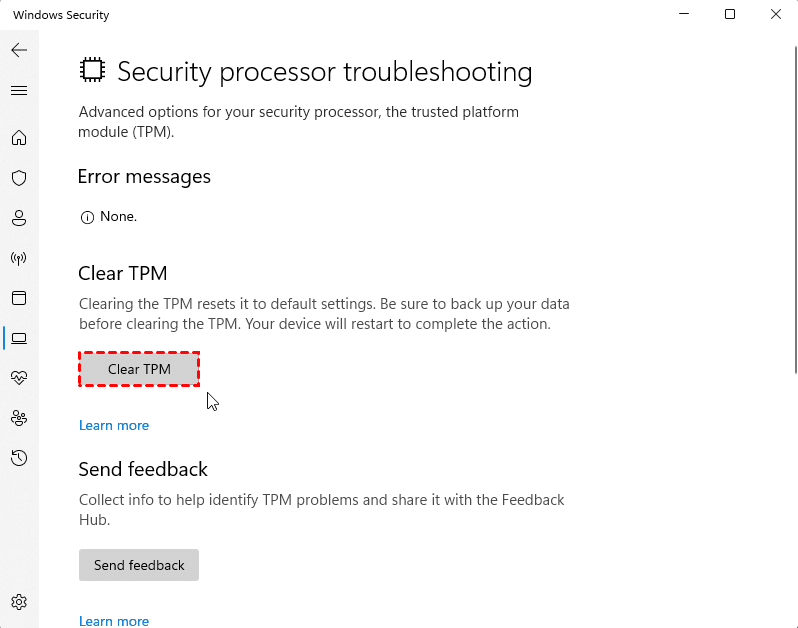
- In the new window, tap Security processor troubleshooting.
- In the new window, tap the Clear TPM button, and then select the Clear and restart option.
Method 7. Replace the motherboard
In fact, the failure to initialize TPM in Windows 11 can also be caused when there is a hardware failure on the motherboard. Therefore, if you are sure that the motherboard is the problem and you have enough budget, you can also consider directly replacing the motherboard, which can also effectively fix the above error, but it should be noted that the new motherboard needs to be consistent with the old one, otherwise the CPU may not be installed.
Simple ways to prevent data loss on Windows 11
When you feel overwhelmed by the TPM could not be initialized error in Windows 11, please try the 7 fixes provided in this article in turn, and I believe these methods can get your Windows 11 computer back to normal.
Note, however, that the above methods will involve clearing the TPM from the BIOS, which may result in the loss of data you need. Therefore, it is recommended that you create bootable media on another computer and use the tool to start the computer before performing the repair operation. And through the File Backup feature of AOMEI Backupper Standard, create backups of important data on your computer for quick recovery in the event of loss of these data.
- It also allows you to save the data you deem important to any desired location, such as backing up files to the cloud, local disks, NAS devices, etc.
- It supports operating systems such as Windows 11/10/8.1/8/7.
Click the download button to install it on your computer and see how to create a backup of your files. If you are a Windows Server user, try AOMEI Backupper Server instead.
Steps to perform a file backup on Windows 11
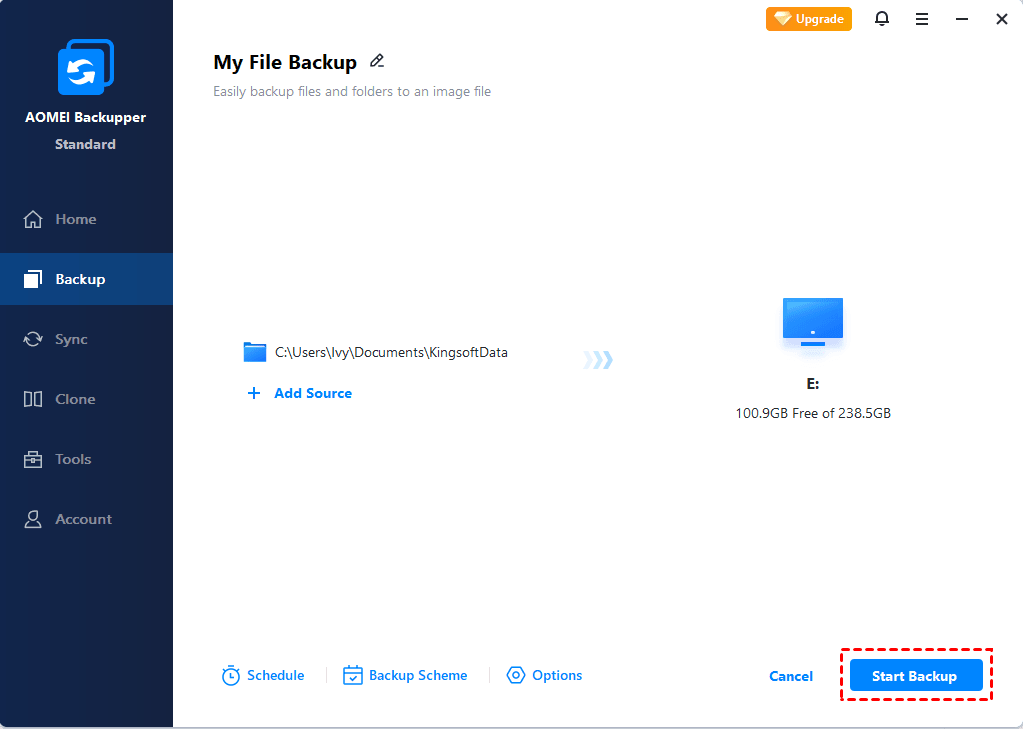
- Start your computer with bootable media, it will automatically run AOMEI Backupper Standard, select Backup in the left panel, and select File Backup in the right panel.

🌟Tip:
If you have an AOMEI account, you can alsobackup files to AOMEI CloudwiththeCloud Backupfeature. And it offers you 1TB of free cloud storage in 15 days.
- You can choose the Add Folder or Add File option according to your needs. In addition, you can click the pencil icon in the upper left corner to name this backup task.

- Select the destination path where you want to save the backup image of this file, and then click the Start Backup button.
✬ Tips: If you have additional requirements, please click on Options, Backup Schedule and Backup Scheme in the lower left corner to set.
>> Options: It includes three functions - backup comments, enable encryption for backups, and enable email notification. It should be noted that the encryption for backups function needs to be upgraded to the Pro version to use.
>> Schedule Backup: You can set up scheduled backups to automatically back up files on a Daily, Weekly, Monthly, Event-Triggers and USB plug in. Among them, Event triggers and USB plug in are the special functions of the professional version.
>> Backup Scheme: You can change the backup method to full backup or incremental backup for free. If you upgrade to the Pro version, you can also use differential backups and enable automatic clean backups.
Besides file backup, AOMEI also provides you with more functions that may be of interest to you.
- When you encounter a similar problem again, you can use the file restore feature to restore the previously created file backup image.
- Bootable media can assist in system recovery, but to further ensure the security of your computer system, it is recommended to take a system backup to quickly restore system files in the event of a system crash or failure to boot.
- If your files change, you can use the file sync function to directly synchronize the changed files in the source directory to the target directory. This method is more time-saving than re-backing up the files.
Summary
If you don't know how to fix the TPM could not be initialized error in Windows 11, read this article in detail to learn the cause of the error and 7 effective fixes to get your Windows 11 system back to normal as soon as possible.
For your data security, it is recommended to use AOMEI for file backup to prevent possible data loss. Besides, you can also use the software for more needs, such as disk backup, partition backup, disk clone, etc., so that you can use your computer in a safer environment.

