Prepare for Windows Server 2016 and Perform in-Place Upgrade
This article focuses on how to prepare for Windows Server 2016 upgrade and upgrade Windows Server 2012 to 2016 step by step. No data loss.
By Ivy Updated on September 26, 2023

Should you upgrade to Windows Server 2016?
Compared with the previous version, Windows Server 2016 has made a lot of improvements and optimization, and introduced some useful features, such as Nano Server, PowerShell 5.0, Windows Server Containers, Active Directory Domain Servers (AD DS), Active Directory Federation Servers (AD FS), Hyper-V Containers, etc.
So many users want to upgrade Windows Server 2012 to Windows Server 2016. Should you upgrade to Windows Server 2016? Learn the following 3 main features before making a decision.
-
Power Shell 5.0: This command line utility is installed by default in Windows Server 2016. It has significant upgrades across security, usability, and new features, such as Windows PowerShell Desired State configuration.
-
Windows Server Containers: Windows Containers provide application isolation through process and namespace isolation technology by sharing a kernel with the container host and all other containers running on the host.
-
Hyper-V Containers: This type of container offers further deployment options for administrators that can provide increased isolation. Specifically, it encapsulates each container in a lightweight virtual machine and supports containerized applications with a greater degree of security by making use of Microsoft’s hypervisor.
In sum, Windows Server 2016 has better security, virtualization, automation, efficiency, availability, and performance. So, if you want to enjoy these features, you can install Windows Server 2016.
Which edition of Windows Server 2016 should you upgrade?
To show you the upgrade possibilities, here's a table with detailed information. Note if your current edition is not listed in the left column, it's not supported to upgrade to Windows Server 2016.
| If you are running this edition: | You can upgrade to these editions: |
| Windows Server 2012 Standard | Windows Server 2016 Standard or Datacenter |
| Windows Server 2012 Datacenter | Windows Server 2016 Datacenter |
| Windows Server 2012 R2 Standard | Windows Server 2016 Standard or Datacenter |
| Windows Server 2012 R2 Datacenter | Windows Server 2016 Datacenter |
| Windows Server 2012 R2 Essentials | Windows Server 2016 Essentials |
| Windows Storage Server 2012 Standard | Windows Storage Server 2016 Standard |
| Windows Storage Server 2012 Workgroup | Windows Storage Server 2016 Workgroup |
| Windows Storage Server 2012 R2 Standard | Windows Storage Server 2016 Standard |
| Windows Storage Server 2012 R2 Workgroup | Windows Storage Server 2016 Workgroup |
The following should also be noted:
- All versions of Windows Server 2016 are 64-bit only, so upgrades from 32-bit to 64-bit architectures are not supported. Please perform a clean install to Windows Server 2016.
- Upgrades from one language to another are not supported.
- Upgrading from a pre-release version (preview) of Windows Server 2016 is not supported.
- Upgrades that switch from a server core installation to a server with a desktop installation (or vice versa) are not supported.
Preparations for Windows Server 2016 upgrade
Before the start, you need to do some Windows Server 2016 upgrade preparations. Just see below.
✔ Check the minimal system requirements for server 2016. If your system meet these conditions, you can continue to prepare for Windows Server 2016 upgrade. If not, you can create a system backup for Windows Server 2012 in case of system failure or hardware issue.
-
Processor: 1.4Ghz 64-bit processor
-
RAM: 512 MB
-
Disk Space: 32 GB
-
Network: Gigabit (10/100/1000baseT) Ethernet adapter, 1Gbps connection is ideal.
-
Optical Storage: DVD drive (if installing the OS from DVD media)
✔ Make sure the applications are compatible. Since Windows Server 2016 only supports x64 bit operating system, you need to check if the installed programs is x64 bit. If not, it may work improperly after the upgrade.
✔ Ensure all Windows updates are complete and no virtual machines running. If there are any upcoming updates in previous version, such as, Server 2012, the upgrade process may fail.
✔ Verify if your disk has enough space. The minimal space for core installation is 32GB, but you may need more space. Because you may need to install new applications, save files and folders on the system drive in the future.
To allocate free space, you can use computer management in server or third-party partition manager like AOMEI Partition Assistant Server. Here take later as an example:
- Select the partition that has much free space and click Allocate Free Space.
- Select the partition you want to transfer to, C: drive, for example, and click OK to confirm it.
- Afterward, click Apply and Proceed to start the allocation process.
✔ Backup your server for backup or rollback. Speaking of upgrading Windows Server 2012 to Windows Server 2016, you may worry about data loss or system failure. In addition, there is a possibility that you may not be used to the new operating system and want to roll back to previous version. So, it’s necessary to backup system to USB drive for your current server. The detailed steps are in the next part.
Necessary to backup Windows Server 2012 R2 before upgrading
Unlike upgrading to Windows 10 or other systems, Microsoft does not support rolling back Windows Server 2016 to 2012 if you perform an in-place upgrade. So if you are worried about system crash, data loss, Windows Server 2012 eol, or you may not like it, it's recommended to back up your server with reliable and easy-to-use software.
We recommend you use Windows Server image backup software - AOMEI Backupper Server. Then, how to image Windows Server 2012 to a new hard drive successfully?
✔ You need to use System Backup or Disk Backup in this software.
✔ To backup files or folders, try File Backup or Cloud Backup instead.
🔹🔷Besides, there are some features for long-term data protection.
🥇Schedule Backup: Daily, Weekly, Monthly, Event triggers, USB plug in. All of them help you backup server 2012continuouly and avoid data loss owing to forgetting to backup but with different priorities.
- You can choose them based on your frequencies, or specific events like System Shutdown.
- Or directly use the plug-and-pull backup feature -USB plug in if your target disk is a USB drive.
👍Backup Scheme: the most effective way to resolve the backup disk full issue, especially for a small disk. It's divided into two parts, namely backup methods and automatic backup cleanup methods.
- You can choose to backup only changed files with Incremental backup (default) or Differential backup methods.
- Or select By time, By quantity, By daily/weekly/monthly, or By space cleanup methods, depending on the selected backup methods. It will directly delete old backups automatically.
In addition, there are some less impressive small functions, but very good, such as Wake the computer to run scheduled tasks, with it, you easily open backup software and run scheduled tasks during off-peak hours, without human intervention.
Please download the AOMEI Backupper Server and install it on your computer.
Step 1. On the main page, click on the “Backup” tab, and then select “System Backup”.

Step 3. In the next screen, the items needed for a system restore is automatically included, and all you need to do is click the folder shaped button to select the target location. It's suggested to backup Windows Server 2012 to new hard drive, USB drive, network drive, NAS or cloud drives.

Step 4. Confirm the backup information and click “Start Backup” to create system image for Windows Server 2012.

Except for 2012, this software still supports Windows Server 2003, 2008, 2016, 2019, and 2022 as well as its R2 version, so even if you want to upgrade Windows Server 2012 to 2019, you can use it as a precaution measure, not alone upgrade Windows Server 2012 to 2016.
And on AOMEI Backupper TechPlus edition, you can use it to backup system on unlimited PCs and servers within a company. To make it more convenient, you can choose to create a portable version of AOMEI Backupper and run it off a flash drive without installing again.

In-depth guide: upgrade Windows Server 2012 (R2) to 2016 step by step
Now, you can safely upgrade your Server 2012 after you prepare for Windows Server 2016 upgrade. For detailed steps, please continue to see below. It also applies to upgrade Windows Server 2012 to 2019.
Step 1. Log in to Windows Server 2012 R2 and download the media file from Microsoft, then double-click it to update and install 2016.
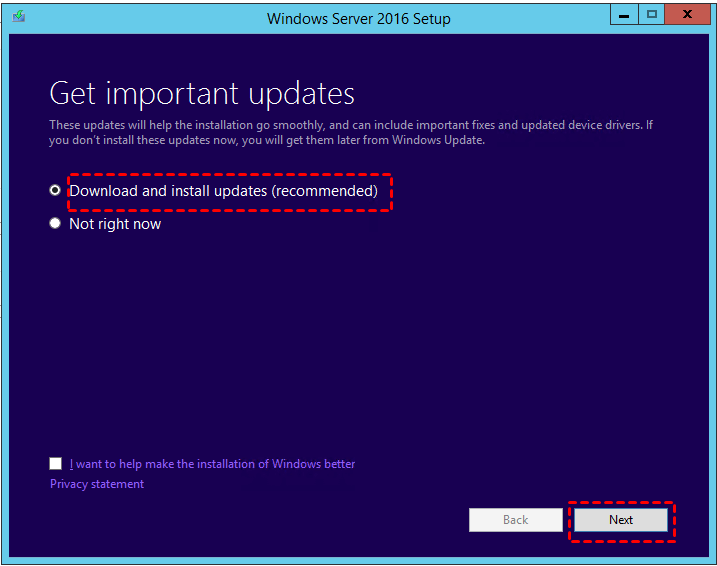
Step 2. In the first Setup window, tick “Download and install updates”, and “I want to help make the installation of Windows better”, then click “Next”.
Step 3. Input the product key of the current server and click “Next”. You can go the properties of the server, then scroll down to the product ID and remember it.
Step 4. Select the image you want to install and click “Next.”
Step 5. Read the license terms and click “Accept” to move on.
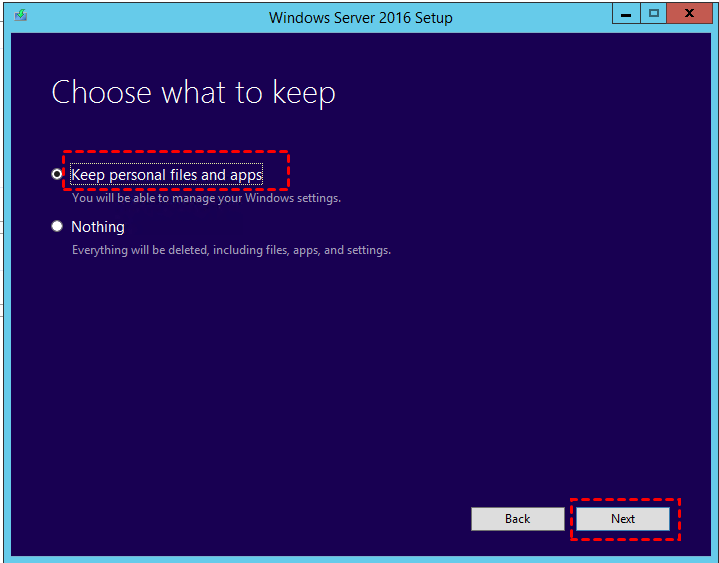
Step 6. Tick “Keep personal files and apps” and click “Next”. If you don’t choose the right version, the first option will be unavailable.
Step 7. Then, you may see some warning messages and click “Confirm” on the right side.

Note: If there is a message, saying, “Active Directory on this domain controller does not contain Windows Server ADPREP /FORESTPREP updates.”, you need to open cmd and change drive letter of the media file with the following commands.
• E: (This is the drive letter of media file.)
• cd /support/adprep
• adprep.exe /forestprep
• c
• adprep.exe /domainprep
• c
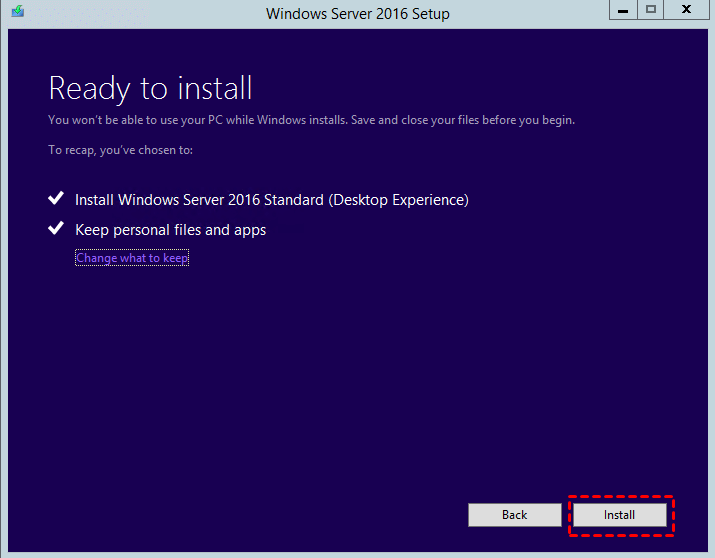
Step 8. Click “Refresh” and then “Install” to start the installation of Windows Server 2016. Wait until the process ends and set up your preferences.
Wait until the process ends and set up your preferences. And then, you can use this operating system to do what you want. If you are not used to it, or something goes wrong, such as system crashes, you can choose to restore Windows 2012 system image from Windows Server 2016.
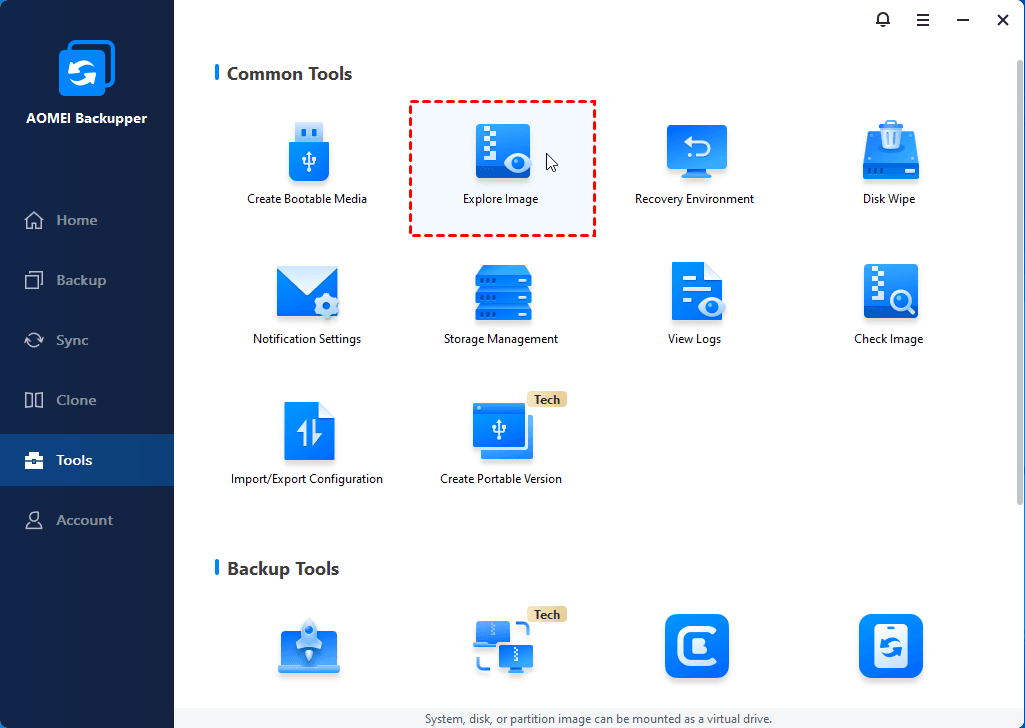
Also, if there is any data loss, you can choose to restore files from backup, even if you don't create a file backup. In this case, you need to use the Explore Image feature to mount backup image and copy files from them.
Summary
When it comes to preparing for Windows Server 2016 upgrade, you need to know this operating system first, then make preparations and install 2016. To avoid any unexpected error, it's highly recommended to backup system and keep it installed on the new system.
With it, you can schedule backup system, disk, partition or files for disaster recovery, and manage backup disk full effectively with the help of different backup features. Only in this case, your image is the latest version and you don’t need to reinstall Windows and programs if the operating system is damaged.

