Windows Server 2012 End of Life: How to Prepare for It
Since Windows Server 2012 and 2012 R2 versions will be terminated in October 2023, Server users need to take measures in advance. This article provides you with detailed information about it and solutions to keep your data safe.
By Jonna Updated on October 31, 2024
Things you need to know about Windows 2012 end of support
While Windows versions are constantly being updated, some older versions are losing official support. Microsoft recently issued a reminder that Windows Server 2012 and Windows Server 2012 R2 will end support in October 2023, when they will no longer receive security updates, non-security updates, bug fixes or technical support.
Windows Server is primarily for servers, workstations, and other devices, and the fact that official updates are no longer being pushed means that new vulnerabilities cannot be fixed if they arise, which is a significant security risk for your business. So if you or your business is still using Windows Server 2012 and Windows Server 2012 R2, do your data migration as soon as possible to avoid problems after the shutdown. For the solutions, Microsoft recommends that users either switch to Azure or choose a newer version of Windows Server.
Also, it is of particular importance for companies and businesses to protect critical data before Win 2012 (R2) end of life. You need to take the appropriate steps before the Windows Server 2012 EOL arrives. This article summarizes several ways for you to do so. To learn more, continue reading below.
Options for you in case of Windows Server 2012 end of life
The older the operating system, the easier it is to exploit, making it easier for cybercriminals to gain access. At some point, manufacturers can’t continue to patch and update older operating systems because the underlying architecture is outdated. So in order to protect your data from malicious attacks and loss, there are some options for you.
The first one is that you can upgrade your Server to the latest version. The other is to run Azure virtual machine on your existing Server computer. Moreover, the most reliable one to safeguard your critical data is to save them in a secure place such as creating Server backup to cloud or an external hard drive.
#1. Upgrade your Server system to the latest version
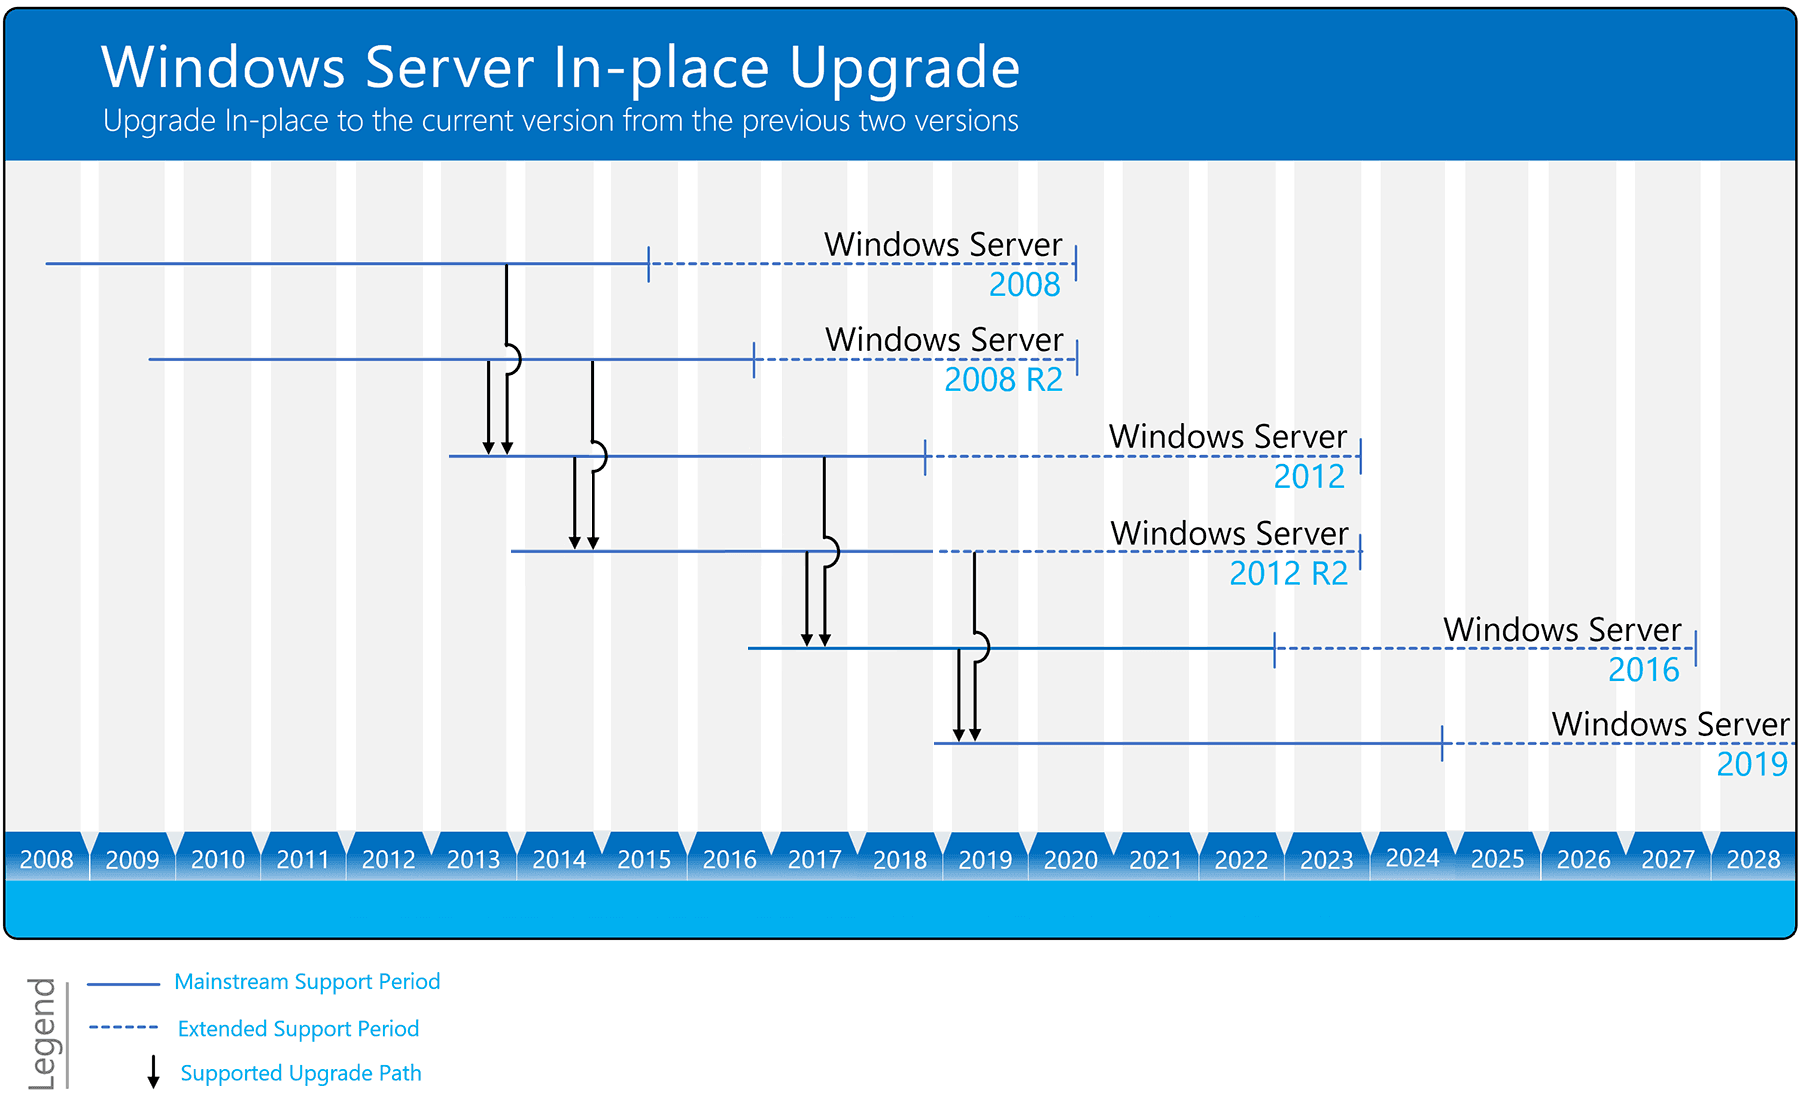
Before Microsoft ends of support for Windows Server 2012 (R2), you’d better take precautions to update computer to a new server version. You should notice that Windows Server can be upgraded to a newer version of up to two versions at a time. For example, you can upgrade Windows Server 2012 R2 to 2019. If you use the cluster OS rolling upgrade feature, you can only upgrade to one version at a time.
Windows Server 2019 has been designed to work with or in the cloud. Upgrading to this version will make it easier to connect your existing local environment to Microsoft Azure, which is a higher level of convenience for work or life.
To upgrade Windows Server 2012 R2 to 2019 securely, there are two options for you, that is to perform an in-place upgrade or clean install of Windows Server. The advantage of upgrading is that all files, accounts, software, configurations, etc. remain after the upgrade. However, during the upgrade process, you may encounter error messages like cannot install, long upgrade time, or the local storage space not enough to support the update, etc. And you may still struggle with ongoing system problems after the upgrade.
Here we take Windows Server 2019 in-place upgrade as an example to show you detailed guide:
1. Locate the Windows Server 2019 setup media, and run setup.exe directly.
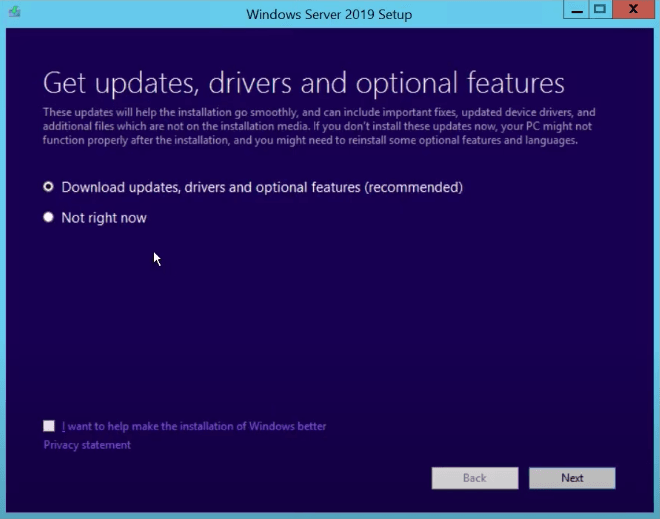
2. Select Download updates, drives and optional features (recommended) and click Next. It will take some time to check device configuration, click Next when it’s done.
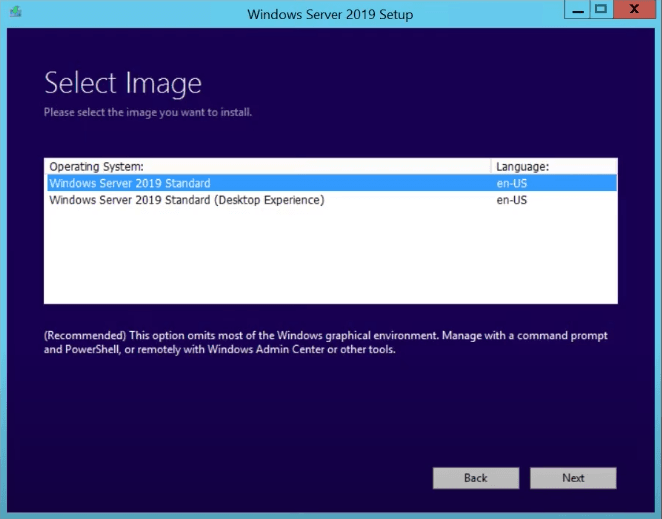
3. Choose an edition of Windows Server 2019 that you want to install, and click Next.
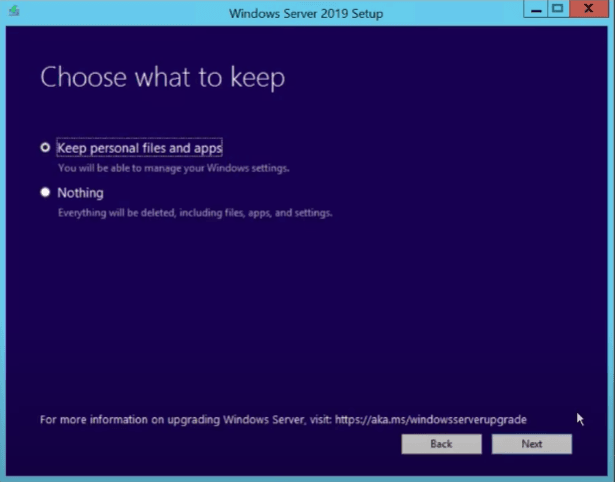
4. Accept the terms, then you can choose whether to keep personal files and apps. Click Next to continue.
5. If there’s anything incompatible with Windows Server 2019, it will prompt you a message requiring you to Confirm.
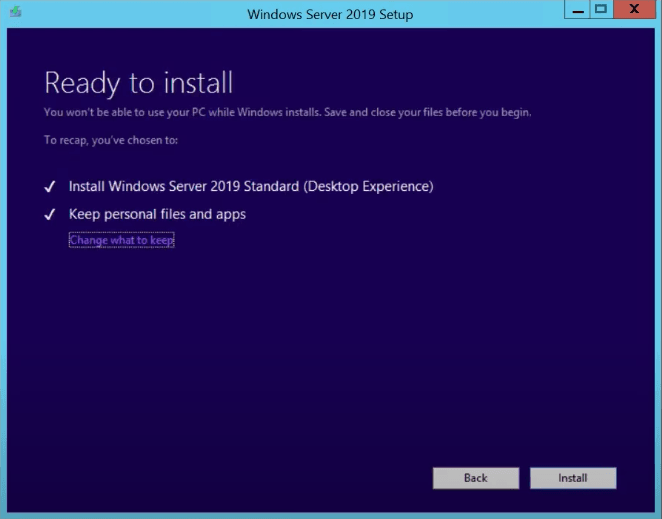
6. Wait for a while and click Install to start upgrading. After finishing, your PC will automatically restart.
#2. Run Azure Virtual Machine on your existing Server computer
If your Server hardware has sufficient resources, you can run a new virtual Server on your Server system (the process is the same as install Windows 11 on VirtualBox), install the latest compatible version of your application, and migrate your data. Operating on a virtual machine is the same as on a physical computer, and you can switch between your existing system and the virtual machine at will.
The advantage of using Microsoft Azure virtual machine is that it allows you to experience various Server versions and you won’t worry about your computer not being upgradable. The disadvantage is that although it is built on the host computer, it is after all a program file and can be easily corrupted. So you need to backup virtual machine data as well.
Follow the steps below to create a Windows virtual machine in the Azure portal that runs Windows Server.
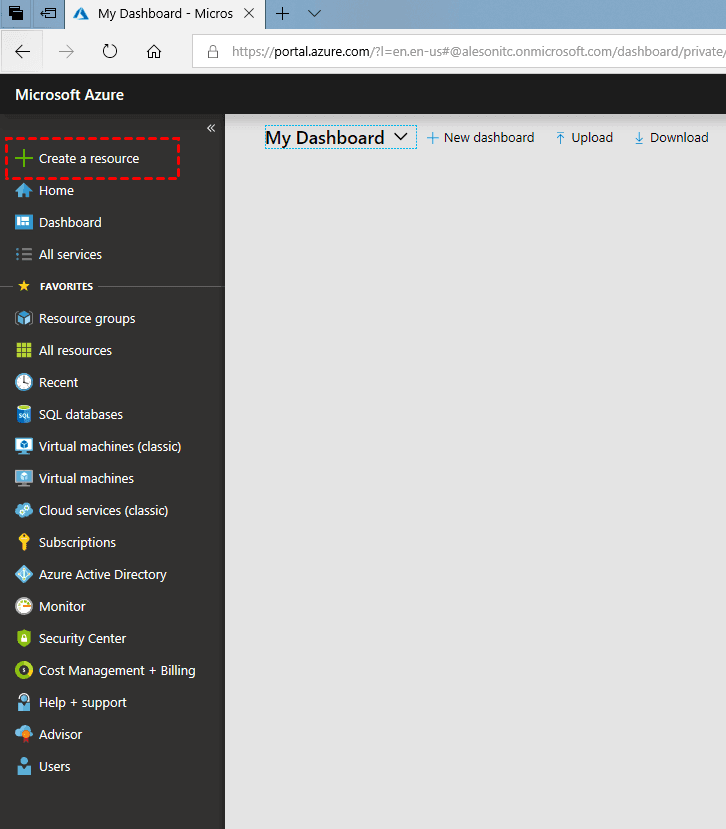
1. Sign in to the Azure portal at https://portal.azure.com If you don't have an Azure subscription, create a free account before you begin.
2. Then go to the Azure portal (https://portal.azure.com), from here go to the selection menu and click on Create a resource. Once clicked, a tab appears where we will write the resource that we want to create.
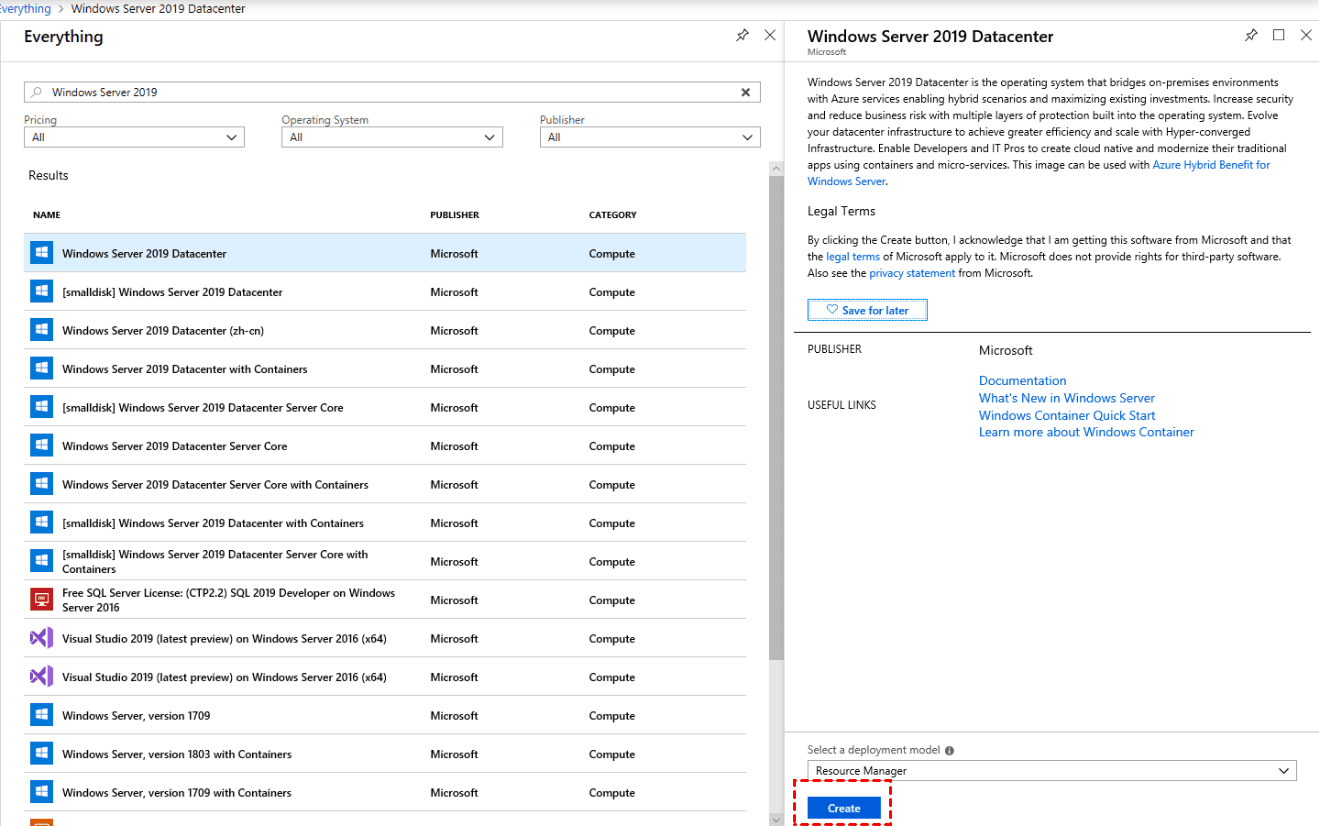
3. Once we have chosen the resources that we want to create and make sure it is the right one, we will click on Create in the lower left part. Now we start with the creation of the virtual machine.
Bonus tip: Backup your entire Server to keep data safe
Seeking reliable backup software for your Server's important files can save your computer from disaster in a timely and effective manner. One best Server backup software can help you to do this that is AOMEI Backupper Server. Once you have a Server system backup image, you are able to restore it in the event of a disaster and Windows Server 2012 R2 end of life without technical support.
As an all-in-one backup and restore solution for all Windows operating systems like Windows 11, 10, 8, 7, XP, Vista, and Windows Server 2025/2022/2019/2016/2012/2003, etc., it can secure your computer data from being lost. Some of its powerful features can be listed as follows:
❀ Various backup types and locations: It allows you to create scheduled system backup, disk backup, file backup, and partition backup to various locations, such as local disk, external hard drive or network share, cloud, etc.
❀ 3 backup methods: It allows you to do full backup, and incremental and differential backup are permitted to improve your backup efficiency.
❀ Schedule Backup: It allows you to automate your backup tasks on a Daily, Weekly, Monthly, Event triggers, USB plug in, etc. basis.
❀ Bootable rescue media/recovery environment: You are able to create a recovery environment or a bootable device so as to recover a crashed system once there’s something goes wrong on your Server.
With its user-friendly interface, you can easily manage the process of backing up Server even if you are a novice. Just click the button below to download AOMEI Backupper Server 30-day free trial for a try.
1. Launch AOMEI Backupper. Click on Backup and select System Backup.

2. It will select the required system partition(s) by default. You just need to choose the destination path to store the backup files.

💛 Set your customized settings:
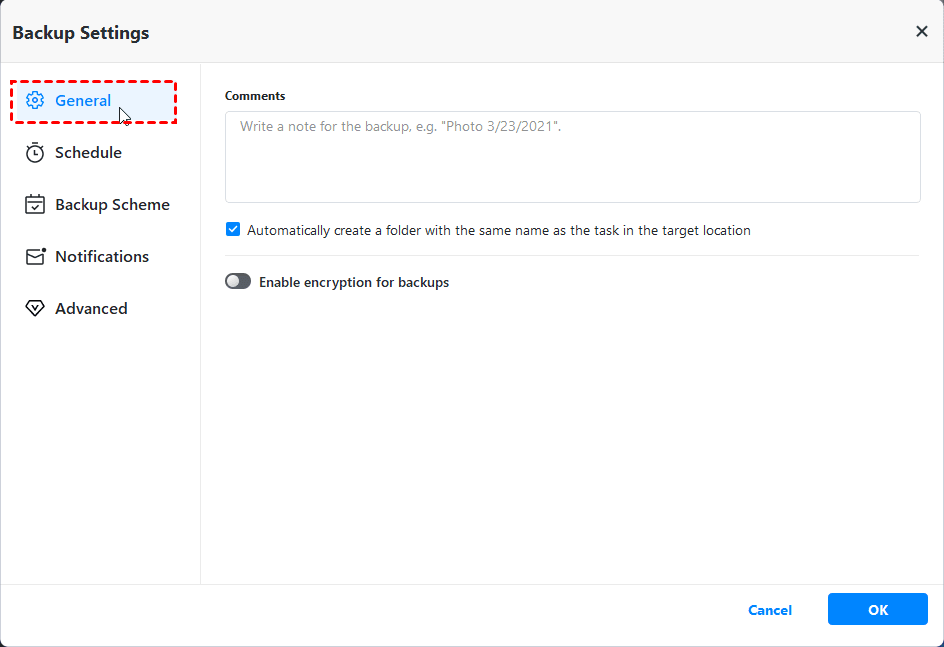
▶Options: You can add comments for your backup image to distinguish it from others. You can also split images into many small files, encrypt images to ensure image files’ security, and so on.
▶Click Schedule Backup in the left lower bottom, and then choose Enable Schedule Backup to set the frequency of the system backup as you like.

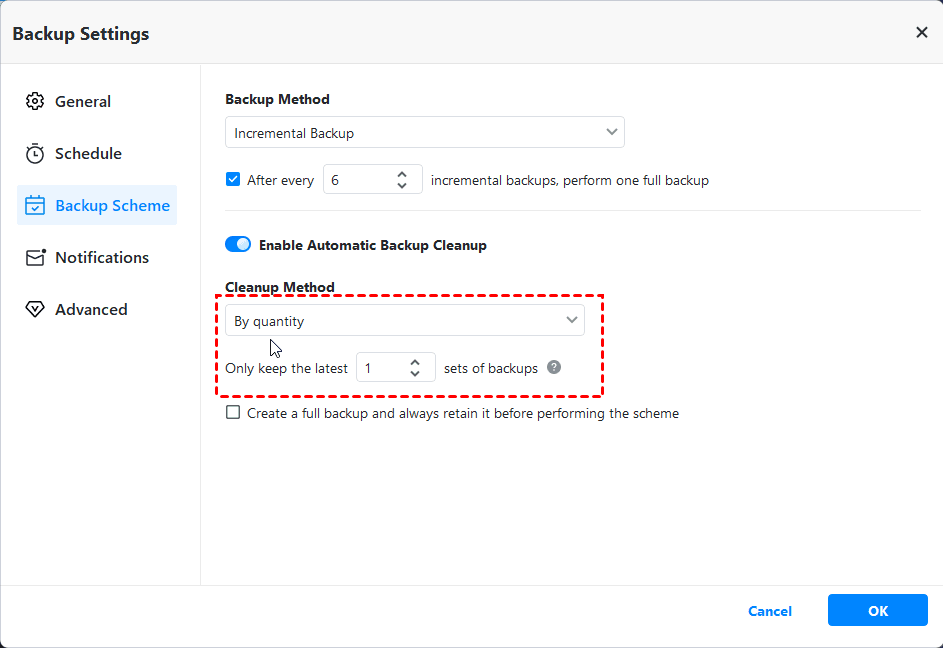
▶Backup Scheme: Click Enable Automatic Backup Cleanup to delete old backup automatically, you can select By quantity, By time, By daily/weekly/monthly, or By space.
3. Confirm the operations and click Start Backup to backup Windows Server 2012.

Summary
Facing the issue of Windows Server 2012 end of life, you may need to take urgent measures to deal with it. You can choose to upgrade to the latest version, or run a virtual machine on your existing Server computer, thus it saves you the trouble of installing a new system every time, as well as if your computer is already not conducive to upgrading.
But the crucial point is that no matter what measures you take, backups are the most necessary move, which will offer you a rescue measure in case of data corruption or loss due to system failure.
AOMEI Backupper, as the best backup & restore solution for Windows Server with its high compatibility and comprehensive features, can be the most effective assistant to help you protect your data security. With it, you can easily create a full backup of your Windows 11, thus when something occurs, you can restore your PC.
Also, as the best disk wipe tool, you are able to securely wipe free space on Windows 11 and make sure that it cannot recover deleted data. Try AOMEI Backupper now, for it can always keep your data safer.

