5 Methods to Reimage Dell Computer [Windows 11/10/8/7]
If you fail to repair Windows operating system, it may be the time to factory reset it. Read the 5 methods to reimage Dell computer and find the most suitable one for your situation.
By Delia Updated on September 5, 2025
Reimage Dell computer in Windows 11/10/8/7
Reimage Dell computer means to restore Dell laptop or desktop to factory settings, which is also known as factory reset or system restore.
There are several methods to reimage a PC in Windows 11/10/8/7, like Dell factory image restore, Reset this PC, third-party tool, etc. Most of them will erase your PC and bring it back to factory settings. Thus, problems caused by system errors or corrupted files will be thoroughly resolved, but some important data may be erased as well.
So you must consider carefully before reimaging. For glitches that can be repaired by normal means, factory reset is simply too much. But if you fail to repair the operating system or even have trouble with starting Windows, system recovery may be the final solution.

Is there a way to reimage Dell computer without losing data?
Despite most of methods to factory reset Dell computer will lead to data erasing, there are some options allow you to remain personal files, for example, you can choose to Reset this PC and Keep my files in Windows 11/10/8. But this won't keep all your files. The most secure way is always to backup files before reformatting.
Make a backup before anything else
Whichever way you choose, it's essential to get your important data insured. More »
5 Methods to reimage Dell laptop and desktop in Windows system
If you've decided to do system recovery, here are 5 different methods to reimage Dell laptop and desktop for different situations and Windows OS. I’ve listed their applicable system respectively for your reference.
Optionally, you could jump to Method 3 or Method 4 to reimage Dell laptop or desktop without losing data.
Method 1. Reset your computer with the built-in feature of Windows
In recent versions of Windows, you can find a built-in Reset feature in Windows settings. It allows you to reset this PC and keep personal files or erasing everything, and you can perform the system reset within several simple clicks. So this could be your first choice to reinstall Dell computer.
Applicable system:
Windows 11/10/8.1/8
Steps to reset Dell computer in Windows 11/10/8:
1. Take Windows 10 as an example, tap Start button and go to Settings, then Update & Security.
2. Navigate to Recovery section and hit Get Started button under Reset this PC. Then you can make your choice between Keep my files and Remove everything.

3. Follow the wizard to start the Reset and wait patiently till the process ends. You computer will restart and launch Windows system automatically. You can now check whether your problems have been fixed.
✍Notes:
-
In case you are locked out and can't remember the password, you can insert an installation disc or recovery drive to enter recovery environment from boot, or keep holding the Shift key while pressing the Power button in sign-in screen to get access to the Troubleshoot page and then click Reset this PC. Thus you can choose to Remove everything including the password.
-
If you choose Keep my files, the personal files such as documents, pictures, desktop icons will remain, but data like installed programs and settings will still be erased. Backup in advance is always necessary if you don’t want to lose anything.
-
In Windows 8, there are two options, "Refresh" and "Reset", the former means to reset your PC and keep personal files, while the later will removing everything.
Method 2. Restore Dell computer with Dell Factory Image Restore
For previous Windows OS like Windows 7 or Vista, you can use the Dell Factory Image Restore feature as an alternative to reset the Dell PC.
Applicable system:
Windows 7/Vista
Steps to reset PC with Dell Factory Image Restore:
1. Start the Dell PC and press F8 while the Dell logo appearing on the screen to enable Advanced Boot Options.

2. Select Repair Your Computer to get access to System Recovery Options.
3. You’ll be required to enter the user name and password. If you don’t have a password for the computer, just leave the field blank.
4. Choose Dell Factory Image Restore to restore your computer to factory condition.
5. Click Next and check the box of Yes to re-format the hard drive and restore system software to factory settings. Then hit Next to start the resetting process and wait till it ends.
✍Notes:
-
If your Dell computer is running in an even earlier system - XP, you can restart it and keep pressing Ctrl + F11 key till the Dell logo appearing and disappearing. Then click Restore and Confirm to begin the system resetting. For data problem after restoring, you can learn more about XP data backup if needed.
-
Windows Vista and 7 requires you to enter password while restoring factory settings. If you’ve got a password yet forgotten it, you should use the installation disk (see detailed steps in method 5) or making a CD or USB from another computer you have access to.
Method 3. Restore Dell computer without unwanted data loss
Unlike the factory reset feature of Windows or Dell itself, a powerful third-party tool like AOMEI Backupper Standard allows you to perform the system recovery with more detailed and advanced settings. But to restore your computer to earlier dates, you should have a previous system backup made with AOMEI Backupper.
Applicable system:
All Windows system
Steps to restore Dell computer to earlier state without data loss:
1. First, you should have a previously backed up system image.
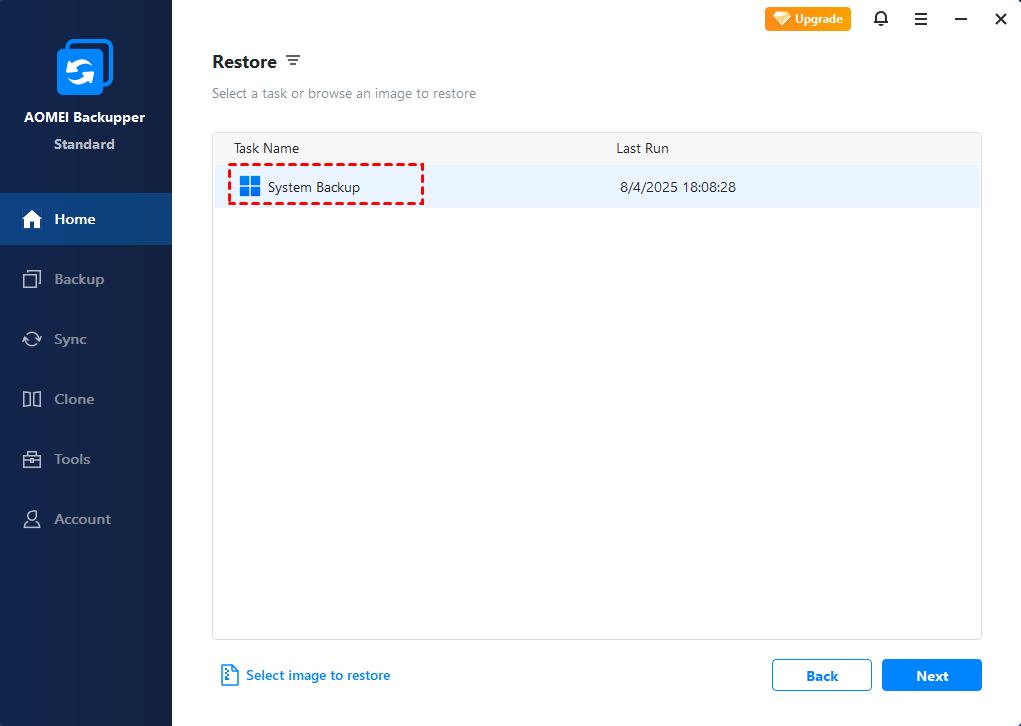
2. Open and launch AOMEI Backupper, choose Home > Restore on the left sidebar, then you can either choose a system backup from the task list or click Select image to restore to select from the computer folders manually.
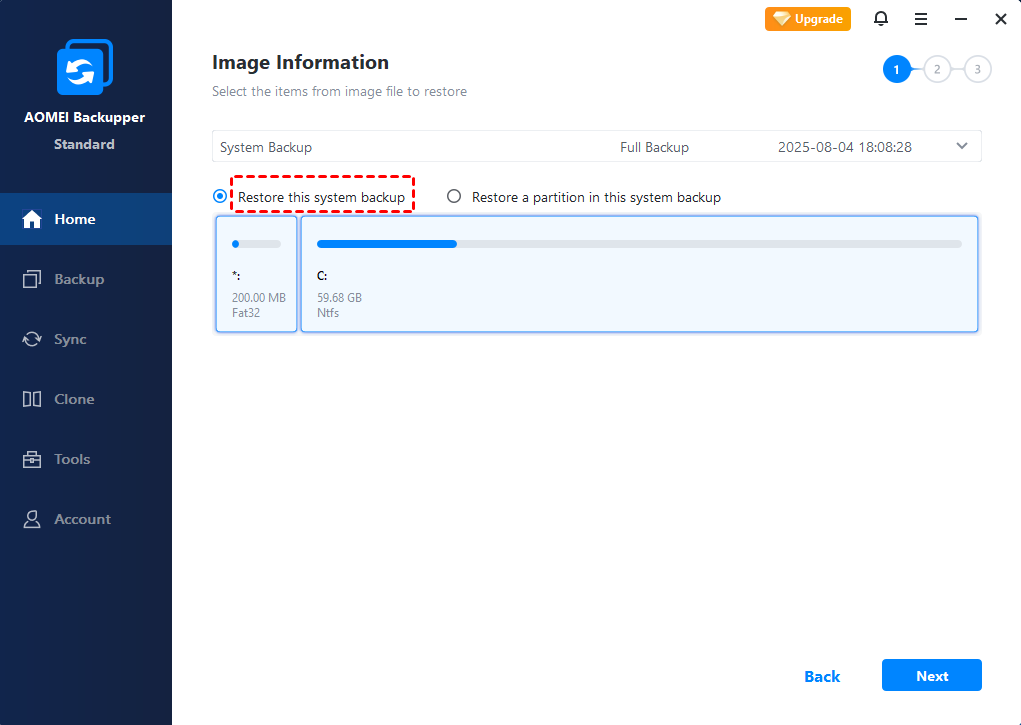
3. After choosing a system image and clicking Next, there are 2 options - Restore this system backup and Restore a partition in this system backup. Here you can choose the first one, hit Next to continue, and Start Restore.
4. There will be a pop-up window that prompts you to restart the computer. Hit Yes, the operations will be completed under the Restart mode.
5. After system restore, you could access the normal system again.
✍Notes:
-
To troubleshoot Windows system as much as possible, you can also create a bootable media shortly after the system is installed. Thus, you can easily rescue your Dell computer from serious failure.
-
Restoring a partition in this system backup will only restore data in the partition. The operation doesn't ensure system will be bootable. To make system bootable, please choose Restore this system backup.
-
Application that installed after the system backup will not be restored in this case.
Method 4. Restore Dell computer to earlier dates with one key
There's another tool called AOMEI OneKey Recovery, providing the easiest system backup and restore solution. Not only Dell laptops or desktops, it works on all Windows computers. With it, you can create you own factory recovery partition and start restoring Windows system by pressing only one key.
Applicable system:
All Windows system
Steps to one-key backup and restore Dell system:
1. Create an initial backup with AOMEI OneKey Recovery. Your Dell PC will generate an AOMEI Recovery Partition contains a system image file to restore system.
This system image contains all the files, apps and settings in your system partition at that time point. That is, you don't have to factory reset the Dell computer, but restore it to a backed up earlier state without data loss.
2. Press F11 or A key to enter AOMEI recovery environment during startup.

3. Select OneKey System Recovery.

4. Choose between these 2 options - Restore system by using the image file in AOMEI OneKey Recovery Partition and Restore system by selecting a system image file, and then hit Next.

5. Follow the guide to Start Restore.
✍Notes:
-
AOMEI OneKey Recovery is a paid software, but considering your precious time and effort that could be saved with the one key recovery feature, it’s worth a try.
Method 5. Restore Dell computer with Windows Installation Disc
If your Dell computer runs into some troubles that cannot be solved easily, and you still own the Windows installation disk, you can boot the computer from the CD instead of the main hard drive. Thus you can erase the hard drive and then reformat the system.
Applicable system:
Unlimited
Steps to reinstall Dell computer:
1. Insert your Windows installation disc into Dell computer and restart it.

2. There shall be a prompt says Press any key to boot from disc during startup. You just need to press any key to start booting.

3. You’ll be required to make some choices in the process, such as the language to install, keyboard or input method, etc.

4. Taping Install now and then accept the license terms.
5. Choose Custom (Advanced) and select the partition with the largest amount of space as the primary partition, then hit Next and follow the guide to continue re-installing.

6. When the process ends, your hard drive will be erased and reformatted to default settings.

✍Notes:
-
Above steps are based on Windows 7. Detailed operations in other systems may be different.
-
If you restart the computer after inserting installation disk and there’s no prompt appearing, you can try changing the boot order of BIOS.
-
The process of reformatting can take up to hours, so please wait patiently and make sure your computer is plugged into power source.
Conclusion
After reimaging Dell laptop or desktop successfully, you could access the normal system again. But no matter which way you chose, the new application installed after the system backup will not be restored. Therefore, it’s better to develop a good backup habit at ordinary times, like doing a schedule system backup.
Thus, the system can be restored to the latest state to avoid reinstallation of applications after restoring, and it will be much easier for you to troubleshoot computer problems.

