How to Boot Windows Server 2019 in Safe Mode (Top 4 Ways)
This article will cover different solutions for resolving boot problems. It includes multiple methods to ensure your server starts correctly and avoids common pitfalls such as BIOS misconfigurations, hardware failures, or corrupt system files. These detailed instructions will help you navigate the booting process smoothly.
By Sebastian Updated on August 28, 2025
Windows Server 2019 can't open safe mode
“Hi. I have Windows Server 2019 in Pc. I did Windows updates and restarted the PC but it's never open again. It's an open automatic repair screen but I can't repair it. Or any of the troubleshooting options do not work at Blue Screen. There aren't “Startup Settings” even on the troubleshooting page. I wanted to open safe mode and uninstall updates but could not do it. I tried cmd commands for open safe mode or commands for recovering Windows boot problems but nothing worked out.”
– Microsoft Community
Why need to boot into Windows Server 2019 safe mode?
Safe mode is a diagnostic feature in Windows that starts the system with minimal programs, drivers, and services, primarily used for troubleshooting issues. If Windows can't boot properly due to malware, viruses, or faulty drivers, you can start it in Safe Mode to resolve these problems. Running Windows in Safe Mode can help pinpoint the cause and make it easier to fix Server issues.
In this guide, you'll learn four simple methods to boot Windows Server 2019 into Safe Mode. Follow them to troubleshoot and resolve any Server problems effectively.

Creating system backup regularly for your Server 2019 allows you to restore the computer to a normal state when it crashes or can't boot up. More »
How to start Windows 2019 in safe mode
From this part, you will be able to learn how to boot into Windows Server 2019 recovery mode in different situations, that is, when your Server can start normally and when it fails to start.
Way 1. Using System Configuration
1. Press Windows + R to open the Run dialog.
2. Type MSConfig and click OK.
3. When the System Configuration tool opens, click the Boot tab. Then, on Boot options, check the box beside Safe boot and select Minimal (default). When you finish, click Apply and then OK.
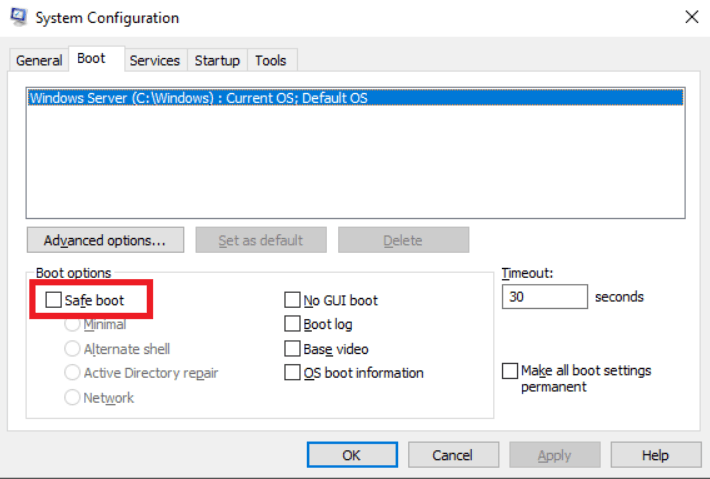
4. Click Restart to confirm you want to restart your PC when a pop-up dialog appears. You’ll then be in safe mode once your PC reboots.
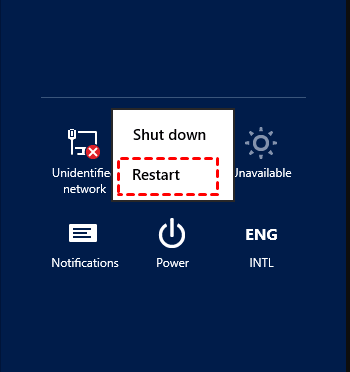
Way 2. From Startup Settings
1. Open Settings, click on Power, and press and hold down the Shift key while you click Restart.
2. After the Server restarts, on the screen, Choose an option, Select Troubleshoot > Advanced options > Startup Settings > Restart.
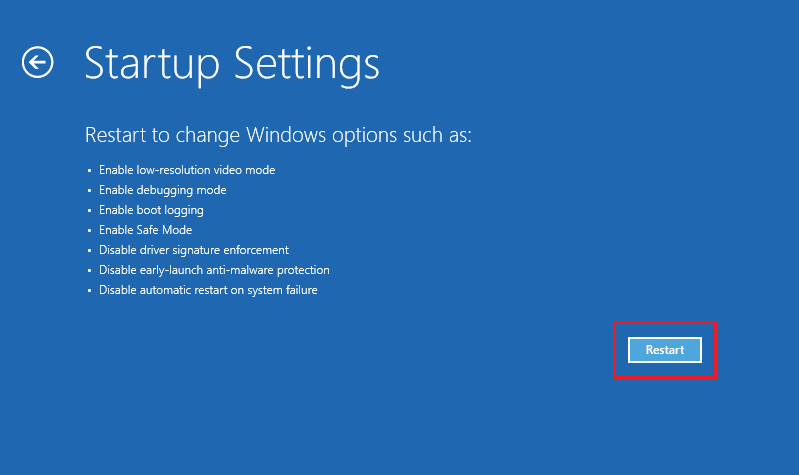
3. The server will restart a second time. This time it will display the Advanced Boot Options screen. Choose which safe mode you’d like to use.
Way 3. Force shutdown
1. Start with the computer completely shutting down, press the Power button to boot your PC. When it starts loading, press and hold the Power button to force the shutdown of the computer again. After a third failed boot attempt, Windows Server 2019 will automatically boot into the Windows Recovery Environment (WinRE).
2. On the Choose an option window, select Troubleshoot > Advanced Options > Startup Settings > Restart.
3. The Server will restart and access the menu Startup Settings. Then you can start the Server in Safe Mode.
❂ Tips:
Safe Mode: This loads Windows with minimal drivers and services – Use this option if you are having trouble booting Windows.
Safe Mode with Networking: Boots safe mode but now includes network drivers. Use this option if you need to get to the internet or access a network resource.
Safe Mode with Command Prompt: Similar to Safe mode but instead of booting to GUI, it displays a command prompt. Use this option if you need to run a command to fix Windows.
Way 4. Use a USB installation media
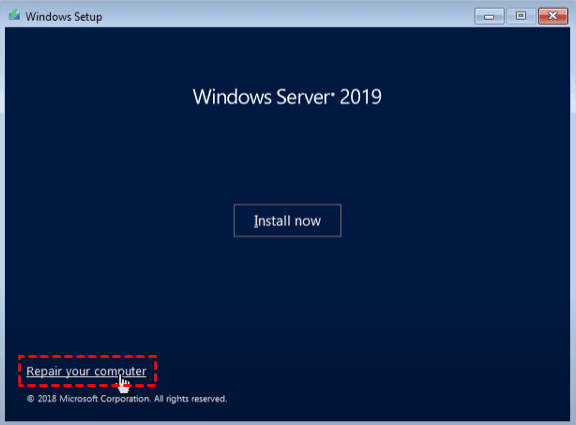
1. Boot the Server from a Windows installation media (DVD or USB).
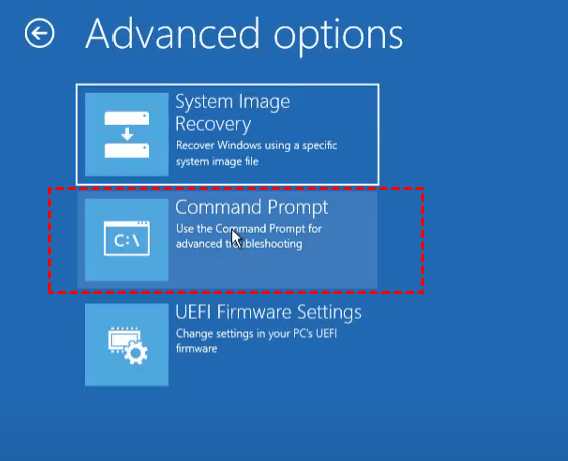
2. Choose Next > Repair your computer > Troubleshoot > Advanced Options > Command Prompt.
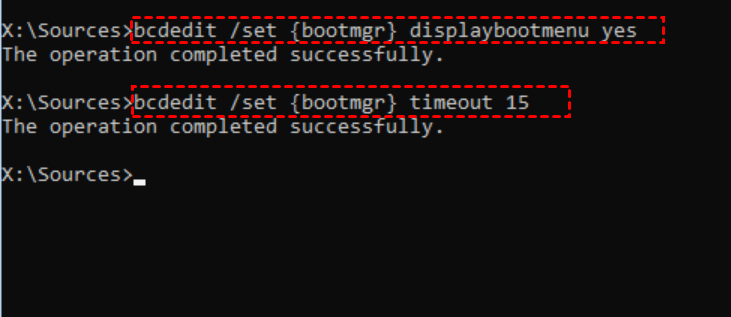
3. In the command prompt window, type the following commands in order:
- bcdedit /set {bootmgr} displaybootmenu yes (This is to manage the data associated with the boot configuration of the system.)
- bcdedit /set {bootmgr} timeout 15
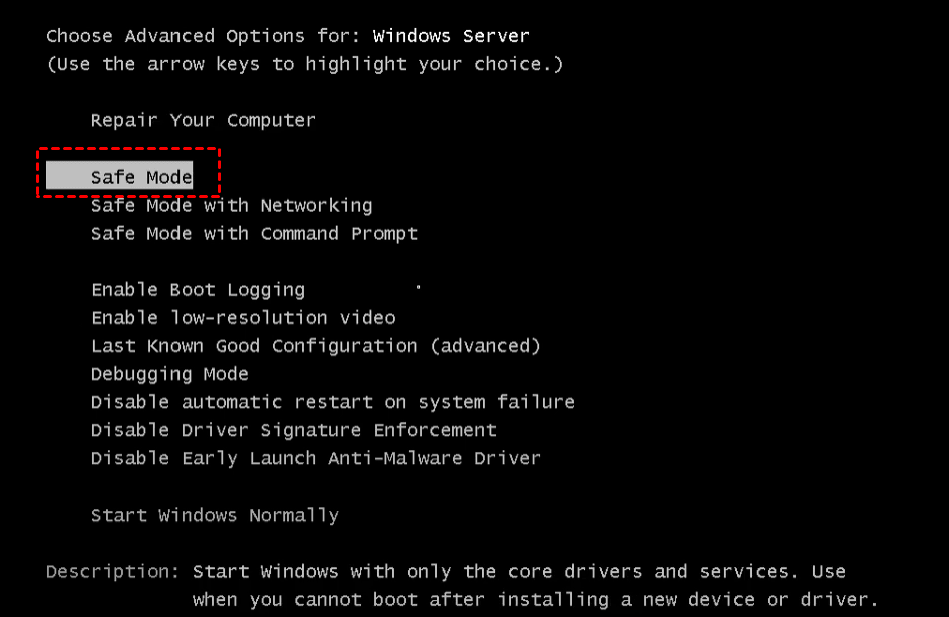
4. Close all windows and reboot the Server. When you reboot the system, you will see the Windows Boot Manager. Please select Windows Server. Then, press F8 to enter advanced start options.
5. Then, just click on Safe Mode to start Windows Server 2019.
Create bare metal recovery image for Server 2019
Following the methods and the detailed steps shown above may help you manage to boot into safe mode, and process to the next step. Furthermore, in order to save your Server 2019 system from unforeseen failures, it is highly recommended that you back up your computer regularly. Here are two of the most trustworthy programs for you to back up your system and recover it if your computer fails to boot or has died entirely.
1. AOMEI Backupper Server
AOMEI Backupper Server is a reliable software that supports Windows Server 2012, 2016, 2019, 2022, and the latest Server 2025. It provides comprehensive features to back up your Server regularly and creates a recovery environment for system backup restore or other backup-restore operations when the system crashes and can not boot up correctly.

-
System Backup: Securely back up all system files, including the OS, boot partitions, system data, personal files, and installed applications.
-
Flexible backup destinations: Save your Server 2019 backup to a local or external drive, NAS, or USB, and backup the Server to Dropbox, or a network location.
-
Microsoft VSS or AOMEI Backup Service: Keep using your computer seamlessly while the backup process runs in the background.
-
Bootable rescue media/recovery environment: create bootable media or environment to restore your server in case of system failure or crashes.
You can download the free trial version to use for 30 days, install it, and follow the guide below to create a system backup of your Windows Server 2019.
Step 1. Open this backup utility, and click Backup and System Backup subsequently.

Step 2. You can modify the task name to tell the backup task from others. The related system partitions are selected by default. You just need to click on the destination box to select the destination path.

Step 3. Confirm the backup task, click Start Backup, then wait for the process to complete.
Notes:✎...
Schedule: You can choose daily, weekly, and monthly backup frequencies, or directly use One Time or Event triggers.
Backup Scheme: You can change the backup method - incremental or differential backup. Also, it's able to manage disk space automatically with cleanup methods, you have 3 options, namely - By quantity, By time, By daily/weekly/monthly.
Options: You can set Windows Server backup encryption to prevent unauthorized access, enable email notifications to get backup results timely, change compression level, etc.
✍ To restore an image file without booting Windows, you may create a recovery environment with AOMEI Backupper in advance. Once the created recovery environment supports you to boot your computer smoothly, you can use this system backup image file to recover your computer in case your computer fails to boot.
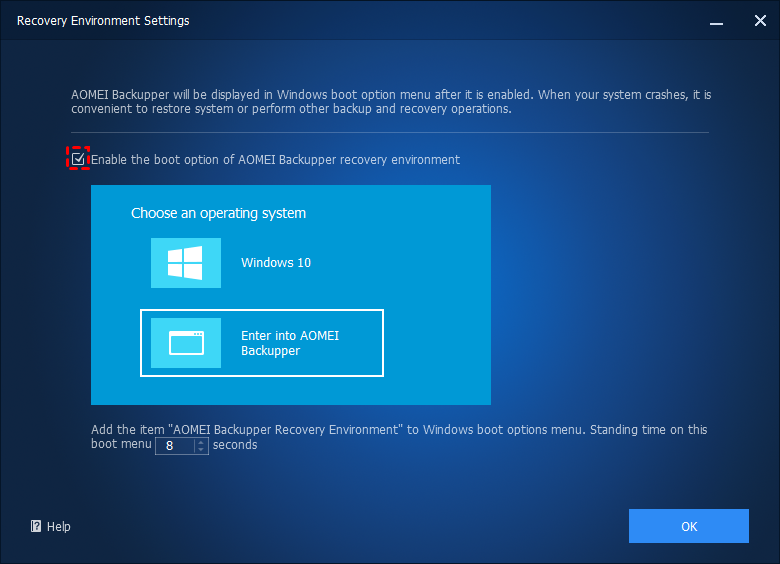
1. Just navigate to the Tools tab and select Recovery Environment under Common Tools.
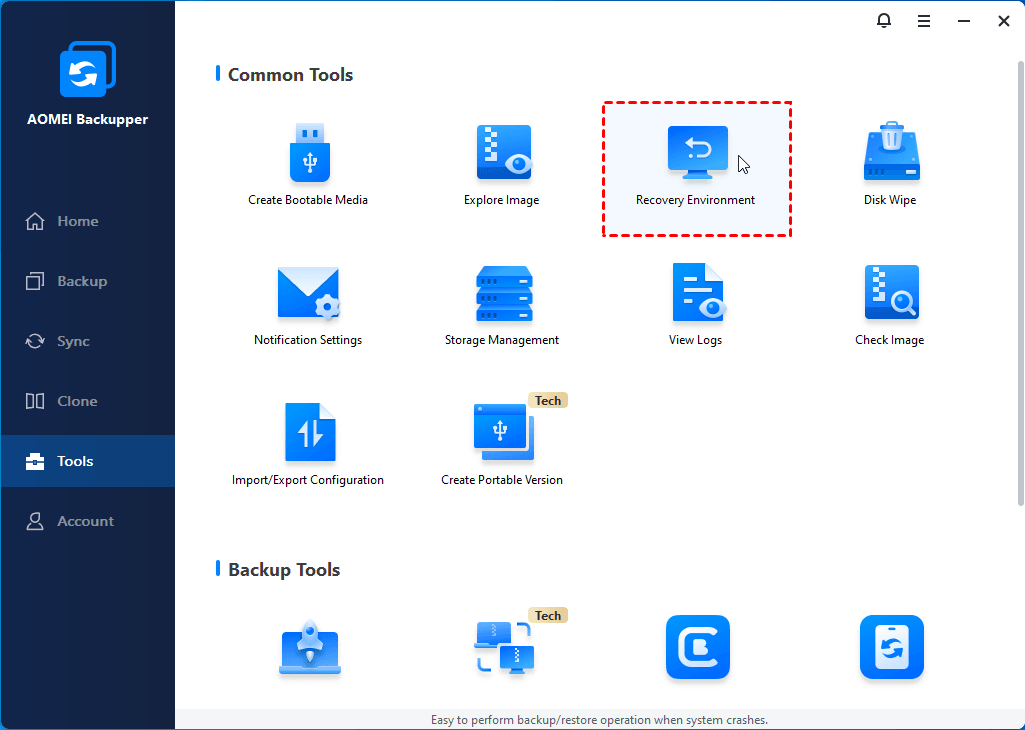
2. In the pop-up window, enable the boot option of the AOMEI Backupper recovery environment, then select its standing time.
✎ This software also offers a Universal Restore feature that can help you restore your system to a computer with different hardware if you need it.
✎ You can upgrade to the AOMEI Backupper Tech or Techplus version, which provides the feature of AOMEI Image Deploy to help you restore system image files to multiple computers.
2. AOMEI Cyber Backup
AOMEI Cyber Backup offers enterprise users all-around server backup solutions: System Backup, Disk Backup, and Partition Backup. You are allowed to save backup images on a local disk, external hard drive, network share or NAS device, etc. It runs well on Windows Server 2022/2019/2016/2012 (R2)/2008 R2. Download it now and follow the instructions below to backup Windows Server 2019 OS.
Step 1. Install and run AOMEI Cyber Backup. The default username and password for AOMEI Cyber Backup are both "admin". Enter them and click Log in.
Step 2. Add the source device that you want to backup.
- Click Source Device > Windows > Add Windows Device.
- Enter the IP address, username, and password of the source device and click Confirm.
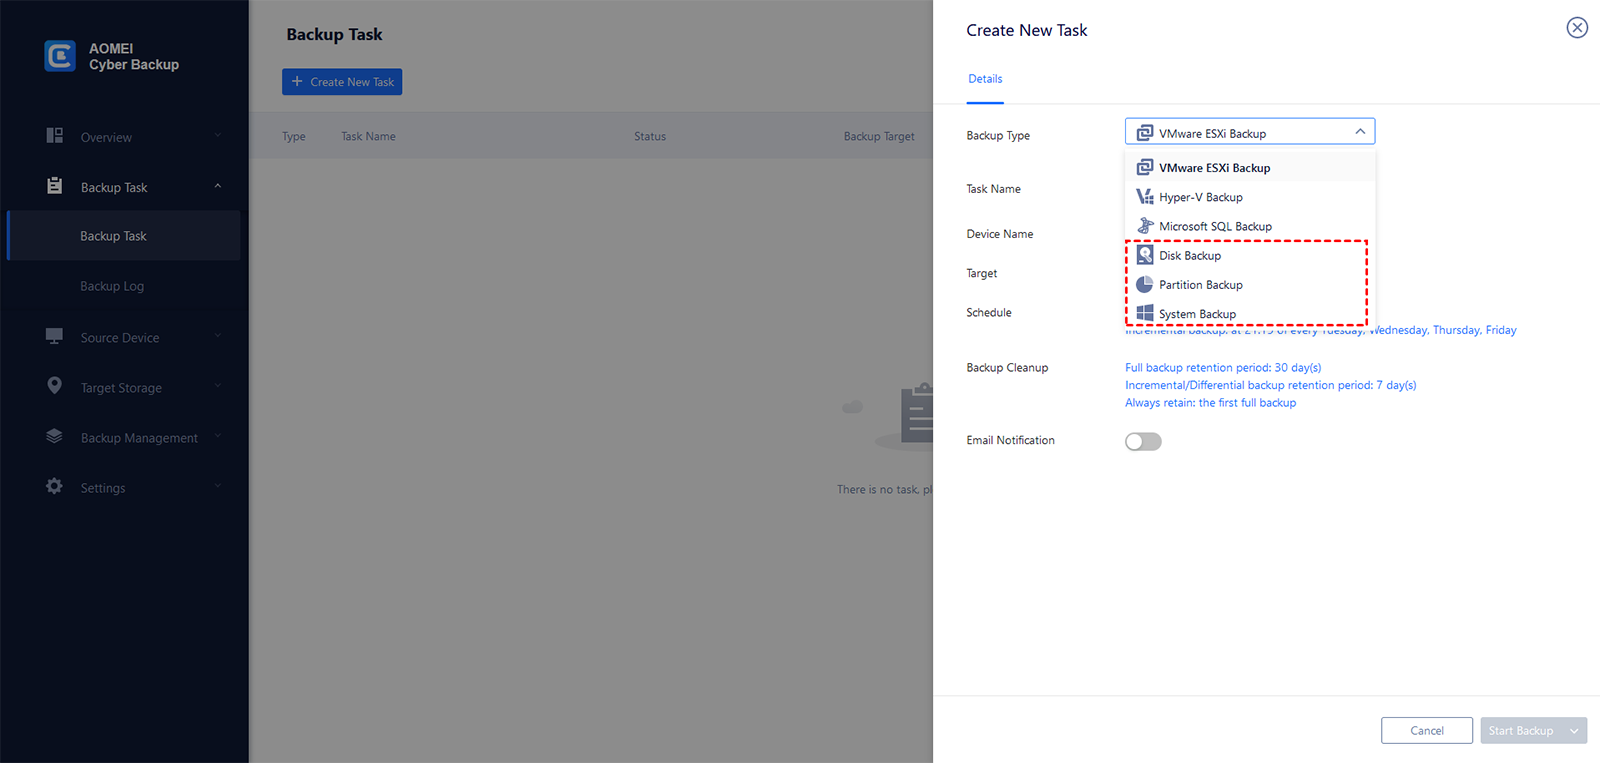
Step 3. Create a new backup task.
- Click Backup Task on the left menu bar and select Backup Task > Create New Task.
- In the Backup Type field, select System Backup.
- In the Task Name field, set your desired task name.
- In the Device Name field, click Select + to select the device you just added.
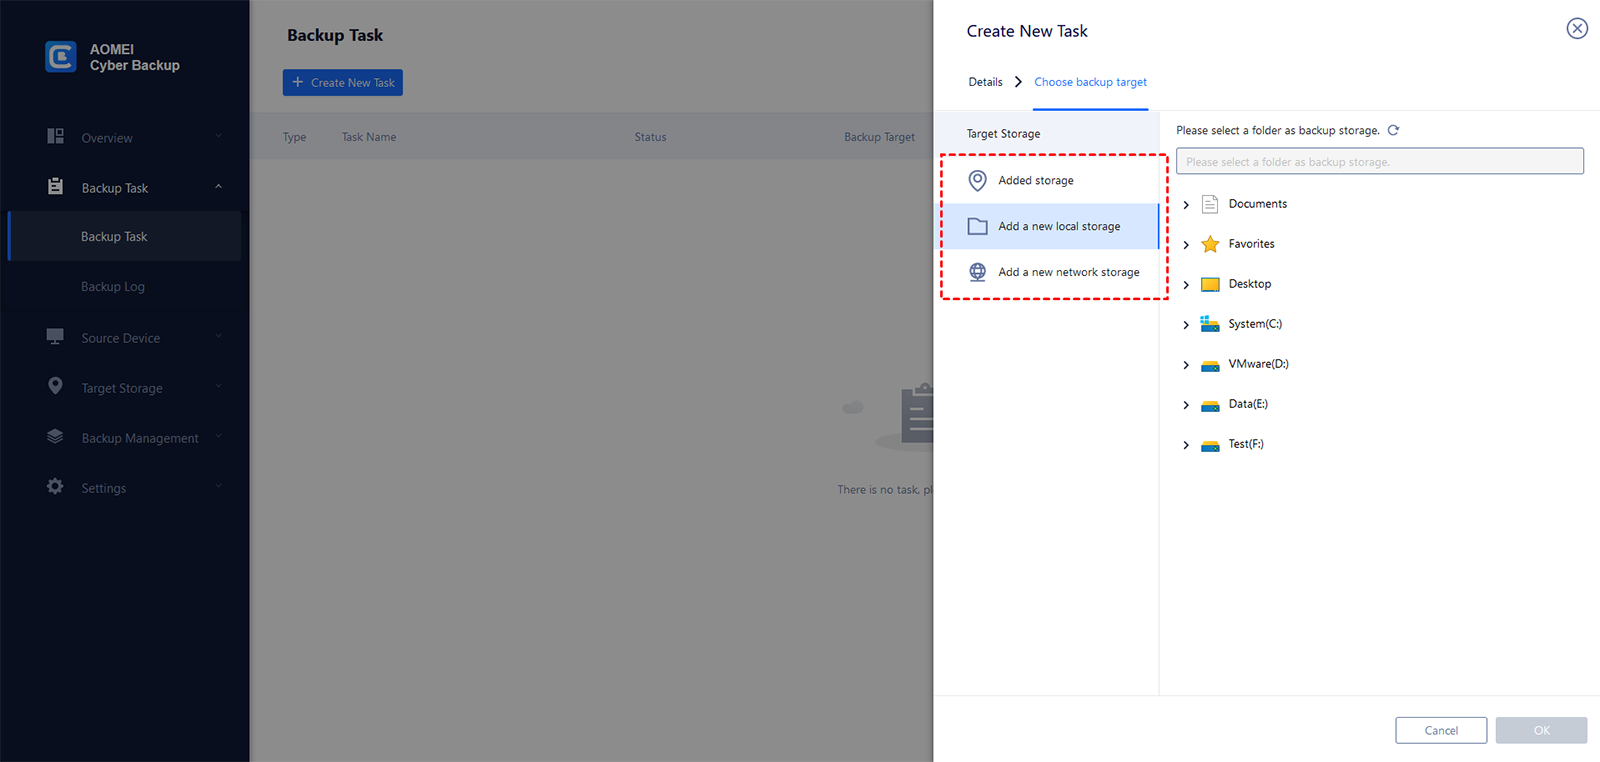
- In the Target field, click Select + and Add a new local storage or Add a new network storage to specify a destination path.
- In the Schedule field, change the default schedule settings based on your needs.
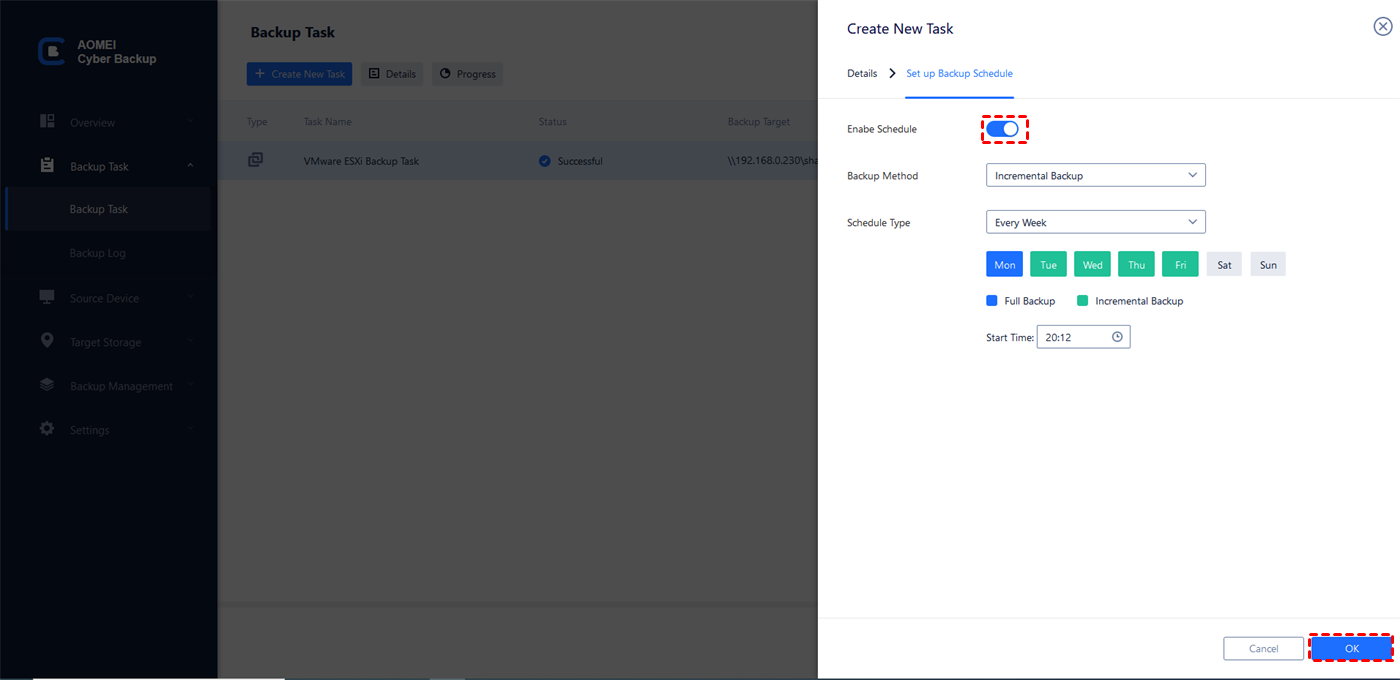
- Click Start Backup > Add the schedule and start backup now to launch the backup process.
Note: To restore Windows Server 2019, click Backup Task on the left menu bar and click the three dots icon on the system backup task you created before. Then select Restore.
🔥Hot: Windows Server 2025 released
Windows Server 2025 was released on November 1, 2024. Following are some of the newest developments in Windows Server 2025:
- Desktop Shell: Upon signing in for the first time, the desktop shell is designed to match the look and feel of Windows 11, providing a familiar and modern user interface.
- Bluetooth: Windows Server 2025 now supports Bluetooth connectivity, allowing you to seamlessly pair and connect devices such as mice, keyboards, headsets, audio devices, and more.
- DTrace: Windows Server 2025 includes DTrace as a native tool, providing a powerful command-line utility for real-time system performance monitoring and troubleshooting.
- Email and accounts: You can now add Microsoft Entra ID, Microsoft account and Work or school account in Windows Settings in Accounts > Email & accounts for Windows Server 2025. It's important to keep in mind that domain join is still required for most situations.
If you'd like to experience all these wonderful features, you may make a Windows Server 2025 Media Creation Tool to install Server 2025 on a compatible device.
Final words
Now you know how to boot Windows Server 2019 in safe mode after reading this article. You are provided with 4 easy ways to enable that and further troubleshooting to solve the Server computer's boot issues.
When you have trouble getting into Server 2019 safe mode, you can create your own recovery environment with the help of AOMEI Backupper Server, and restore your Server computer to a normal state.
In addition, as the fastest file transfer and sharing software, AOMEI Backupper can also help you cope with Windows Server 2019 slow file sharing issue and speed up the file transfer speed.
FAQs about booting Windows Server 2019 in safe mode
#1. Can I boot Windows Server 2019 into Safe Mode without using the F8 key?
Yes, you can also boot into Safe Mode by using the System Configuration utility (msconfig). Press Win + R to open the Run dialog, type "msconfig", and press Enter. In the System Configuration window, go to the Boot tab, check the "Safe boot" option, select the desired Safe Mode option, and click OK. You will be prompted to restart the server to apply the changes.
#2. Can I boot Windows Server 2019 into Safe Mode with networking support?
Yes, you can select the "Safe Mode with Networking" option from the Advanced Boot Options menu or enable networking support in Safe Mode using the System Configuration utility (msconfig) method mentioned earlier.
#3. Can I run diagnostics or perform repairs while in Safe Mode on Windows Server 2019?
Yes, you can run various diagnostic tools and perform repairs while in Safe Mode on Windows Server 2019. Safe Mode provides a limited environment with essential services and drivers, allowing you to troubleshoot and fix certain issues with the operating system.
#4. How do I exit Safe Mode and return to normal boot on Windows Server 2019?
To exit Safe Mode and return to normal boot, simply restart the server and let it boot normally. If you used the System Configuration utility (msconfig) method to enable Safe Mode, open msconfig again, go to the Boot tab, uncheck the "Safe boot" option, and click OK. Restart the server to apply the changes.
#5. Is Safe Mode available on Windows Server 2019 Core editions?
Yes, Safe Mode is available on Windows Server 2019 Core editions. You can access Safe Mode using the same methods described for the full GUI version of Windows Server 2019.
Common Boot Issues in Windows Server 2019
1. BIOS Misconfigurations: A poorly configured BIOS can lead to boot issues, leaving your server stuck at startup. Ensuring the boot order and proper hardware settings are essential for a successful boot.
2. Hardware Failures: Hard drive or RAM failures can halt the boot process. Incompatible or faulty components can cause the system to crash before it even loads.
3. Corrupt Boot Files: If critical boot files like the Boot Configuration Data (BCD) become corrupted, your server might fail to start. This usually requires boot file repairs or reinstallation of the operating system.
Practical Tips for Avoiding Boot Issues
- Hardware Maintenance: Ensure all hardware components, especially storage devices and memory, are compatible and functioning correctly to avoid boot complications.
- Stay Updated: Regularly update your system to prevent software bugs or vulnerabilities from interfering with the boot process. These updates often contain critical patches that improve system stability.