Create System Image Backup in Windows Server 2012 Easily (3 Ways)
You can choose to create a system image in Windows Server 2012 step by step with Windows Server Backup, AOMEI Backupper Server or AOMEI Cyber Backup. It depends on the level of disaster recovery you need.
By Ivy Updated on December 12, 2023
Windows Server 2012 System Image Backup
System image backup in Windows Server 2012 is an exact copy of a drive required to boot Windows. By default, it’s a compressed image file that include operating system, system reserved partition or EFI partition, recovery partition, boot sectors, custom settings, all the installed programs and saved data etc.
It’s the saver of your computer life, and you can use it to prevent many boot failure error, such as, system crash, hard drive failure, virus or hacker attack, hardware, software failure, wrong operations or blue screen etc. In the event of these bad situations, you can restore your computer with all the backed up items at that point in time including the installed program and data stored on the system partition. Please note you cannot choose individual items to restore if you use built-in tool Windows Server Backup.
Method 1: Create Windows Server 2012 System Image Backup with Built-in Tool
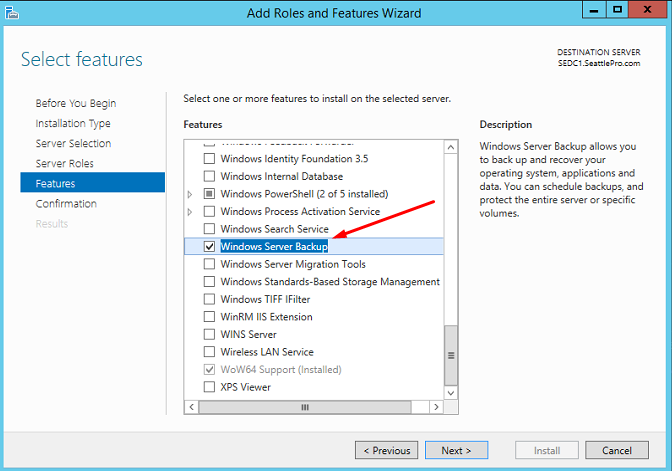
Windows Server Backup is a built-in backup tool for Windows Server 2012, 2012 R2, 2016, 2019, 2022 etc, but it's not installed by default and you need to do this manually. Open Server Manager, go to Manage > Add Roles and functionalities > Features > Windows Server Backup and install it with the on-screen instructions.
After installing Windows Server Backup, you can follow the step by step guide below to create a system image backup in Windows Server 2012 with it.
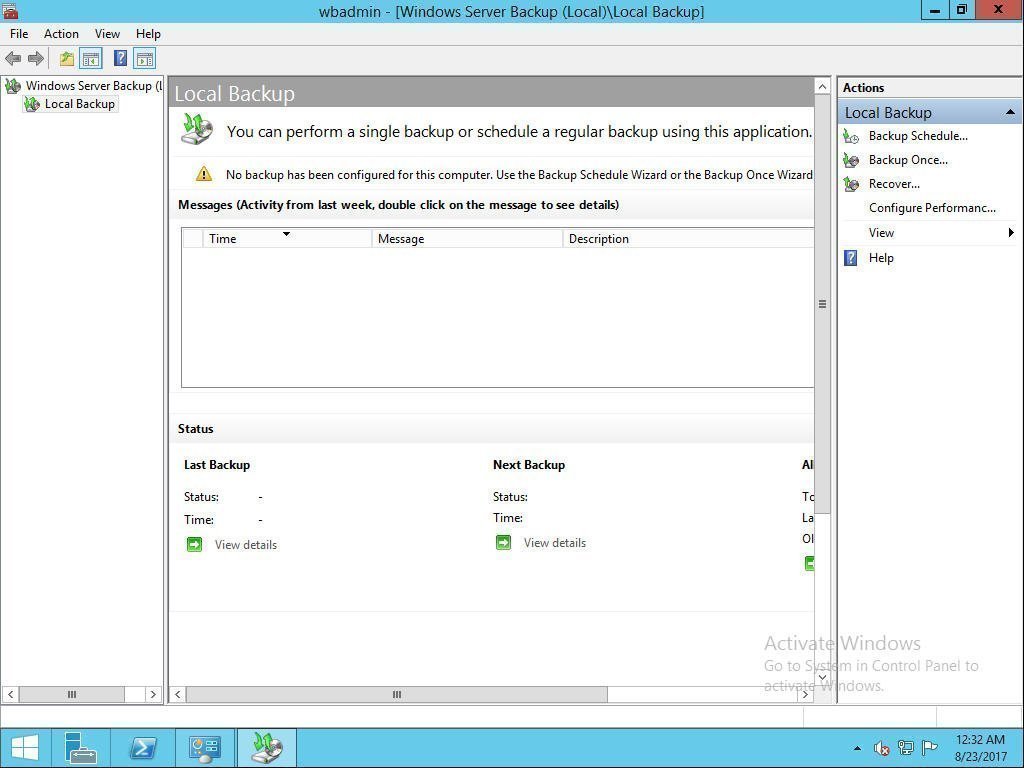
Step 1. Navigate to “Start”>”Administrator Tools”>”Window Server Backup” and then select “Backup Once” under the Actions tab.
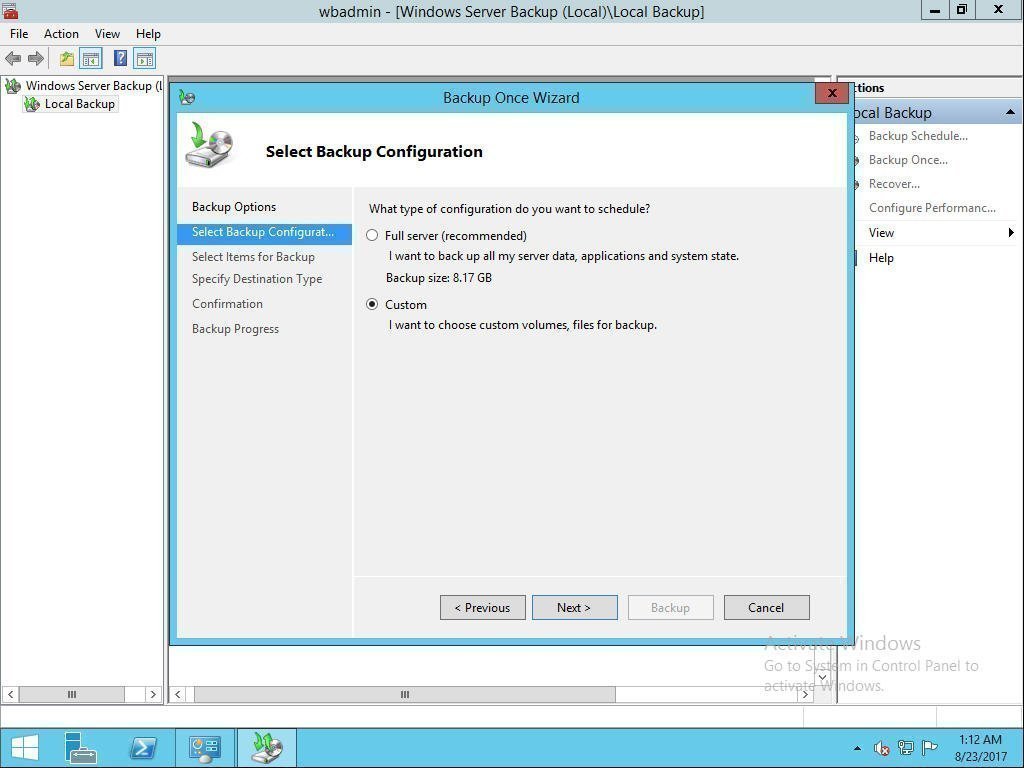
Step 2. Then, you will see the Backup Once Wizard, click "Next" to continue. The default backup options is "Different options".

Step 3. Tick "Custom" backup configuration to choose specific volumes, files, data for backup etc and click "Next". Also, you can backup all server data, application and system state with "Full Server".
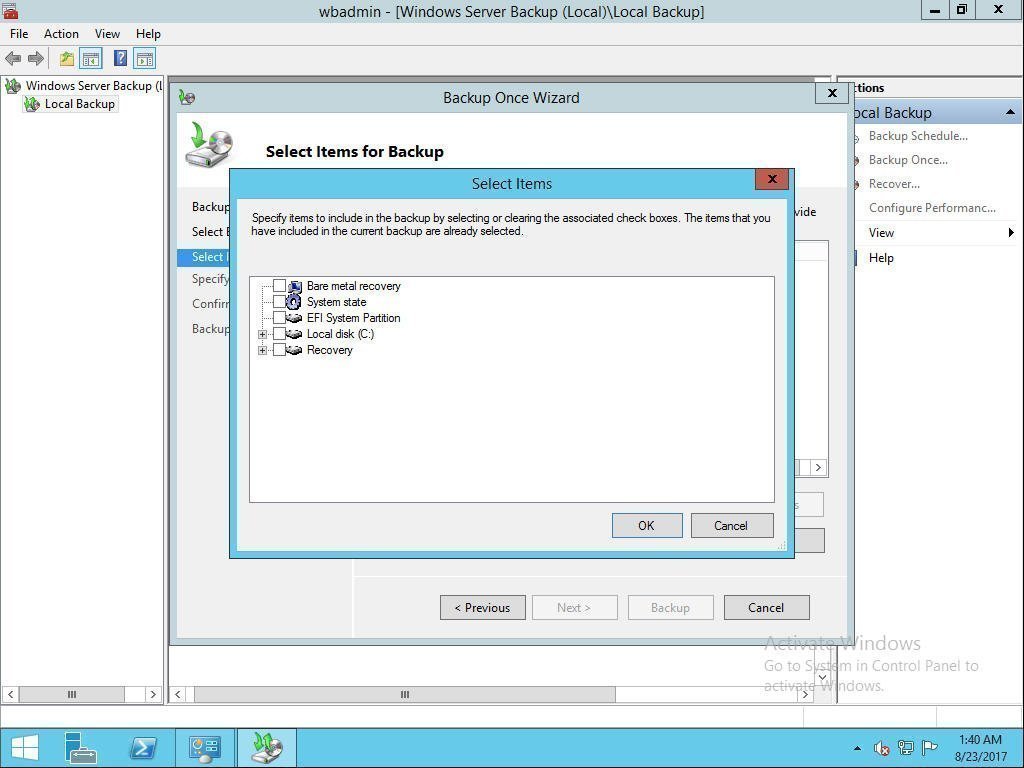
Step 4. Click "Add Items" and select the item you want to backup, here is system state. Then, click "OK" and "Next" to move on.
Step 5. Tick "Local drives" to select a backup storage and click "Next". Please connect the USB flash drive to your server in advance if you want to backup Windows Server 2012 to USB drive. Also, you can use other external devices and remote shared folder to store files. Finally, click "Backup" to start Windows Server 2012 image backup.

The backup will take a long while to complete and it depends on the amount of data you have. Then, you can start to create another backup, but you need to use a different location as destination path. If you still use the same location to store backup files, the previous one will be overwritten. And this also applies to backup schedule.
In addition, you are only allowed to perform system state recovery via Wbadmin, which is not easy for many common users to operate. And it only restore system files and registry when your computer won’t start. If your situation is much worse, for example, you cannot start your computer with error message like “Operating System not found”, it becomes useless.
In this case, you need to turn to one more powerful server backup software to backup OS and all the system files required for boot.
Method 2: Create a System Image Backup in Windows Server 2012 with AOMEI Backupper🔥
Here you will use AOMEI Backupper Server to help you create a system image backup in Windows Server 2012 step by step, even for multiple backups in daily, weekly, monthly, without overwriting the previous backup. And you can enjoy the following advantages:
- It provides you different backup methods (Full, Incremental, Differential) and allows you to backup only changed files every time.
- It offers you various cleanup ways ( By quantity, By time and By daily/weekly/monthly) and enable you delete old backups regularly to free up disk space for new backup.
- Except for backup, you can easily restore system image in Windows Server 2012 to new hard drive, even for computer with different hardware.
- This software applies to server 2003/2008(R2)/2012 (R2)/2016/2019/2022 and Windows 11/10/8//7/XP/Vista. Thus, you can use it to create Windows Server 2016 image backup or system backup in other systems.
Then, you can download this software and create Windows Server 2012 system image backup with it. For unlimited servers and PCs, try AOMEI Backupper TechPlus edition.
(PS: Note this free trail version is available within 30 days, to protect system continuously, it's suggested to buy official version. 70$ Off for one server computer.)
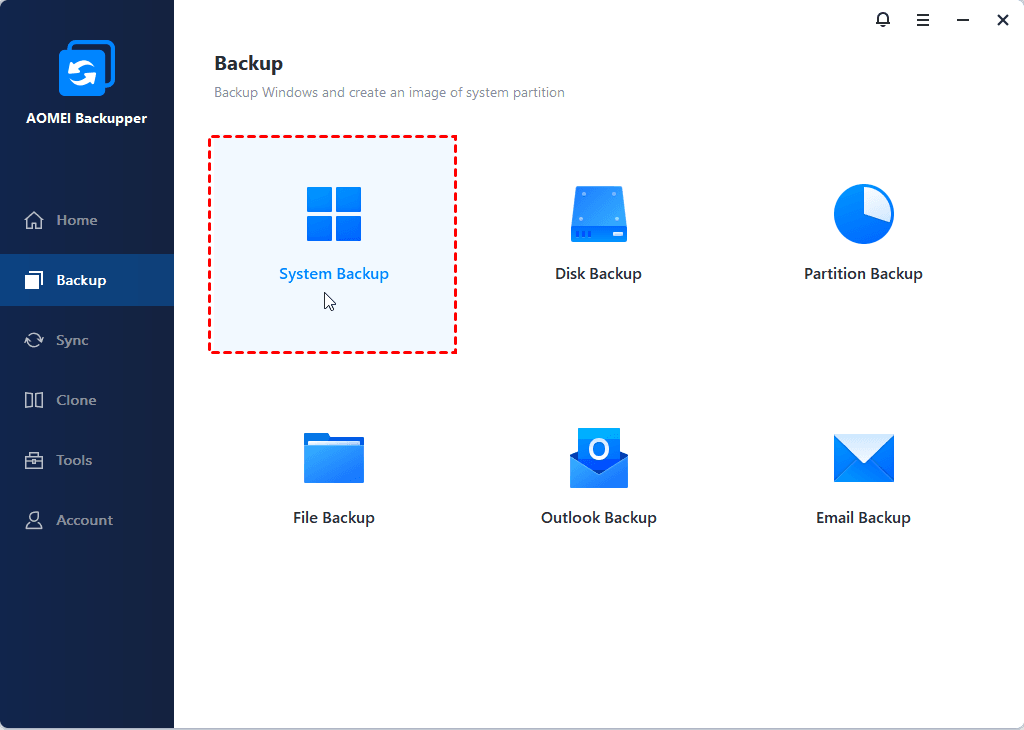
Step 1. Plug in your external storage if you want to save image to and be sure it can be detected. Then, launch this software, then select “System Backup” under the Backup bar.
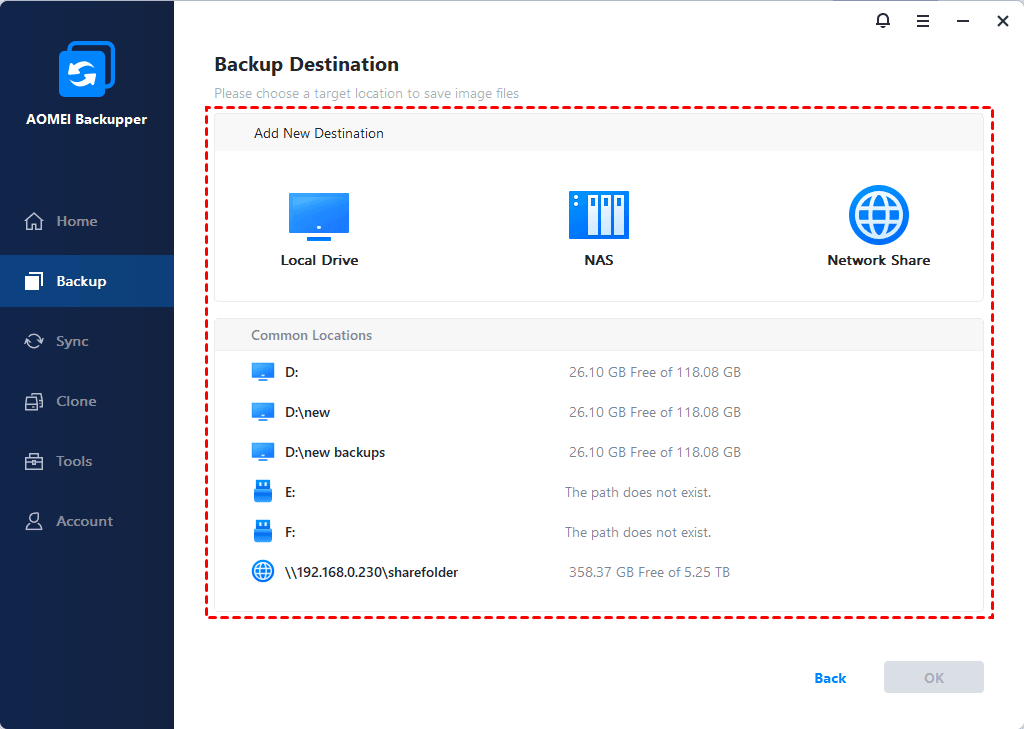
Step 2. Click where the arrow point to select a destination path and all the partitions related to boot Windows are selected automatically.
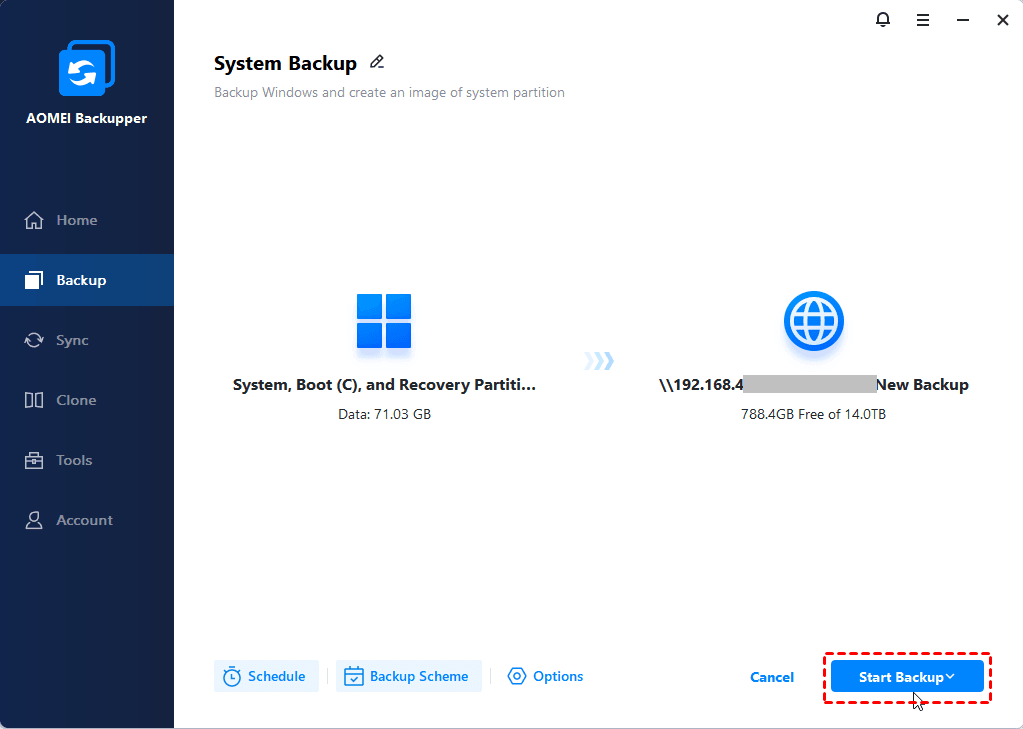
Step 3. Now you can click “Start Backup” to create Windows Server 2012 system image backup to protect data on it.
That’s the entire process of creating Windows Server 2012 system image backup and you will get an exact copy of your system. Meanwhile, it's suggested to create Windows Server 2012 recovery disk so you can restore your computer when it fails to boot.
Helpful tips on continuous data protection and retention:
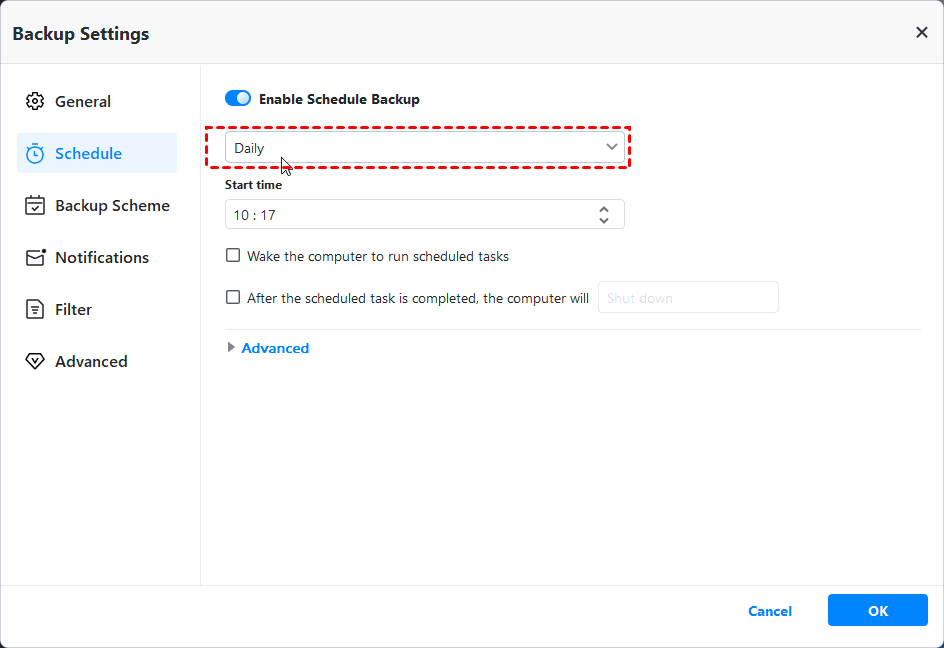
Single backup only includes the items in Windows Server 2012 when you back up it. Thus, if you need to keep the newly added data or installed program, it’s suggested to enable daily backup, weekly backup or monthly backup in the “Schedule Backup”, depending on the backup frequency you want. For off-peak backup, please tick Wake the computer to run scheduled tasks to ensure the task will be executed as expected.
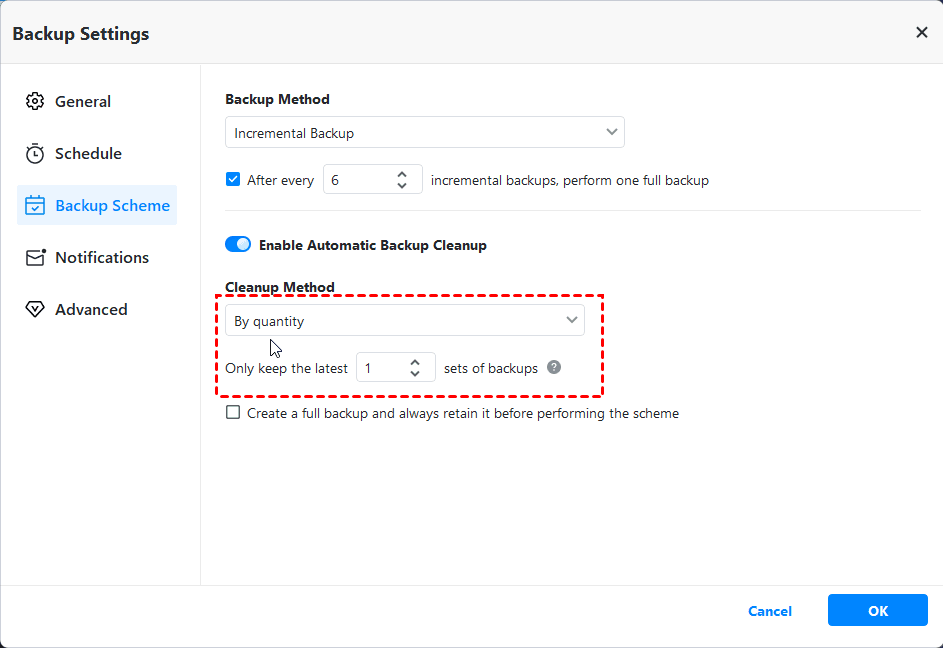
In a long run, this may result in backup disk full issues, especially for a smaller drive. You can enable “Incremental Backup” or “Differential Backup” to backup only changed files instead of everything.
But it cannot solve this problem completely, but only alleviates it to some extent. The best way is to take this as a basis and then manage disk space by deleting backup files automatically with the help of " Backup Scheme" feature.
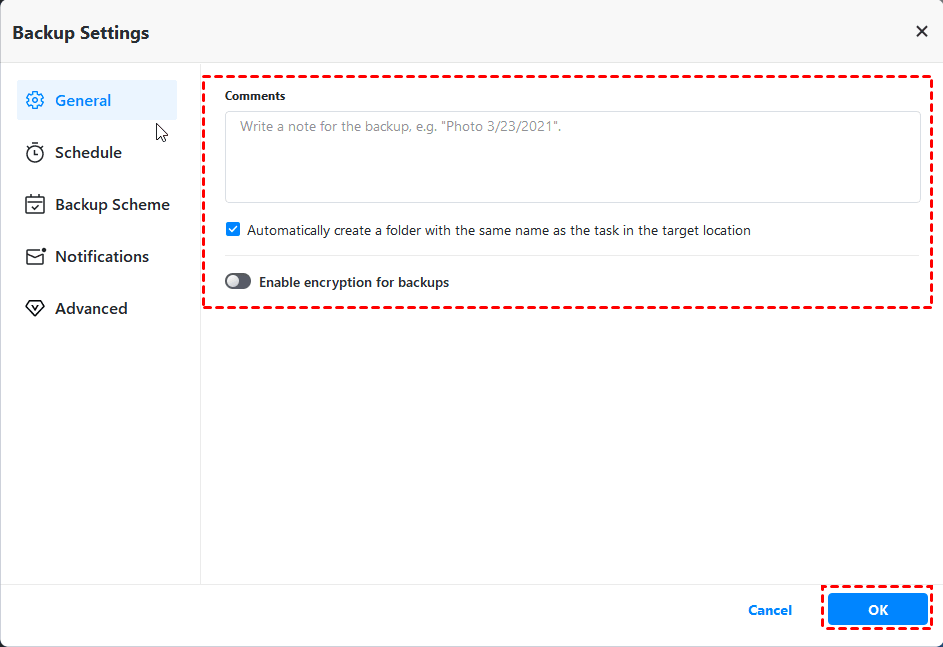
Besides, you may be bothered by other issues, such as, the backup image is very big, or you don’t want others to see sensitive data, etc. Click “Options”, select “Normal” or “High” compression level to compress Windows Server, click Enable encryption for backup to add a password on it.
Sometimes, you may meet the unbootable issues when the Windows computer fails to boot, and intend to backup hard drive without Windows using bootable media created before.
Also, if you made a recovery environment in advance, you just need to restart your computer and then you will see an option like Enter into AOMEI Backupper. Select it and you will see the main page AOMEI Backupper Standard just as in Step 1.
Method 3: Create Windows Server 2012 system state backup with AOMEI Cyber Backup👍
The best enterprise backup software - AOMEI Cyber Backup provides a convenient and reliable solution for centralized backup management of all Windows operating systems.
★ It enables you to create system/disk/partition backup for a bunch of Windows PCs and Servers, supporting Windows 11/10/8.1/8/7 and Windows Server 2022/2019/2016/2012 (R2)/2008 (R2).
★ You are allowed to save backup images on a local disk, external hard drive, network share or NAS device, etc.
★ You can schedule a backup task to run daily/weekly/monthly using the full/incremental/differential backup method.
Now create Windows Server 2012 system state backup with the following steps.
Step 1. Download, install and run AOMEI Cyber Backup. Log in with AOMEI Cyber Backup account or Windows account.
Step 2. Click Source Device > Windows > Add Windows Device to add the Windows Server 2012 device that you want to backup. You need to enter the IP address, username and password of it.
Step 3. Create a new backup task.
- Click Backup Task on the left menu bar and select Backup Task > Create New Task.
- Choose System Backup as the Backup Type.
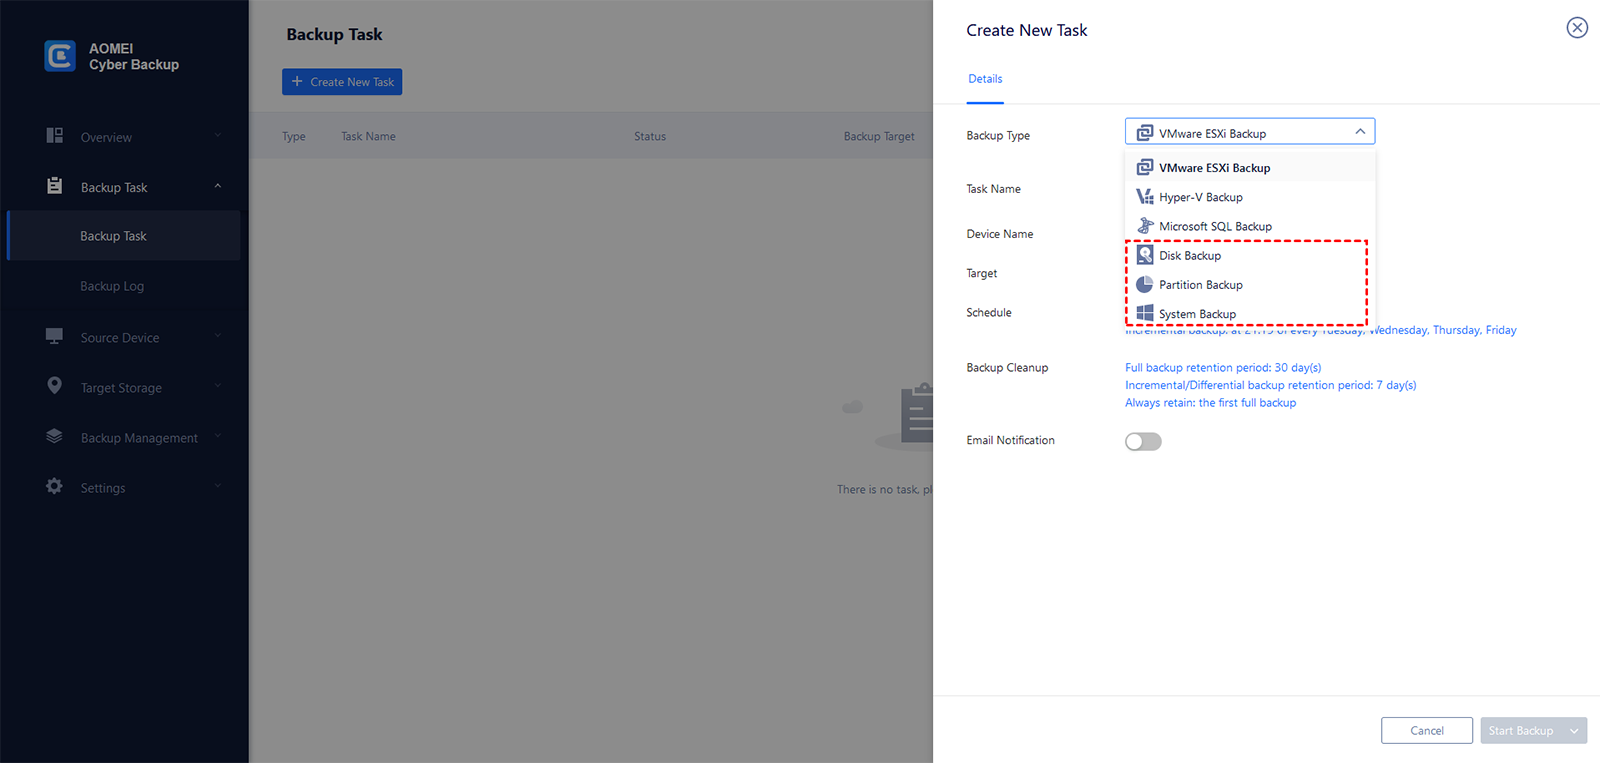
- Edit Task Name based on your need.
- In the Device Name field, click Select + to select the device you just added.
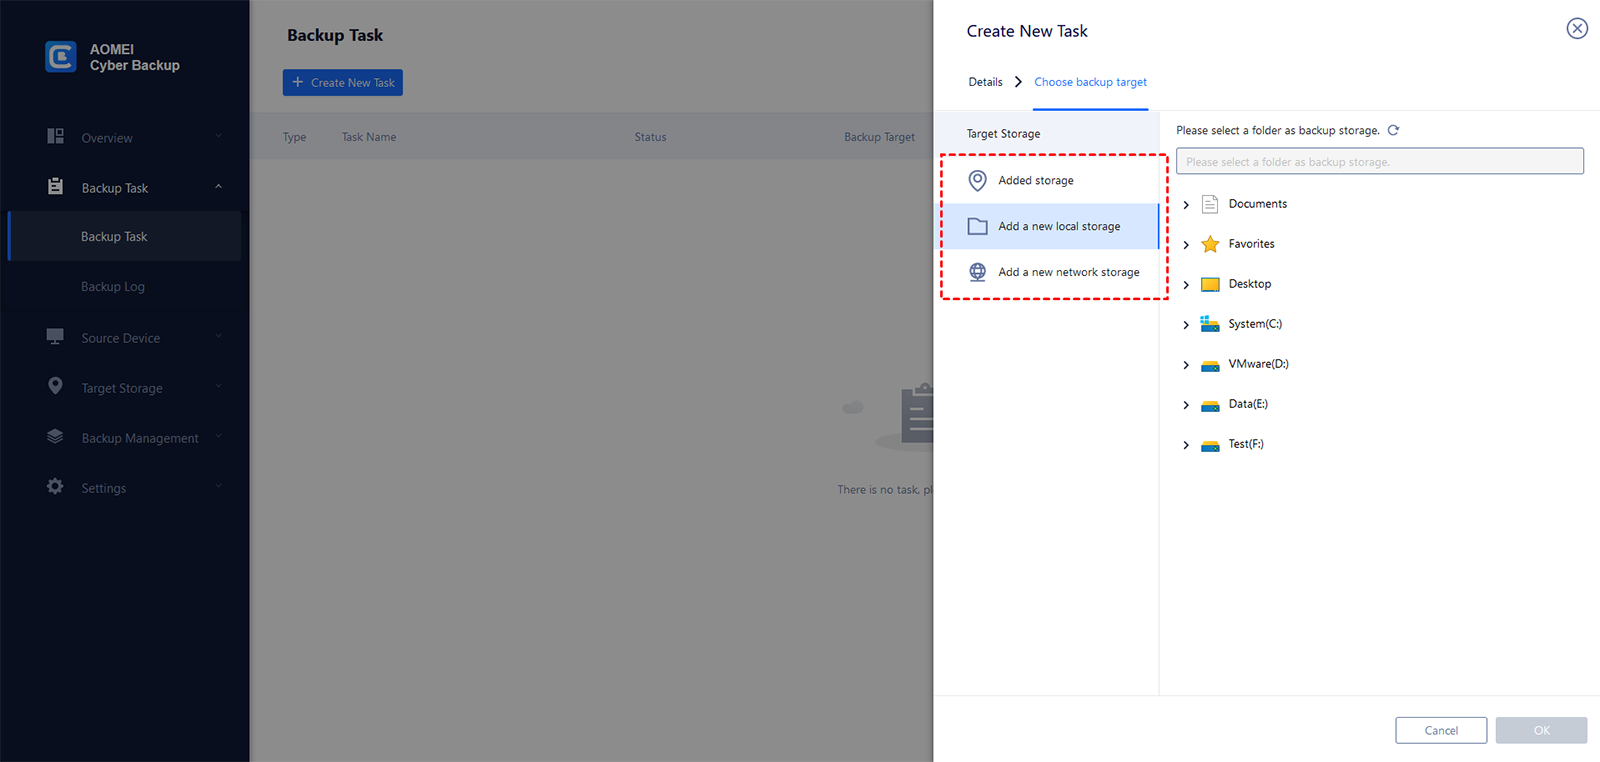
- In the Target field, click Select + and Add a new local storage or Add a new network storage to specify a destination path.
- In the Schedule field, change the default schedule settings as you want.
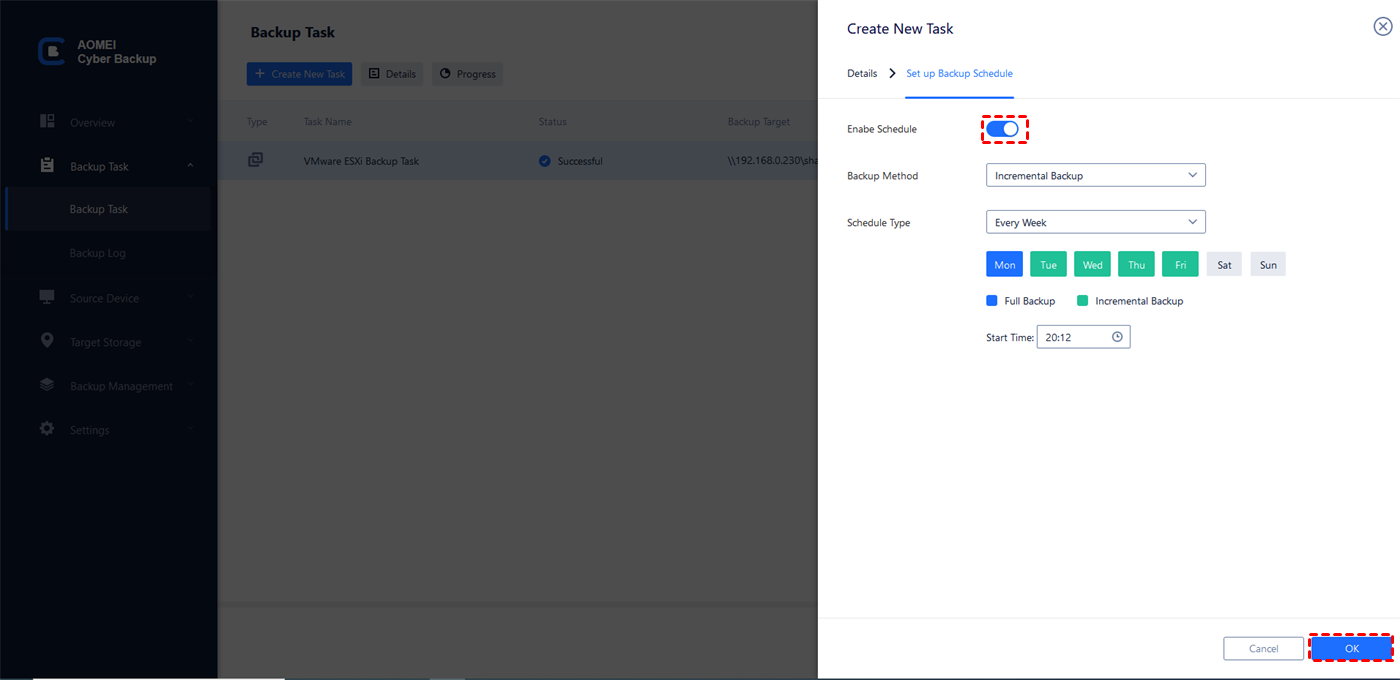
- Click Start Backup > Add the schedule and start backup now to launch the backup process.
Wrapping Things up
You can easily create a system image backup in Windows Server 2012 with the help of Windows Server Backup, AOMEI Backupper Server and AOMEI Cyber Backup. However, the previous one only restores system files and registry, which does not contain the entire system of your server computer.
Thus, to protect your system and avoid any data loss due to computer failure, creating a complete system backup with AOMEI Backupper Server will be a much better choice. More so, this software comes with many useful features to continuously protect your data, including schedule backup, backup scheme, differential backup, incremental backup, event triggers, create bootable media, etc.
For IT technicians or small and medium-size companies, you can use its Technician or Tech Plus edition, which can be installed on unlimited PCs and Servers within one computer. And its image deploy tool allows you to restore system to multiple computers simultaneously.

