Beginner’s guide to Windows 10 Recovery Environment
Read this article to learn what a Windows recovery environment is, how to enable or disable Windows 10 recovery environment, and then launch it. And it provides a smart tool to fix problems like Windows 10 recovery environment missing. Check it out right now!
By Ivy Updated on September 2, 2025
Overview of Windows 10 Recovery Environment
What is Windows Recovery Environment
Windows Recovery Environment(WinRE) is a preloaded recovery environment in Windows 8.1 and Windows 10, which allows you to repair, reset or diagnose your computer when it’s unbootable. This process can be manual or automatic. Among them, WinRE starts automatically after detecting the following issues:
• Two consecutive startup failures.
• Two consecutive unexpected shutdowns or system reboots within two minutes of boot completion.
• Secure Boot error (except for issues related to Bootmgr.efi).
• BitLocker error on touch-only devices.
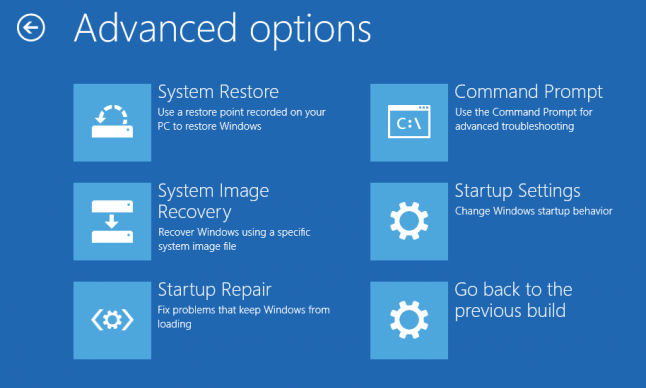
What Can Windows Recovery Environment Do for You
As you know, Windows Recovery Environment (WinRE) is a helpful tool for fixing common computer problems in Windows. It provides various tools to assist users in resolving issues. Here are some of the main tools available in WinRE:
✍System Restore: Use a system restore point to get your computer back to an earlier date when it’s not in trouble. It requires at least one available restore point on the current computer. For detailed steps, check this article: How to Use System Restore from Boot in Windows 10/8/7?
✍System Image Recovery: Similar to System Restore, but this tool is more powerful. It can save your computer from a serious error, such as a system crash or hard disk failure by restoring the system image to the new hard drive. It requires a backup image created by (Windows 7) Backup and Restore. For detailed steps, please click on this article: 2 Ways to Restore Windows 10 System Image to New Hard Drive
✍Startup Repair: This tool may be launched automatically when your computer fails to boot twice in a row, then it will scan and fix the problem it detects. Also, you can launch this tool manually.
✍Command Prompt: You can use multiple command lines to repair computer failure, such as fixing the BCD startup error.
✍Startup Settings: It allows you to restart the computer and change Windows startup behavior, such as video resolution mode, debugging mode, boot logging, disable automatic restart on system failure, etc.
✍Go back to the previous build: This is used to restore the same operating system to the version before you upgrade. For example, if you install Windows 10 1709 on your computer, then you use this option to go back to Windows 10 1703.
As a part of the Windows recovery environment, these tools are invaluable for troubleshooting and resolving common computer problems effectively. So, how do you access the Windows recovery environment? Continue to read the following content.
How to Enable or Disable Windows 10 Recovery Environment using Command Prompt
In this part, you will learn how to enable or disable the Windows 10 recovery environment using the command prompt. For detailed steps, please keep reading below.
Enable Windows 10 Recovery Environment
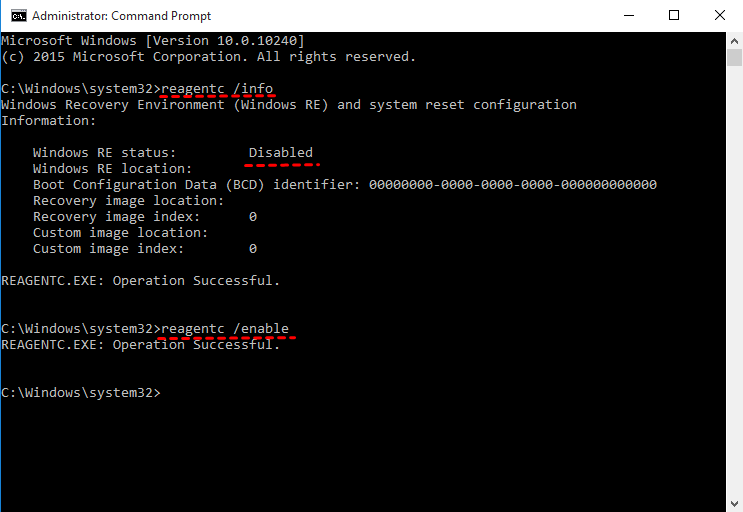
1. Open an elevated command prompt with administrator priority.
2. Type reagentc /info in the command prompt window and hit Enter.
3. Then, look for Windows RE status to check the Windows 10 recovery environment status, it can be Enabled or Disabled.
4. If it’s Disabled, type reagentc /enable and hit Enter to enable WinRE.
Disable Windows 10 Recovery Environment
1. Open the command prompt window and run as administrator.
2. (Optional) Check the Windows 10 recovery environment status, you can type the command line reagentc /info and look for its status.
3. Type reagentc /disable and hit enter to disable the Windows 10 recovery environment.
How to Launch Windows 10 Recovery Environment for Troubleshoot
You probably don’t know there are many ways you can launch the Windows 10 recovery environment and then troubleshoot your computer. Just select one of the x ways per your needs. Then, let’s learn them in detail.
Way 1: Use combination key
1. If your computer is powered off:
Press and hold the Windows Key on your keyboard.
While holding the Windows Key, press the power button on your computer.
Release both keys.
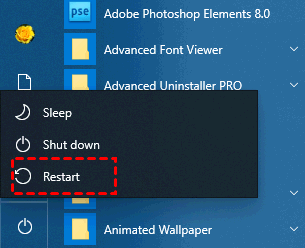
2. When your computer is on:
Select Start -> Power, and then press and hold the Shift key while clicking Restart.
Way 2: Use the Advanced Startup Option
Select Start -> Settings -> Update and Security -> Recovery and then click Restart now under the Advanced Startup option.

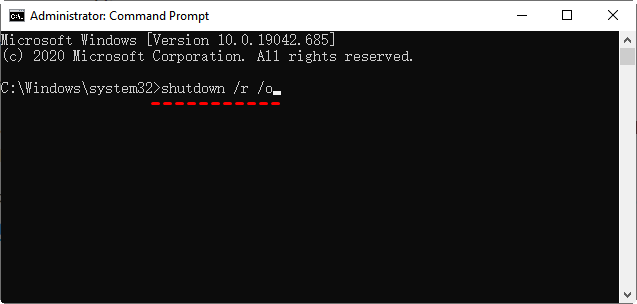
Way 3: Use the shutdown command line
Open the command prompt window and run shutdown /r /o command line.
Way 4: Use Windows 10 Recovery Drive
1. Insert the recovery media into your computer, and be sure it can be detected. Then, restart your computer and then press a specific key you will see on the initial screen.
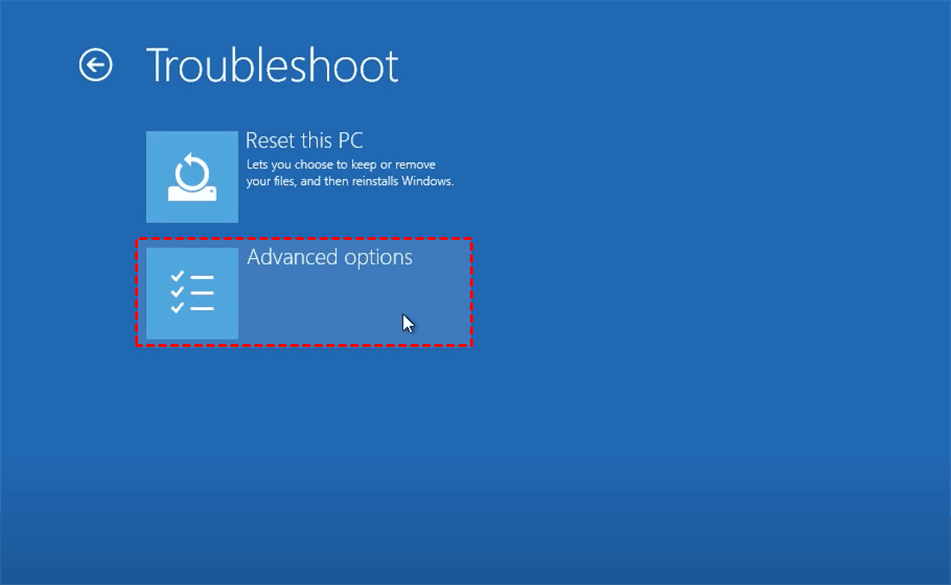
2. Click Next until you see the Repair your computer option. Then, click it to access a blue Troubleshoot window with 2 options. Click Reset this PC, you can reset Windows 10 while keeping my files.
3. If that’s not what you want, click Advanced options and then select a recovery tool per your needs.
Way 5: Force Restart
Start your computer and hold down the power button to shut it completely when you see the start-up logo screen. Repeat once, and then start normally.
Windows 10 Recovery Environment Missing - How to Fix it Easily
Windows 10 recovery tools in the Windows recovery environment can help you a lot when you need to repair your computer, but sometimes they are not working as usual. Here are some possible errors you may encounter:
◆ An Unspecified Error Occurred During System Restore 0x80070002
◆ System Restore Failed To Extract the File in Windows 7/8/10
◆ Windows cannot find a system image on this computer
◆ Windows 10 Startup Repair not working
You could consider using a self-booting recovery environment released by a trustworthy and reliable backup and restore software like AOMEI Backupper Professional to access the Windows 10 recovery environment and then restore the Windows 10 system image to the new hard drive. It requires at least one available system image backup created by AOMEI Backupper.
Then, let’s get started enabling/disabling Windows 10 Recovery Environment using AOMEI Backupper Professional.
Enable Windows 10 Recovery Environment using AOMEI Backupper Professional
1. Download AOMEI Backupper and install it. Then, launch it, click Tools, and select Recovery Environment under the Common Tools line.
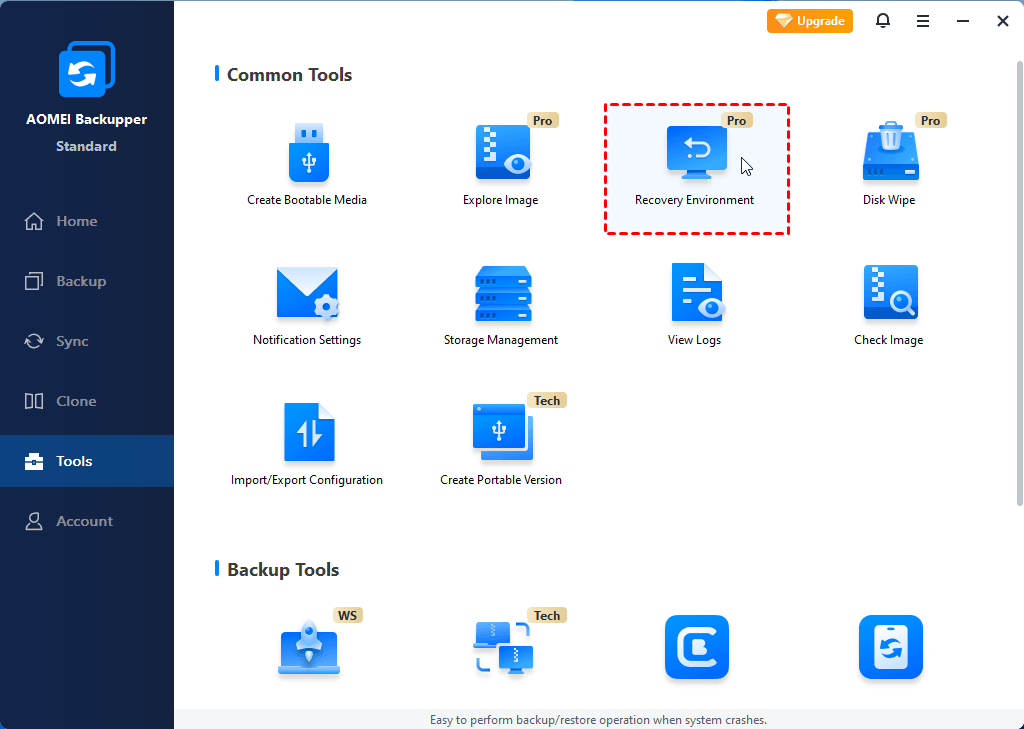
2. Then, you will see the Recovery Environment Settings window, tick the option Enable the boot option of AOMEI Backupper recovery environment.

3. Set the standing time on this boot menu. By default, it’s 3 seconds. But you can change it to a proper one you like. Then, click OK.

4. After that, you will be prompted the boot option will take effect at the next system startup, click OK to confirm and start the creation.

Wait until the process is complete and click X to exit this software.
Disable Windows 10 Recovery Environment using AOMEI Backupper Professional
1. Launch this software again, and go to Recovery Environment.
2. In the Recovery Environment Settings window, uncheck the option Enable the boot option of... and click OK to confirm.

Notes:
✦ The tool currently does not support systems before Windows 7.
✦ The tool currently does not support a dynamic system.
✦ After the software is automatically updated or registered, it is recommended to update the recovery environment.
✦ When the loss of the recovery environment is detected, it is recommended to update the recovery environment to ensure that the recovery environment is available.
Tips:
✦ It’s suggested to create a system image backup in Windows 10 when it’s working properly, so you can use a recovery environment to restore the system image to the new hard drive. If possible, please schedule a backup system to keep track of changes made later.
✦ The recovery environment created by AOMEI Backupper is kept under the path C:\Aomei Recovery. If your C drive is wiped or damaged, it will not work. Please create a bootable USB instead and then restore the image from the boot.
FAQs
1. Can I boot Windows in repair mode?
Yes, just go search for "Change Advanced Startup Options" in Windows and select it. Restart your computer choose Troubleshoot, then Advanced Options, and click Startup Repair. After that, follow the instructions on-screen and select your account. The repair process will scan your computer and try to fix any startup issues.
2. Is there a way for me to enter Windows 10 repair mode?
You can access the Windows 10 Advanced Startup Options menu. This can be done in various ways, such as pressing F11 when you start your computer or booting from an installation disk and selecting Repair after clicking Next.
3. Can I boot corrupted Windows 10?
Yes, you can. Try to boot it from the Windows installer choose your language, then select Repair Your Computer. In the Troubleshooting menu, press Shift+F10 to open the Command Prompt. Lastly, change to the Windows OS drive and run the command "bootrec /rebuildbcd" to repair the corrupted Windows 10 installation.
Your turn
That’s all for the Windows 10 recovery environment, you can learn to enable, disable, and launch it. After that, you can use the recovery tools in the recovery environment to repair your computer and restore it to a good state.
In addition, you still can use the AOMEI Backupper self-booting recovery environment to access the Windows 10 recovery environment, then restore the image or try other backup and recovery operations.
In sum, it’s powerful software that can help you protect data and systems safely. Please download it to have a try! For IT technicians or small and medium-sized companies, you could use AOMEI Backupper Technician to protect unlimited PCs within one company while providing billable technical support as a service to unlimited clients.

