How to Backup Windows 11 Files & OS to Network Drive
This guide walks you through the benefits of backing up Windows 11 to a network drive, explains different backup solutions, and provides step-by-step instructions. Whether you are setting up a backup or automating the process, this article covers every detail. Additionally, we answer faqs and offer expert tips to ensure your data.
By Sebastian Updated on September 20, 2024
How do You Back and Restore Windows 11 to a Network Drive?
“I have used the "Backup and restore your files" program in Control Panel with Windows 11 to back up my pc. I am backing up my NAS through my network and the credentials are correct. Now I am getting an error code of 0x80070544 and the backups are not working. The credentials for the NAS have not changed. My Windows 10 PC is backing up to the same NAS without a problem. What changed? Why is this happening?”
– Microsoft Community
Why Backup Windows 11 to Network Drive
For frequent Windows users, safeguarding important data is essential. Backing up files to a local disk can be risky because if the system crashes or the hard drive fails, it can become impossible to start the computer or recover the data.
To ensure better protection, you can back up your Windows 11 operating system and files to a network location like a NAS or mapped drive. This allows other users on your local network to access the data, and even if your computer malfunctions, you can access these backup files through the network. In the following sections, we’ll explore 4 methods to back up Windows 11 to a network drive.
How to Create Shared Folder and Network Drive in Windows 11
A network drive could be a NAS or a mapped shared folder. If you’ve got a NAS as backup storage, then there’s no problem. But if you are not familiar with network share, you can follow this guide:
☛ How to share a folder in Windows 11:
1. Navigate to the folder you want to share, right-click it and choose Properties.
2. Switch to the Sharing tab, click Share… and hit the down arrow to choose who you want to share the folder with. If you want to allow everyone on the network to access this folder, just choose Everyone and click Add > Share.
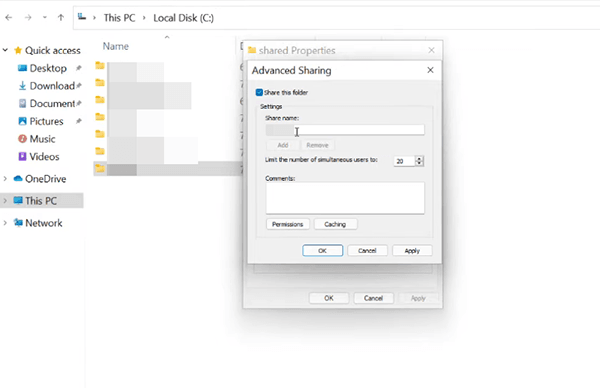
3. Back to the Sharing tab, click Advanced Sharing… and tick Share this folder. Then in the section below, you can give it a name, and edit its Permissions.
When you choose a network share as the target path, the backup may fail in some cases, and the image file is also not very easy to access. Therefore, you could consider mapping it as a network drive. It will assign a drive letter on your local computer, as thus you can easily access the files in shared location.
☛ How to create a network drive in Windows 11:
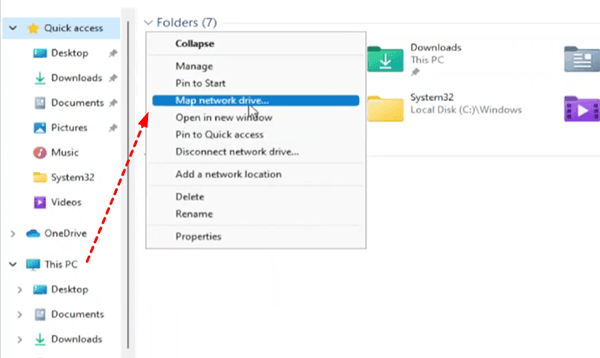
1. Please first open File Explorer, and find This PC on the left pane.
2. Right-click it, and choose Show more options > Map network drive… in the menu.
3. Choose a drive letter, and input the path of the shared folder in the textbox.
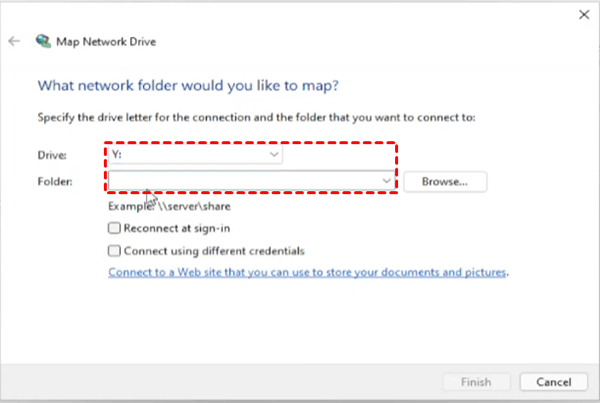
4. Click Finish to execute it. Then you will find the mapped network drive under This PC.
Then, you can try following methods to backup Windows 11 to network drive.
How to Backup Data to Network Drive in Windows 11
Compared to Windows 10, Windows 11 mainly adds an option to backup files to OneDrive. You can still use old features like File History and Backup and Restore (Windows 7) to backup Windows 11 to network location, but the approaches have changed a bit.
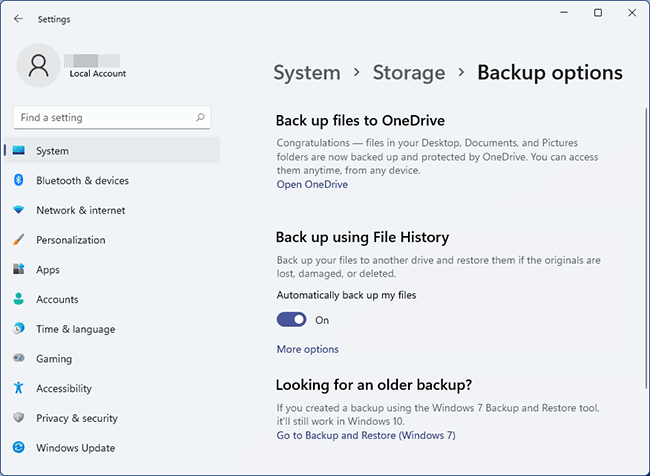
First, please launch System Settings through Start > Settings or Win + i shortcut.
Then you can navigate to System > Storage > Advanced storage settings > Backup options.
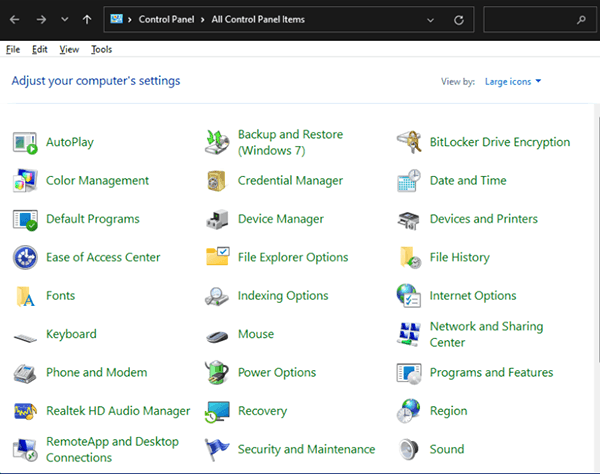
Alternatively, you can search for them directly, or find them in Control Pane > Large icons/small icons.
▶ If you want to auto backup user folder to network drive, then choose File History.
▶ If you want to backup specific libraries or system image to network drive, then choose Backup and Restore.
▶ If you want a more efficient Windows backup solution for file/partition/disk/OS, try Method 3.
▶ If you want a centralized backup tool for Windows 11, try Method 4.
Method 1. Windows 11 File History
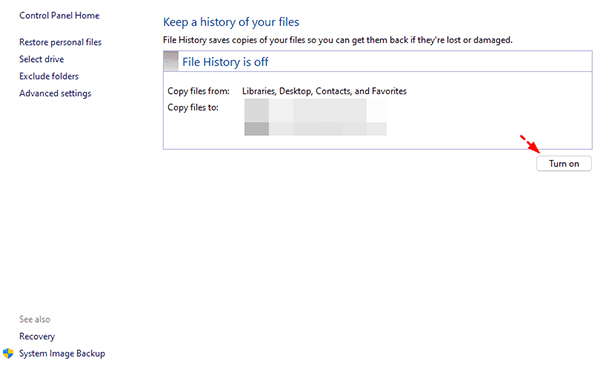
1. Here you can launch File History from Control Pane, and click Select drive on the left side to Add network location.
2. Specify a network location in the pop-up window. To choose a mapped drive, you can choose This PC on the left-top corner. Then find this drive under Network locations, and click OK to confirm it.
3. After selecting a drive, you can Turn on File History service.
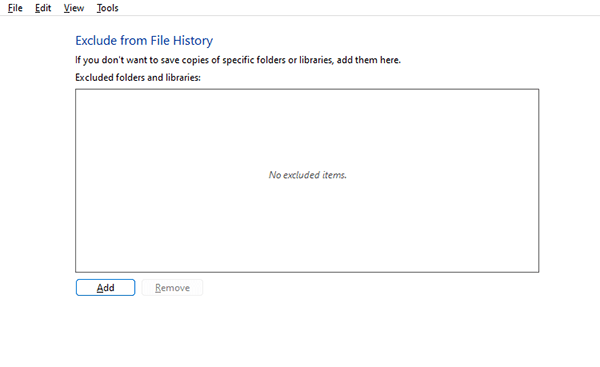
4. Thus the user folders will be auto backed up to the selected network drive. You can also Exclude folders that you don’t want to back up.
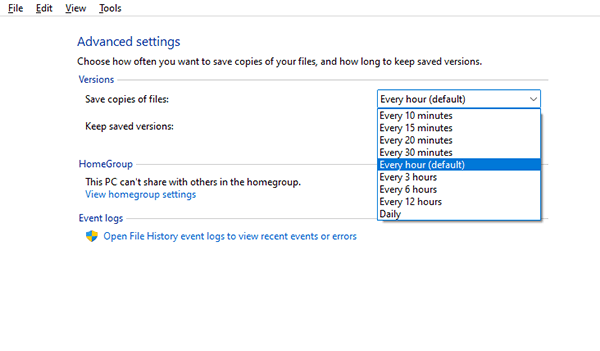
Or go to Advanced settings to configure backup frequency and retention policy.
Method 2. Windows 11 Backup and Restore
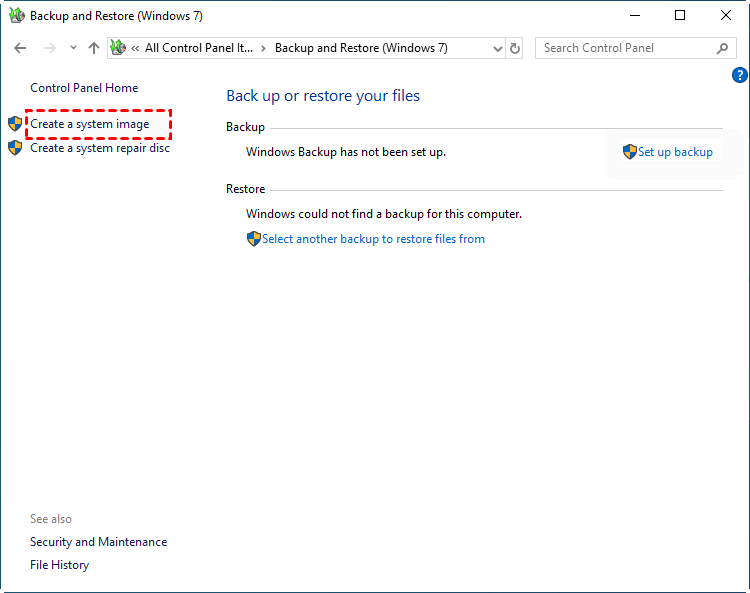
1. Launch Backup and Restore (Windows 7) from Backup options or Control Pane.
2. Then you can see the familiar Backup and Restore window. As always, you can click Set up backup if you want to backup selected libraries & folders, and click Create a system image if you want to create a full system backup.
3. Here take system backup as an example. Click Create a system image on the top-left corner.
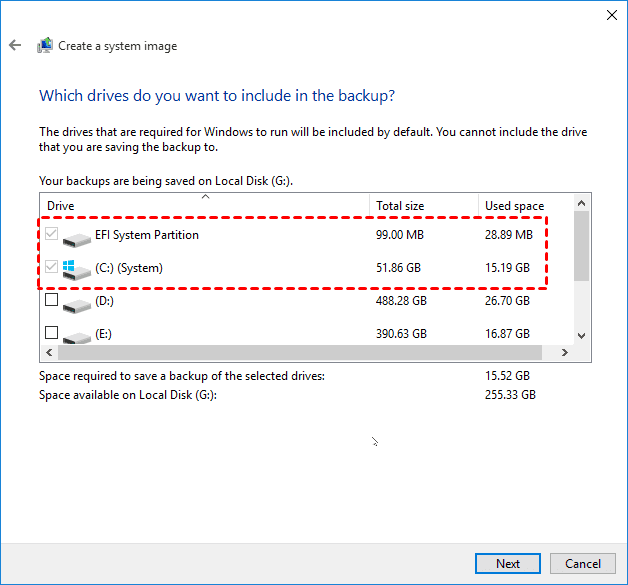
4. In the popping out window, you can choose On a network destination and click Select > Browse to specify a NAS or shared folder and click OK.

5. Click Next to continue the wizard. In addition to the required drives for Windows to run, you can also include additional drives as you like.
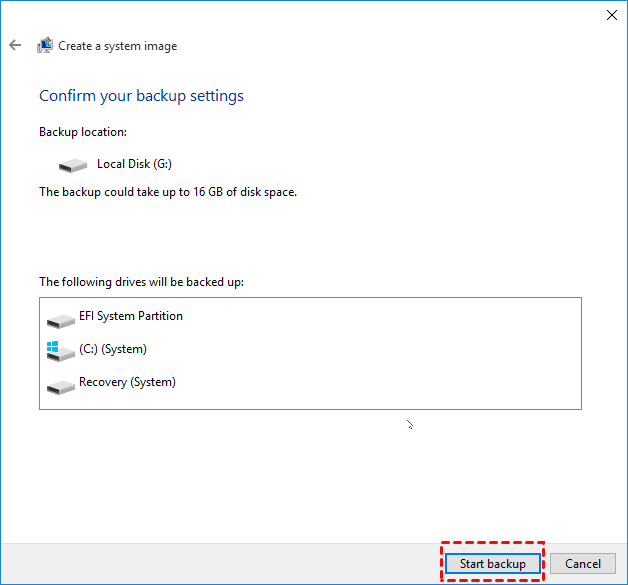
6. In the Next page, confirm the operation and click Start backup to execute it.
Method 3. Standalone Tool to Backup Windows 11 to Network Location
As for the backup destination, you can choose an internal/external hard drive, network share, NAS, USB flash drive, and cloud service. If you want to execute a task regularly, you can set up an automatic backup with Schedule options.
You can choose from various backup destinations, including internal or external hard drives, network shares, NAS, USB flash drives, or even cloud services. To keep your data protected regularly, you can also set up automatic backup using the Schedule feature.
Try AOMEI Backupper for free by downloading it today:
How to backup Windows 11 to network drive:
1. Install the software and launch it, then navigate to Backup tab. You will find multiple options to choose from: System Backup, Partition Backup, Disk Backup and File Backup.
Here I will take File Backup as an example to backup files to network drive in Windows 11.

2. Click Add Folder or Add File to specify the data you want to backup. You can add multiple items as you like.

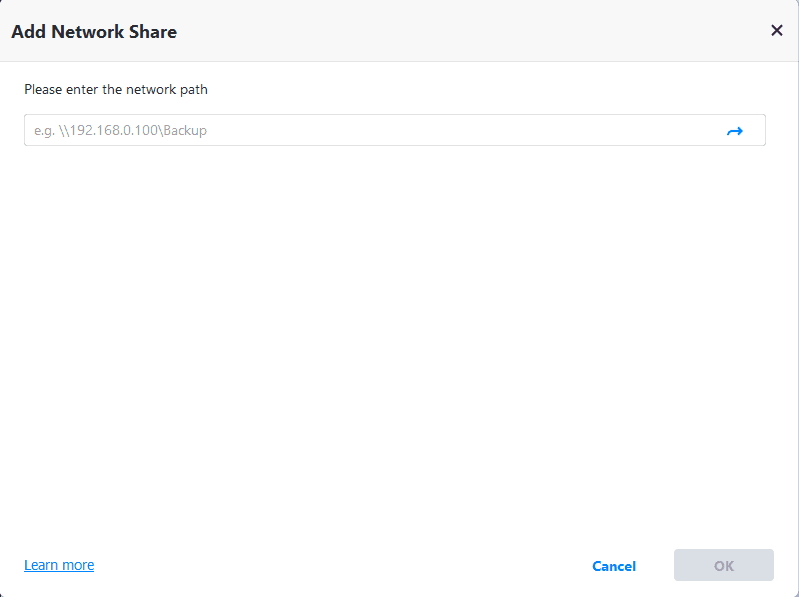
3. Click on the small down arrow beside the destination select box, choose Add Share or NAS Devices.
*If you want to backup Windows 11 to cloud drive, then choose Select a cloud drive.

In the popping out window, enter the path of your network drive. The added path can be used directly the next time.
4. Now you can further configure the backup, e.g. create a Schedule on the basis of daily/weekly/monthly, or click Options to comment, compress, and split the backup. Then, click Start Backup to execute it.
More advanced features can be found in the Professional edition:
- Filter settings: Specify the file suffixes you want to include or exclude from the source folder.
- Backup scheme: Set up a rule to auto-delete older backups and save storage space.
- Universal restore: Restore the system from another computer with different hardware and ensure a secure boot.
- Real-time sync: Sync changed files from the source folder to the target folder in real-time.
Method 4. Centralized Tool to Backup Windows 11 to Network Drive
AOMEI Cyber Backup is the top choice for enterprise-level backup solutions, offering a reliable and efficient way to manage backups across multiple Windows systems.
- This powerful tool lets you easily create system, disk, and partition backups for several Windows PCs, supporting versions like Windows 11, 10, 8.1, 8, and 7.
- You can store backup files on a local disk, external drive, network share, or NAS device, giving you flexible storage options.
- With the ability to schedule backups on a daily, weekly, or monthly basis using full, incremental, or differential methods, data protection becomes hassle-free.
Take system backup as an example. Learn how to backup Windows 11 to network drive as follows:
1. Run AOMEI Cyber Backup. Log in with an AOMEI Cyber Backup account or Windows account.
2. Click Source Device > Windows > Add Windows Device to add the Windows 11 device that you want to back up. You need to enter the IP address, username, and password of it.
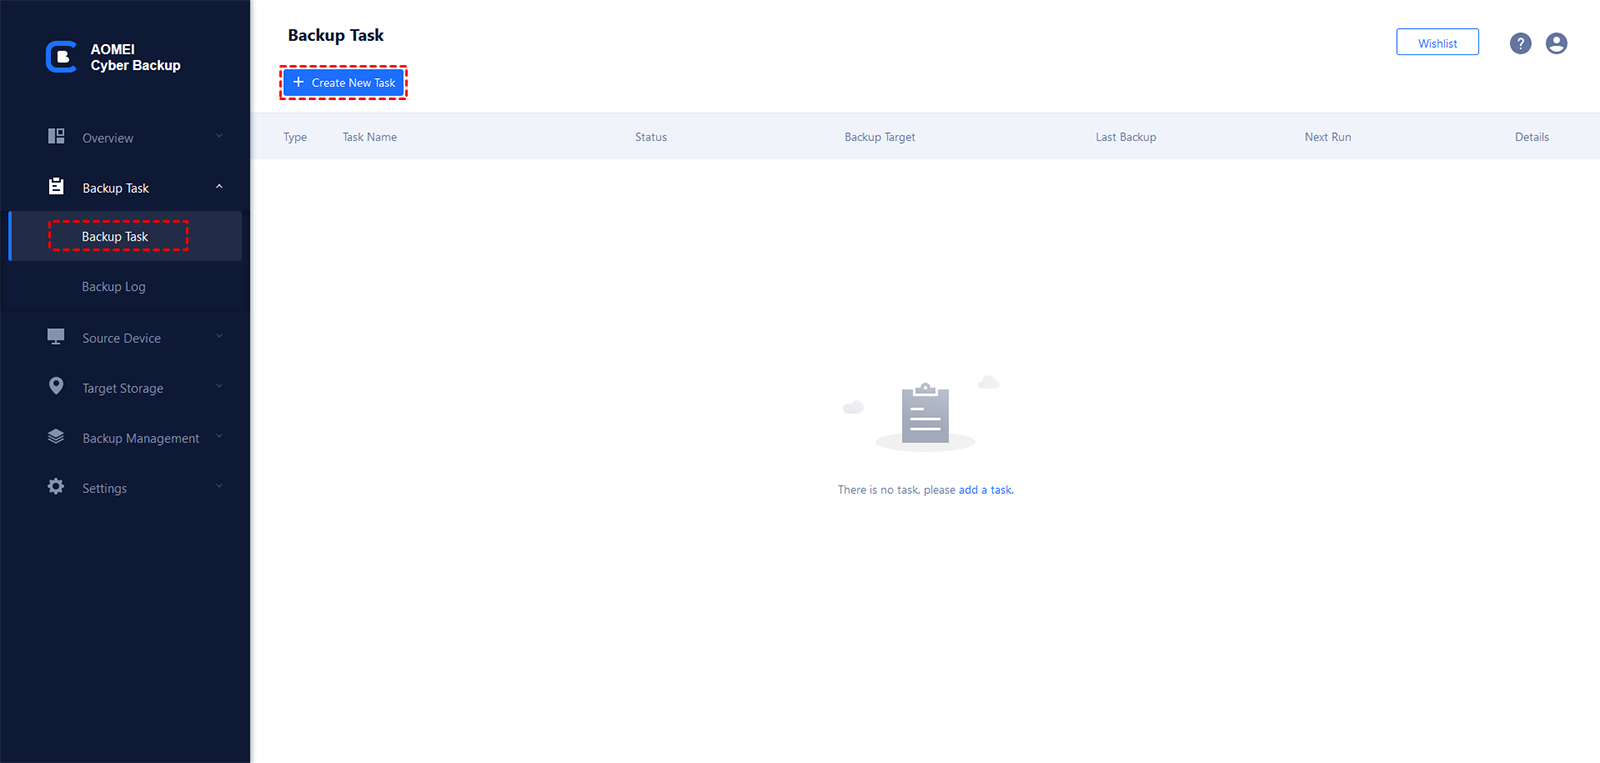
3. Create a new backup task.
- Click Backup Task on the left menu bar and select Backup Task > Create New Task.
- Choose System Backup as the Backup Type.
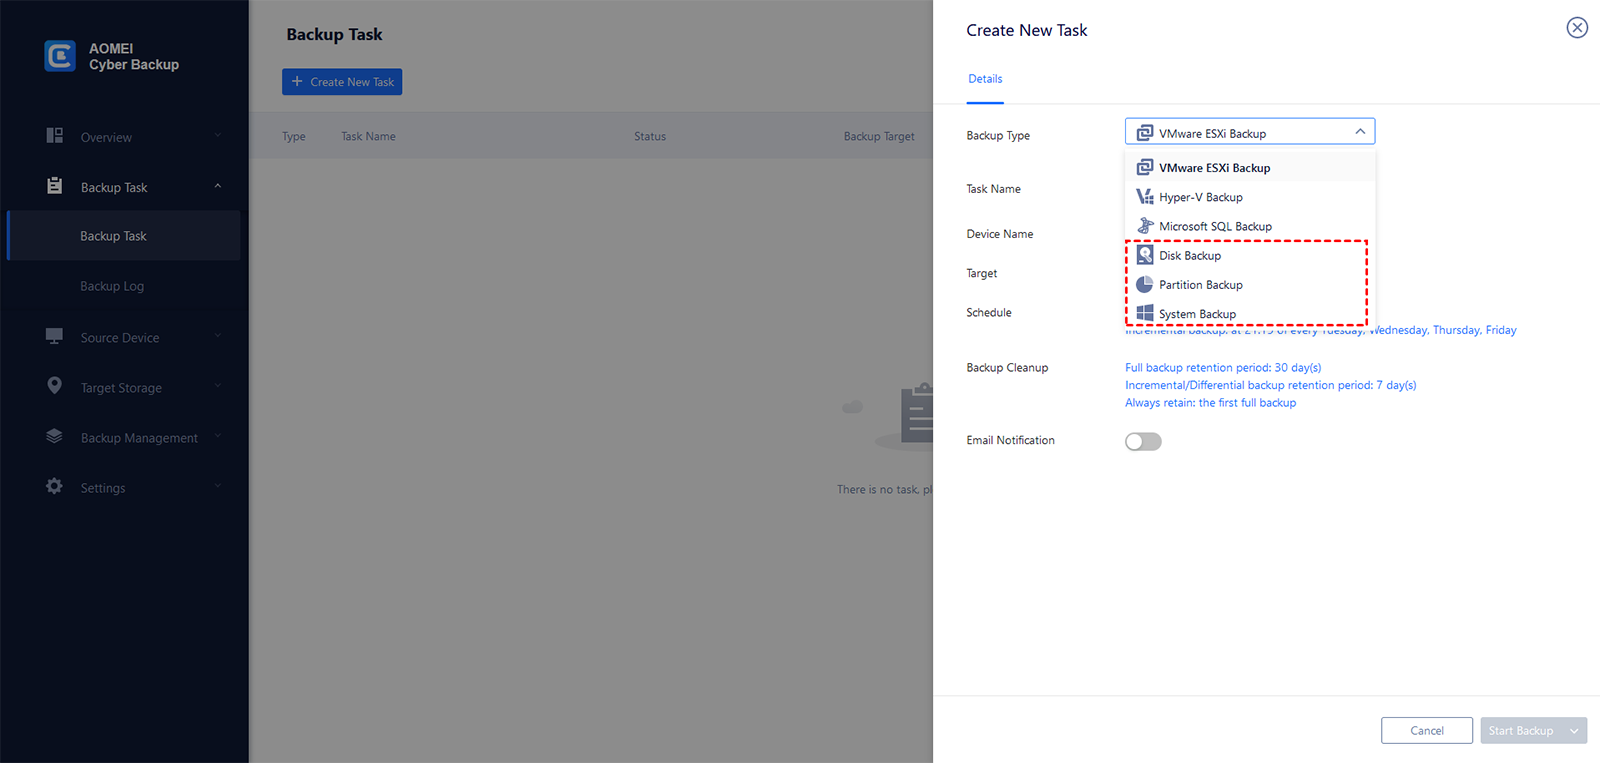
- Edit the Task Name based on your needs.
- In the Device Name field, click Select + to select the device you just added.
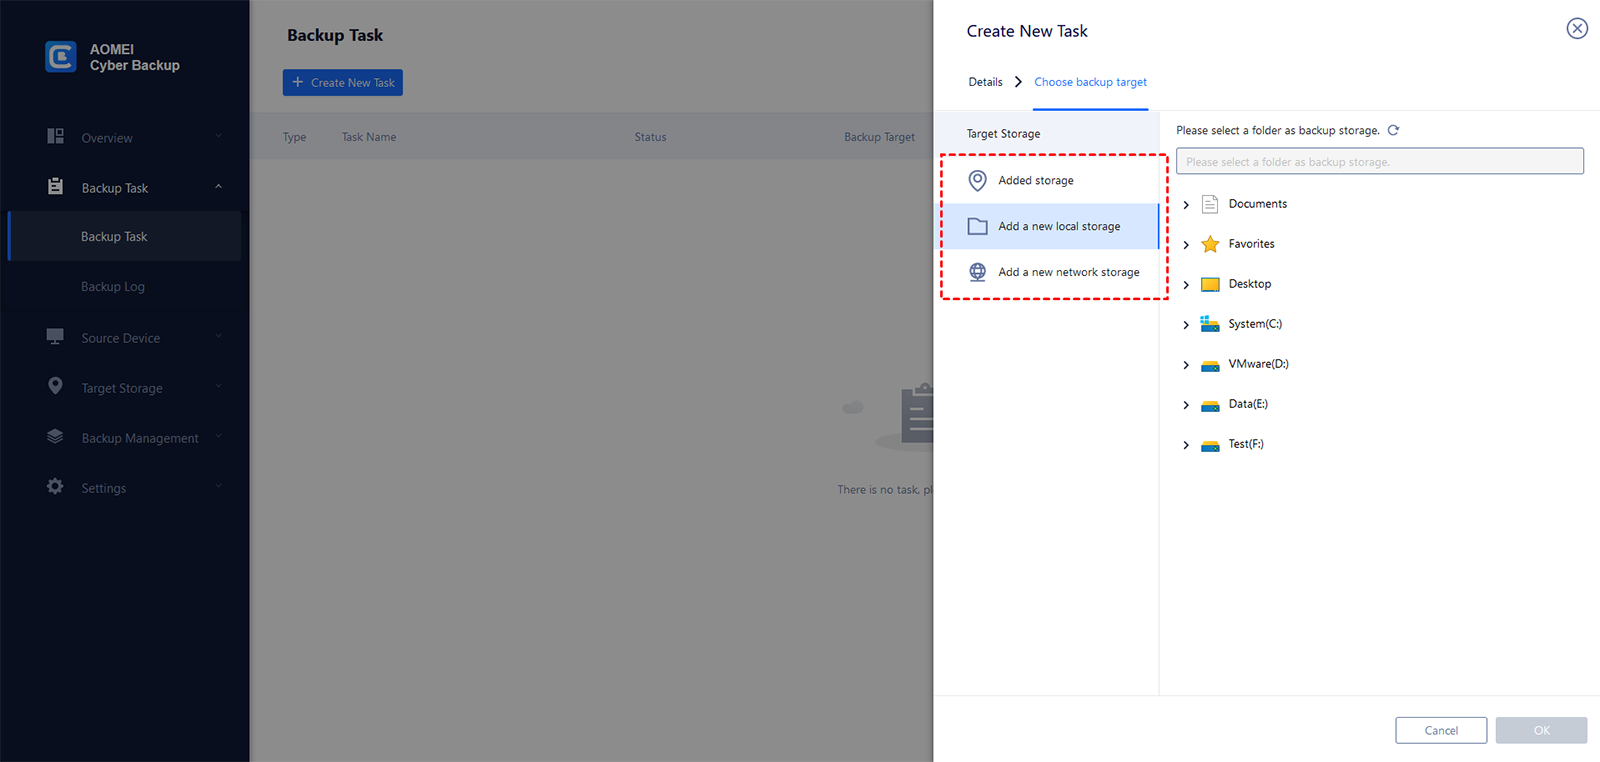
- In the Target field, click Select + > Add new network storage to choose a network folder as the backup target.
- Change the default schedule settings in the Schedule field.
- Click Start Backup > Add the schedule and start backup now to run your first backup.
If you don’t know how to choose between AOMEI Backupper and AOMEI Cyber Backup, check the comparison table on the Windows PC Backup.
Frequently Asked Questions (FAQ)
Q 1: Can I back up Windows 11 to multiple network drives?
A 1: Yes, you can create backups on different network drives by configuring them individually for each backup method, whether through Windows Backup or third-party software.
Q 2: How much space do I need on my network drive for backups?
A 2: The required space depends on the size of the files you are backing up. Consider allocating at least twice the size of your backup data to accommodate incremental backups and system changes.
Q 3: Can I restore a Windows 11 backup to a different device?
A 3: Yes, backups stored on a network drive can be restored to any compatible device, provided you have access to the network drive and the necessary credentials.
Expert Tips for a Smooth Backup Process
-
Monitor Backup Integrity: Regularly verify that your backups are completed successfully by checking the status in Windows Backup or your third-party software.
-
Use a Reliable Network Connection: Ensure that your network connection is stable and fast, especially during large backup operations. Use wired connections when possible to avoid interruptions.
-
Keep Multiple Backup Versions: Store multiple versions of your backups on your network drive to allow for recovery from different points in time, ensuring you can access previous versions if needed.
Conclusion
Backing up Windows 11 to a network drive provides better data protection than a local disk backup, and makes it possible to access the backup files from other computers in the LAN. This article provides 4 methods to backup your important files or OS to network location in Windows 11.
AOMEI Backupper and AOMEI Cyber Backup are recommended due to their simple operations, and they offer the most comprehensive set of features. In addition to providing data protection, AOMEI Backupper is also a powerful cloning software. For example, when you purchase a new SSD and do not want to reinstall OS, then you can use this software to directly migrate Windows 11 to SSD.