Solved | Windows 10 File Copy/Transfer Very Slow (8 Methods)
This article provides a comprehensive guide on how to efficiently manage file copy processes in Windows 10. It covers solutions for optimizing file transfer speed, troubleshooting common problems, and utilizing advanced tools like AOMEI Backupper to improve file management.
By Lily Updated on August 28, 2025
Case: Windows 10 File Copy Slow
I ran into a problem after upgrading to Windows 10, whenever I try to copy files between two drives, the speed is extremely slow. Does anyone know how to fix it?
Tons of Windows 10/11 users have reported the slow file transfer issue as above, the scenarios include:
⛔ Slow file copy between two internal drives;
⛔ Slow file copy between an internal drive and an external drive;
⛔ Slow file transfer between two PCs over the network...
What's confusing is that nothing seems wrong with the computer, any other operation could be done just fine. So what is the culprit that slows down the file copy? The most common causes include disk fragmentation, file system errors, outdated drivers, antivirus settings, and some other Windows features.
If you need to transfer files frequently yet find the slow copy speed in Windows 10 frustrating, please try the following methods one by one for troubleshooting. Alternatively, you can use a free transfer tool to copy a batch of files at once with fast speed, or even with the automatic schedule.
Quickly and automatically copy files or even entire disks to the local folder, external drive, network, cloud, etc. More »
How to Fix Slow File Transfer in Windows 10?
If you're unsure what's causing slow file copy speeds, it's a good idea to start with basic troubleshooting. In Windows 10, head to "Start" > "Settings" > "Update & Security" > "Troubleshoot" and run the appropriate troubleshooter.
If that doesn't fix the issue, you can try the following methods based on your situation: Methods 1-4 work for general cases, Methods 5-6 focus on network file transfers, and Methods 7-8 are useful when copying files to or from a USB drive.
Method 1. File System Error Checking
No matter whether you are trying to copy files to an internal drive or external drive, you can use the built-in tool to check its file system and fix the errors that could slow down the copy speed in Windows 10.
1. Open This PC, right-click the drive you want to perform data transfer and choose Properties.
2. Switch to the Tools tab, and tap Check under Error checking to check the drive for file system errors.

3. Follow the wizard to complete the checking. If it doesn’t detect any error, move to the next method.
Method 2. Enable Optimize Drives for Defragmentation
This one has been proven to work by many users, especially those who just upgraded from Windows 7 to Windows 10 and find the copy speed very slow.
1. Press Windows + R and type “services.msc” in the Run window. Click OK to enter Service Manager.
2. Find Optimize drives, right-click it, and choose Properties.
3. Change the Start type into Automatic and tap Start under Service status.

4. Click Apply and then OK to confirm the settings. This service will run defragmentation and help the system to clean bad sectors when you start transferring data between drives.
Method 3. Disable Real-Time Protection
Real-time protection of Windows Defender Antivirus seems like the cause of the Windows 10 file copy slow in many cases. During data transferring, it might scan all the files for malware presence and significantly slow down the process. Besides, it can also hold up system resources and affect the overall operation smoothness. So you can give it time to disable this feature.
1. Search for “Windows Security” in Windows 10, and go to the Virus & Threat Protection tab.
2. Click Manage settings under Virus & Threat Protection settings.
3. Toggle off Real-time protection and try copying files again. If you want to enable it afterward, just toggle on the button.

Method 4. Disallow Drive Indexing
Windows 10 provides a Drive Indexing feature to help you index local files and get quick access to them when needed, but sometimes it might work during data transferring. In this case, you can try disabling it to figure out whether it’s the reason to slow down your file copy.
1. Open This PC, right-click the drive you want to perform file copy, and choose Properties.
2. Uncheck the option “Allow files on this drive to have contents indexed in addition to file properties” at the bottom and click Apply > Apply the changes to drive X:\, subfolders and files > OK.

3. Restart your PC to make the setting take effect to solve slow file transfer in Windows 11/10.
Method 5. Disable Windows Auto-Tuning
If you're transferring files over a network, Windows 10's auto-tuning feature could play a role. It's meant to enhance the performance of programs receiving TCP data, making file transfers faster. However, if you're using an older router or a firewall that doesn't support auto-tuning, it might actually slow down the transfer speed instead.
To disable Windows 10 auto-tuning, try these steps:
1. Open Command Prompt (you can search for it on the taskbar) and choose to Run as administrator.
2. Type this command and press Enter to disable auto-tuning:
netsh int tcp set global autotuninglevel=disabled
3. Then you can try if the copy speed returns to normal. If it doesn't work, just replace “disable” with “normal” in the command to enable it again.
netsh int tcp set global autotuninglevel=normal

Method 6. Disable Large Send Offload
This is also applied to network file transfer, just like Method 5.
Large Send Offload (LSO) is meant to improve the network performance of the system, but it actually allows background apps to consume a large amount of network bandwidth and therefore slows down the network data transfer speed. So it may be a solution to disable it manually.
1. Search for "Control Panel" on the taskbar to open it.
2. Choose Device Manager and expand Network adapters.
3. Right-click your network card in the list and choose Properties.

4. Switch to the Advanced tab, select Large Send Offload V2 (IPv4), and set the value to Disabled, the same goes for Large Send Offload V2 (IPv6). Hit OK to confirm it.
Then you can restart the computer and try file copy over the network again to check the speed. If the send speed is ok but the receive speed is still slow, just repeat the configurations on that computer sending data.
Method 7. Check the USB port and update the drivers
First of all, make sure your USB or external hard drive is connected to the right port. For example, a drive that supports USB 3.0/3.1 should be plugged into a USB 3.0/3.1 port, otherwise the transfer speed will be affected.
Second, the slow copy speed from Windows 10 to USB or vice versa could also be caused by outdated drivers. To fix it, you can go to the PC’s manufacturer’s website, and download the latest USB drivers. This could ensure your USB drive works well and solve some other glitches as well.
Method 8. Re-format the USB drive
A USB drive is normally formatted with FAT32 by default, which is an older format compared to NTFS. Although the file copy speed is affected by many other factors in practical use, NTFS formatted hard drives have tested faster on benchmark tests. Some users have also reported a significant increase in transfer speeds after converting FAT/FAT32 formatted USB to NTFS. If you want to have a try, here are the steps.
Caution: Be sure to backup the external drive before formatting, because this operation will erase all the data on the USB drive.
1. Right-click the connected USB drive in File Explorer and choose Format...
2. In the popping-out windows, choose NTFS from the list of File systems.
3. Click Start and OK to confirm the operation. Wait until the re-formatting process ends.

Alternative to copy large files smoothly and flexibly in Windows
If you find it troublesome to try these solutions one by one, or all the attempts have unfortunately failed, maybe it’s time to adopt a powerful alternative.
Simply put, AOMEI Backupper Standard, the free data transfer & backup software can offer you a better experience for automatic file sync.

-
Easy and quick transfer: Easily copy (sync) files and folders between two directories. The supported devices include internal/external hard drives, USB drives, NAS/network share and cloud drive.
-
Automatic file copy: If you need to transfer data frequently, you can add a schedule to do automatic file sync, like daily, weekly, monthly, etc.
-
Backup and clone: In addition to file copy, there are also image backup and disk clone features to suit your data protection/migration needs and help for disaster recovery.
With it, you don’t need to suffer from the slow copy speed in Windows 10 especially when you want to transfer enormous data. Download it to have a try. If you want to copy files on Windows Servers, there’s a specialized Server edition.
I’ll give an example of copying files from a C drive to another drive, you could follow the process but make your own configurations. Let’s get started.
How to copy files/folders with free transfer tool in Windows 10
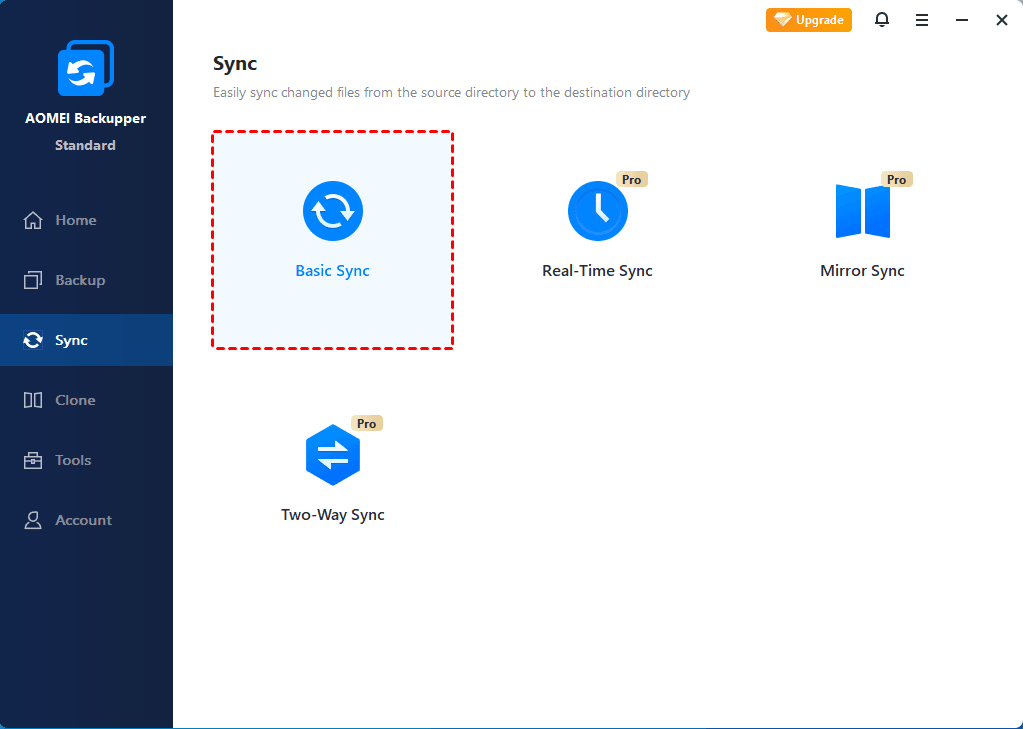
1. Install and launch the software, go to the Sync tab, and choose Basic Sync.
More sync modes in advanced editions:
Real-time Sync: Copy any changes and new files from folder A to folder B in real-time. No schedule is needed.
Mirror Sync: Make folder B identical to folder A. The changes made to folder B solely will be erased at the next sync.
Two-way Sync: Changes made to folder A or folder B will be copied to the other side.
2. Click Select Source to locate the folder (s) containing the files you want to copy.
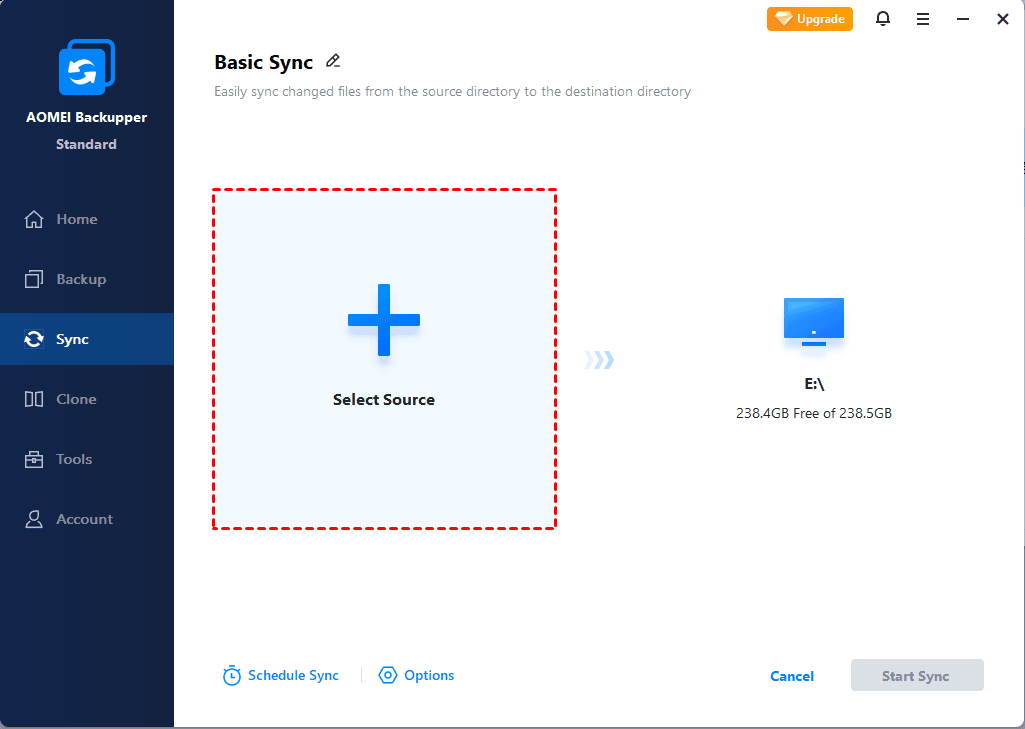
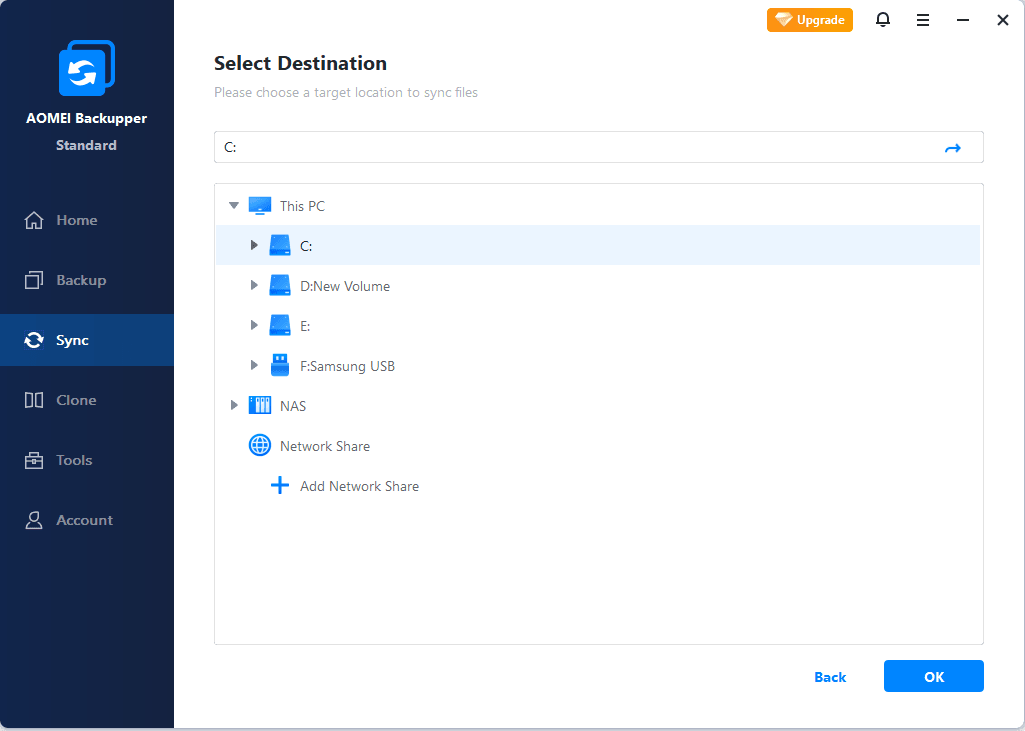
3. Select the target directory. If you want to choose a removable device instead of internal drive, connect it first.
✍Optionally, you can add and select NAS or a network location.
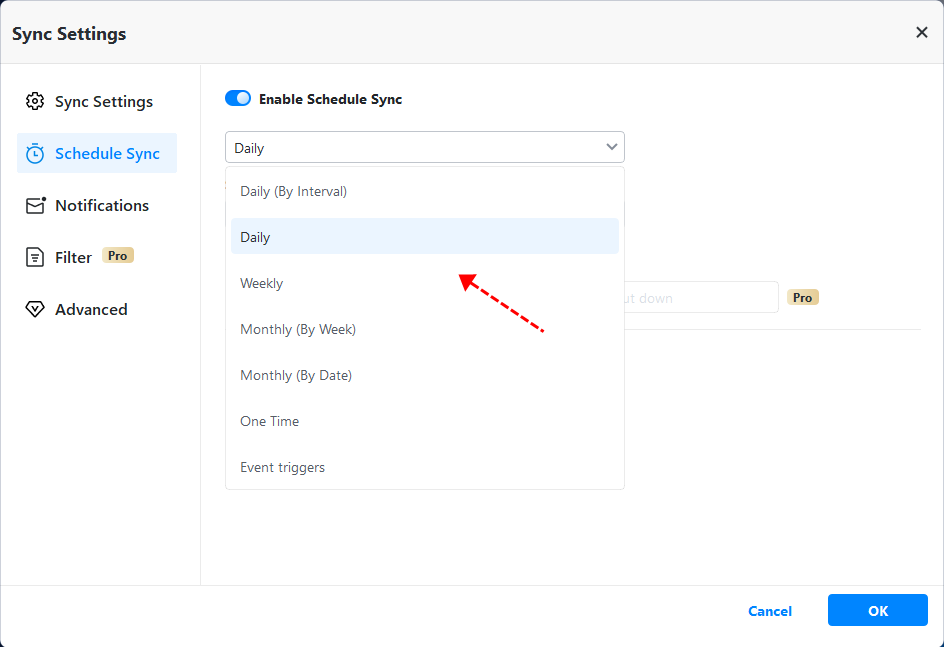
4. Click Schedule Sync to automate the file copy if necessary. You can further refine the settings in the pop-up window, and then Start Sync to execute the task.
✍Schedule Sync options include Daily (By Interval), Daily, Weekly, Monthly (By Week), Monthly (By Date), One Time, and Event triggers.
✍You can manage more settings in Options, like comments, email notifications, operation priority, etc.
💬Tips:
- If you want to copy an entire hard drive, it’s recommended to use its powerful disk cloning feature.
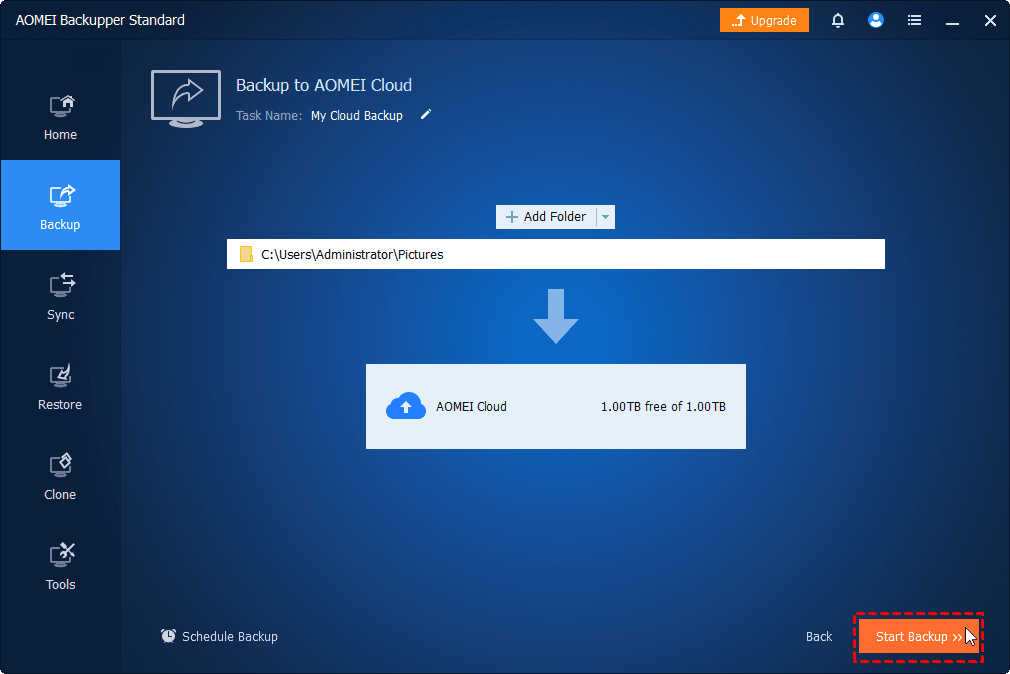
- For users who want to create a cloud backup, but have limited cloud storage, you could consider to backup the folder to AOMEI Cloud, a cloud drive developed by AOMEI Tech, which offers you 1TB free cloud storage from the time you sign up until 15 days. And the process is automatic.
FAQs about Windows 10 file copy
How do I make Windows 10 copy faster?
Why do small files take longer to copy?
How to average copy speed in Windows 10?
Expert Tips for Efficient Windows 10 File Copy
- Use SSDs for Large Files: An SSD dramatically improves file copy speed compared to traditional hard drives.
- Avoid Background Processes: Close unnecessary programs while copying files to allocate more system resources to the process.
- Regular Maintenance: Regularly clean and defragment your hard drive to maintain optimal file copy performance.
Verdict
Copying and pasting files on a computer is a routine task, but many users have faced slow file transfer speeds in Windows 10, and in some cases, the speed drops to zero.
There are several reasons for this issue, and you can try the suggested solutions above to resolve it. However, if troubleshooting doesn't work or you still face the problem, AOMEI Backupper offers a faster, simpler alternative for copying files. It’s particularly useful for transferring large amounts of data, and its disk clone feature makes it easy to back up or replace your entire hard drive, even skipping bad or unused sectors, so as to clone a larger drive to a smaller drive.

