How to Run Sysprep in Windows 10 and 11 | Step by Step
To deploy OS to different computers, you can run Sysprep in Windows 10 to prepare a system image. This article provides a detailed tutorial and also an easier alternative.
By Lily Updated on September 12, 2025
What Does Sysprep Do in Windows 10
What is Sysprep (System Preparation) in Windows 10/11? Built into Windows, it is often used to prepare a system image, which can be deployed to multiple computers. The preparation process is also called generalizing the image.

Each time you install Windows on a computer, the operating system assigns an unique SID (Security Identifier) on it. If you create a system image for the purpose of installing the same OS on multiple computers, the SID info will be copied to the other devices as well, which may cause some problems.
To avoid WSUS incompatibility and such issues caused by SID duplications on the same network, you must remove the computer-specific information. Luckily, Microsoft provides Sysprep to not only clear the SID information, but also generalize new SIDs for client computers. It helps you to prepare a Windows image for deployment.
After generalizing the Windows 10/11 OS, you can capture the image for deployment with the best image deployment tool.
How to Sysprep Windows 10 Step by Step
You can use Sysprep to remove computer-specific information (SID, GUID, etc.) and generalize the image. Here I will take Windows 10 as an example.
Step 1. Configure a reference computer.
Before generalizing the image and deploying it, first you need to configure a reference computer. This means:
- An up-to-date Windows build;
- A clean Windows installation;
- Necessary drivers, applications, and configurations.
Step 2. Run Sysprep in Windows 10.
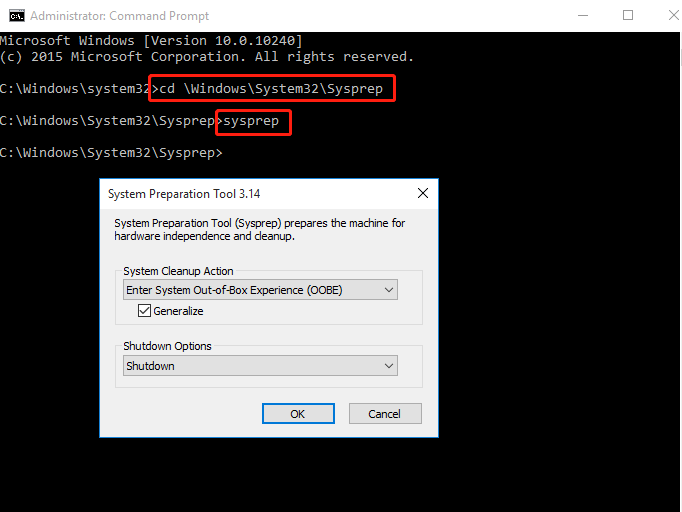
To run Sysprep in Windows 10, press Windows logo key + X at the same time. Select Command Prompt (Admin) from the menu.
Type the following command and press Enter, this will change the working directory to “Sysprep”.
cd \Windows\System32\Sysprep
Step 3. Generalize system image using Sysprep.
Then, enter this command to generalize system image:
sysprep /generalize /shutdown
*If you are running Windows 10/11 in a VM, you can generalize the OS by: sysprep /generalize /mode:vm
Optionally, you can type sysprep and press Enter to open Sysprep GUI mode. Choose Enter System Out-of-Box Experience (OOBE) and tick the Generalize checkbox. Select Shutdown from the drop-down menu. Then click OK.
✍Tips:
-
To explore the command line mode, you can type sysprep /h and then press Enter at Step 3.
-
Enter System Out-of-Box Experience (OOBE): prepares the server as if it is powered on for the first time.
-
Generalize: removes SID information from the image.
-
Shutdown: once Sysprep completes, shutdown the server.
-
The above steps also work when you want to run Sysprep in Windows 11.
Step 4. Capture a Syspreped Windows 10 image.
If you want to use Sysprep for cloning Windows OS over computers, you still need to prepare the image for deployment.
After generalizing the image using Sysprep, the reference device will shut down. Next time you start the device, it will boot into OOBE.
📢Note: Don't power on the reference computer until you have captured an image. Otherwise, you'll need to repeat the Sysprep process.
Then, to create a system image for deployment, you will need to do the following in conventional means:
>> Create a bootable USB drive from another computer.
>> Boot the reference computer from the bootable USB drive. You may need to enter BIOS (by pressing a specific key during startup) and select the USB as the first boot option. Then the computer should be able to boot into WinPE.
>> Access Command Prompt from WinPE, then you can use DISM to capture Windows 10 image. For example:
DISM /capture-image /imagefile:C:\IoTOS.wim /CaptureDir:C:\ /Name:"Windows 10 IoT Enterprise"
This will capture an image of the Windows partition and store it on C: drive.
>> Copy the system image to an external drive or network location. And you can use the bootable USB drive again to deploy the system image to other computers.
For specific steps, please refer to this Microsoft document.
Create and Deploy Windows 10/11 System Image without SID (Easier)
Since Sysprep is only for generalizing image, you still need a simple and reliable tool to capture and deploy system image. Although there are some Windows built-in tools can help you do that, you will find the whole process complex and unfriendly to novices.
Therefore, I would like to introduce you an easier way to complete the series of operations - that is using the all round Windows backup & restore utility AOMEI Backupper Technician Plus.

▪ Use the Create Bootable Media feature to prepare a WinPE drive.
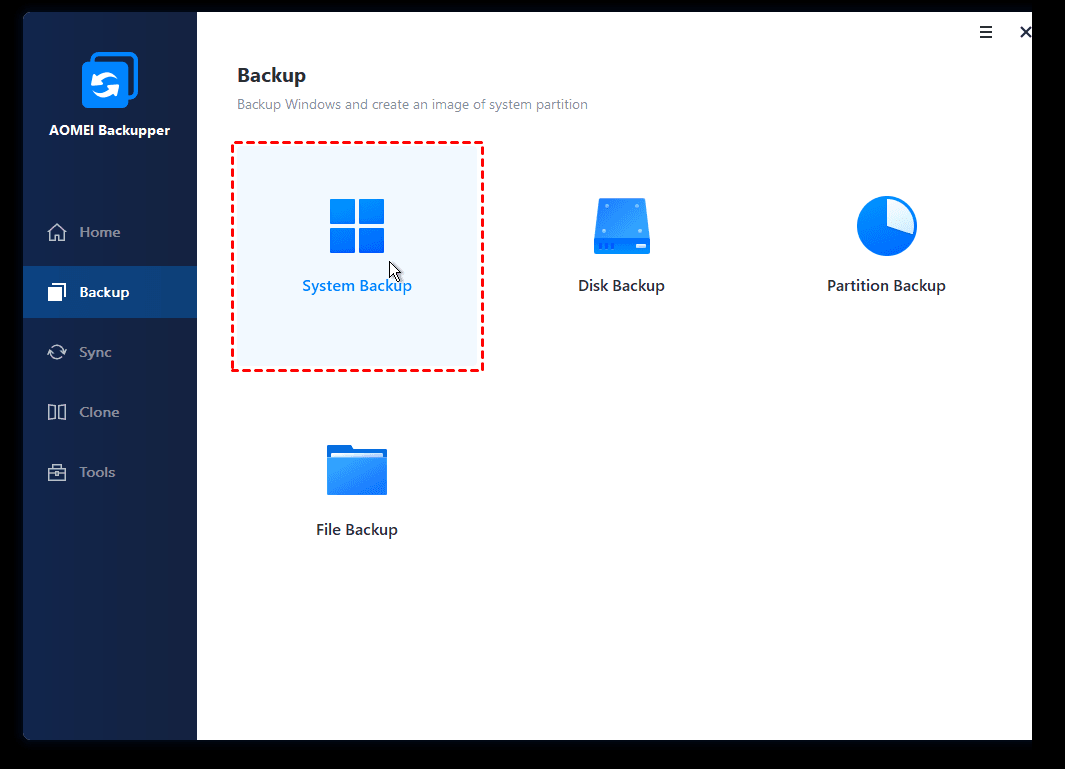
▪ Create a Windows image via the System Backup feature.
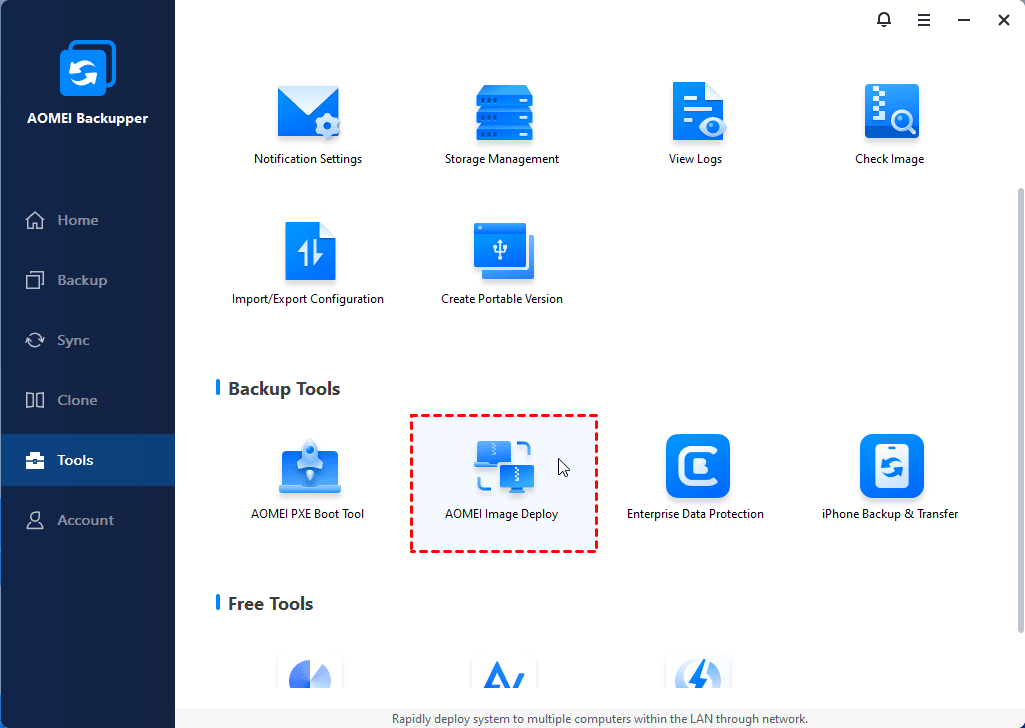
▪ Deploy system to unlimited computers over network with the embedded AOMEI Image Deploy tool.
Compatible with Windows 11, 10, 8.1, 8, 7 (all editions, 32-bit and 64-bit) and Server 2025, 2022, 2019, 2016, 2012, 2008 (including 32/64-bit, R2/SBS/WHS).
How to capture Windows 10 image without SID
-
Make sure that all the required computers are on the same network, and all client computers support PXE boot (if not, exclude it please).
-
The disk sequence numbers for storing system in target computers must be the same. Move out other disks and only keep the destination disk.
-
Launch AOMEI Backupper to make your partitions be marked. Then go to the Tools tab to create bootable media.
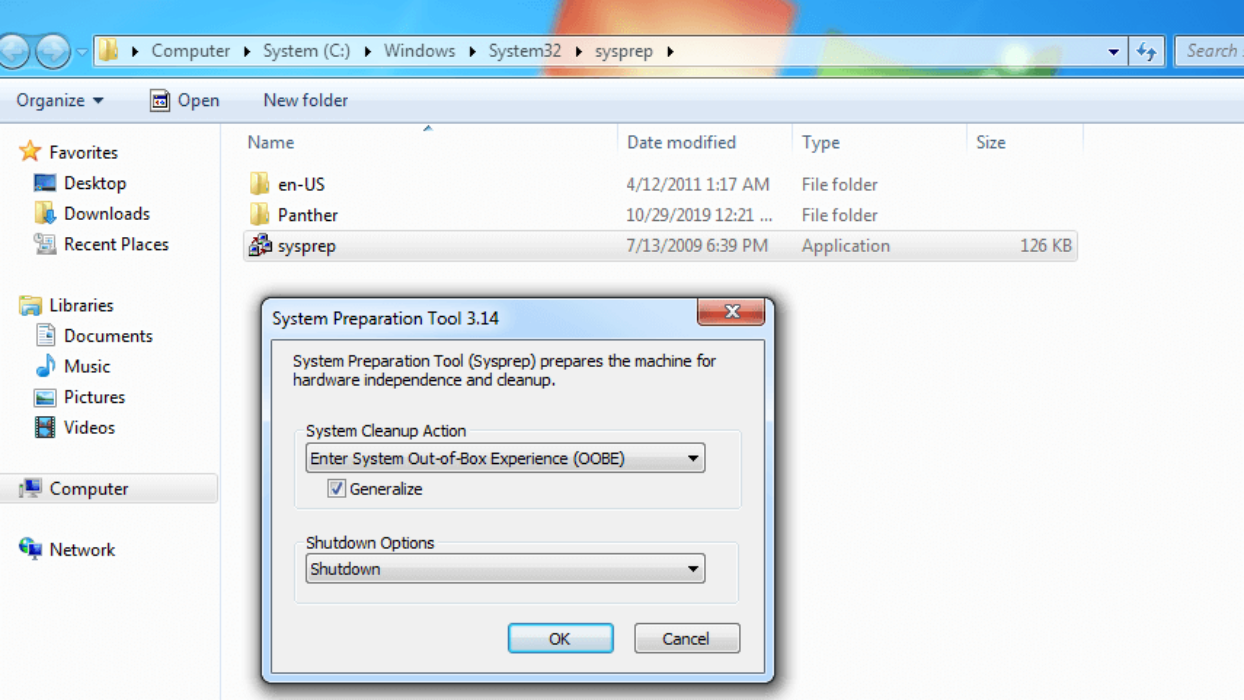
1. First, press Win + R and enter "sysprep" in the textbox to find Sysprep.exe. Run it and choose Enter System OOBE, tick Generalize option, and select Shutdown. This step is to remove SID and avoid related issues after deployment.
2. Click OK and the computer will shutdown automatically. You can then boot the computer into WinPE with the bootable media you created, and perform a full system backup with the pop-up AOMEI Backupper.
📢Note: Please boot into WinPE right after running sysprep, or the new SID information will be created.
How to deploy Windows 10 image to multiple computers easily
1. When the syspreped Windows image is ready, you can go to Tools tab, and choose AOMEI Image Deploy to deploy the system image you just created.
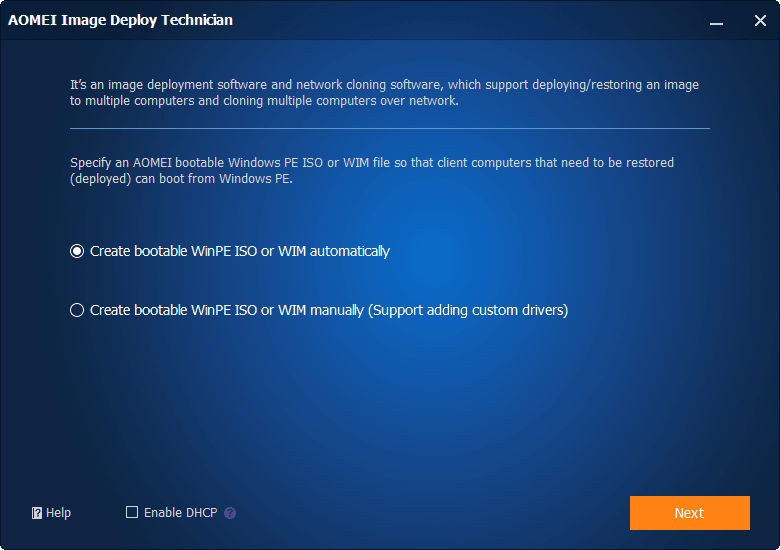
2. In the AID window, choose Create bootable WinPE ISO or WIM automatically to create a bootable Windows PE ISO.
In case the drivers being incompatible with your hardware and the WinPE cannot start up the client computers, you can also choose Create bootable WinPE ISO or WIM manually to add custom drivers into WinPE.
📢Note: There must be a DHCP server in the LAN for system deploy over network. If not, tick Enable DHCP.
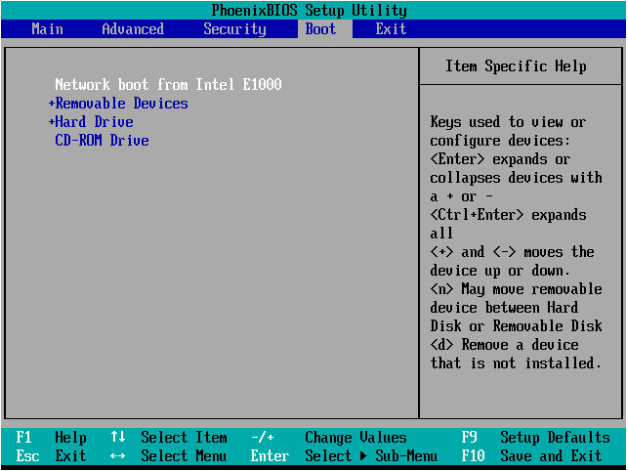
3. When the tool shows "The service has started, waiting for connect...", it's time to start all the client computers. If all the settings are correct, they should boot into AID recovery environment, otherwise you can enter BIOS to set the network boot as the first boot option.
4. Here you can see the status for all client computers. Once a computer connects to AID successfully, you will get "Client computers connected". When all the client computers are ready, check I confirm all the... and click Next.

5. Here comes the guide for deploy configuration. For more details, please refer to image deployment.
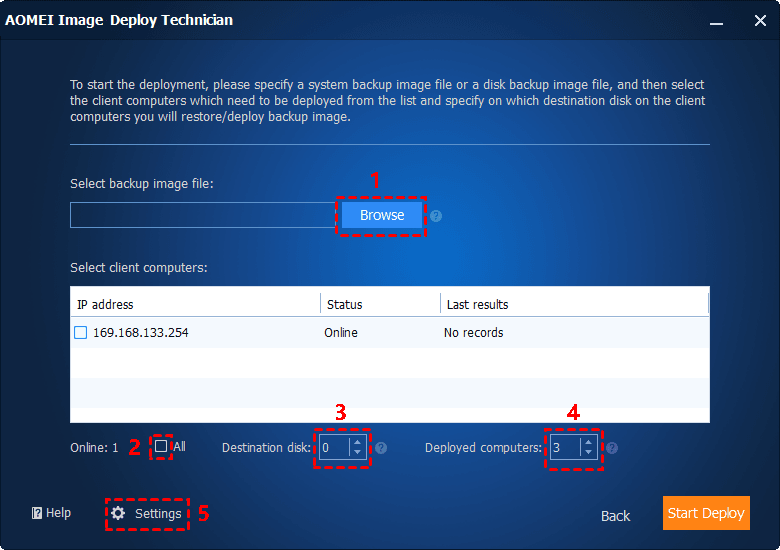
a. Choose Browse to find your system image.
b. Select the client computers you need or click All to select all connected computers.
c. Input the destination disk number. If all the client computers have only one disk reserved, the disk number is 0.
d. Decide how many computers will be deployed each time.
e. Click Settings to set computer name. Then click OK.
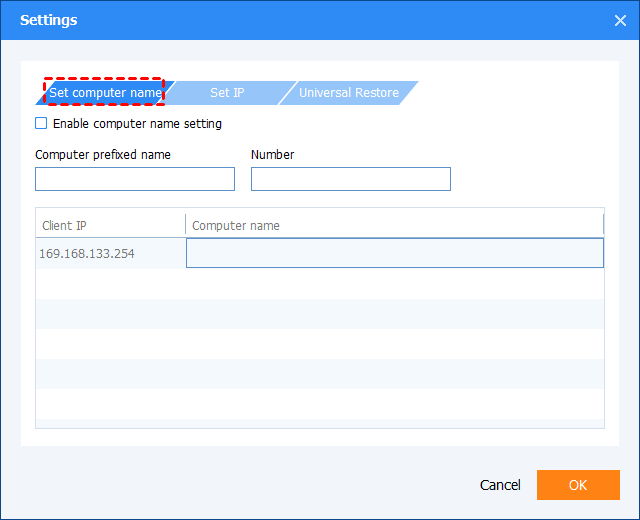
Set IP: click it to preset IP address.
Universal Restore: you can deploy system image to computers with different hardware.
6. After confirming your operations, you can click Start Deploy. Then choose whether to shut down or restart the client computers.
Extend Reading: Reliable Enterprise Backup and Recovery Solution
After deploying system image to multiple computers, you’d better create a backup for each computer regularly. AOMEI Cyber Backup, the best backup software for businesses of all sizes, can give you a hand.
- It enables you to create system/disk/partition backup for a bunch of Windows PCs and Servers from one central console.
- You can schedule a backup task to run daily/weekly/monthly using the full/incremental/differential backup method.
- You are allowed to restore the backup image to the same computer or different computer.
- If your backup has multiple versions, you can choose to restore from any point you want.
Download this powerful enterprise backup software now!
To make backups for client computers, just log in AOMEI Cyber Backup, and add the Windows device that you want to backup. Then click Backup Task on the left menu bar and select Backup Task > Create New Task.

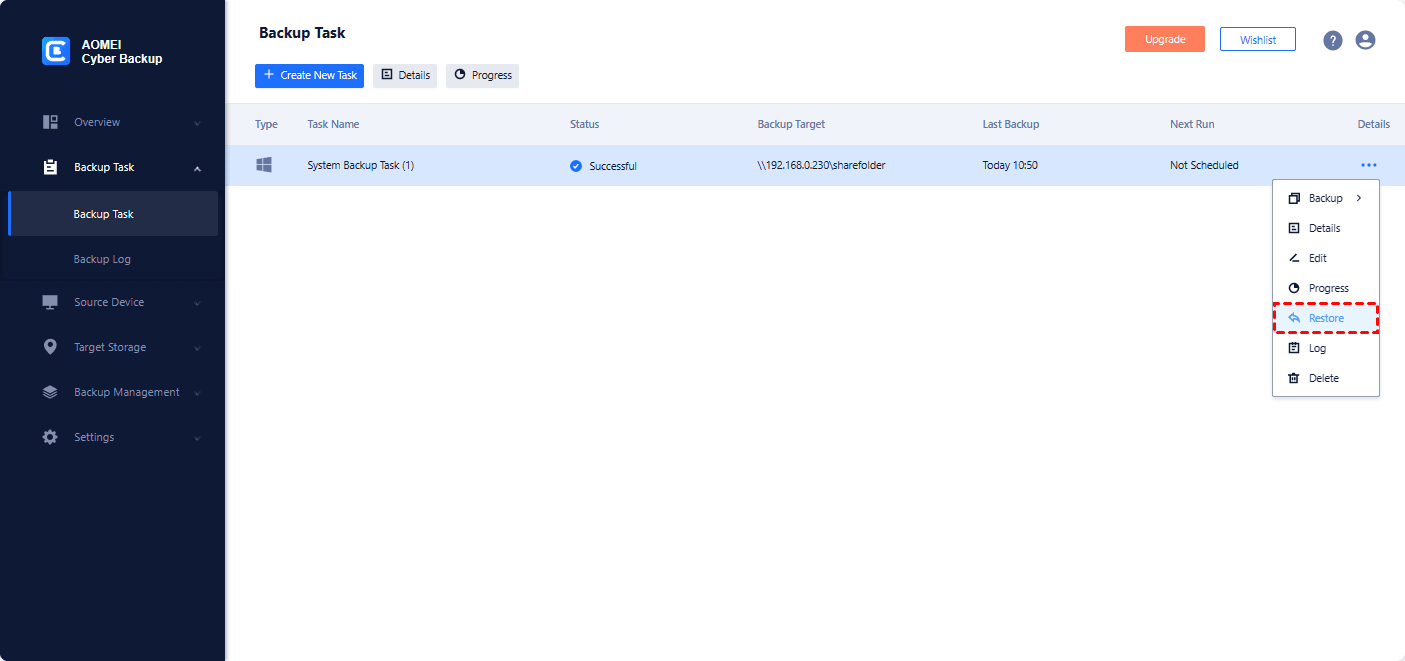
To restore data on client computers, you need to click Backup Task on the left menu bar and click the three dots icon on the task you want to restore. Then select Restore from the drop-down menu.
Note: AOMEI Cyber Backup can not only help you backup physical machines but also virtual machines. It enables you to backup VMware and Hyper-V easily.
FAQs about Sysprep on Windows 10
Verdict
Although Windows users are given many tools to deploy system image remotely, you must prepare the system image using Sysprep in Windows 10. For many users, Sysprep is time consuming and complex, and sometimes it even goes wrong.
However, the Image Deploy Tool of AOMEI Backupper makes a real difference. By using it, you don’t need to be worried about Sysprep limitations. What’s more, it serves you well as an Acronis Snap Deploy alternative.

