6 Methods | Fix or Reset Windows Update in Windows 11/10
This guide will walk you through multiple methods to reset Windows Update. Additionally, you’ll find answers to frequently asked questions, technical explanations, and practical tips to help you maintain a stable Windows 10 update environment.
By Sebastian Updated on August 28, 2025
How to Reset Windows Update Components
“I have been suffering from some complex problem with my pc. Could not be able to fix such as low memory space, automatically restart the pc itself, etc. So I would like to update my Windows 10 but whenever updating Windows it creates an error. So I think before doing this I should reset the updated components.
So anyone kindly tell me the way to reset the Windows update components and also further steps to fix the problem for updating Windows? Thanks”
– Microsoft Community
Windows Latest Version: Windows 11 23H2 Update
Windows 11 23H2, released on October 31, 2023, is the second major update for the operating system, bringing a host of new features and improvements. Curious about what's new? Here's a quick rundown:
AI-Powered Copilot: Say hello to Copilot, the new AI assistant that replaces Cortana for smarter, more efficient help.
Upgraded File Explorer: A refreshed design, enhanced Gallery page, and new Details pane, with added support for file formats like RAR, 7z, GZ, and TAR. Plus, Nearby Sharing makes transferring files between computers easier.
App and Tool Upgrades: A new Windows Backup app and revamped Outlook email client, along with updates to Paint, Photos, Snipping Tool, Clipchamp, Notepad, and more.
The version update also brings new changes, while the update still brings some reporting errors according to users who have updated. Therefore, many users have chosen to uninstall Windows 11 23H2, and we hope that you will make a good backup of your system before updating to protect your important data.
⚠️Notes: Other than Windows Update, different issues can cause system errors. To avoid constant troubleshooting, it's recommended to establish a backup plan in Windows 10/11. Essentially, by scheduling regular system backups, you can easily restore your system to a previous working state if problems arise. AOMEI Backupper Standard is a suitable option for this purpose. Click the jump link below to quickly get the guide. What are you still hesitating about?
👉How to Restore Windows 10/11 to Earlier State to Fix System Issues
Have trouble Updating Windows?
Installing Windows 11 or 10 updates allows you to explore new features, handle new security threats, and improve system performance. But you may also encounter problems such as being unable to search for new updates, being stuck in the download process, or eventually failing to install it. (Recently, some users reported that they failed to install the KB5034441 update.)
In these cases, you may wonder how to reset Windows Update. Another related scenario is that you receive system errors after installing an update, and in severe cases, you can't even start the computer. At this point, you may want to rollback or uninstall the update.
How to solve these problems? Here's a comprehensive tutorial.
How to Reset Windows Update in Windows 11/10 (6 Methods)
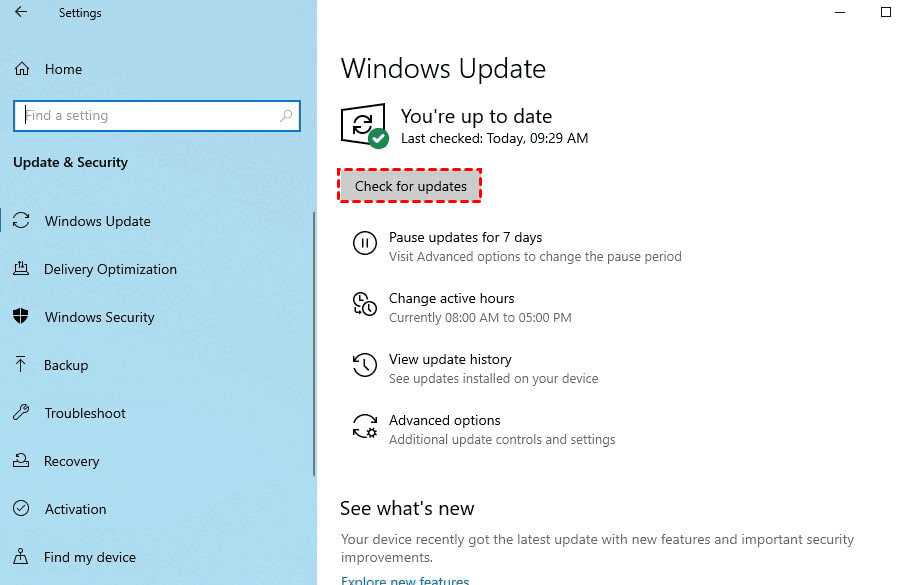
Usually, you can check and download new updates in Settings > Update & Security > Windows Update. But if you encounter problems like Windows Update stuck, you can try the following methods to fix or reset it.
| 🩺Windows Update Troubleshooter | Use troubleshooter to fix downloading or installing errors.»
|
| 💻Command Prompt | You can use SFC and DISM commands to fix corrupted system files.»
|
| 🚀Clear cache | Clear Windows Update cache to reset the download.»
|
| 💱Reset components and policies | Use Command Prompt to reset Window Update components.»
|
| 💾Install the latest SSU | Servicing Stack Updates provide fixes to the servicing stack that installs Windows updates.»
|
| 📂Install the update manually | You can also manually download the update file to install it.»
|
Regularly backing up your system is essential for preventing various Windows errors and minimizing data loss. Click "More" to get the complete backup guide:
✍Tips: Always Be Prepared
To prevent various Windows errors and data loss, it's also a necessity to back up your system regularly. More »
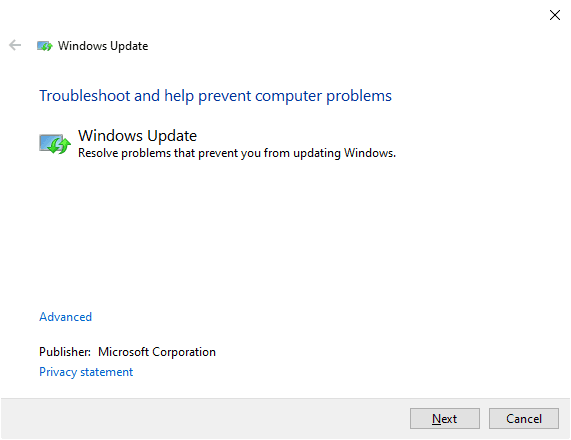
Method 1. Fix errors via Windows Update Troubleshooter
To reset Windows Update in Windows 10 or 11, you can start by using the Windows Update Troubleshooter, a built-in tool designed to fix errors related to downloading or installing updates. It's worth trying if you're encountering issues.
- For Windows 10, go to "Start" > "Settings" > "Update & Security" > "Troubleshoot" > "Additional troubleshooters" > "Windows Update" > "Run the troubleshooter."
If "Additional troubleshooters" isn't available, open "Control Panel" (set to view by large or small icons) > "Troubleshooting" > "View all" > "Windows Update."
You can also download the WindowsUpdateDiagnostic.diagcab tool directly by clicking HERE.
👉If you are trying to reset the Windows 11 update, you could go to "Start"> "Settings" > "System"> "Troubleshoot" > "Other Troubleshooters", scroll down to "Windows Update" and select the Run option to launch the Software update troubleshooter. After that, it will start to check the default checks and fix issues during the process.
2. By running this troubleshooter, you can detect and resolve problems that prevent you from updating Windows. If you are given the option, you can also “Try troubleshooting as an administrator”.
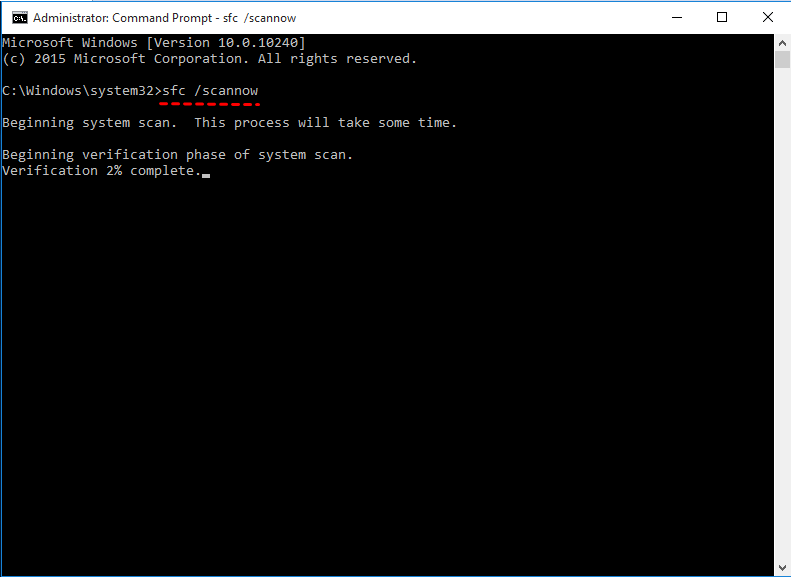
Method 2. Repair corrupted system files with Command Prompt
Windows Update problems could be caused by corrupted system files. For this situation, you can use Command Prompt to fix them. The frequently used commands are SFC and DISM.
1. Search for “Command Prompt” in Windows 10/11, and run it as administrator.
2. Type this SFC command and press Enter to check and fix system files:
sfc /scannow
If you can’t run SFC tool or SFC can’t fix the problem, you can also try DISM tool. The command is:
dism.exe /Online /Cleanup-image /Restorehealth
After fixing corrupted system files, restart the computer to check if Windows 11/10 Update works normally now.
Method 3. Clear Windows Update cache
Sometimes the corrupted or overloaded cache files could also cause problems, so you can clear Windows Update cache in Windows 11/10 to reset the download.
1. Before starting, you need to stop the Windows Update service. Search for “services” on the taskbar and run it as administrator. Then find “Windows Update” from the list and “Stop” it.
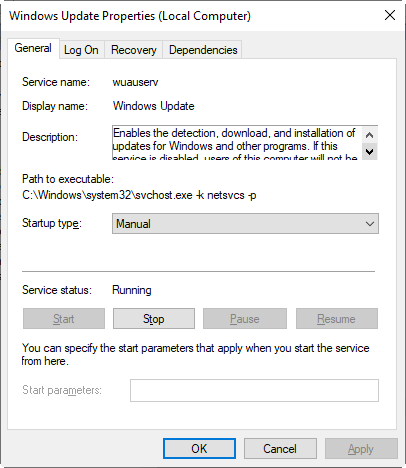
2. Go to C:\Windows\SoftwareDistribution\Download, and delete all the files in it. Thus the Windows Update cache is cleared.
3. Select Windows Update service again by the path in Step 1, and “Start” it.
Then you can try checking for update and download it again.
Method 4. Reset Windows Update components and policies
A powerful way to fix this kind of issue is to reset Window Update components. Normally you can implement it by Command Prompt in Windows 10/11, but the steps are rather cumbersome (see this tutorial). So instead of entering all the commands manually, you may want a Windows Update reset script to complete all the steps automatically.
Fortunately, you can find such a bat file for resetting Windows Update components.
Download the bat file from the pages below:
How to Reset Windows Update in Windows 10
How to Reset Windows Update in Windows 11
And then follow the guide to run it. Thus most of Windows Update shall be resolved at once.
Note: You should sign in as an administrator to reset Windows 11/10 update.
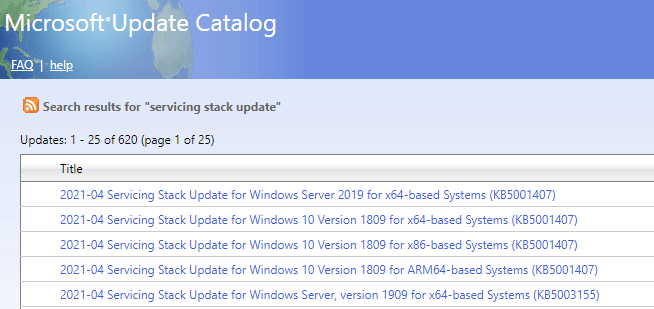
Method 5. Install the latest Servicing Stack Update
Servicing Stack Updates provide fixes to the servicing stack, which is the component that installs Windows updates. So you can try installing the latest SSU manually to fix Windows Update errors.
1. Go to Microsoft Update Catalog, search for “servicing stack update” and download the latest Servicing Stack Updates. Note there are different version for different architectures (x86/ARM64/x64).
You can find your architecture by this path: “Control Panel” > “System” > “System type”.
2. Double-click the downloaded file to install the SSU update.
Restart your computer and check if your problem has been solved.
Method 6. Install the latest update manually
Similar to the last method, if you can’t download the update in Settings, you can manually download the update file to install it.
1. First, you should know the latest version of Windows 10 or 11. If you have a problem searching for new update, then you can view the Windows Update history page and find the KB number of the latest version:
2. Search for the version number in Microsoft Update Catalog, it will provide you download links for different architectures (x86/ARM64/x64).
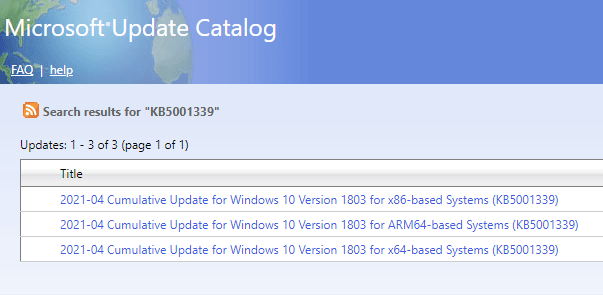
3. Run the downloaded file to install this Windows update.
After finishing and restarting, your update problems should be solved.
How to Rollback Windows 11/10 Update If You Don't Want It
If you successfully install an update but encounter serious system problems afterward, you can revert to the previous version as a solution. But the approaches to rollback major updates and minor updates of Windows 10 are different.
☛ For a major feature update, Windows will keep the old files within 10 days allowing you to roll back. Once this period is exceeded, these files will be deleted and you cannot revert to the previous version. So you must act fast.
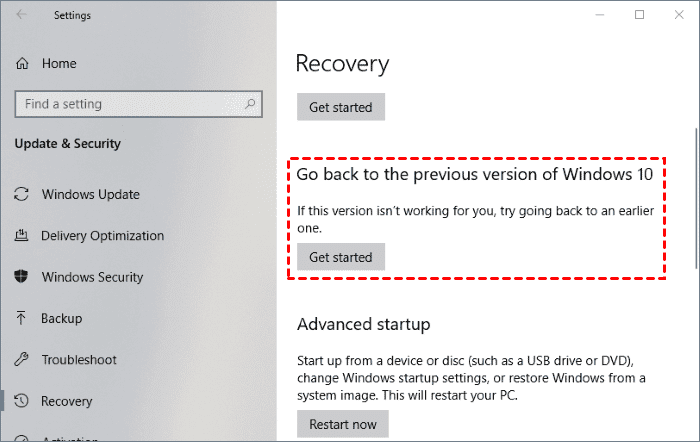
The path to uninstall a major update in Windows 10:
“Start” > “Settings” > “Update & Security” > “Recovery” > “Go back to the previous version of Windows 10“ > ”Get started“
*If there’s no “Go back to the previous version” section, then it should have been more than 10 days since you updated.
To uninstall a major update in Windows 11:
“Start” > “Settings” > “System” > “Recovery” > “Previous version of Windows 10“ > ”Go backup“
It helps you return Windows 11 to Windows 10.
☛ For a smaller Windows update that just fixes some minor bugs and improves system performance, you can undo it quite easily.
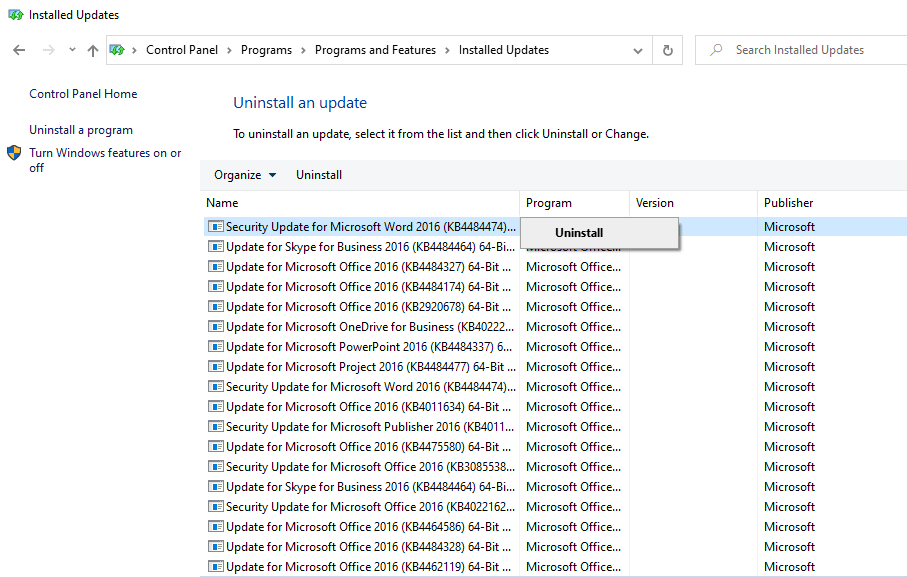
The path to uninstall a minor update in Windows 10:
”Start“ > ”Settings“ > ”Update & Security“ > ”Recovery“ > ”Windows Update“ > ”View update history“ > ”Uninstall updates“
If you want to uninstall a minor update in Windows 11:
”Start“ > ”Settings“ > ”Windows Update“ > ”Update history“ > ”Windows Update“ > ”Related settings“ > ”Uninstall updates“
In the popping-out window, you can select the update you want to remove and then “Uninstall” it.
*It’s possible that none of the above methods works, or you find that there are other system problems that have not been resolved. For these situations, you could consider taking a more secure disaster recovery strategy as follows.
How to Restore Windows 10/11 to Earlier State to Fix System Issues
Windows is very powerful but also fragile. Unexpected problems happen now and then. Known issues include "Some Windows devices might start up to an error (0xc000021a) with a blue screen" and "Security Update for Secure Boot DBX might fail to install". We are even less able to predict what the consequences of the next update will be.
Besides Windows Update, there can be many other system errors caused by various reasons. If you don't want to go through the trouble of troubleshooting every single time, it's advised that you develop a good backup strategy in Windows 10/11.
Simply put, you can set up a regular system backup task at once so that if something goes wrong, you can quickly restore your system to a previous state. In this case, AOMEI Backupper Standard can be a good choice.

- Versatile Backup Options: Diverse backup options are available. Easily backup Windows OS to various devices and restore whenever needed.
- Scheduled and Efficient Backup: Efficiently manage backups through scheduling. Save storage space by utilizing incremental or differential backup methods.
- Versatile Backup: Enjoy versatility in backup capabilities. Back up the operating system, partitions, or specific files/folders according to your needs.
- Efficient Sync Capability: Utilize the sync feature for seamless folder synchronization. Whether it's syncing a local folder to a network drive or vice versa, maintain an intact copy of your files effortlessly.
In case the PC fails to boot due to system errors, it’s also a good idea to create a bootable media with AOMEI Backupper. Thus you can boot the faulty computer into WinPE and perform a system restore as normal.
In advanced editions like Professional, you are also allowed to restore the system images to another computer or set up a scheme to auto-delete old backups.
What you could do for OS and data protection:
◉ Download and install AOMEI Backupper.
◉ Launch the software and go to the Backup tab to create a scheduled System Backup task. It’s recommended not to store system images on the local drive.

◉ Go to the Tools tab and use the Create Bootable Media tool in case of boot failures.

How to restore Windows 10/11 to an earlier normal state:
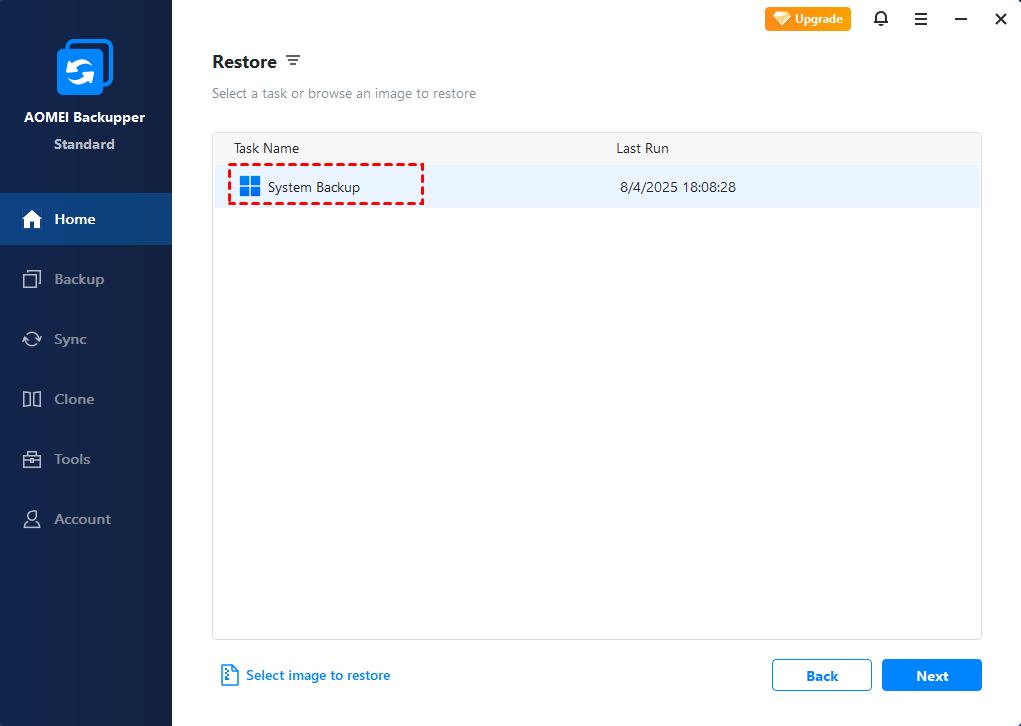
1. Go to the Home > Restore, and choose the target backup task or click on Select image to restore to locate the system backup you created.
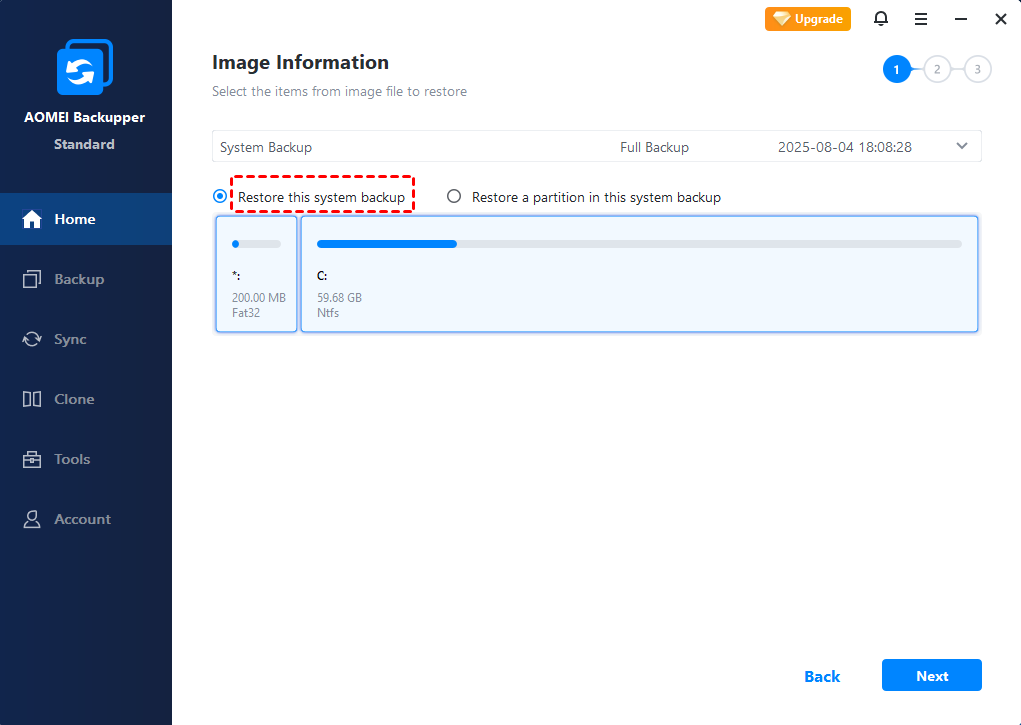
2. Choose Restore this system backup and click Next. If the drive letters and folders have changed, please select Restore to a new location and specify the path you want.
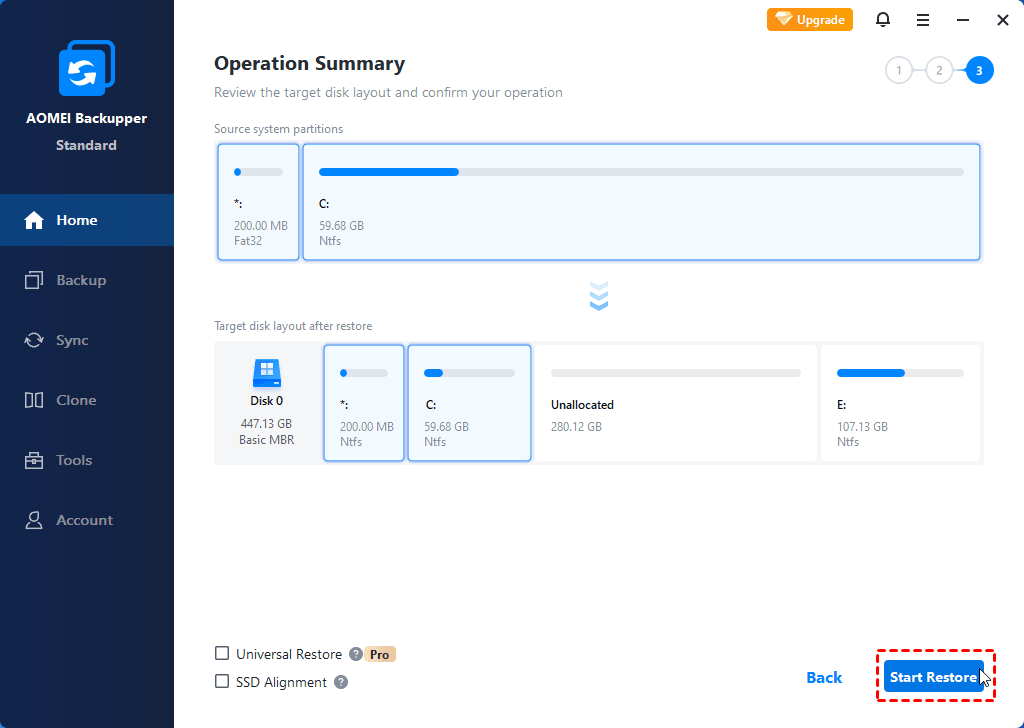
The Standard edition supports restoring the system image to the new hard drive on the same PC. If you want to restore the system image to another computer with different hardware, please upgrade to the Pro edition and tick the Universal Restore feature.
3. Confirm the operation and Start Restore.
FAQs About Reset Windows Update in Windows 10
Key Tech Terms Explained
-
SoftwareDistribution Folder: This folder stores temporary files needed for Windows Updates. Sometimes these files get corrupted, and renaming the folder can resolve update issues.
-
BITS (Background Intelligent Transfer Service): A service that transfers files between a client and a server, primarily used by Windows Update to download updates in the background.
-
Catroot2 Folder: A system folder used to store signatures of Windows Update packages. Resetting it helps resolve update failures.
Helpful Tips to Avoid Windows Update Issues
-
Keep Your System Clean: Regularly perform system maintenance, such as running disk cleanup and checking for malware, to keep your Windows Update running smoothly.
-
Install Updates Regularly: Don’t delay installing updates. The longer you wait, the more likely issues may arise.
-
Use a Reliable Internet Connection: Ensure a stable and fast internet connection to avoid incomplete or corrupt update downloads.
Conclusion
When you fail to download or install an update, you can reset Windows Update in Windows 10/11 to do it again; When a Windows Update causes system failures and even prevent you from booting the computer, you can uninstall the update to cancel all the changes. But if you want a more universal solution to solve all the system problems, you could try AOMEI Backupper.
It enables you to back up the system automatically and restore to any previous version when needed. Even if your computer breaks down suddenly, you can recover it by system image and recovery media on another working PC.
Not only backup, this software also includes a disk clone feature to help you migrate OS and all the data from one hard drive to another. So you can easily transfer Windows 10 from one SSD to another, clone the hard drive in Windows 11, and clone the entire HDD to SSD.