Auto Sync Folder to Network Drive in Windows 10 (2 Ways)
Syncing local folder to network drive automatically is one of the best ways to protect data in the long-term. For easy access, you can choose to make network files available offline.
By Ivy Updated on September 2, 2025
“Is there any way to automatically copy files to a network drive? Hello all! I am trying to mirror the My Documents folder on the C drive to another mapped network drive folder, so if I save something to My Documents, it automatically gets duplicated. Is this possible within Windows and is it possible to set up it in real-time?”
Need to auto sync local folder to network drive ❗❗❗
Syncing folder to network drive is one of the most popular ways to keep data safe since it will make two or more identical folders. To keep all changed files between source and destination directory, you can choose to sync files manually or automatically copy files to network drive.
If you sync files manually, there is a data loss risk due to forgetting to sync changes after making them. Hence, it's suggested to run scheduled file sync tasks, and the frequency may vary depending on your situation.
-
Real-Time: It will sync files in real-time, in a simple word, sync files now once changes made.
-
Hourly/Daily: It is based on daily, and then, choose to run once or multiple times. Among them, the shortest interval is 1 hour.
-
Weekly/Monthly: For files you don't often change, you can sync files in a longer frequency, such as every week or month.
How to sync folder to network drive automatically
In fact, there are multiple ways to automatically copy files to network drive, and among them, file sync software is the easiest way for all users. While for IT technicians, more thoughtful and like customizable, command line utility like Robocopy will be a better choice.
Method 1: Automatically sync folder to network drive with AOMEI Backupper 🔥
AOMEI Backupper Professional has a user-friendly design, and easy to operate. With it, you can sync files to network drive automatically in simple clicks.

- 4 sync solutions: 1 basic option - Basic Sync and 3 advanced options - Real-Time Sync (to sync files in real-time), Mirror Sync, and Two-Way Sync.
- Multiple sync destinations: Besides network drives, you are able to sync files to external hard drives, flash drives, cloud drives like OneDrive, etc.
- More flexible sync settings: You can sync files once or multiple times in a day, weekly, monthly, or using event triggers and USB plug in.
- Multi-system compatible: It is capable of syncing files in Windows 7, 8, 10, 11. For server users, try the AOMEI Backupepr Server.
Here's a 3-steps guide to sync folder to network drive in Windows 10:
Step 1. Download file sync software - AOMEI Backupper to get started. After installing, open it and click "Basic Sync" under the "Sync" tab.

- Real-Time Sync: It will sync files right now when you make any changes. This is the fastest way for automatic sync.
- Mirror Sync: It helps a lot to avoid any unwanted changes in the destination directory while syncing files from one folder to another.
- Two-Way Sync: Unlike the previous 3 methods, it syncs files and changes between source and destination directories, especially useful for team collaboration.
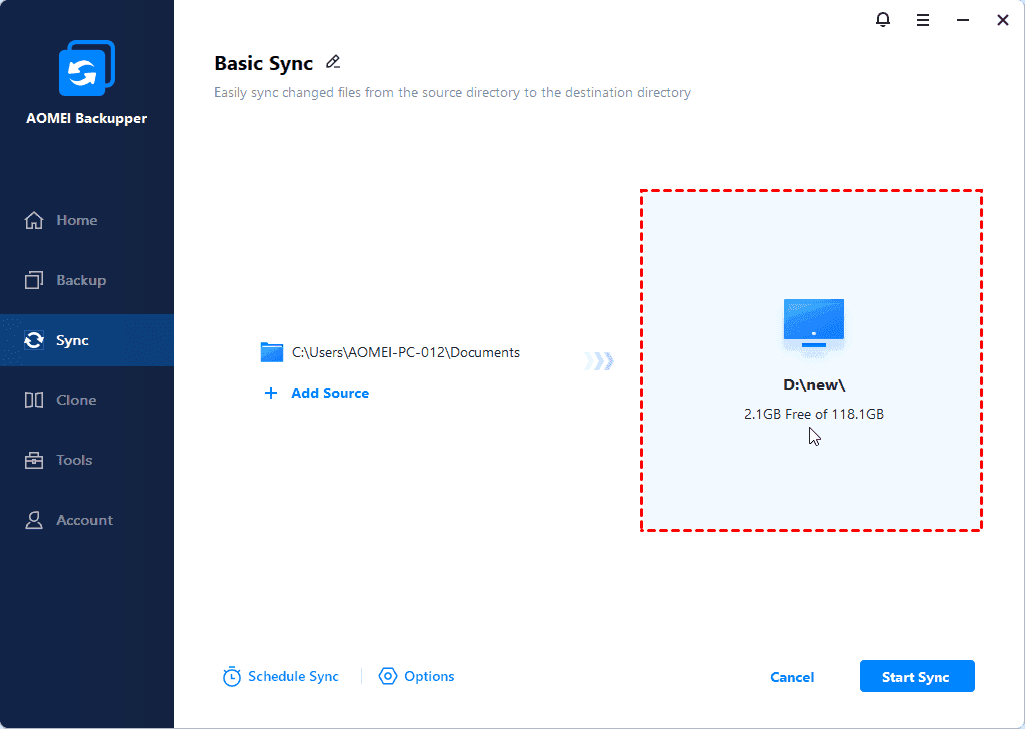
Step 2. In this window, you need to do two steps sequentially, namely, select the folder you want to sync and network drive.
① select the folder you want to sync:
Click “Select Source” and browse to the folder's location. Then, select the folder containing files you want to sync.
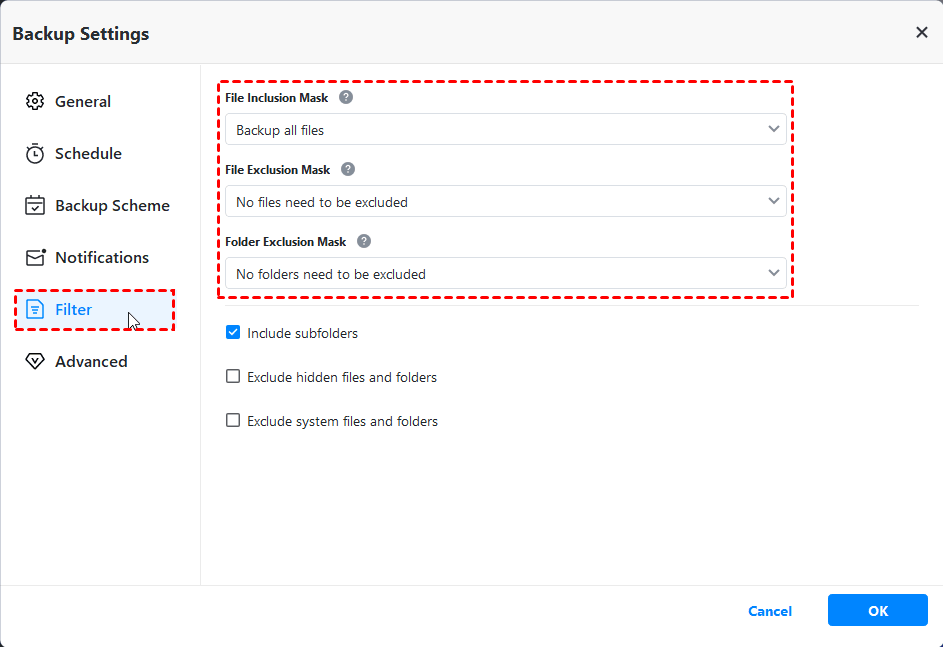
After selecting the folder, you still can click Option > Filter to sync files with certain file extensions. With it, you can exclude or include certain file types by directly typing them in the corresponding box.
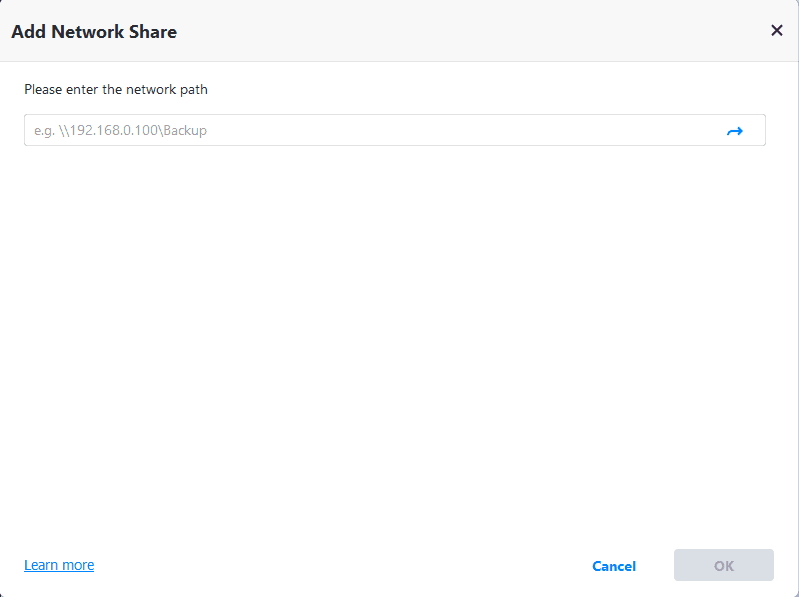
② Select the network drive to sync to
Click the PC icon and go to Network Share > Add Network Share. Then, type the network path and select a folder on network drive to save files. Note that only the shared folder will be displayed on the network path.
Step 3. Click "Schedule Sync" at the bottom and enable it, then select any schedule sync you like. Then, click “Start Sync” to sync folder to network drive.
You can select schedule settings based on different frequencies, specific events, or USB drive ( to automatically sync files between computer and flash drive).
- For frequencies, you can choose daily (from every 1 hour to 6 hours or only once), weekly, or monthly.
- For specific events, you can use system startup or shutdown, user logon, logoff, or USB plug in (simply connect, and you don't even need to open the software).

-
Don't modify the source folder name; otherwise, it will not sync files anymore.
-
By default, the Basic Sync option does not sync the deletions in source directory to destination.
Except for network drive, you still sync folder to cloud drives like Google Drive. For users with a few GB of cloud storage, you can choose to backup folders to AOMEI Cloud and get 1TB free storage 15 days after you sign up for an AOMEI account.
Method 2: Automatic sync folder to network drive using Robocopy
Here you will use /MIR in Robocopy to sync folder with steps below. It's the combination of /e and /purge, which will copy all subdirectories (including empty subdirectories) and delete files and directories that no longer exist in the source directory. /MIR also overwrites the directory security settings (unlike /e) if the directory already exists.
Step 1. Type cmd in the search box and open cmd.
Step 2. To copy files from c:\robocopy to k:\robocopy_mirror, you can type the following command and hit Enter.
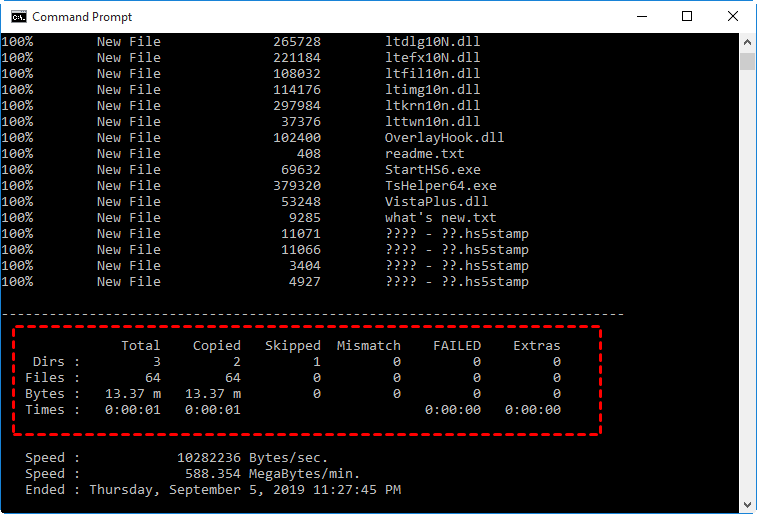
robocopy c:\robocopy k:robocopy_mirror /MIR
-
① Replace the following path with yourself.
-
② Please remember to add quote if the path has space.
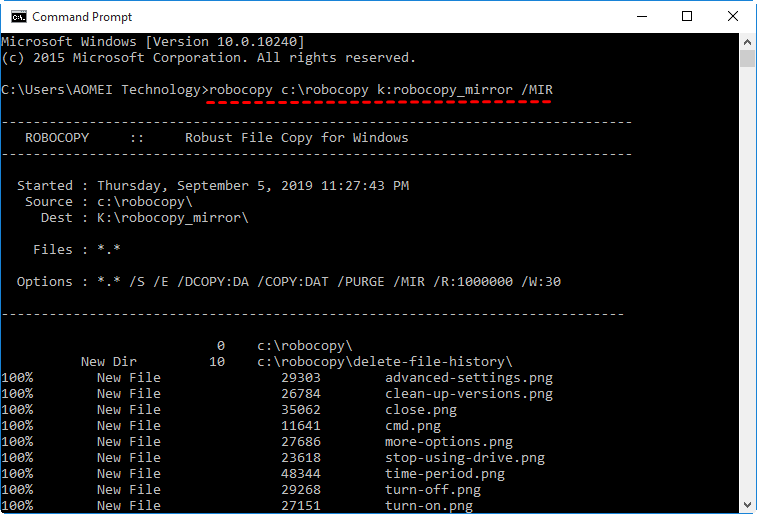
Wait until the process is complete, you will see the sync details and then check it in the destination path.
Step 3 (optional). To avoid typing the command repeatedly, you can copy and paste it to notepad, then save it as .bat extension. Then, you can double-click the file and run the file sync process.
How to sync data between PC and network drive
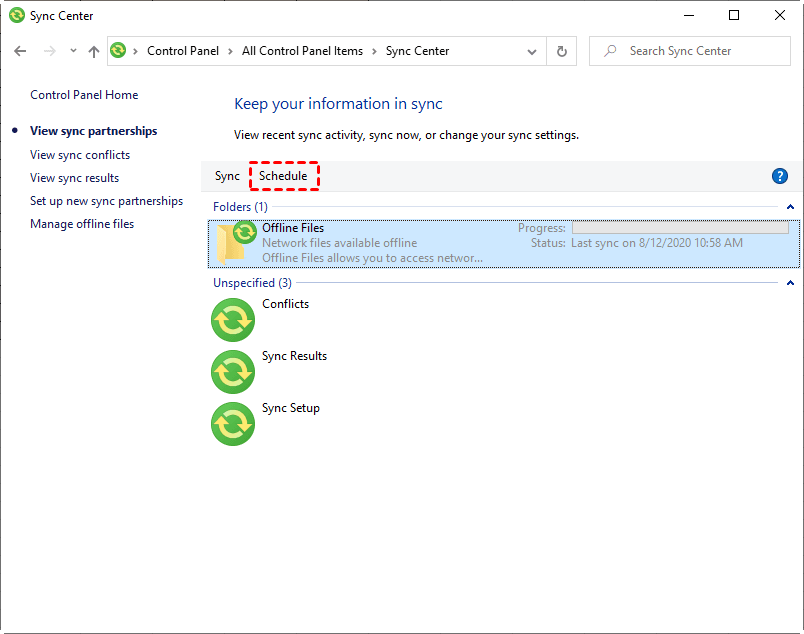
Except for syncing folder to network drive, some users still want to make network folder available offline with Sync Center in Windows 7/8/10/11 and access data on the network drive, even when your drive is disconnected or there is no network connection.
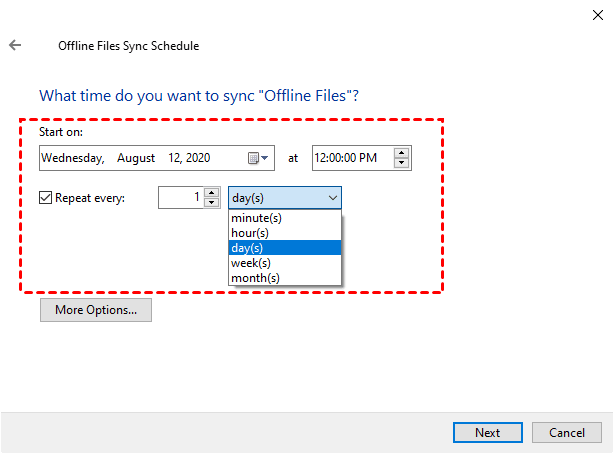
Step 1. Go to Sync Center, then select "Offline Files" under the Folders (1) and click "Schedule". You can also right-click the Offline Files and select "Schedule for Offline Files" from the context menu.
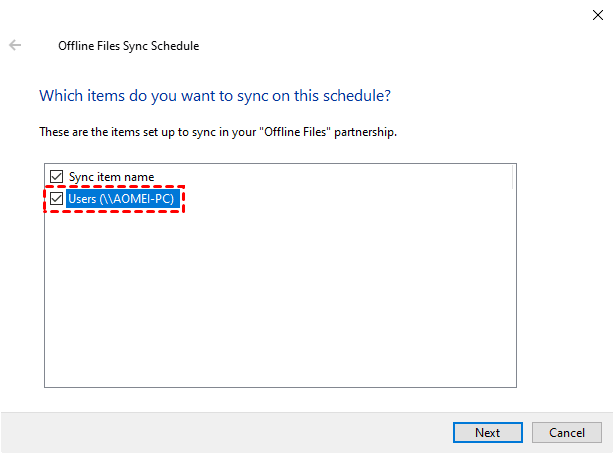
Step 2. Tick an item when you are asked "which items do you want to sync on this schedule?".
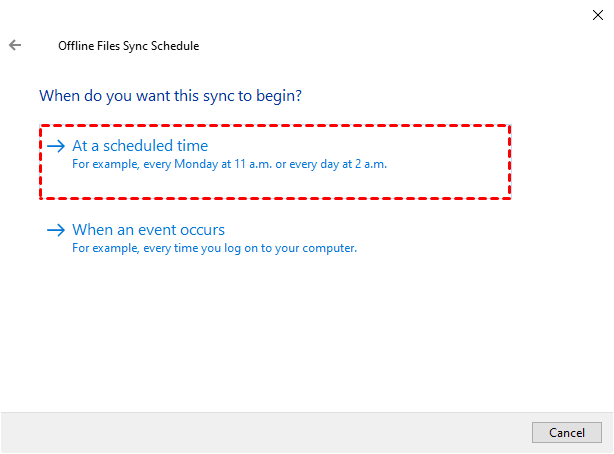
Step 3. Click "At a scheduled time" under the "When do you want this sync to begin" link.
Step 4. Set the time you want to start on and select "Repeat every 1 minute(s)" as sync interval.
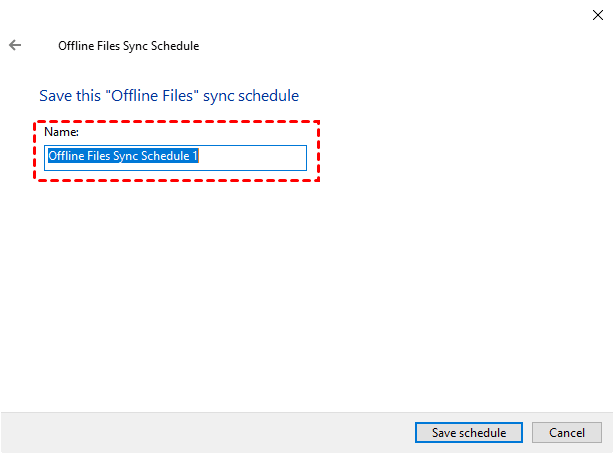
Step 5. Then, name this schedule sync task and click "Save schedule" to automatically copy files to network drive.
This operation also works for Windows 7/8 sync local folder to network drive. All the steps are almost the same, but there are some differences in the interface.
Summary
Syncing folder to network drive automatically in Windows 10 or other systems is very easy with help of third party sync software - AOMEI Backupper. You can choose among daily (only once or from every 1 hour to 6 hour), weekly, monthly, event triggers, real-time, etc. Also, Robocopy is worth trying if you are familiar with this commane line utility.
In addition, to further improve data security, you can still use it to auto backup files to external hard drive, network drive, cloud drive, flash drive, etc. In this way, it will compress all the data into an image file, so no one can modify it at will. And it helps to minimize backup image size and disk usage with multiple features, such as, compression, splitting, incremental or differential backup, automatic backup cleanup, etc.

