Top 5 Ways to Clear Update Cache on Windows 11
You can learn five useful ways to clear update cache on Windows 11 to free up space on your computer, and recommend you backup your system to prevent data loss.
By Miya Updated on December 28, 2023
You might want to know about the Windows 11 23H2 update
Unveiled on October 31, 2023, Windows 11 23H2, also referred to as Windows 11 2023 Update, represents the second major overhaul of the operating system. Keen to explore the newest features and improvements introduced in the Windows 11 23H2 update? Let's delve into the details:
1. Cutting-Edge AI Digital Assistant:
- Enter Copilot, the sophisticated AI-driven digital assistant stepping into the shoes of Cortana.
2. Revamped File Explorer:
- Upgraded iteration showcasing refreshed visual aesthetics, an improved Gallery page, Details pane, and native support for RAR, 7z, GZ, and TAR pack file formats.
- Simplified Nearby Sharing facilitates efficient cross-computer file transfers.
3. Expanded App and Tool Upgrades:
- Debut of the Windows Backup app and a revamped Outlook email client. Updates extend across various tools including Paint, Photos, Snipping Tool, Clipchamp, Notepad, and more.
The Windows 11 23H2 update brings a lot of new things, as well as some reported errors. Many users want to uninstall Windows 11 23H2 because they are not used to its updates, and we also recommend you to backup your Windows 11 in advance to be able to roll back to the previous version at any time.
👉Bonus tip: Always backup Windows 11 to prevent data loss
Overview of clearing update cache on Windows 11
Windows 11 cache refers to the data that is stored on a computer as a result of regular activity on applications and services. While it can provide quick access to applications or programs, unnecessary cache data and information can cause issues during the Windows 11 update process. Clearing Windows update cache is the easiest and most effective way to fix update-related problems, such as Windows 11 update stuck or installation failures with various errors.
The system automatically caches all Windows update installation files when checking for updates, and sometimes bugged or corrupt updates can be stored in the cache folder, leading to errors throughout the process. In such situations, clearing the Windows update cache is recommended as it removes old update files.
This post provides detailed instructions on 5 different methods for clearing the Windows update cache, including step-by-step guidance.
Why need to clear update cache on Windows 11?
Continuously storing cache files on your system can create issues with your regular Windows services. Deleting Windows update cache files offers several basic advantages, which are outlined below:
- Cache files can accumulate and take up significant space on your device. Deleting them is an effective way to clear your system and free up space.
- Deleting the Windows cache file can help improve system speed and performance.
- Over time, cache files can become corrupt, which can negatively impact your system. Deleting such cache files reduces the risk of corruption.
Before deleting Windows update cache files or the folder containing them, it's important to follow these steps to prepare your computer:
- Turn off all background applications running on your computer.
- Disconnect any remote connections that may be active.
- Consider creating a system backup file in case of emergencies.
How to clear Windows 11 update cache with 5 ways
Clearing update cache on Windows 11 can be done with ease using various methods. This post will outline different techniques for clearing Windows update cache.
1. Clean Windows update cache using Notepad Script
This method involves using a code written in Notepad and saved with the name Cleardown.cmd on your device. The code contains a cleardown command setting that is created and saved at a location of your choice.
Step 1. Open Notepad and tape the code below:
@Echo On
net stop wuauserv
C:
cd %Windir%\SoftwareDistribution
del /f /s /q Download
pause
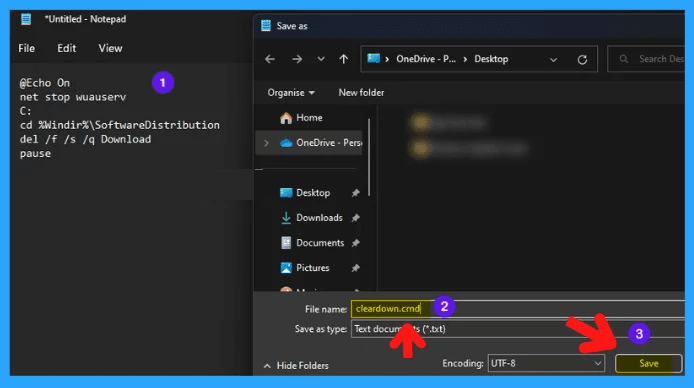
Step 2. If you have saved the Cleardown.cmd file on your desktop, an icon for the cleardown command will appear. Right-click on the cleardown icon and select Run as Administrator. The User Account Control window will appear and request permission; click YES to proceed.

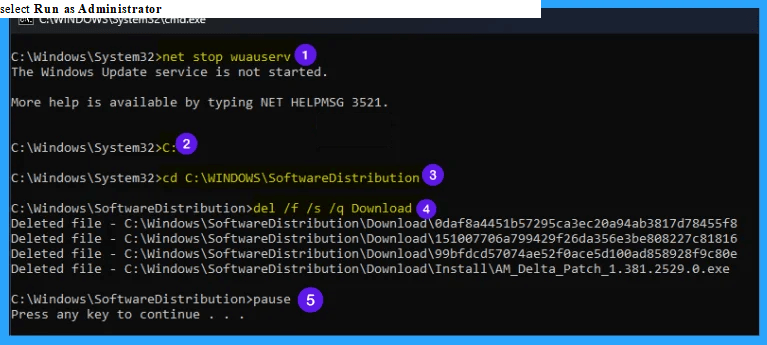
Step 3. After receiving permission, the cleardown command will start running in the command prompt and perform the task as scripted in Notepad, which involves deleting the Windows update cache files.
Once the process is complete, a message will appear saying Press any key to continue.. Press any key to close the command prompt window.
2. Clear Windows 11 update caches with Run dialog box
This chapter involves clearing Windows 11 update cache from your system using the Run dialog box. The following instructions provide a detailed explanation of the process.
Step 1. Open the Run dialogue box, press the Win Key + R. Next, type services.msc and click OK to open the services window.

Step 2. After opening the Services (local) window, scroll down to locate the Windows Update option. Refer to the image below for further clarification:

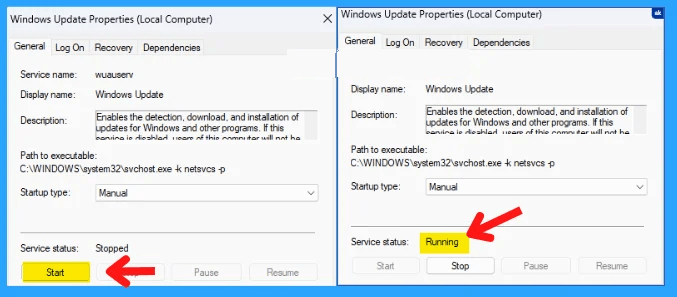
Step 3. Double-click on the Windows Update option to access its properties in the Services window. Scroll down and click on the Stop button, as shown in the image below, to halt the Windows Update services.
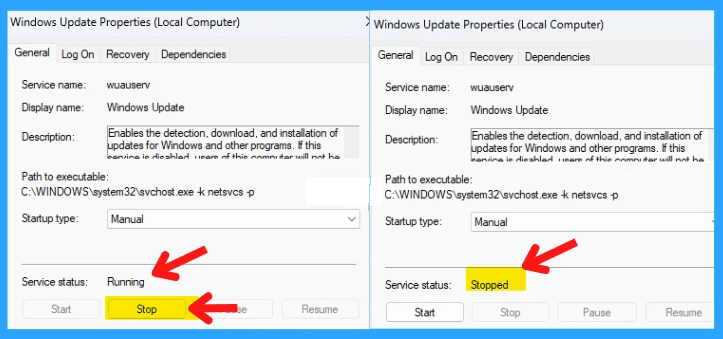
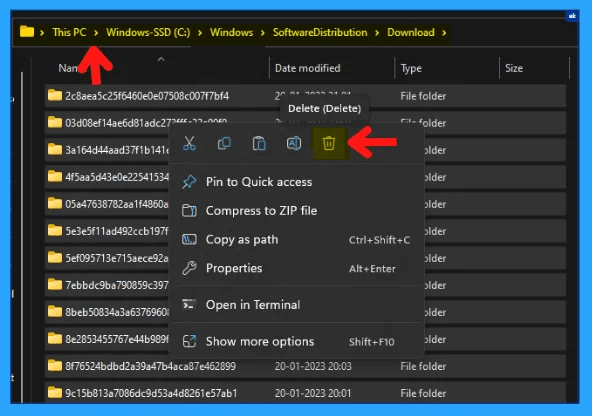
Step 4. Once the Windows Update services have been stopped, navigate to the C:\Windows\SoftwareDistribution\Download folder. Select all files in the folder (Ctrl + A), and then delete them.
Step 5. Once you have successfully deleted the selected files, repeat steps 1 and 2 to access the Services window. Locate the Windows Update option, double-click to open it, and click on the Start button to restart the Windows Update services.
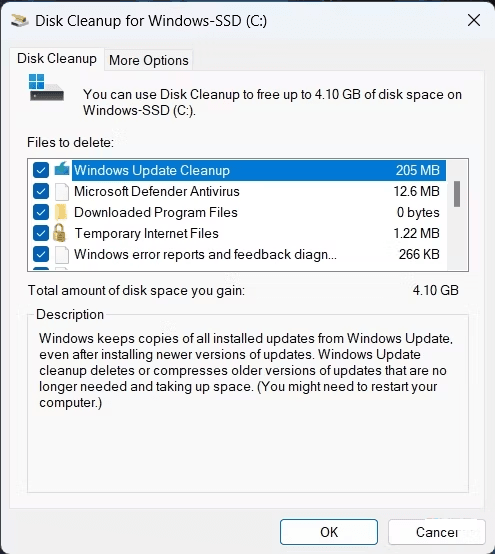
3. Use Disk Cleanup to remove Windows 11 update cache
The following steps outline the basic method for how to clear Windows 11 update cache using Disk Cleanup.
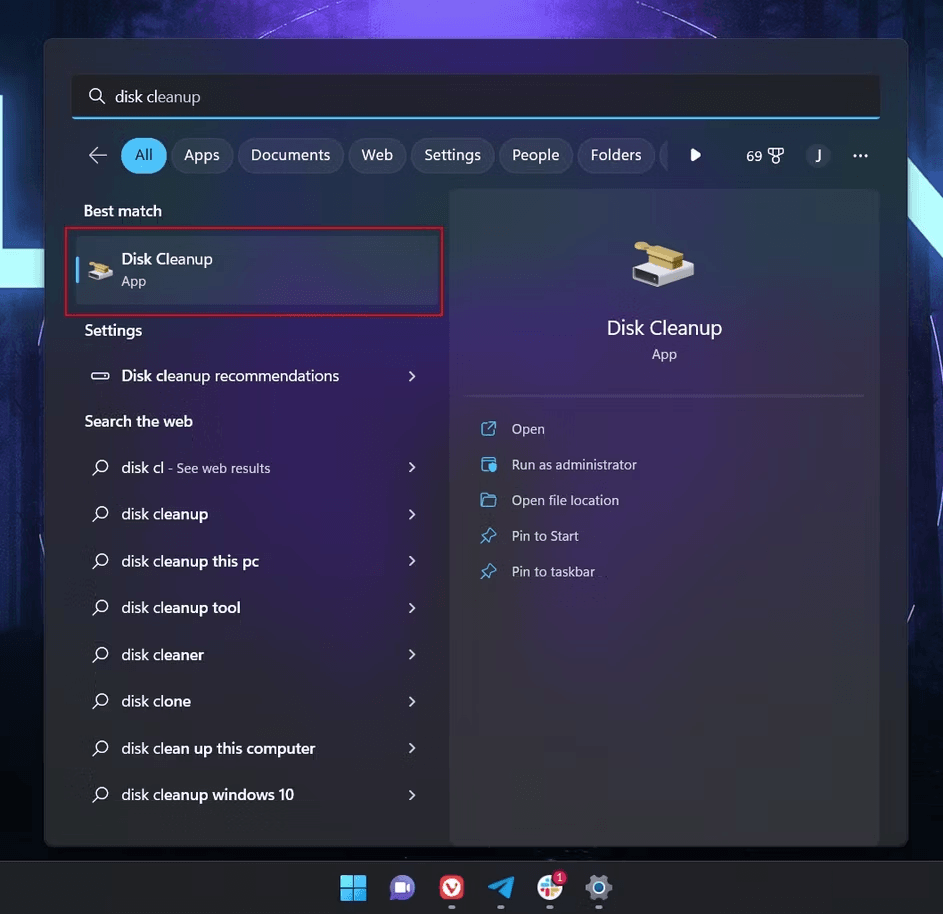
Step 1. Access the search box in the taskbar and type Disk Cleanup. The Disk Cleanup App will appear in the right panel, click on Open to launch it.
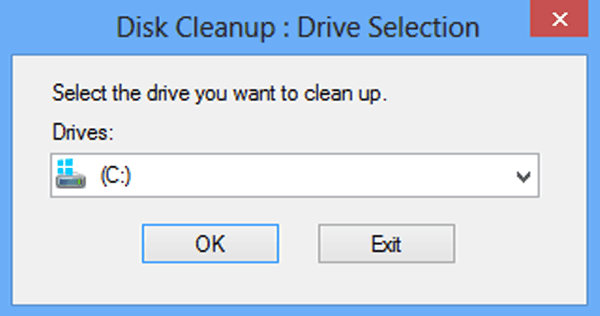
Step 2. Upon launching the Disk Cleanup app, the Disk Cleanup: Drive Selection window will appear. Select the drive you wish to clean up; in this case, select Drive C: and click OK.
Step 3. Choose all the boxes of the files that you wish to delete. And click OK to delete the files you selected.
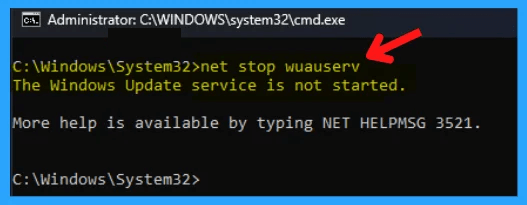
4. Use Command Prompt to clear Windows 11 update cache
To clear the cache using the Command Prompt, you must open it with administrative privileges, type net stop wuauserv, and press Enter. A message will appear stating, The Windows Update service is not started.
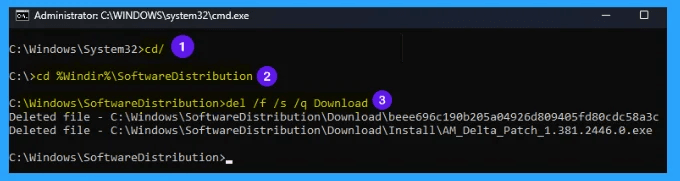
Once the Windows Update option has been stopped, proceed to run the commands in the elevated command prompt to remove the cache files of Windows updates. Run each command listed below one by one, following the parameters described in the table:
- cd/
- cd %Windir%\SoftwareDistribution
- del /f /s /q Download
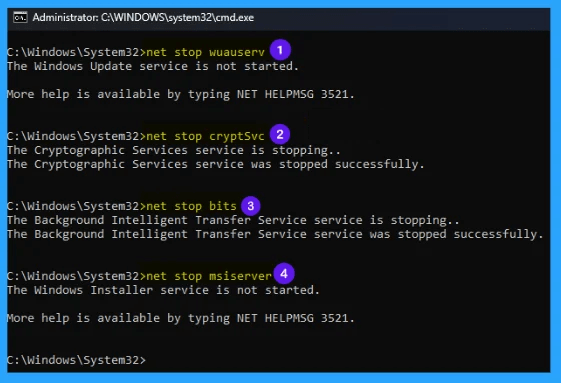
5. Reset in Command Prompt to clear Windows 11 update cache
To reset the Windows Update cache, open the elevated Command Prompt and enter the following commands one by one. Press Enter after each command to execute it. The commands are listed below:
- net stop wuauserv
- net stop cryptSvc
- net stop bits
- net stop msiserver
By executing the above commands, all services have been stopped. To proceed, enter the following command lines one by one and press "Enter" after each command:
- ren C:\Windows\SoftwareDistribution SoftwareDistribution.old
- ren C:\Windows\System32\catroot2 Catroot2.old
After executing the above command, the Windows Update processes that were stopped earlier will be started. To initiate these processes, enter the following commands one by one and press Enter after each command.
- net start wuauserv
- net start cryptSvc
- net start bits
- net start msiserver
Once each process is complete, restart your device. Resetting the Windows Update cache can also clear any previous cache from your computer. These are all the methods, I hope that any of these five methods can solve your problem. Try it now!
Bonus tip: Always backup Windows 11 to prevent data loss
As mentioned in the previous part, although deleting the storage cache file is good for your computer in many ways but you may make various unexpected errors during the operation which may lead to the loss of your data, so you should consider backing up your Windows 11 system just in case.
To perform a Windows 11 local backup, we recommend using a professional backup software such as AOMEI Backupper Standard, which offers a variety of backup options to meet your needs. It also has the following advantages:
- Various backup types: This program has a variety of backup features such as system backup, disk backup, partition backup, file backup, etc.
- Multiple storage devices: Supports various storage devices such as external drives, USB, SSD, HHD, USB drives, cloud drives, network, etc. as backup destinations.
- Scheduled backup: Allows you to set the backup frequency (Daily, Weekly, Monthly, Event triggers, USB Plug in) according to your needs, and the software will automatically back up files to the target device at the set frequency.
- Incremental backup: Supports the incremental backup method, which helps improve backup efficiency and save disk space, especially when running scheduled backup tasks.
- Compatible with various Windows operating systems: Besides Windows 11, it also supports other Windows PC operating systems, including Windows 10/8.1/8/7/XP/Vista.
You can download this freeware and follow the graphic tutorial below to easily backup Windows 11 to a local drive or other locations. If you are a Windows Server user, you can opt for AOMEI Backupper Server.
Step 1. Install AOMEI Backupper Standard Edition and launch the software.
Step 2. Click on Backup on the left-hand side of the screen, and then select System Backup. If you wish to backup your entire computer disk, you can choose Disk Backup.

Step 3. The program will automatically select the system-related partition(s) as the source data. You only need to choose a destination path.

Step 4. Click on Start Backup to backup Windows 11 and wait for the process to complete.

How to restore the system image backup:
☞ Click on Restore and select either Select Task or Select Image File. Then, follow the wizard to complete the system recovery process.

☞ It is recommended to create Windows 11 bootable USB in advance so that you can restore your computer if it fails to boot.

Note: If you purchase a new computer, you can use the Universal Restore feature (in Pro version) and the bootable media to recover the system files on the new computer.
FAQs about clearing update cache on Windows 11
➹ 1. Is it safe to clear the update cache?
Clearing the update cache is generally safe and can help fix problems with Windows updates. However, it is recommended to create a backup of important files before performing any system changes.
➹ 2. Will clearing the update cache delete my personal files?
No, clearing the update cache will not delete your personal files. The cache only contains temporary files related to Windows updates.
➹ 3. Do I need to clear the update cache regularly?
It is not necessary to clear the update cache regularly. You may only need to do it if you encounter problems with Windows updates.
Summary
That’s the complete process of how to clear update cache on Windows 11. You have 5 options to overcome this task. If you want to backup your Windows 11 computer, you can use this free backup software - AOMEI Backupper Standard. It has many of the powerful features mentioned above. In addition to backing up Windows system, it can also perform Windows 11 system restore from boot. Download and experience its powerful features now!

