How to Transfer Photos from iTunes to iPhone 14/13/12/11
This guide will show you how to transfer photos from iTunes to iPhone. In addition, a way to transfer photos to new iPhone without syncing will be presented.
By Lena / Updated on May 14, 2026
Case: want to use iTunes to transfer photos to iPhone
How to transfer photos from iTunes to new iPhone
I need to get some photos to my new iPhone so anybody could tell me how to use iTunes to transfer photos to iPhone? Thanks.
- Question from an Apple User
Photos could be very important data on iPhone. After you take beautiful pictures or download delicate images from the Internet, you could enjoy them from time to time. Sometimes, you'll want to transfer photos from your computer to iPhone.
● You might have downloaded many pictures from the Internet on PC and want to transfer these photos to iPhone as wallpaper.
● You might have saved old iPhone photos to computer and now want to transfer photos to new iPhone.
● You might want to save pictures from computer to iPhone, so you could share them with friends.
Whatever the reason, in the following content, you would know how to use iTunes or professional tool to transfer photos from computer to iPhone.
Section 1. How to transfer photos from iTunes to iPhone
iTunes has a lot of useful features, but there might be too many features that new users would complain about the complicated GUI. You could use it to transfer photos from PC to iPhone. However, please note that it will delete the existing photos, as it transfers them by synchronization.
How to use iTunes to transfer photos to iPhone
Step 1. Launch iTunes and connect iPhone to computer with USB cable
Make sure the connection is stable. Find a good lightning cable and plug it into an undamaged USB port.
![]()
Step 2. Select your device in iTunes
After your iPhone is recognized by iTunes, you could click the device icon in the upper-left corner to interact with your iPhone. It is suggested to uncheck Automatically sync when this iPhone is connected.

Step 3. Select photos on computer
After you select your iPhone, you could select Photos on the left. You should turn off iCloud Photos on iPhone, going to iPhone Settings > [your name] > iCloud > Photos to switch off the button, or you could not sync photos with iTunes.
Check Sync Photos and select Copy photos from Pictures (it could be any folder on PC). If you wish to sync all the photos, just select all folders. If you just want part of them, you could choose Selected folders. It is suggested to prepare all the wanted pictures in a new folder, so it would be easy to manage them on iPhone.

Step 4. Sync photos from iTunes to iPhone
After all the preparation and settings, you could click Apply at the bottom to transfer photos to iPhone.
Note: You could find all the photos from iTunes in Photos app on iPhone. If you want to delete them, just connect iPhone to iTunes, deselect Sync Photos and click Apply. These photos could coexist with iCloud photos. If you turn on iCloud Photos, they would be removed from iPhone, so you’d better backup iPhone photos to computer with the professional tool before you do that.
Section 2. How to transfer photos to iPhone via a professional tool
You might find that using iTunes is not so convenient. After you sync photos to iPhone, there are so many limitations like photos synced from iTunes will be removed if you turn on iCloud Photos on iPhone.
Professional tool never brings you such trouble. You could use FoneBackup to transfer photos to iPhone as you wish. It is far more professional than iTunes when transferring photos.
-
You can preview and select the photos you want to transfer to iPhone.
-
FoneBackup will only add photos to iPhone, it will not erase any existing photos and other data.
-
Besides computer to iPhone transfer, it also supports iPhone to computer transfer & iPhone to iPhone transfer.
How to transfer photos from computer to iPhone
Step 1. Download FoneBackup
Simply download the iPhone photo transfer. Connect iPhone to computer with USB cable and tap "Trust" on it.
Step 2. Waiting for FoneBackup recognizes iPhone
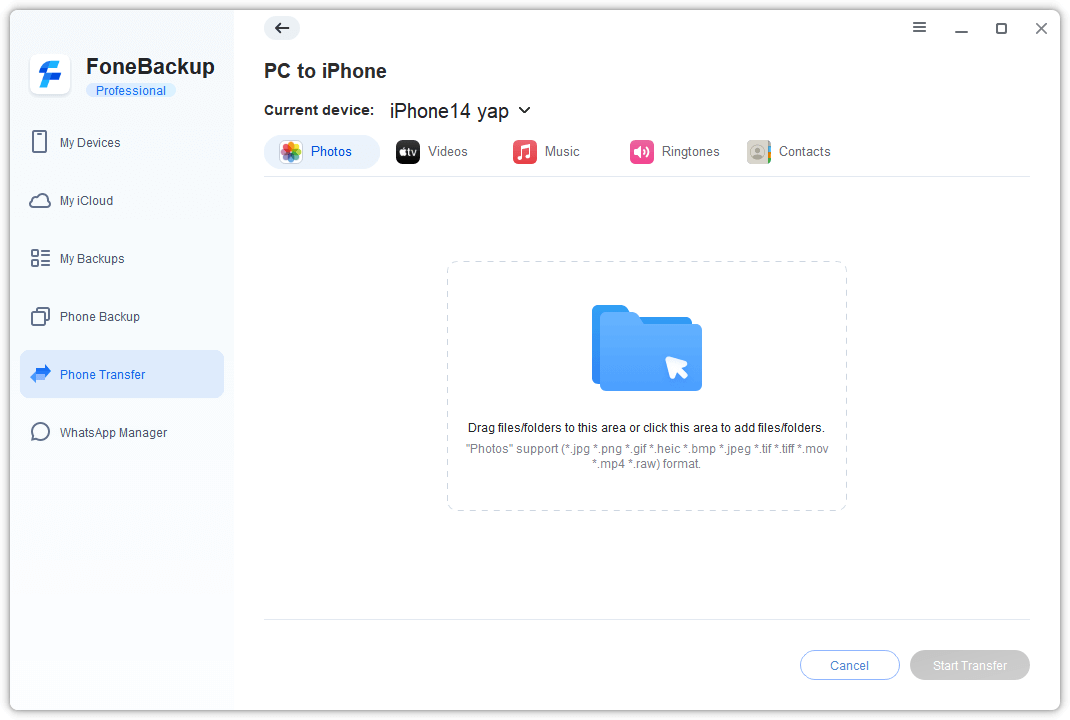
Select Phone Transfer on the left pane of the homepage. Move the mouse to PC to iPhone. Click Start Transfer.

Step 3. Transfer photos to iPhone in a blink
Click the plus icon to add photos from computer.
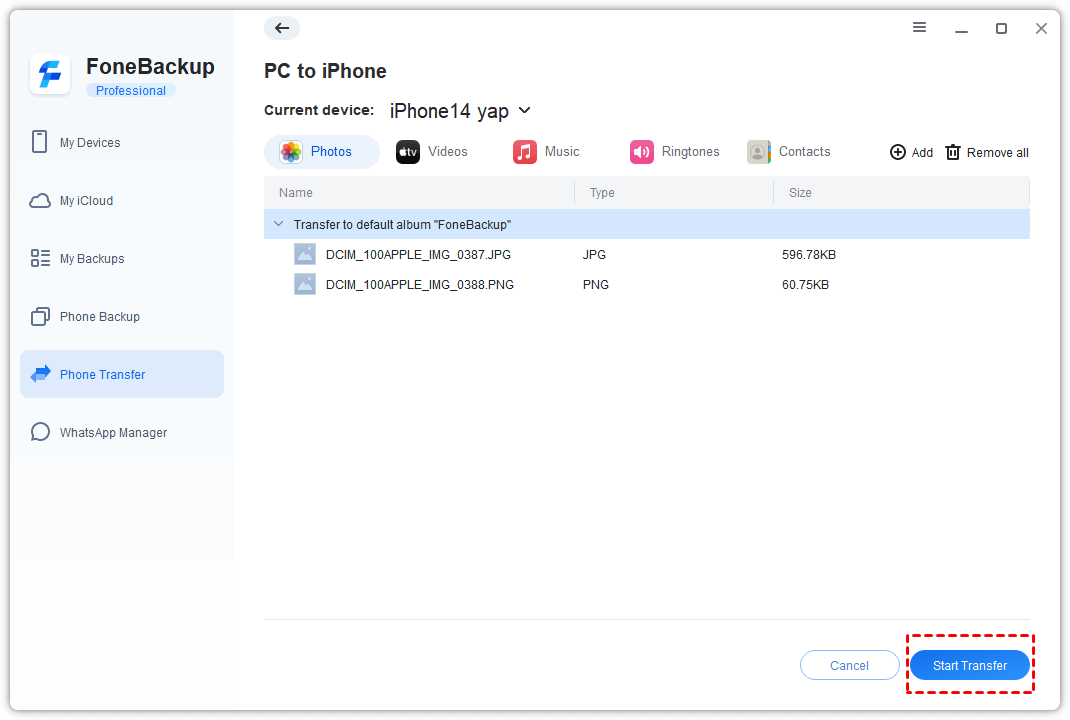
Confirm the photos that will be transferred to iPhone. Finally, click Start Transfer to quickly import photos.
Conclusion
Although you can use iTunes to transfer photos on your iPhone, there are many inconveniences. For example, you may lose some photos after the sync.
If you do not like the limitations of iTunes, try FoneBackup to easily transfer photos between iPhone and computer. Besides photos, it can also help you transfer videos, songs, contacts and more.
Does this passage solve your problem? You could share it to help more people.