What to Do When Photos Synced from iTunes Will Be Removed
When you enable iCloud backup on iPhone, you may receive a prompt “Photos synced from iTunes will be removed.” Luckily, this post will tell you how to fix this issue and offer you alternative ways to make all your photos safe on iPhone.
By May / Updated on May 14, 2026
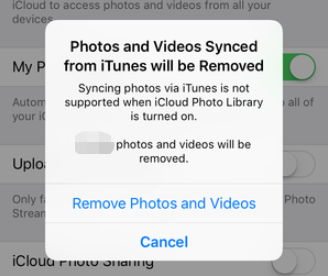
I got the warning that Photos synced from iTunes will be removed
Hi guys, I got into a problem when using iCloud photos. Once I tried enabling iCloud photos on my iPhone X, it said iCloud would delete iTunes photos. I have a lot of photos from iTunes and I don't want them to be deleted, so how can I make them stay?
- Question from Apple Community
Photos are very important. To better manage photos, you may want to transfer photos and videos to another device with iTunes. However, when you perform such a task, you may receive a message saying "Photos synced from iTunes will be removed". or similar prompts like "Are you sure you want to remove existing photos and sync photos from this computer". If you use macOS Catalina, the message should be "Photos synced from Finder will be removed".
You may wonder "What does it mean when it says photos synced from iTunes will be removed?". Next, we will explain this prompt, and help you safely share photos between your device without deleting them.
What Does It Mean When It Says Photos Synced from iTunes Will be Removed?
You might have piles of pictures on your computer and want to conveniently view them on your iPhone, so you use iTunes to sync photos. If you have turned on iCloud photos, you would get the removing message in iTunes, because iCloud photos and iTunes photos will not coexist on the same iPhone. So it means you have to turn off the iCloud photos if you need to sync photos and videos via iTunes.
For some reason, you need to turn on iCloud Photos again, but receive an iCloud photos warning. It means iTunes photos will be totally replaced with iCloud photos. The whole folder you sync from iTunes will be deleted and there is no way to retrieve it.
iPhone thought that there are the original photos on computer and you’d better make sure there are. If you can’t find them on computer but don’t want to see iTunes photos disappearing from iPhone, you could read the next section to easily save your photos.
How to Fix “Photos Synced from iTunes Will Be Removed”
You might find no way to directly save these photos on iPhone, because when you select iTunes photos in Album, there are no options for you to save or delete them. What to do when your photos seem fixed on iPhone? There are 2 easy and useful ways to help you move your photos.
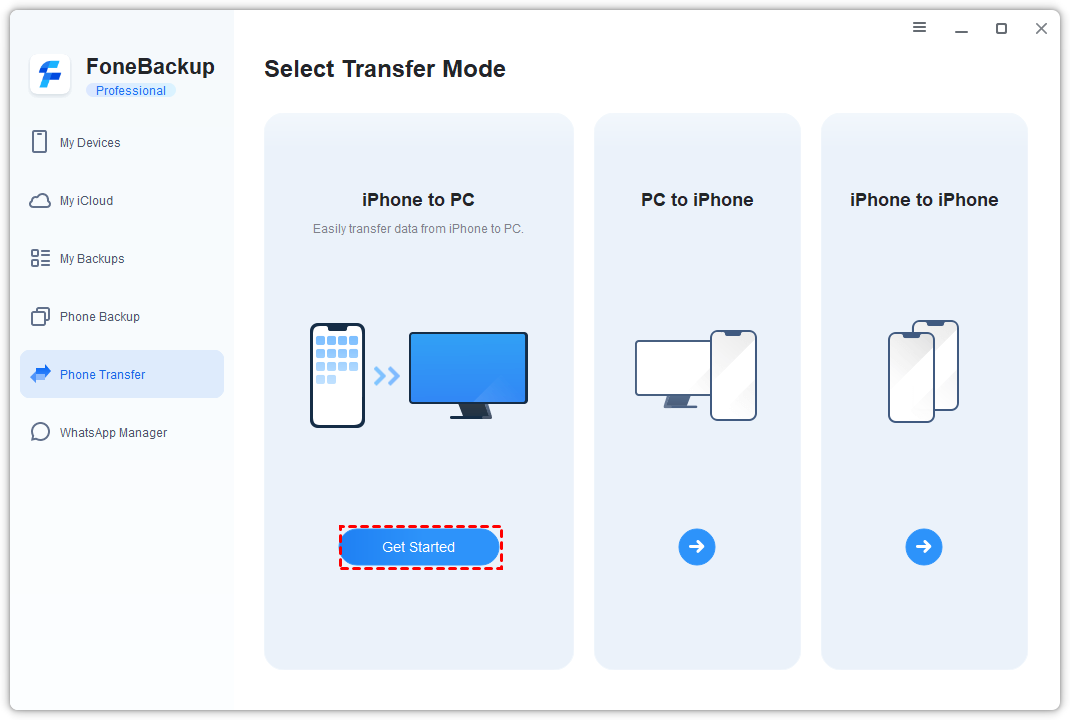
Way 1. Alternative Way to Share Photos Between iPhone and PC - FoneBackup
FoneBackup is an excellent iPhone photos transfer tool and iTunes alternative allowing you to transfer photos from iPhone to PC, or from PC to iPhone with no photos/videos deleted. You could use it to export all the iTunes photos to computer. It is the fastest iPhone data transfer so far and you can complete the process with one click. Next, we will guide you on how to use this tool.
Step 1. Download FoneBackup and connect iPhone to PC with USB cable.
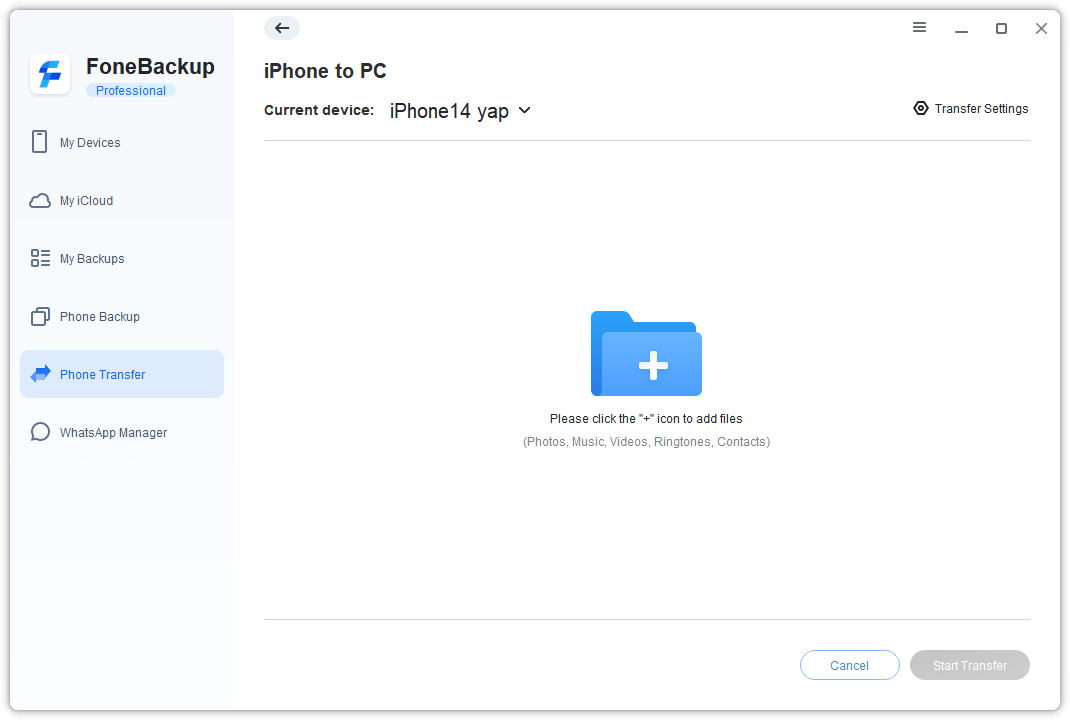
Step 2. To move data from iPhone to a computer, please select Phone Transfer on the home screen. Go to iPhone to PC and click Start Transfer.
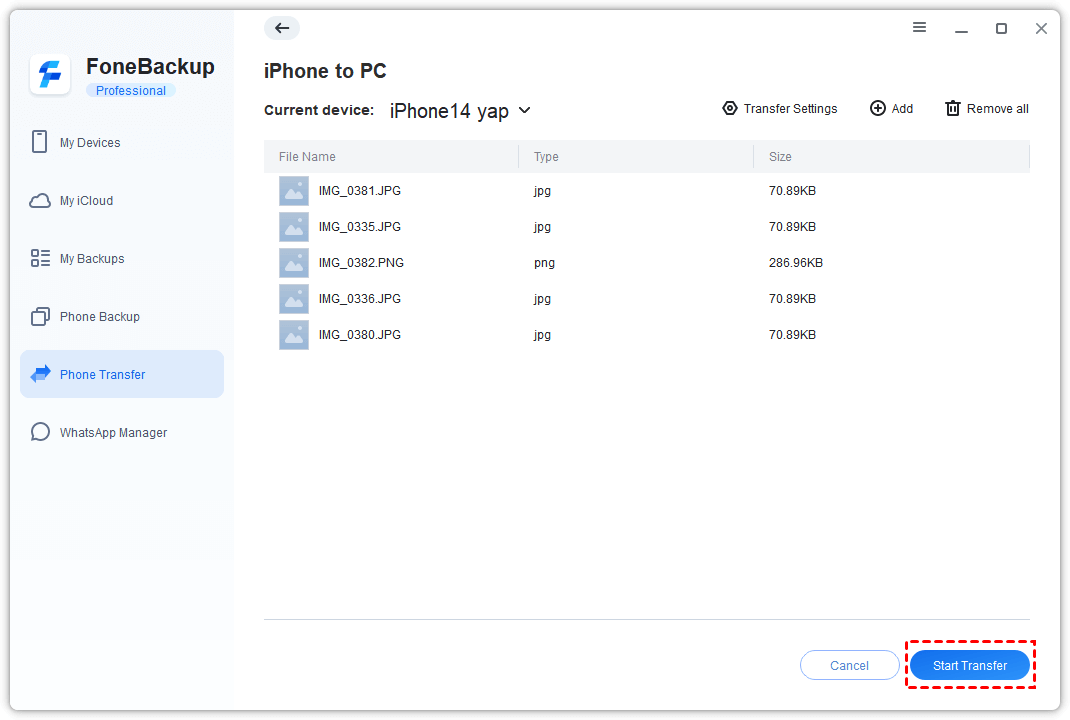
Step 3. Click the plus icon to select photos on your iPhone. Select iPhone photos and click OK.
Step 4. Click Start Transfer > Select the storage path and click Transfer to export the selected photos.
FoneBackup is very professional. If you transfer photos from PC to iPhone later, these photos could be edited, shared, deleted like the photos taken by the camera.
Way 2. Upload Original iTunes Photos to iCloud
Original photos are always the best insurance. If you could find them on your computer, you could import these photos to iPhone at any time.
To avoid these photos being overwritten by iCloud Photos again, you don’t need iTunes anymore. You could upload photos to iCloud on the computer or download iCloud backup to computer.
Step 1. Open your browser, go to icloud.com, and sign in with your Apple ID.
Step 2. Click the Photos icon and upload photos from the computer to iCloud.

Bonus Tip: How to Delete Photos Synced from iTunes Library on iPhone
iTunes photos are only allowed to be viewed on iPhone. If you always receive the message “photos and videos synced from finder will be removed”, turning on iCloud Photos will remove all the iTunes photos. To delete some of them, you just need to find the original folder on the computer, remove the unneeded photos in it, and sync the folder with iTunes.
If you want to delete all the iTunes photos, you just need to sync an empty folder to iPhone, or you could turn on iCloud Photos and then turn it off.
Conclusion
After reading this post, you know how to fix “photos synced from iTunes will be removed”. iTunes allows you to quickly sync photos to an iPhone, but they are not so secure on iPhone. If you turn on iCloud photos, you would be warned that Photos synced from iTunes will be removed. In this case, you can use use alternative way to move your photos with FoneBackup.
Using FoneBackup would be the best solution because you could edit, share, or delete photos like the photos taken by an iPhone camera. Besides it is more than a transfer tool, FoneBackup also helps you convert HEIC to JPG/PNG.