How to Backup iPhone Photos to PC/iCloud/iTunes: 5 Ways
Photos could carry your memories and other information. You can read this passage to know how to backup iPhone 16/15 photos in every way.
By Kathy / Updated on May 14, 2026
How to backup iPhone photos.
I love taking photos on my new iPhone 16 and have saved a lot of photos. My iCloud storage is full, so I want to backup my photos to PC. What is the best way to backup photos from iPhone to Windows computer?
- Question from Apple Community
With the improvement of iPhone shooting capability, you can take lots of beautiful photos on your iPhone. but as time goes by, these photos or videos can eat up your iPhone storage. In this case, you can backup iPhone photos to computer, external drive / USB drive, or iCloud, and delete these photos to free up iPhone space.
In addition, an iPhone is easy to experience some unexpected issues leading to data loss. So if these photos are really important to you, you can create a backup for them. Once your iPhone data is gone, you can easily restore them to your iPhone after the problem is solved.

Next, you can follow the next content, which would give you the best ways to do iPhone backup photos.
Method 1. Best way to backup photos from iPhone [Recommended]
The best way to backup iPhone photos without iCloud is saving them to your computer. This would protect your privacy better than saving them to the cloud. The professional iPhone backup software - FoneBackup could help you to quickly backup photos from iPhone to computer.

- Preview and choose iPhone photos you need to back up in one click.
- Quickly back up 1000 + photos to PC within 10 minutes.
- Also supports backing up videos, contacts, music and messages.
- Total USB connections ensure all backup processes are safe & stable.
- Fully compatible with the latest iPhone 16 and iOS 18.
Next, you can download FoneBackup to computer for free. Connect your iPhone to PC with USB cable. You need to Trust This Computer on iPhone if it's the first time you connect iPhone to this PC. We will show you how to use this tool to finish iPhone photo backup.
Step 1. Run FoneBackup. On the Phone Backup > Select Selective Backup. Click Get Started.
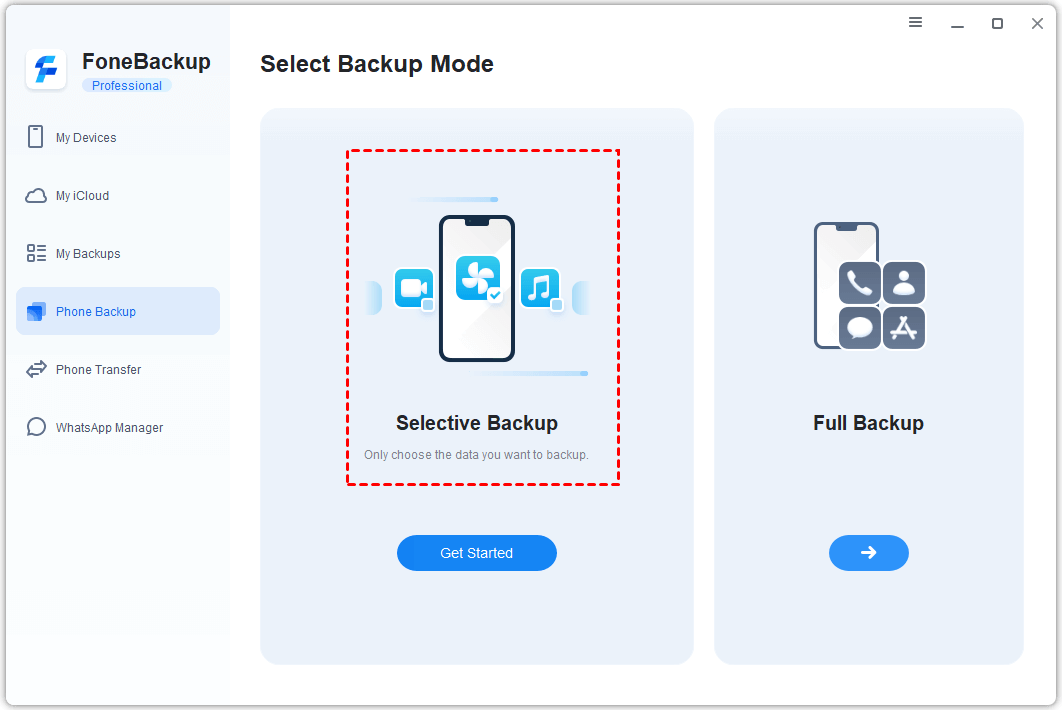
Step 2. Check the Photos option to backup entire iPhone photos. Or you can click the Photos icon to decide which items to be backed up > Click Backup Storage Path to specify a location to save the backup files. Click the Start Backup button to begin the task.
You also change the Backup Storage Path to backup iPhone photos to external hard drive.
![]()
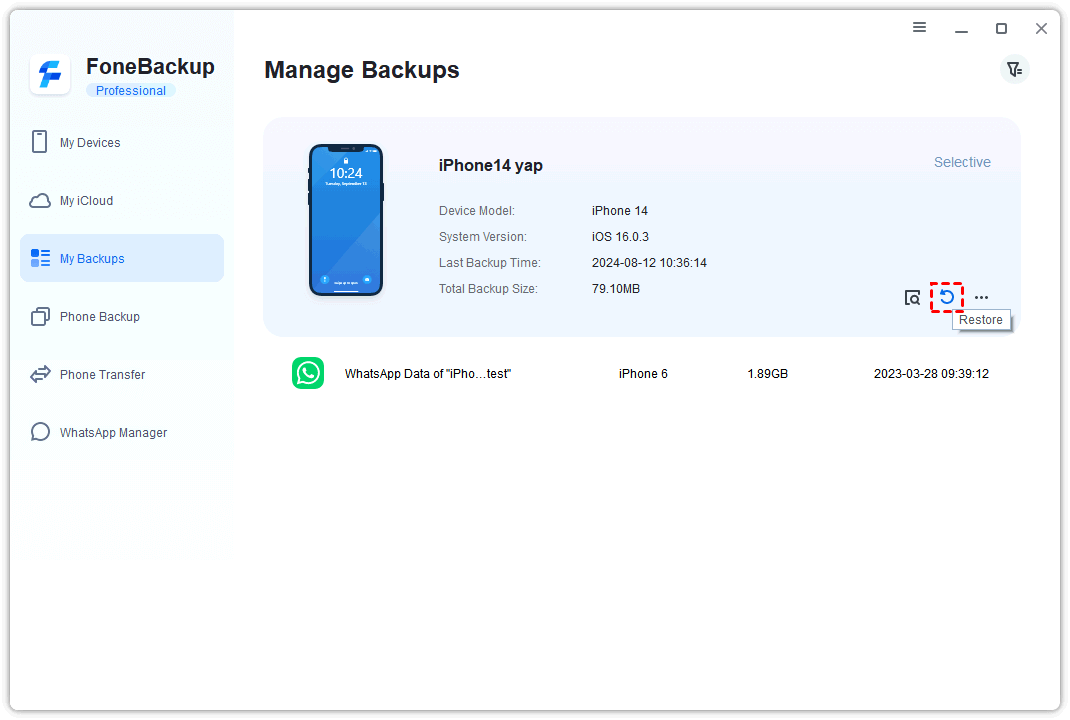
Wait for the backup process to get finished. When you need to restore, you can connect your iPhone to the computer, and go to My Backups to restore data to the device.
You can also directly transfer photos from iPhone to Windows 10 with FoneBackup's iPhone transfer feature (Phone Transfer > iPhone to PC).
Method 2. How to backup iPhone photos to iCloud
Apart from backing iPhone photos to computer, you could also use iCloud to backup iPhone photos. iPhone users usually transfer photos after upgrading iPhone in this way. If you have problems during the process, refer to this guide: Photos Did Not Transfer to New iPhone.
Most photos in the Photos app would be saved to iCloud. Photos synced with iTunes could not be save to iCloud because you could only sync iPhone photos with iTunes when iCloud Photos is disabled on iPhone, and enable iCloud Photos again on iPhone would erase these photos. Enable iCloud Backup on another iPhone could download every iCloud photo to that device. Also, you could backup iPhone photos to PC with iCloud, but you need to download these pictures from the site of iCloud or using the client of iCloud.
Steps to enable iCloud photos syncing:
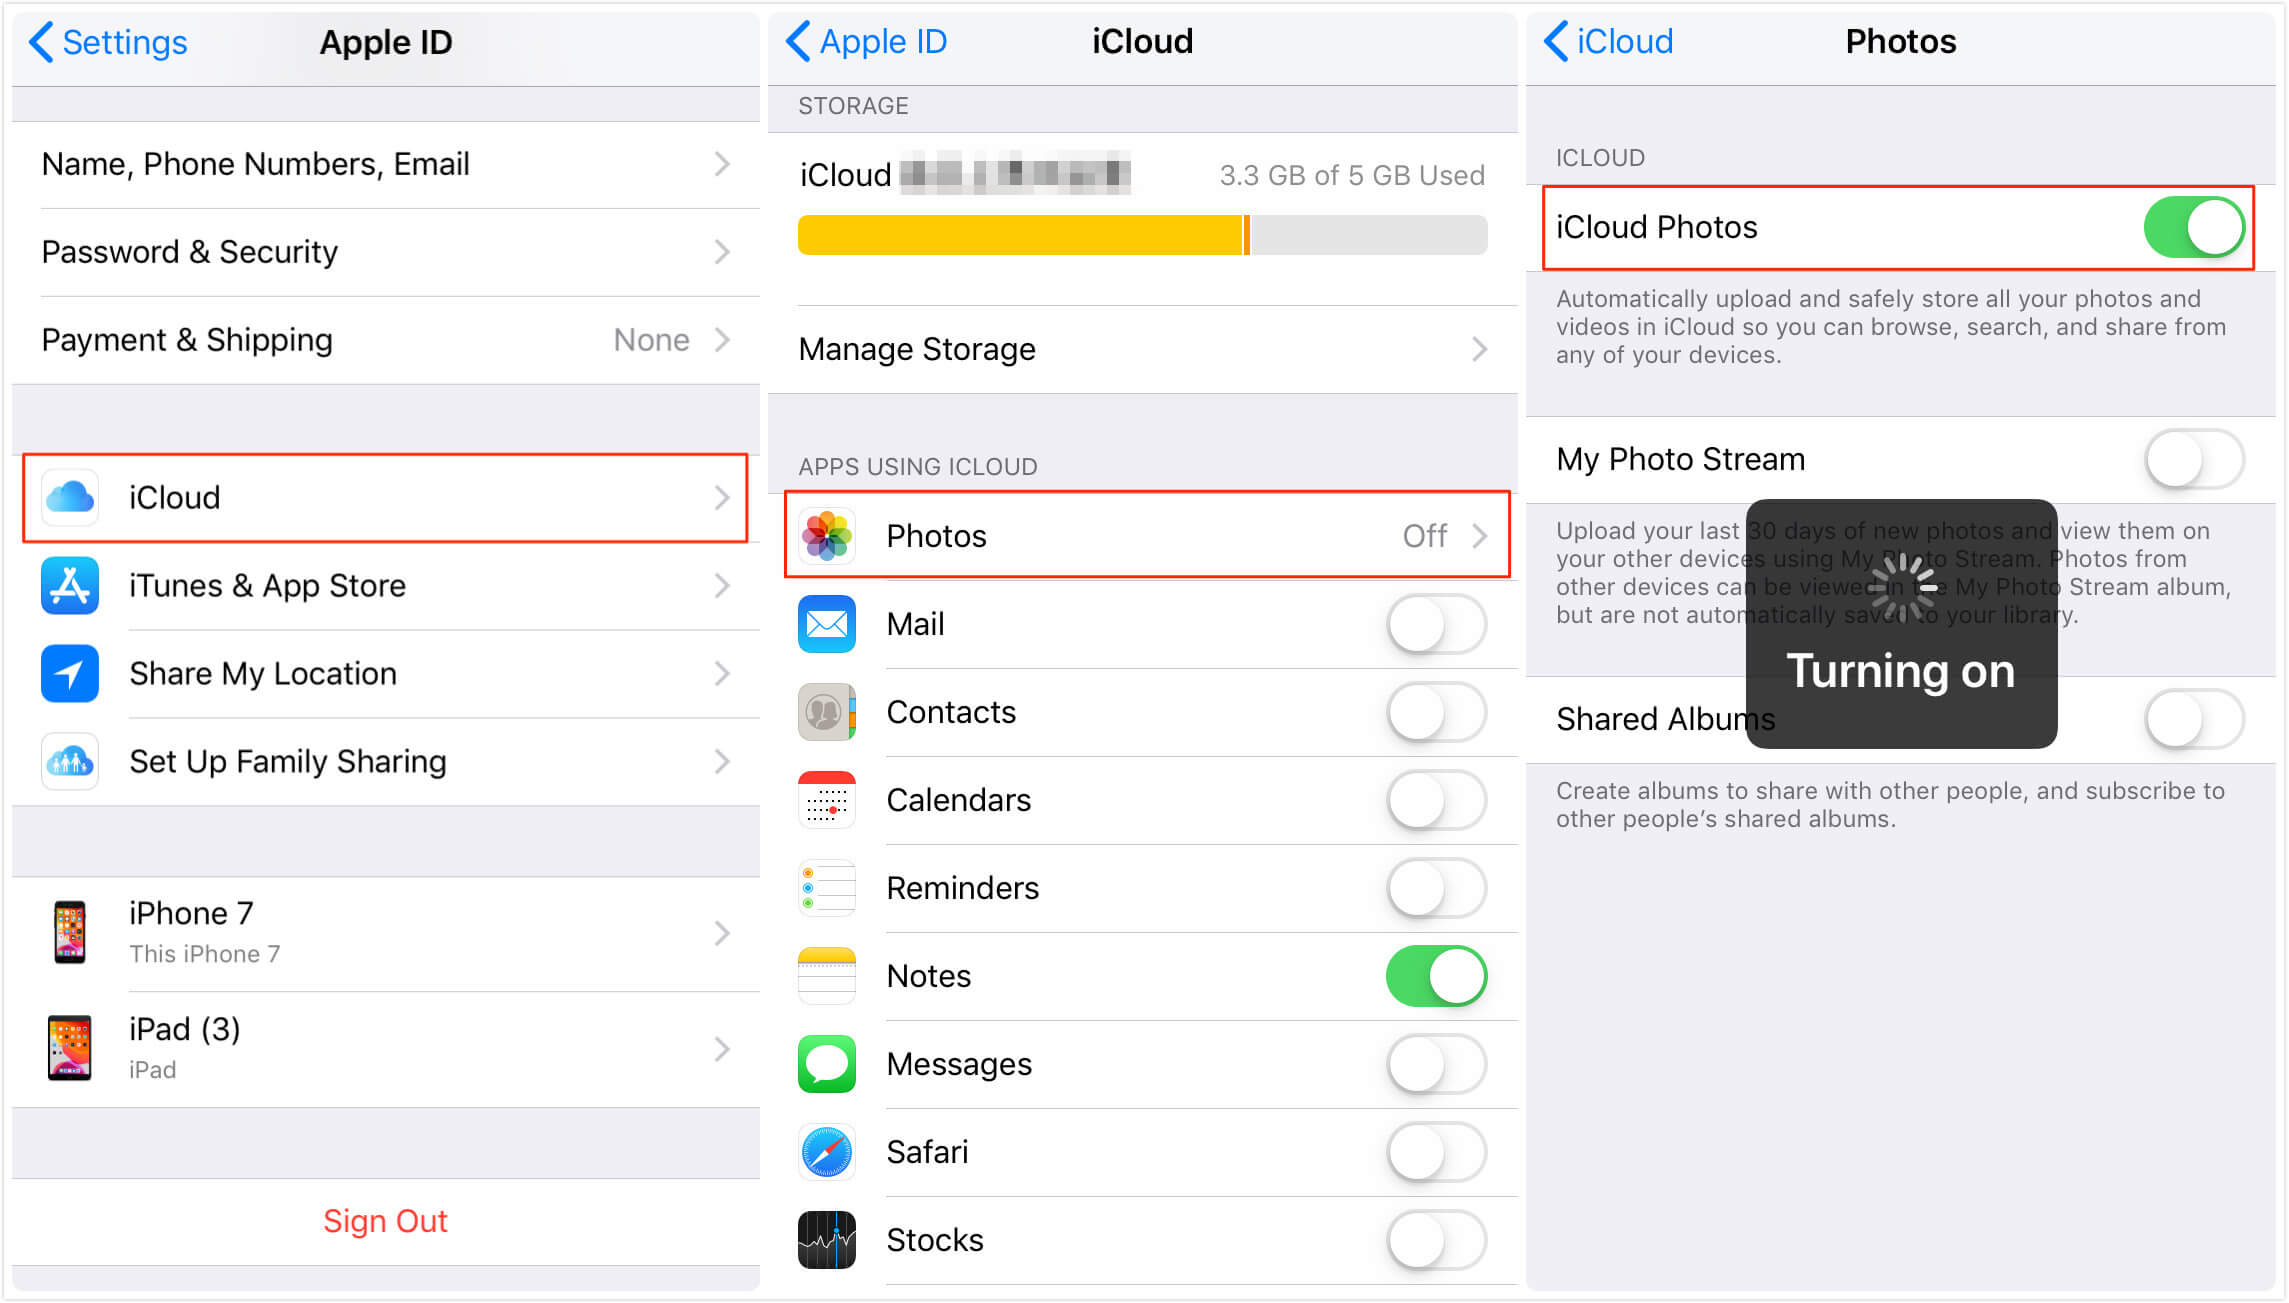
1. Go to iPhone Settings > tap [your name]
2. Enter iCloud > Select Photos
3. Switch on iCloud Photos to upload photos from iPhone to iCloud.
Method 3. How to backup photos on iPhone to iCloud backup
iCloud would save most of the necessary data when you backup pictures from iPhone with iCloud. If iPhone says there is no enough iCloud storage, you should reduce the content by entering iCloud > Manage Storage > Backups > [device name]. You could download iCloud backup to PC if you just need the photos later. You should know that if you have already enabled iCloud photos in method 1, these photos would not be saved to this iCloud backup again.
Steps to make iCloud backup:
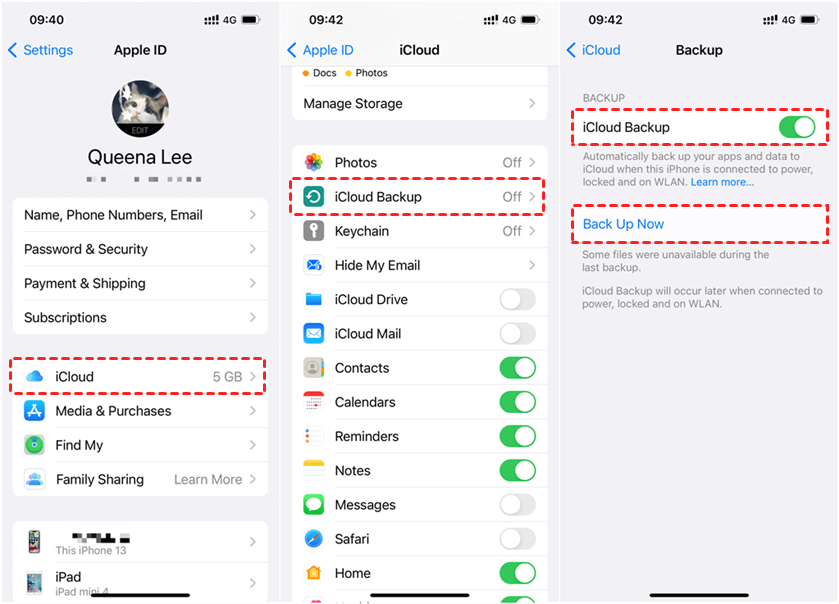
1. Go to iPhone Settings > tap [your name]
2. Enter iCloud > Select Backups
3. Enable iCloud Backup
Method 4. How to backup iPhone photos to PC with iTunes
Does iTunes backup include photos? You might have used iTunes to purchase and manage media files but do you know how to save iPhone to iTunes on computer? First, you should know what iTunes backup includes. It works in a similar way as iCloud does, saving most necessary data on iPhone. If your iCloud storage is full, you could use iTunes to save iPhone photos to computer. You should also know that iTunes would not save the photos already uploaded to iCloud.
Steps to make iTunes backup:
1. Download iTunes. Connect iPhone to computer with USB cable.
2. Click the phone-shape icon in the upper-left corner.
3. Click Back Up Now in Summary.

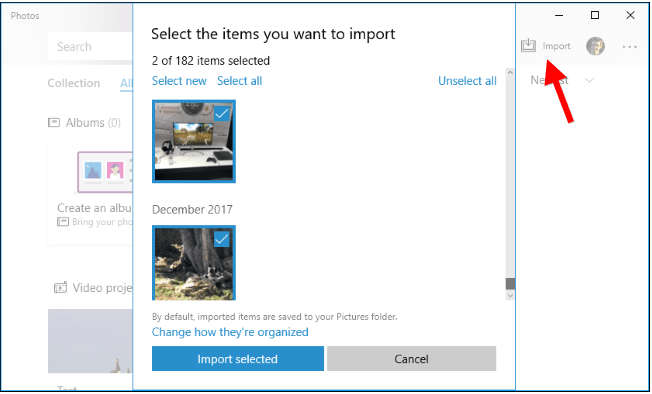
Method 5. How to backup pictures on iPhone with Windows Photos
Microsoft Photos is an app in Windows 8/10/11, you could also use it to backup iPhone pictures, but sometimes it doesn't work when iPhone screen is locked.
Steps to create iPhone picture backup on Windows:
1. Connect iPhone to computer with USB cable.
2. Click the Start Button and open Photos.
3. Select Import from USB Device.
Conclusion
This is how to backup iPhone photos to PC, iCloud, or external drive. Your photos would be safe when there is a copy of them.
Using FoneBackup is considered the best software to backup iPhone photos because it is fast and professional, helping you do iPhone backup photos.
Share this passage and it would help more people.