How to Transfer Photos from iPhone to Windows 10/11 PC
This post offers 5 methods of how to transfer photos from iPhone to Windows 10/11 desktop or laptop easily. You can use FoneBackup, Photos app, File Explorer, iCloud or iTunes to export iPhone photos to PC.
By Kathy / Updated on May 14, 2026
What is the easiest way to transfer photos from iPhone to Windows PC?
How do I export photos from my iPhone 16 to Windows 10 laptop? I need to make a physical copy of my photos and movies on a backup drive via the Windows computer.
- Question from Apple Community
iPhone is a good device for taking photos with great quality. You may love to take selfies or record your life via photos. But soon, you will find your iPhone is running out of space and need to transfer photos from iPhone to Windows 10/11. Then you can free up storage space on your iPhone.
Besides, having a copy of important photos on PC is a good way to avoid data loss. Once your iPhone has an issue causing data loss, you can still restore the backup to your iPhone to keep the photos. How to make it efficiently? Just find all the details in this passage!
1. How to transfer photos from iPhone to PC Windows 10/11 [Easiest & Free] 🔥
What is the fastest way to finish the photo transfer from iPhone to Windows? Professional FoneBackup can be your ideal choice.

- You can move 1000 + photos within 10 minutes without losing quality.
- Preview and select photos/videos to move as you like.
- Total USB connections ensure the process is safe and stable.
- Common file formats are supported (jpg, jpeg, png, gif, heic, raw, etc.).
- Various iOS devices and versions are compatible (iPhone 16/iOS 18).
Now you can download FoneBackup and connect your iPhone to computer with a USB cable. We will guide you on how to move photos from iPhone to PC.
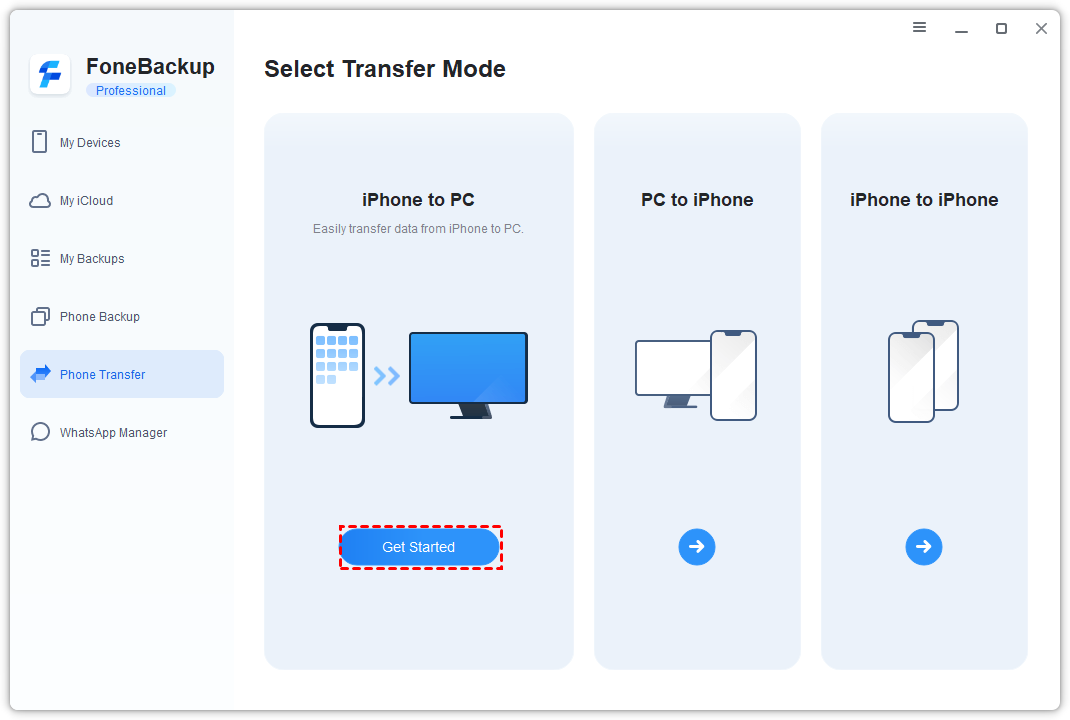
Step 1. Run FoneBackup > Go to Phone Transfer on the left pane > Move the mouse to iPhone to PC > Click Get Started to continue.
Step 2. Click the Photos icon > Preview and select the files you need to move > Click OK.
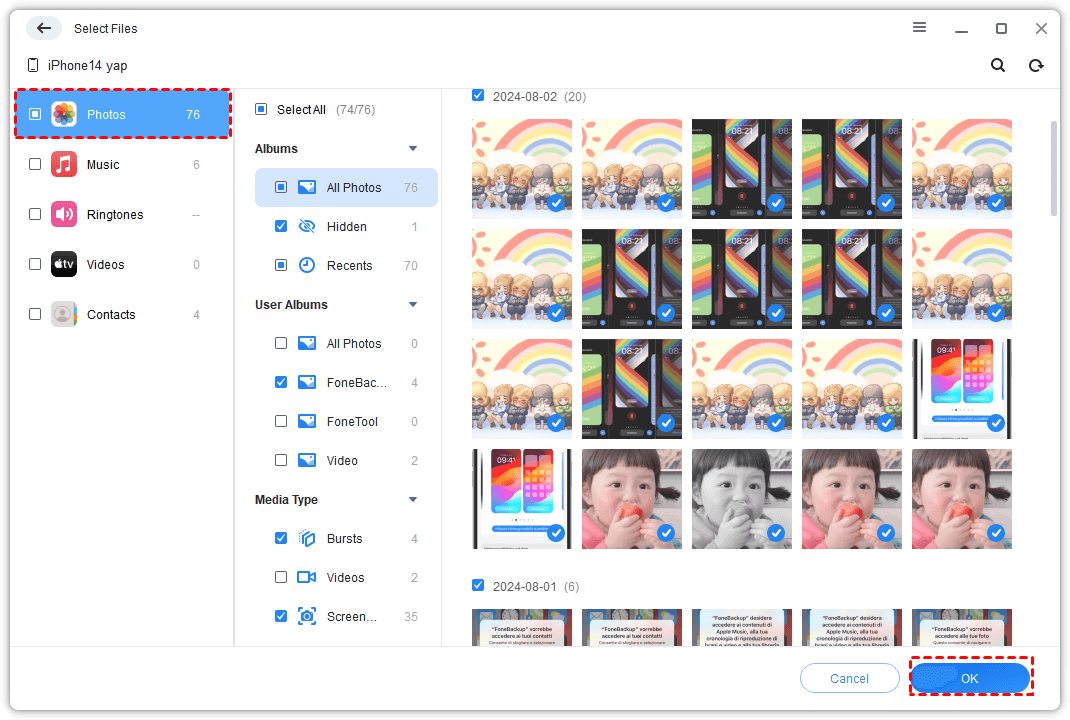
You can also click the Videos icon to move videos on iPhone to PC as you like.
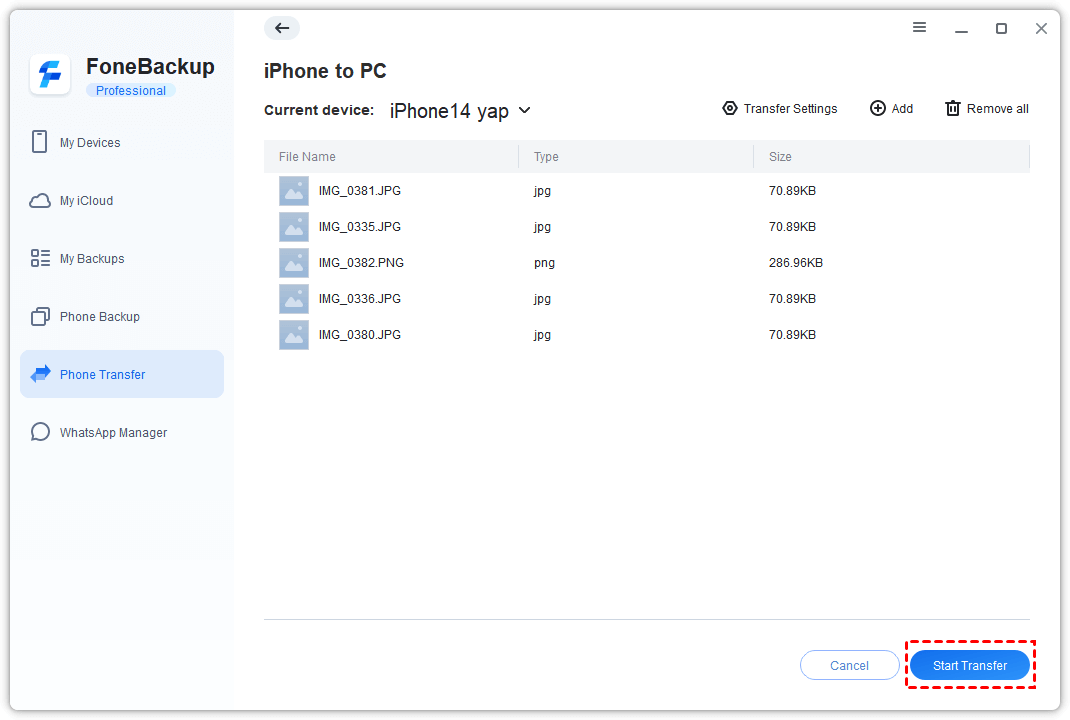
Step 3. Set the storage location from the Transfer Settings option > Click Start Transfer to transfer photos from iPhone 15/16 to PC.
2. How to transfer photos from iPhone to computer with USB - iTunes
iTunes software can back up the whole iPhone to your computer. If you want to move photos from iPhone to Windows 10/11 with iTunes, follow the guide below.
Step 1. Connect your iPhone to your computer, and run iTunes.
Step 2. Click the phone icon from the top. Under the Summary tab, choose Back Up Now to back up your iPhone.
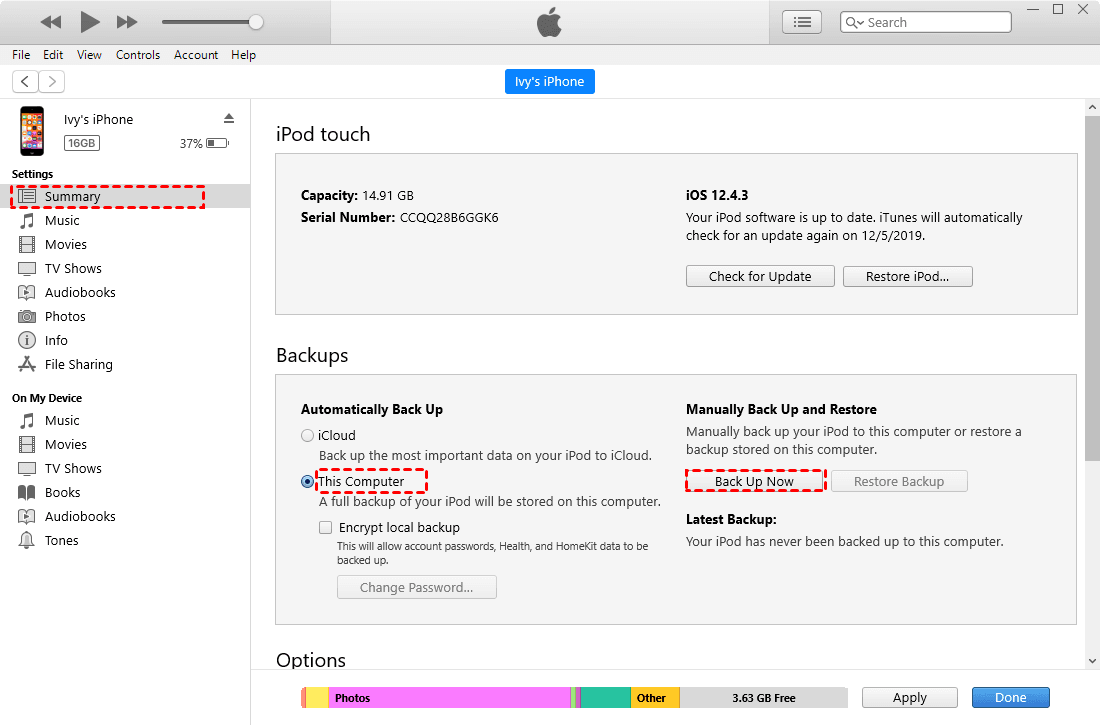
iTunes backup file is defaultly located in C:\Users\Username\AppData\Roaming\Apple Computer\MobileSync\Backup. Your iPhone photos will be saved here as backup image files, but you can't view these photos directly. You can use backup extract software to view iTunes backup photos.
3. How to copy pictures from iPhone to PC - Windows Photos
Microsoft Photos or Windows Photos app, which is a Windows built-in tool, helps you get photos from your devices. You can connect your iPhone to your PC and use it as a USB external storage device. Then follow the guide on how to transfer photos from iPhone to PC:
Step 1. Connect your iPhone computer with a USB cable. Usually, the Windows Photos app will be automatically opened.
If it does not appear, you can click the Windows start button to look for it on the right, or you could also type Photos in the Windows search bar.
Step 2. Click Import in Microsoft Photos and then select From a USB device.

Step 3. Preview and select the photos on your iPhone and click Import Selected.

After the process is completed, you can go to File Explorer > Photos to find pictures on your computer.
4. How to transfer photos from iPhone to Windows 10/11 computer - File Explorer
Windows Files Explorer is a Windows tool that can help you easily and quickly access your iPhone files and export photos from iPhone to Windows 10/11 computer. Here is a full guide on how to import photos from iPhone to PC:
Step 1. Connect your iPhone to your computer. Double-click This PC or Press the Win + e keys to open Windows File Explorer.
Step 2. Open your Apple iPhone under the Devices and drives option. And find the DCIM folder.
Step 3. In the folder, you can copy and paste or drag and drop the photos you need to the targeted location on your computer.
5. How to transfer photos from iPhone to laptop/desktop wirelessly
If you don't have a USB cable, iCloud is another way to download photos from your iPhone to Windows 11/10/8/7 PC wirelessly. It is a cloud storage service provided by Apple. You can upload your iPhone to iCloud, and download photos from iCloud to your computer.
Part 1. How to upload photos from iPhone to iCloud
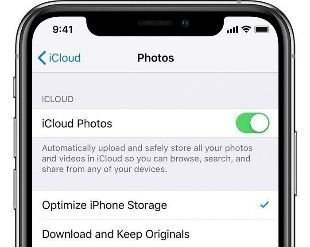
Please make sure your iCloud has enough space and enable iCloud Photos on your iPhone. Then your photos will be automatically uploaded to your iCloud.
Step 1. Open the Settings app on your computer. Scroll down and tap Photos.
Step 2. Toggle on the iCloud Photos / iCloud Photo Library.
Part 2. How to download photos from iCloud to PC
When it comes to getting iCloud photos to Windows PC, there are 2 ways to make it. You can go to the iCloud official web mentioned in Option 1 or use the professional iCloud manager - FoneBackup mentioned in Option 2 to download. FoneBackup's fast download speed can help you shorten the process as much as possible. Here is how to transfer photos from iPhone to PC free without USB cable:
Option 1. Access iCloud photos from the official web
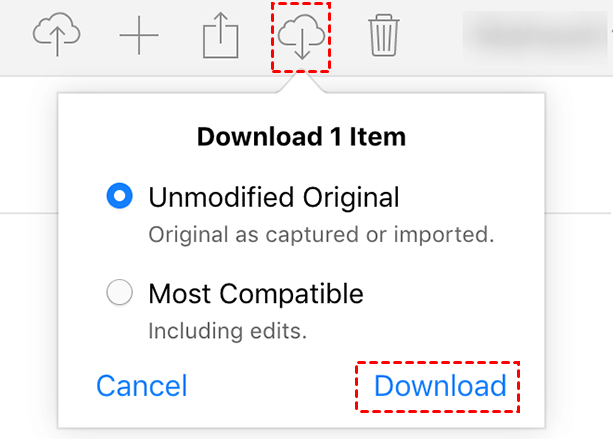
Step 1. Go to the iCloud site on your Windows 10/11 PC. Sign in with your Apple account. Click the Photos icon to continue.
Step 2. Here you can view all uploaded photos. Choose what you need, and click the download icon from the top to store them on your computer.
Option 2. Save iCloud photos to PC via professional FoneBackup
Except for iPhone data management, FoneBackup is also a handy iCloud manager.
· You can upload, download, delete or sync iCloud data from a Windows PC.
· It uses two-factor authentication to protect your iCloud data which is the same as the encryption used by Apple.
· Fast download speed allows you to download 1000 + iCloud photos within 15 minutes.
Now just download it on your Windows 11/10/8/7 PC to experience its fast transfer speed.
Step 1. Launch FoneBackup > Go to My iCloud > Log in with your Apple ID > Choose Manage iCloud.
Step 2. Select the photos you need under the Photos option > Click the Download button from the top of the page.
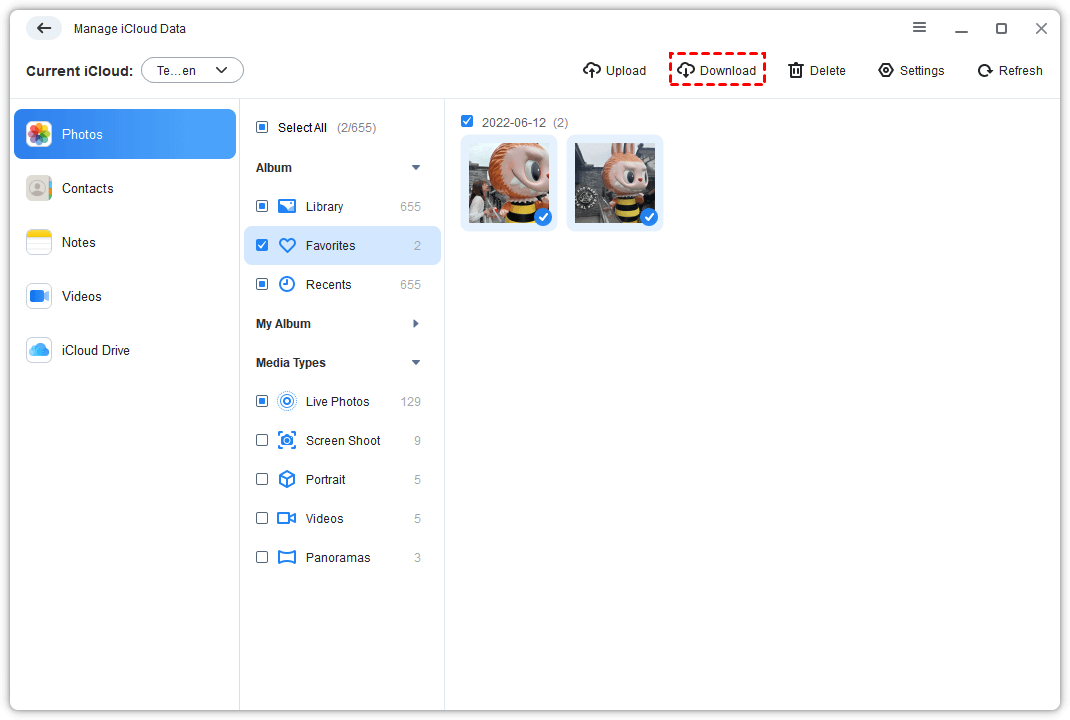
Step 3. Change the download settings from the pop-up window > Click Download to start.
FAQs about how to transfer iPhone photos to Windows 10/11
Q1: Why can't I transfer photos from iPhone to Windows computer?
When your iPhone not import photos to Windows, that may be because the file formats can't be recognized, you haven't downloaded the original iCloud photos to your iPhone before importing them to your PC when the iCloud Photos is turned on, the cable you're using might not be working properly or the device is locked.
Q2: How to transfer photos from iPhone to Android?
FoneBackup offers an airdrop-like app to help you send photos from iPhone to Android without losing quality. With 3 simple steps, you can easily finish the process without any Wi-Fi connection or cellular data consumption.
Q3: How to transfer photos from iPhone to Mac?
To copy iPhone pictures to your Mac, you can turn on the iCloud Photos to sync photos between your iPhone and Mac. Or connect your iPhone to the computer and open the Photos app on Mac to finish the transfer.
Conclusion
This is how to transfer photos from iPhone to Windows 10/11 laptop/desktop. You can perform this operation with FoneBackup, iTunes, File Explorer, Photos app, and iCloud.
If you need to finish the process wirelessly, you can use iCloud to transfer iPhone photos to PC. If you want a wired way, FoneBackup is the quickest tool to transfer photos from iPhone to PC. It is safe and easy to use. Besides photos, you can also let it help you transfer videos, music, messages, and more as you like. Why not try it out? Download and use FoneBackup now!