


How to Open VMDK File in VMware ESXi and Workstation
In some cases, you will not be able to start the VM, but you may need to access the data stored on the virtual disks. Do you know the most efficient way to open VMDK file in VMware? This article is to provide the solutions for you.
By Crystal / Updated on July 1, 2024
What is VMDK in VMware
A VMware virtual hard disk usually contains one or more .vmdk files. The VMDK here, short for Virtual Machine Disk, is a file format that describes containers for virtual hard disk drives to be used in virtual machines like VMware Workstation or ESXi.
For VMware ESXi VMs, the VMDK format is the virtual disk descriptor (diskname.vmdk) and the virtual disk extent (diskname-flat.vmdk, where raw files are stored). For VMware Workstation VMs, the VMDK format is an extended data file (diskname.vmdk, monolithic sparse). It contains an embedded virtual disk descriptor that defines the structure, geometry of the virtual disk, virtual hardware version and identifiers.
Sometimes you may want to directly access the data stored on the VMDK file, especially when the original VM is unavailable due to some application failures, update issues, virus & malware, human errors, etc. But how can you do that? keep reading to get the answer.
![]()
How to open VMDK in VMware with VM powered on (2 methods)
The following part will show you how to open VMDK files on ESXi and Workstation.
✎ Tips: Both of the methods require a hypervisor (VMware ESXi/VMware Player/VMware Workstation) to be installed and the virtual machine to be powered on.
Method 1. Use Live DVD to open VMDK file in VMware
This method requires you to have a VM and can boot from a DVD disc. Then you can use the ISO image as a DVD disc to boot the virtual machine, and mount the partitions of your virtual disk and copy files from the virtual disk to a USB hard disk attached to the VM or to your host machine, or to any other machine via the network.
*The following tutorial is based on an ESXi virtual machine to demonstrate how to use Live DVD to open VMDK files. It also applies to VMware Player / Workstation.
✤ How to open VMDK in VMware using Live DVD:
1. Log in vSphere Client and access to the virtual machines. Right-click a VM and select Edit Settings.
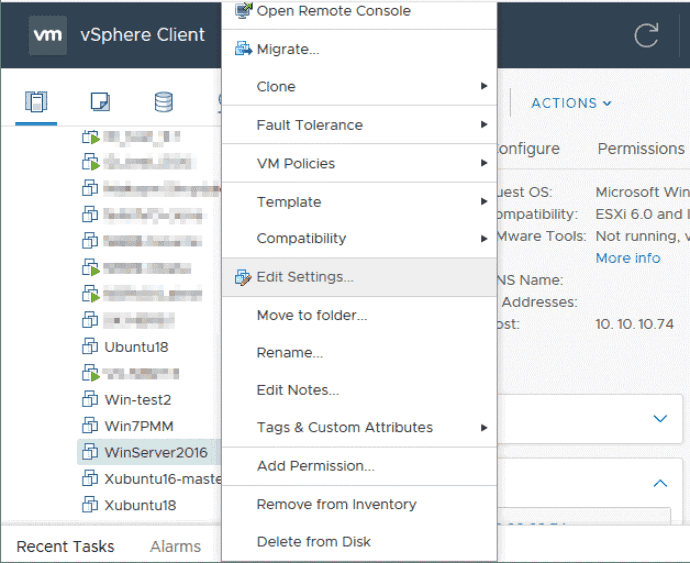
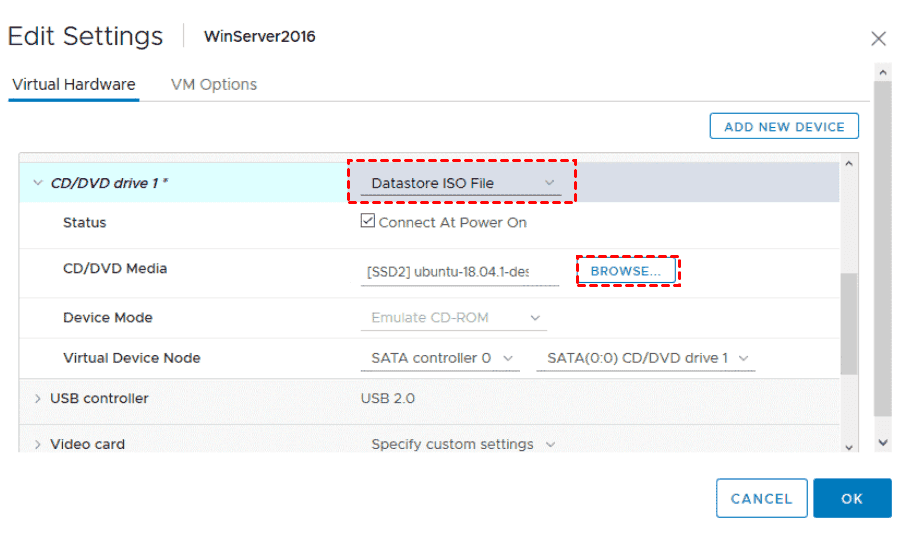
2. In the open wizard, find the CD/DVD Drive option. Select Datastore ISO File. Then go to CD/DVD Media option, click BROWSE to select the ISO file that are accessible by the ESXi host.
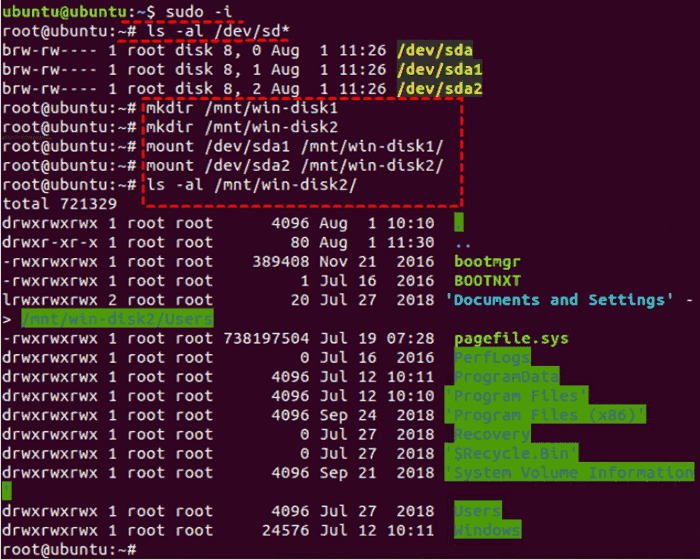
3. Boot the virtual machine from ISO image, then select Try Ubuntu Without Installing. Once Ubuntu has booted from the Live DVD media, open console (Terminal).
Type sudo -I to list available hard disk devices.
ls -al /dev/sd*
There are two partitions - /dev/sda1 and /dev/sda2.
Make directories to be used as mount points for each partition.
mkdir /mnt/win-disk1
mkdir /mnt/win-disk2
Mount the partitions of the virtual disk to the appropriate directories.
mount /dev/sda1 /mnt/win-disk1/
mount /dev/sda2 /mnt/win-disk2/
Then list files and directories of the mounted partitions.
ls -al /mnt/win-disk2/
ls -al /mnt/win-disk1/
4. Attach a USB hard disk drive (HDD) to the USB port of your ESXi host and connect this HDD to the virtual machine with the USB pass-through feature for copying the necessary files stored on the VMDK file used as a virtual disk by a virtual machine.
✎ Tips: You can also use an SMB (CIFS) share and copy the contents of the virtual disk to another destination via the network.
Method 2. Mount VMDK file as virtual disk to an available VM
The VMDK file can be attached to an existing virtual machine as an additional virtual disk. This method also works with VMware ESXi, VMware Player and VMware Workstation. As examples, I will explain how to do this in ESXi and Workstation respectively.
✤ How to mount a VMDK file to an ESXi VM
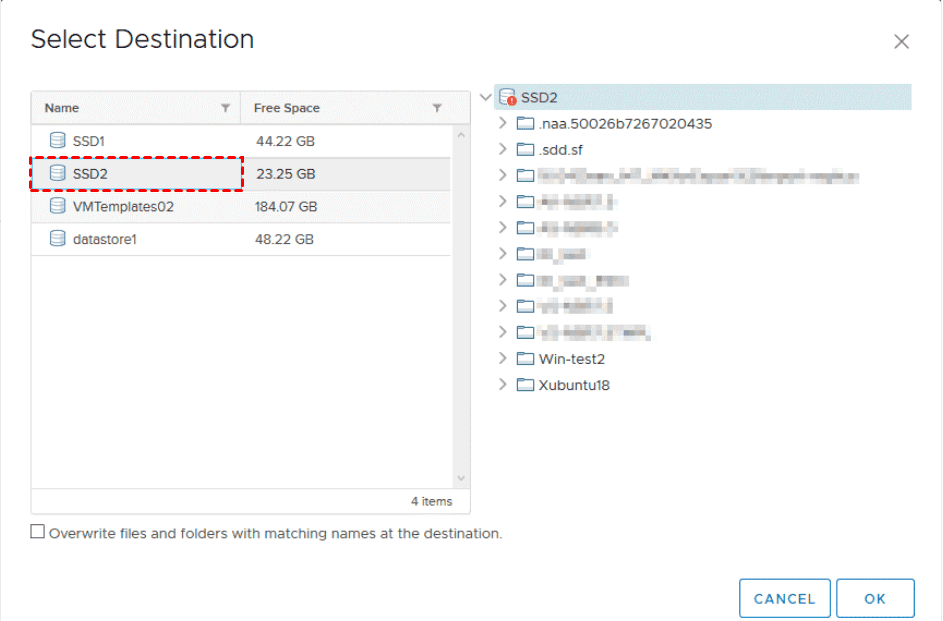
1. In vSphere Client, navigate to Storage >> Datastore Browser, and select the VMDK file on the datastore. Then click Copy to.
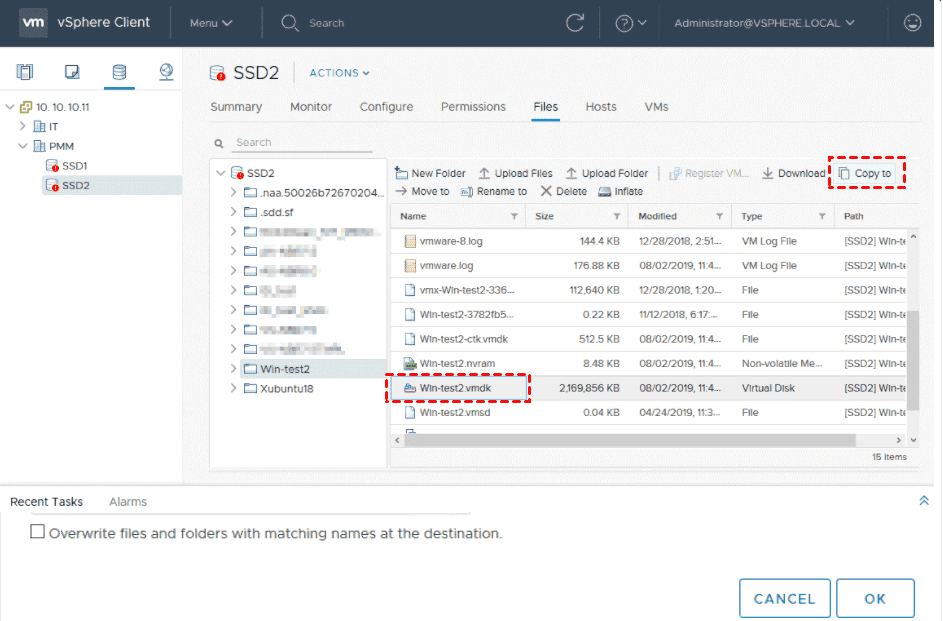
2. Select the destination datastore to store the VMDK file.
3. Back to the main screen, right-click a VM and select Edit Settings.
4. In the open wizard, click ADD NEW DEVICE >> Existing Hard Disk.
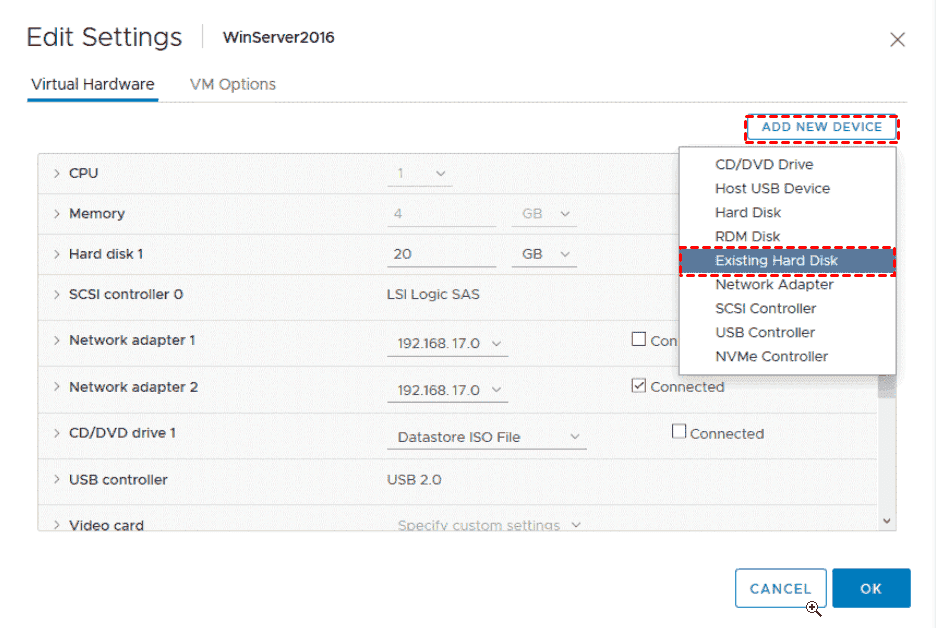
5. Select the recently copied VMDK file and click OK.
Now, you can open the mounted drive in Windows Explorer and then copy the contents of the VMDK file connected to the virtual machine.
✤ How to mount a VMDK file to a Workstation VM
When there is no sufficient disk space on the ESXi datastore to copy a virtual disk, you can mount the VMDK files to Workstation to open it in VMware Workstation.
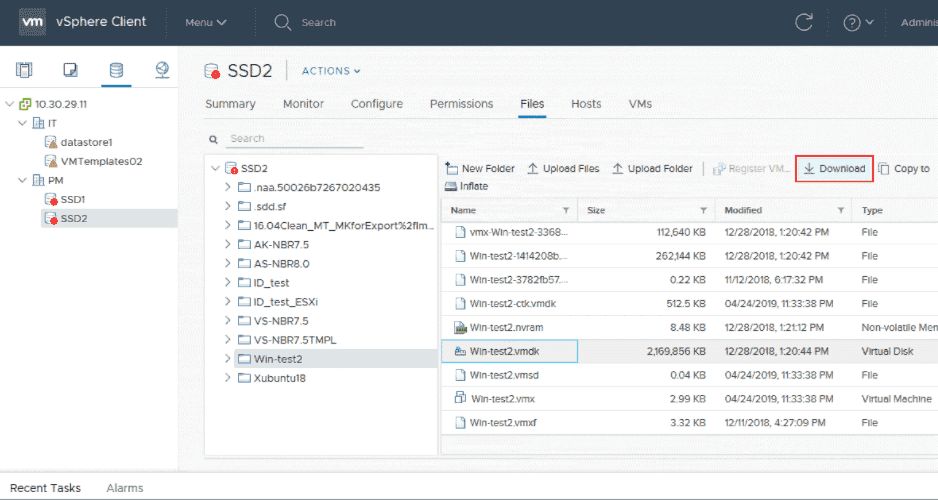
1. In vSphere Client, access to Storage >> Datastore >> File >> Download. You can check the files downloaded in a ZIP archive. Then unzip the two files.
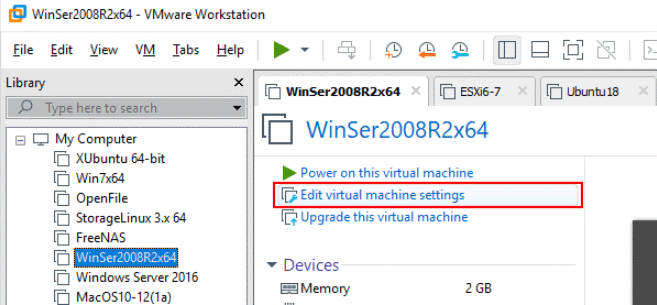
2. Go to VMware Workstation, select a virtual machine and click Edit the virtual machine settings.
3. In the open wizard, click Add. Then select Hard Disk >> SCSI >> Use an existing virtual disk. Then find the downloaded .vmdk file. Click Finish.
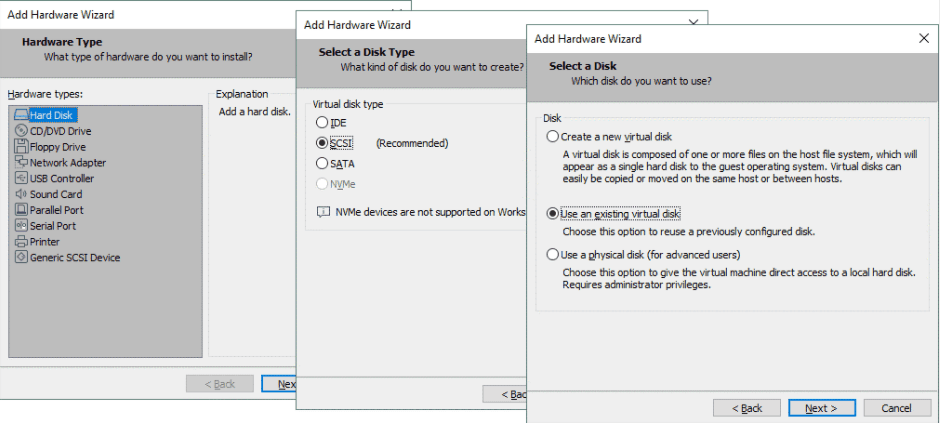
✎ Tips: In this process, if the selected virtual disk is not compatible with the version of Workstation, you can edit the disk descriptor file to solve it.
5. Open the Disk Management in Windows, change your virtual disk status to online, assign a drive letter to a partition and browse the files.
How to open VMDK in VMware Workstation with VM turned off
With VMware Workstation installed on your physical Windows or Linux operating system, you can mount the VMDK files to your host operating system. The virtual disks of the ESXi format and delta disks related to VM snapshots are all supported.
This method doesn't require the VMs to be powered on, and is therefore more versatile.
✤ How to open VMDK in VMware Workstation:
1. Access to Workstation. Click File >> Map Virtual Disks >> Browse.
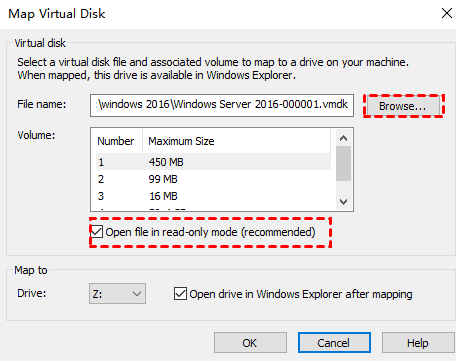
2. It is recommended that you open the VMDK file in read-only mode to prevent any possible damage to virtual disks that belong to the snapshot chain after writing data. The default drive letter is Z: in this case and the drive is opened in Windows Explorer automatically after mapping. Then click OK.
3. In the open wizard, you can only check the delta virtual disk related to the first snapshot. After you have finished working with it, click Disconnect Virtual Disk.

To avoid unbootable virtual machines or corrupted disk files due to the accidents such as system upgrades or virus attacks etc., I recommend you to make backup virtual machines regularly.
Additions: A surefire way to secure your VMware VMs and VMDK files
VMDK file is vulnerable to be damaged that leads to data loss of virtual machine. So, you need to offer a secure insurance for your VMs. You could back up VMware datastore or back up all the virtual machine in VMware. The frequently used methods include coping VM files, exporting VM from ESXi, etc.
However, the traditional built-in options can hardly meet your needs for batch operation and long-term protection. It’s recommended to choose a professional backup utility to simplify the VM management. Here, I’d use the free VMware backup software AOMEI Cyber Backup as an example. It offers an easy-to-use central console to help you achieve the following operations:
📌 Agentless backup: You can add VMs on both paid and free versions of VMware ESXi and Hyper-V for backup without installing agents on them.
⏰ Schedule backup: Create an automatic task to back up VMs daily, weekly, monthly.
💡 Restore from any point: With backups in hands, you can restore VMs to usable state from any history version.
✌ Cloud Archive: Save backups to a cloud storage like AWS S3 for higher backup security.
✤ Secure steps to protect VMware VMs regularly:
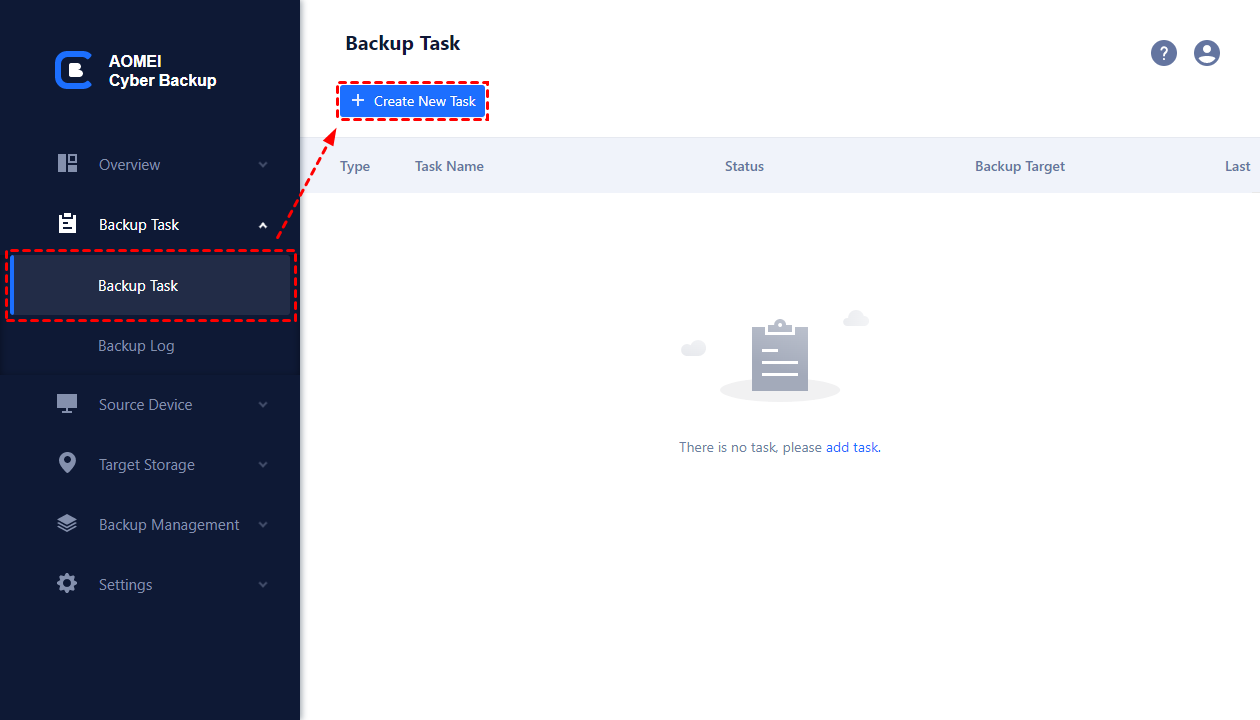
1. Install AOMEI Cyber Backup and add vCenter or Standalone ESXi hosts as the source device (here's the perpetual free edition).
2. Navigate to Backup Task >> Create New Task.
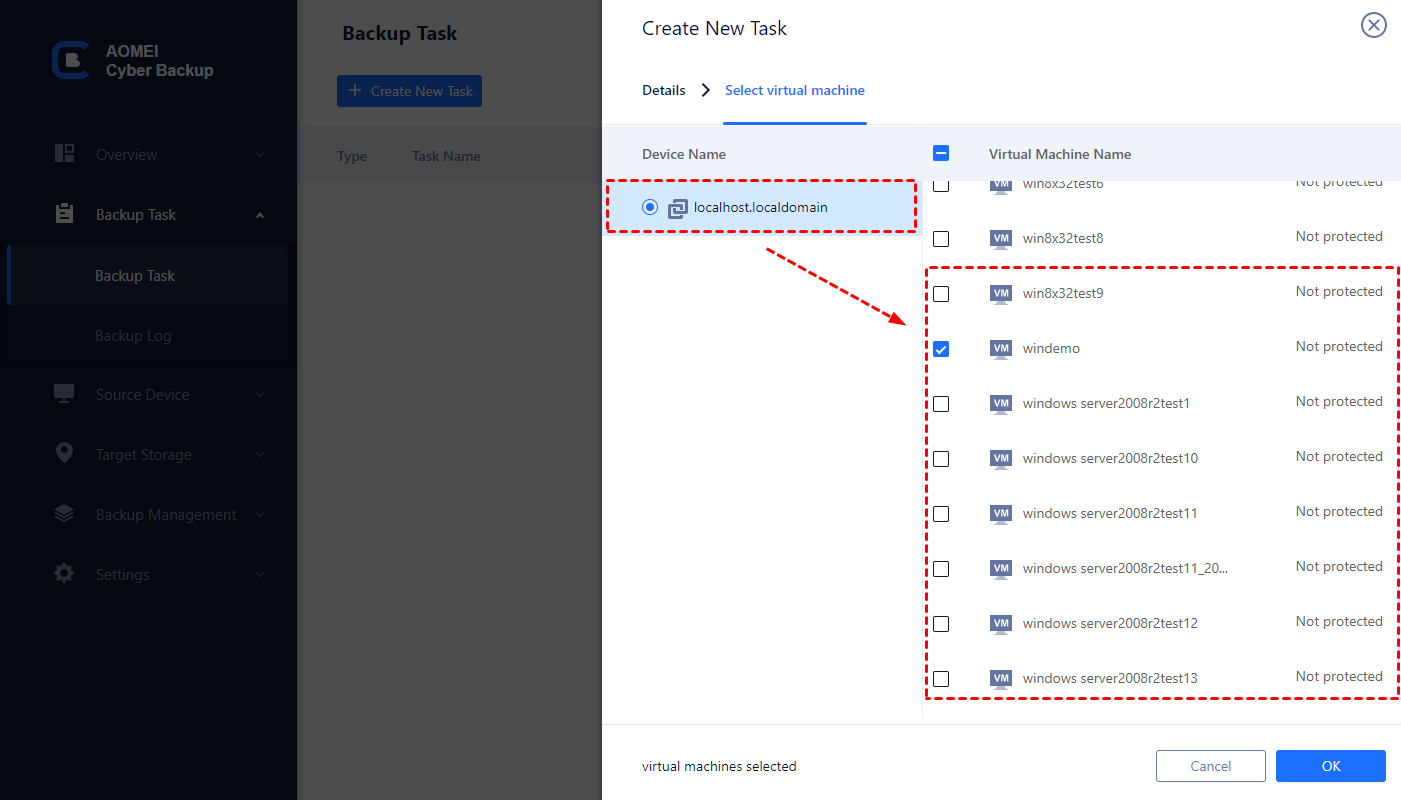
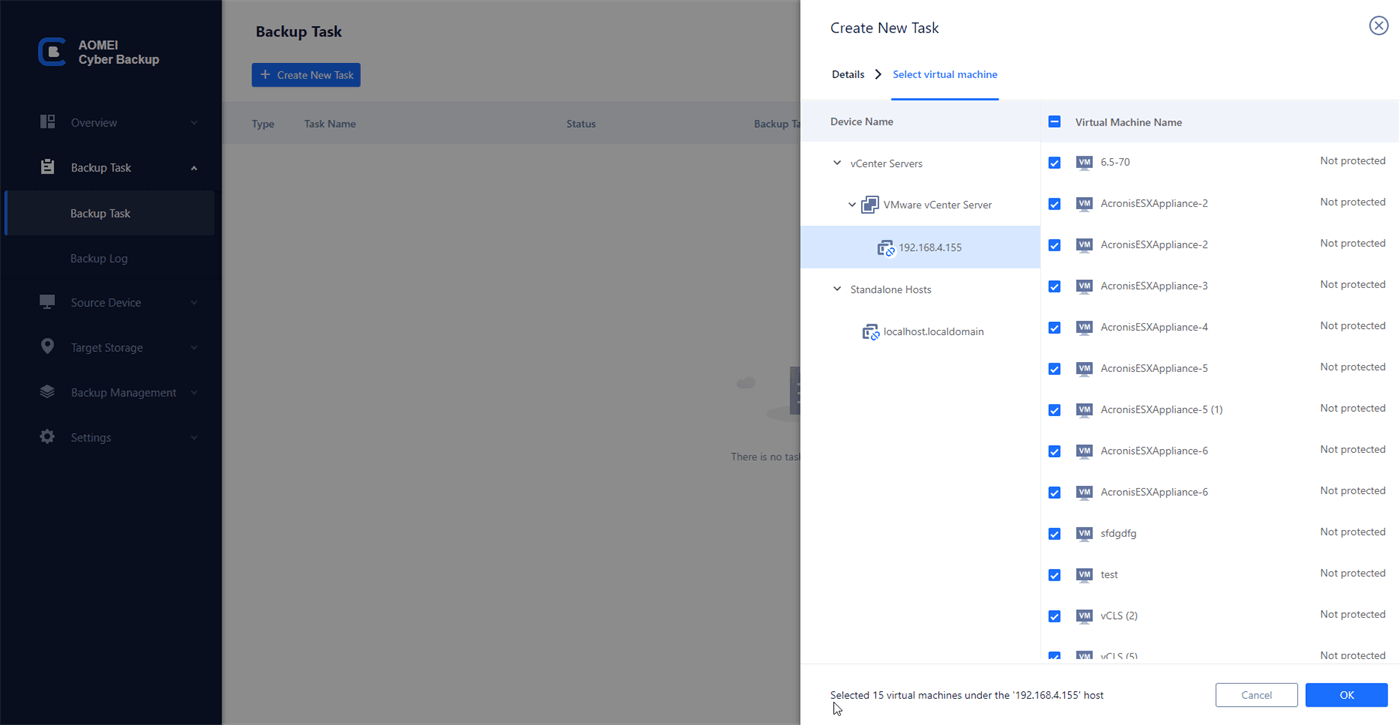
3. In configuring page, enter a name for backup task and select device and virtual machines to back up at once.
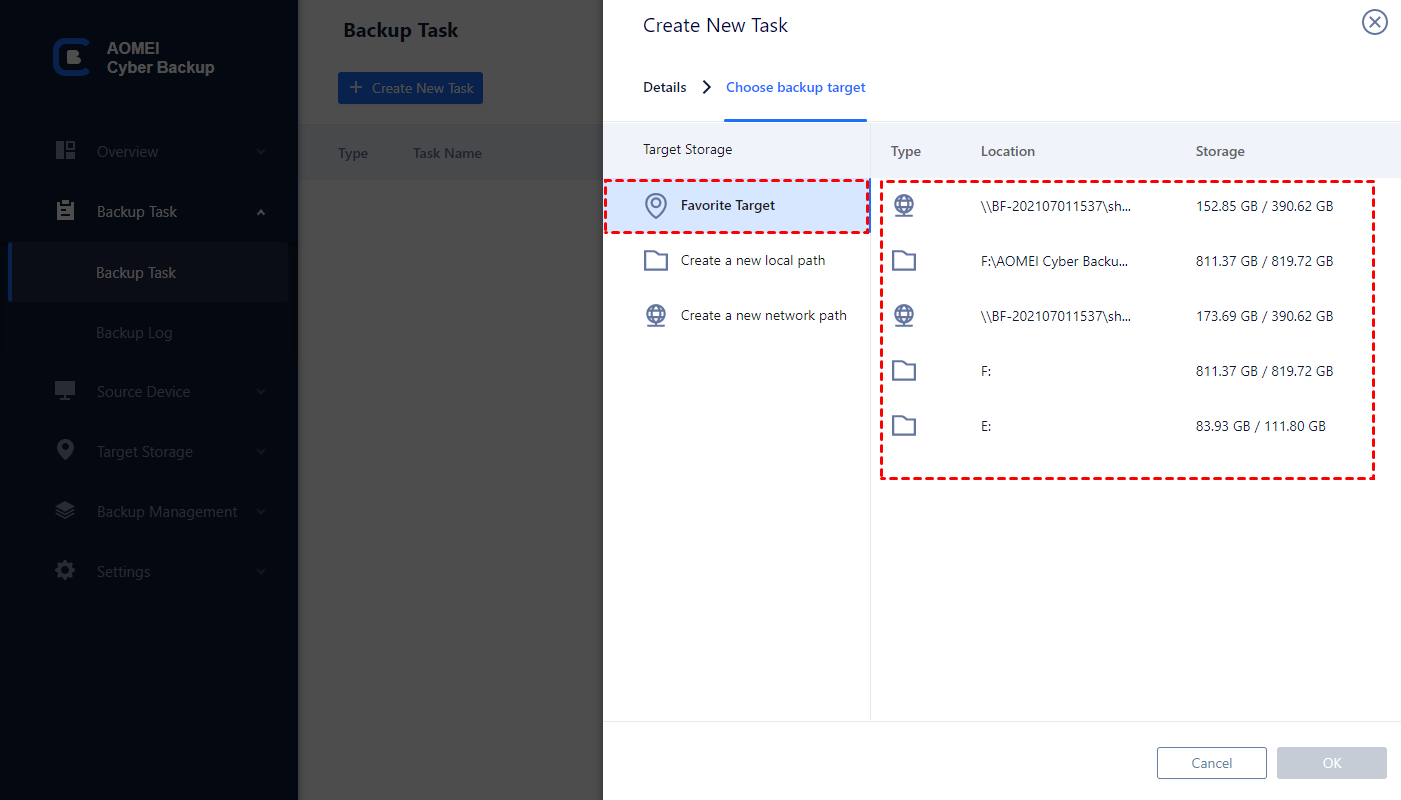
4. Select Target to store backup files, for example local or network path.
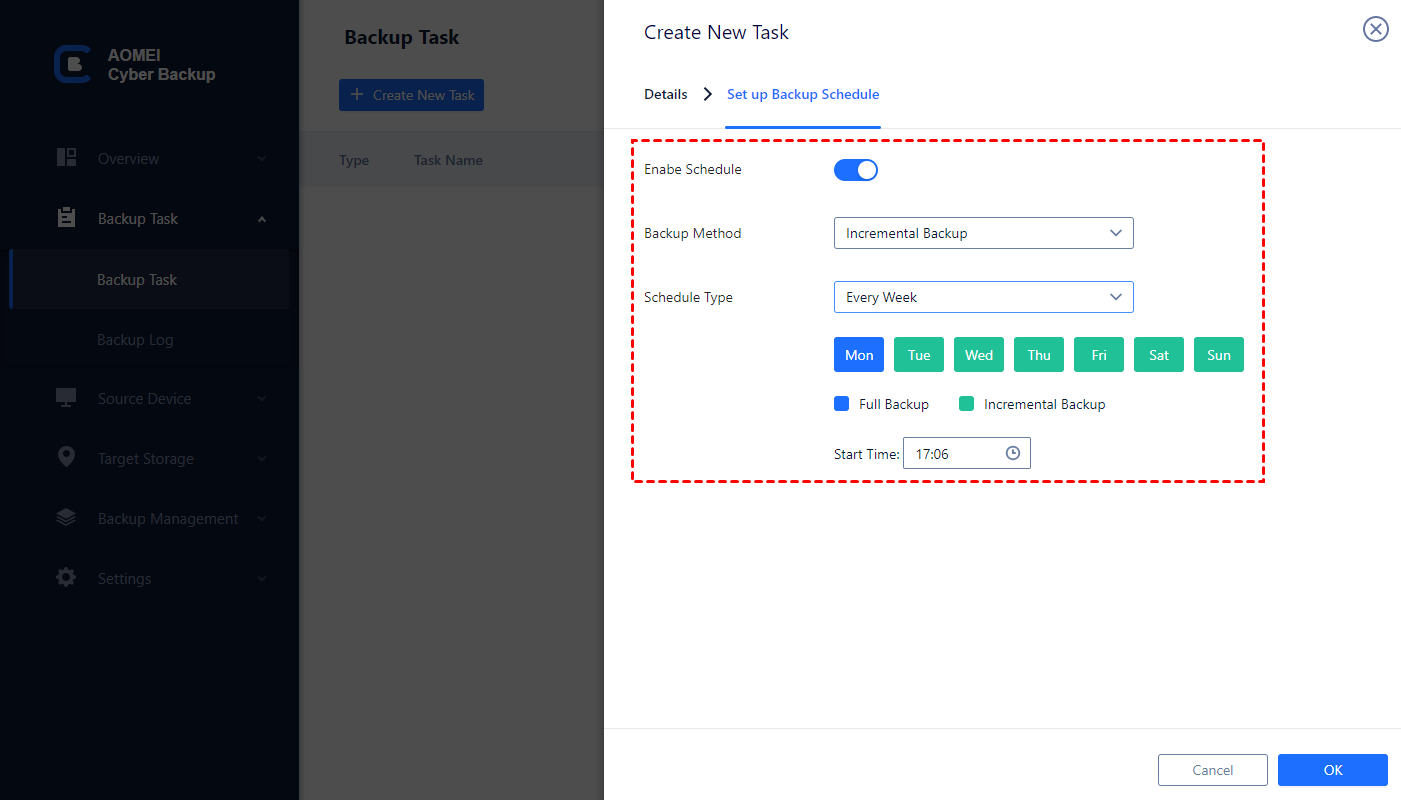
5. Set up a backup Schedule flexibly and specify the time to run the backup task. Then you can click Start Backup to execute it.
✤ Simple steps to restore VMware VMs from any point:
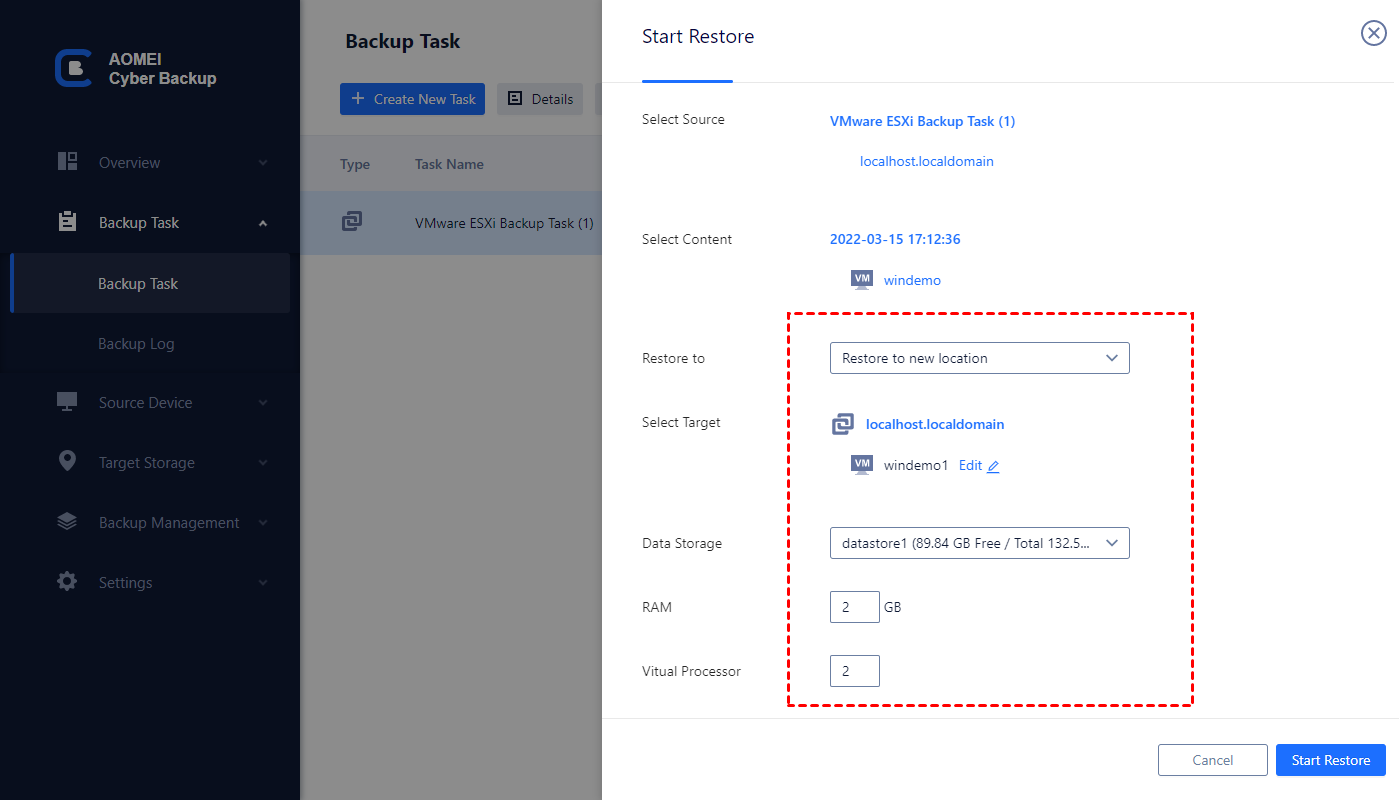
1. When you need to recover the VMs, just click on the task and choose to Restore from it. You can choose which VM to restore, and which history version to restore from.

2. Then you can recover the entire VM quickly to a usable state.

- Batch VM Backup: batch backup large numbers of VMs managed by vCenter Server or on standalone ESXi hosts.
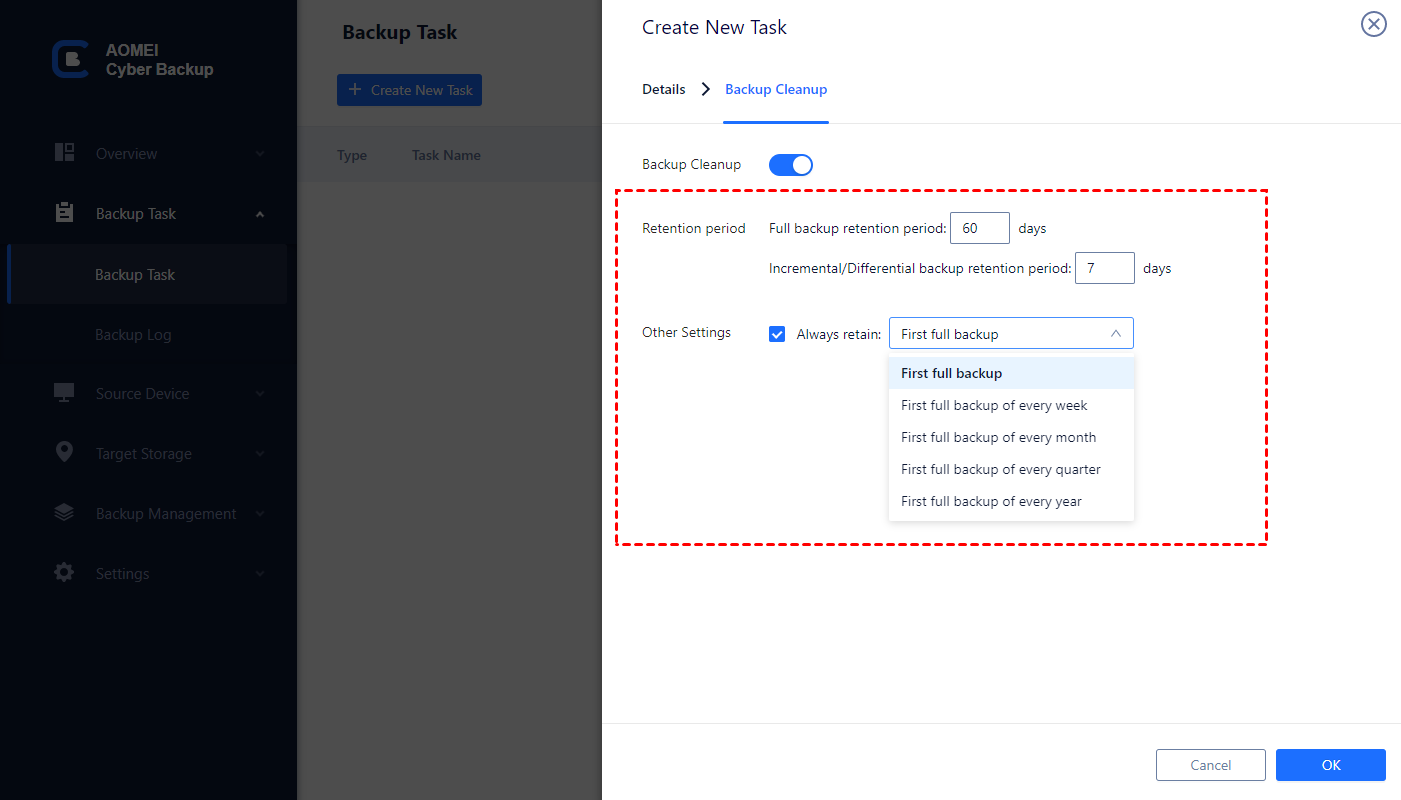
- Backup Cleanup: Specify the retention policies to delete the unwanted backup files automatically.
- Restore to New Location: Create an identical new VM by selecting Restore to a new location.
AOMEI Cyber Backup specifies in data protection for virtual machines. You can create an efficient backup task without complicated settings and extra cost. It always safeguards your workloads and offers instant recovery solution.
Summary
This article explains multiple solutions to open VMDK in VMware ESXi and Workstation. VMDK is important to store virtual machine data, so, in order to avoid data loss, it’s recommended you to back up virtual machines regularly.

