


How to Merge Multiple VMDK Files into One Securely
Are you suffering from performance issues after choosing split file mode for VMware VMs? This article offers you effective solutions for merging multiple VMDK files into one file with ease.
By Crystal / Updated on March 8, 2023
Why merge VMDK files into a single one?
When you create a VM, there’s a step that lets you specify the disk capacity. Due to the limitation of FAT32, you may split virtual disk into multiple files to make each file smaller than 4 GB, and it will also be easier to move or copy the split VMDK in VMware.
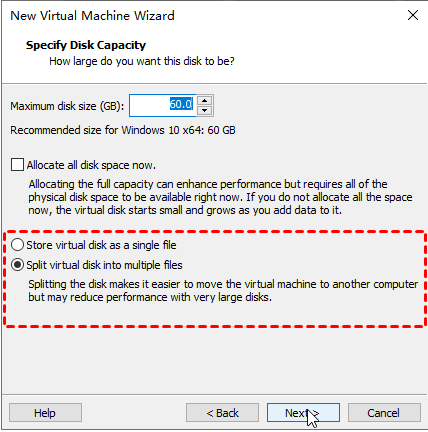
However, multiple VMDK files may lead to poor performance of VM once they occupy large space of disk. To improve performance, you may want to merge multiple VMDK files into one disk.
In this article, I will explain how to merge VMDK files into a single file from VMware Workstation, Fusion, or Player. Before you start, please remember to back up the original file or VM in case of accidental errors.
How to merge VMDK files into a single file [2 Cases]
To combine VMDK files into one, your need to install the Virtual Disk Manager (vmware-vdiskmanager) first. It is a utility that you can use to create, manage, and modify virtual disk files from the command line. You can use Virtual Disk Manager with virtual disks created under VMware Workstation 5 or higher, VMware Fusion, VMware Player, VMware ESX/ESXi server, etc.
However, since some platforms come with it installed while some don't, the steps will be a little different if you use a different hypervisor.

You can jump to the needed part via the following anchor text.
- Case 1. For VMware Workstation/Fusion users, Virtual Disk Manager is included in the VMware Workstation/Fusion program files directory when they are installed, therefore you can easily find it in your virtual machine software folder.
- Case 2. For VMware Player users, the vmware-vdiskmanager application is not part of a Player install, you will need to install this utility from VMware's website.
After ensuring you installed the vdiskmanager.exe, the remaining steps are roughly the same. As examples, I will explain how to combine VMDK files into one in different situations.
Case 1: On VMware Workstation/Fusion how to merge multiple VMDKs
If you are using VMware Workstation or VMware Fusion, it is easy to access VMware-vdiskmanager and use it to merge source disks into a new single disk.
Tips: If you want to open VMDK files on VMware Workstation, you can mount a VMDK file to a virtual machine.
How to merge VMDK files into a single file:
1. Shut down the VM, and find the location of split VMDK files.
2. Find the VMware Workstation file and locate the vmware-vdiskmanager.exe on this folder, then do the following steps:
☛ Copy the path: C:\Program Files (x86)\VMware\VMware Workstation\vmware-vdiskmanager.exe
Note: For VMware Fusion, the Virtual Disk Manager file, vmware-vdiskmanager, is located in the directory:
Applications/VMware Fusion.app/Contents/Library.
☛ Copy the source disk of VM: G:\Windows 10 x64.vmdk (original source file)
☛ Create a new destination folder for the new single file: G:\newimage\newimage.vmdk (destination file)
3. Open a command prompt, then enter the command, for example:
"C:\Program Files (x86)\VMware\VMware Workstation\vmware-vdiskmanager.exe" -r "G:\Windows 10 x64.vmdk" -t 0 "G:\newimage\newimage.vmdk"

4. You can check the status, and the new single VMDK file will be created in the destination folder when it finishes to convert the multiple VMDK files.
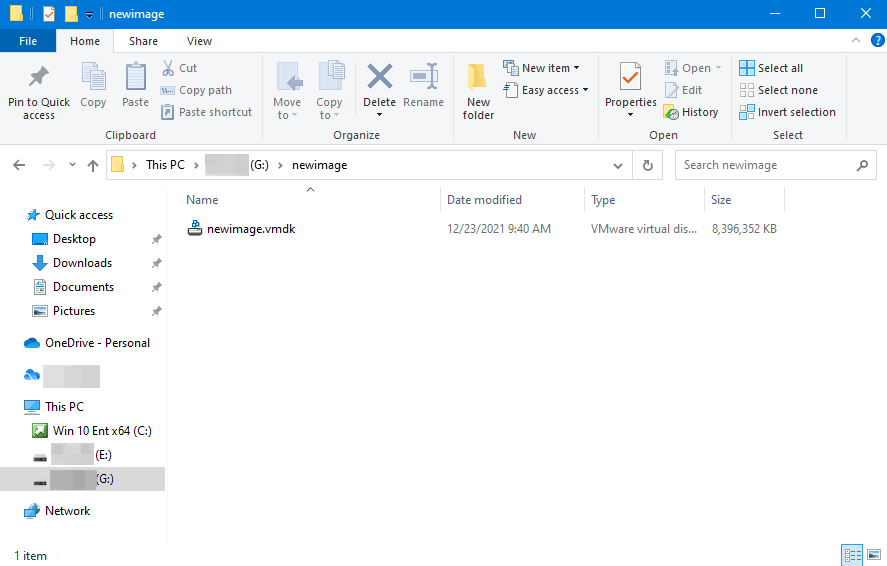
5. After the new VMDK file is created, please move the original files into another directory, and rename the new VMDK file as the original one “Windows 10 x64.vmdk”
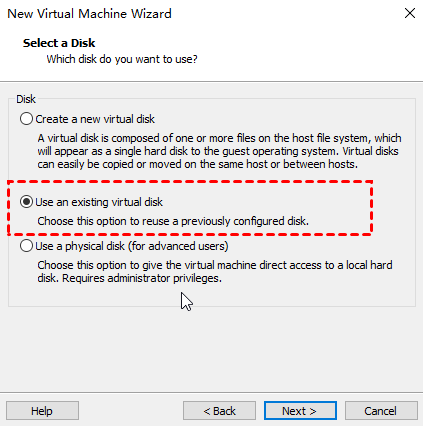
Now you finish the process to merge multiple VMDKs into a single file in Workstation. Please choose to use an existing virtual disk (using the new single VMDK file) to create a virtual machine.
Case 2: On VMware Player how to merge multiple VMDK files into a single file
If you are using VMware Player, you may find that VMware Player do not come with vdiskmanager. So, you should download it first from VMware website and refer to the following steps to combine VMDK files into one.
How to merge multiple VMDKs step by step:
1. Click here to start download vdiskmanager.
2. Unzip and rename 1023856-vdiskmanager-windows-7.0.1.exe into vmware-vdiskmanager.exe.

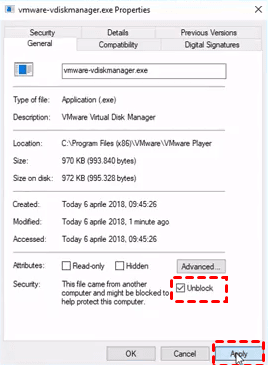
3. Copy or move to the directory where VMware Player is installed.
⊹ If you see the denied notice while copying, click Continue.
⊹ After successful copy, right click the vdiskmanager >> Properties >> Unblock >> Apply.
4. Now, open the command prompt and enter this command as before:
☛"C:\Program Files (x86)\VMware\VMware Player\vmware-vdiskmanager.exe" -r “C:\temp\Win2012R2\Windows Server 2012.mdk” -t 0 “C:\temp\Win2012R2_New\Win2012R2_New.vmdk”
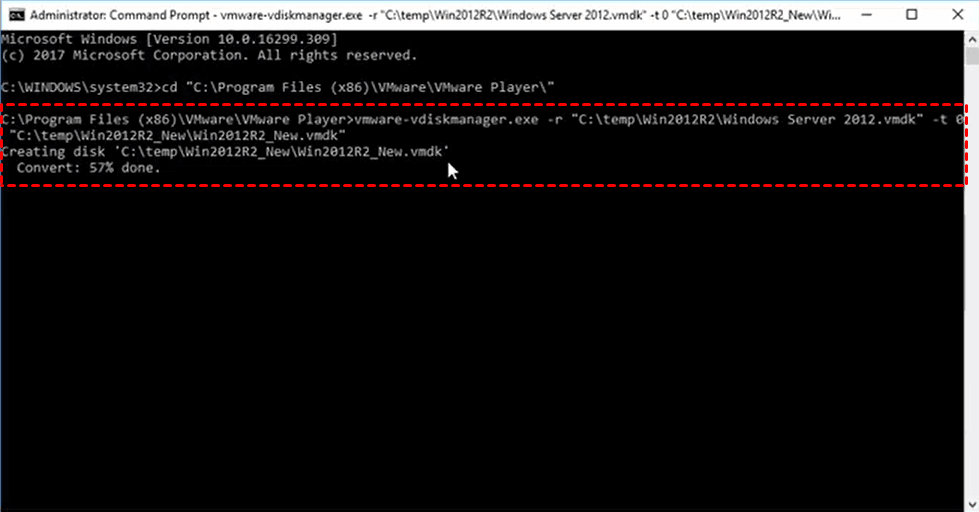
5. Then you will get a combined single VMDK file in VMware Player.
Some users may be confused about command line and worry about human errors to cause data loss when merging VMDK files, and some users find that the virtual disk is not bootable after merging. It's necessary to backup your virtual disk first before merging multiple VMDK files.
Important: Backup the original VMDK files securely before the merge
To prevent data loss caused by unexpected errors, it is critical to back up the original files before any risky operations. For example, there are chances that the VMDK you merged cannot be opened normally.
There are many ways you can back up VMware Workstation VMs. But to make it more convenient and efficient, you can try professional backup software to protect your virtual disks.
AOMEI Centralized Backupper provides you with a simple interface to back up virtual disks as physical files with just a few clicks. In addition, you can save storage space via compression or further secure your data via encryption.
As a centralized backup solution, it also centralized the features of File, System, Disk, Partition, and SQL Server Backup, as well as Basic Sync, Real-Time Sync, and Mirror Sync.
You can click the following button to start a 30-day free trial:
1. Install Agent on all the client computers you want to backup. You can launch Centralized Backupper, switch to Computers tab, and choose to Install client program manually or remotely.
*The client programs installed remotely will be auto controlled by the central machine, but if you choose the manual way, you still need to Request Control over them.

Then go to Tasks tab and create a New Task as you need. The options include file, system, partition, disk and SQL Server. Here, choose Disk Backup to get started.
2. The backup setup screen is divided into three steps. In Step 1, you can click + Add Computers to detect all the controlled computers, and select the ones you want to backup.
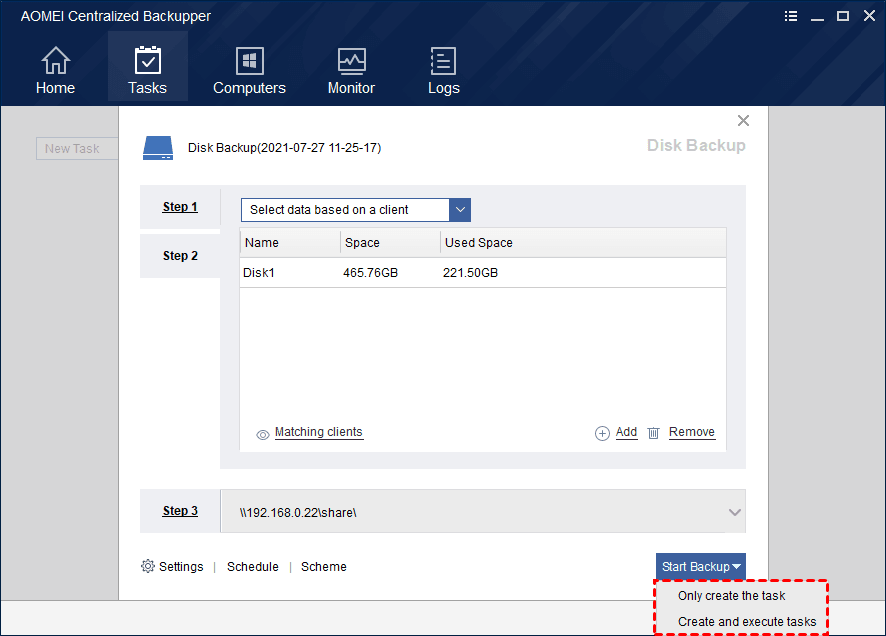
3. In Step 2, you can either Select data based on a client (manual selection), or Select data based on backup rules (auto selection).
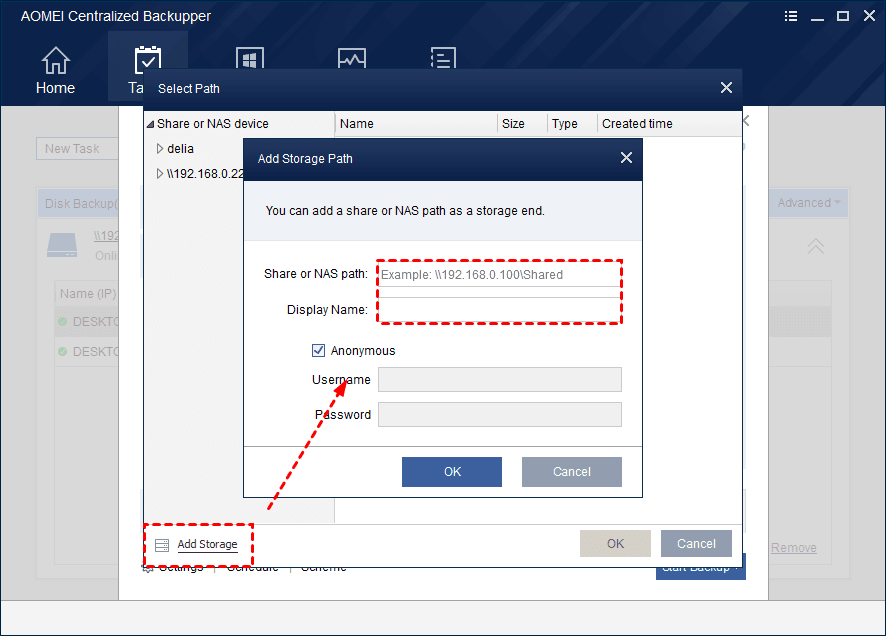
4. Click on Step 4, and click Add Storage to enter the network path of a share or NAS, then specify a folder in it as the target directory.
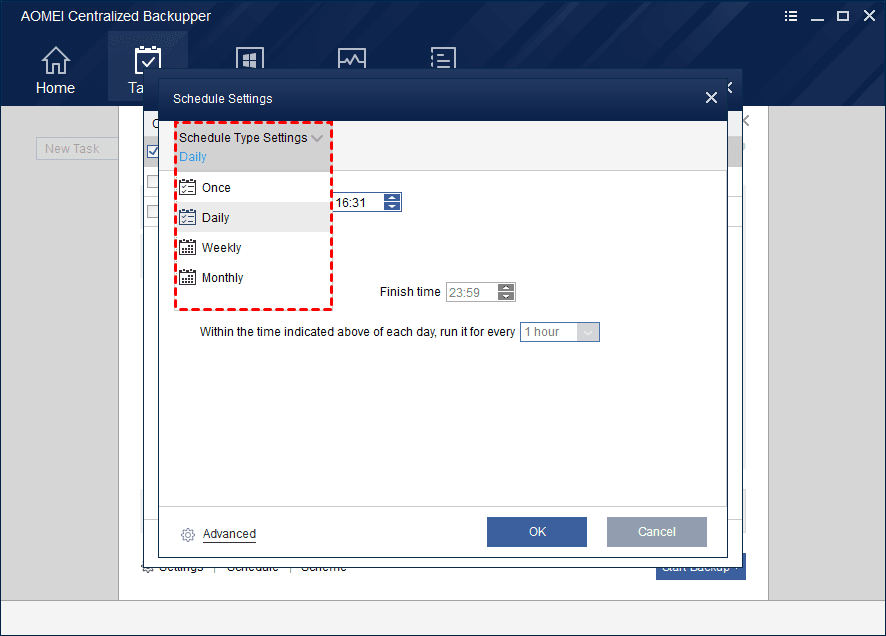
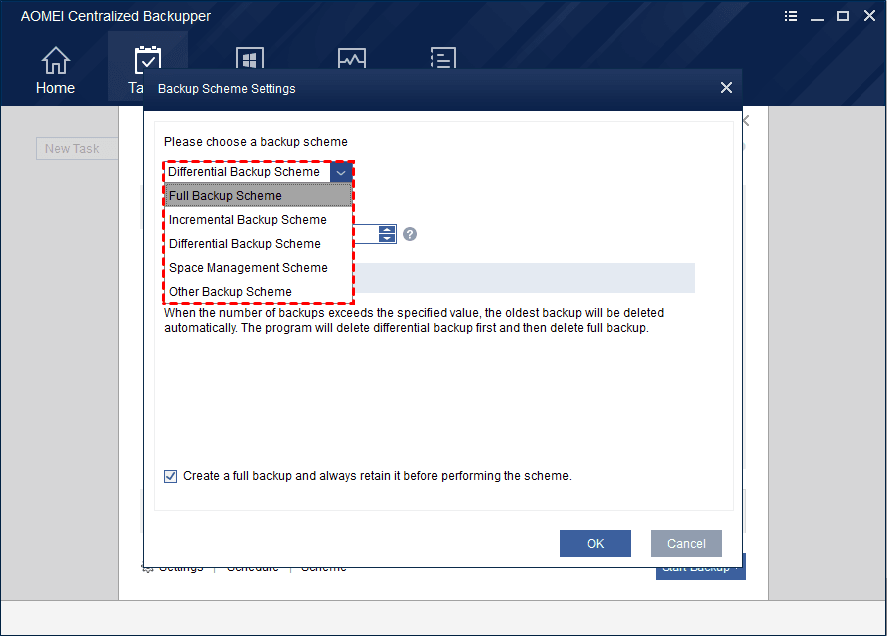
5. After the basic setup, you can manage Settings, or create a Schedule, Scheme to customize the backup, then click Start Backup to create and execute the task.
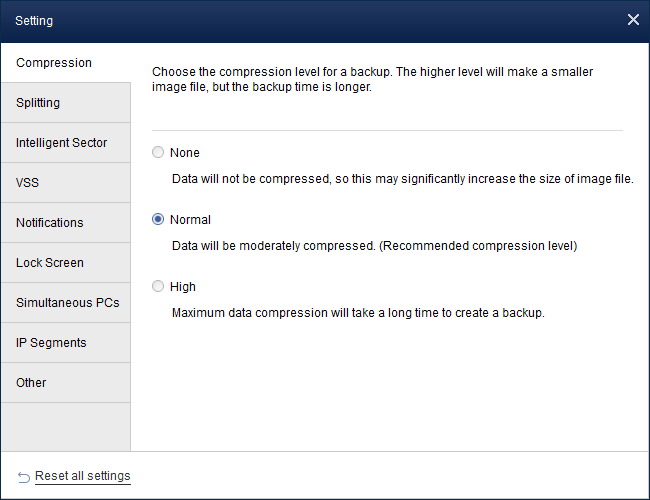
Setting: Manage compression level, image spitting, backup mode (intelligent sector or exact backup), notifications, etc.
Schedule: Set up automatic backup Once/Daily/Weekly/Monthly, and choose to perform Full Backup/Incremental Backup/Differential Backup.
Scheme: Create a rule to auto delete backup older than x days and therefore save your storage space.
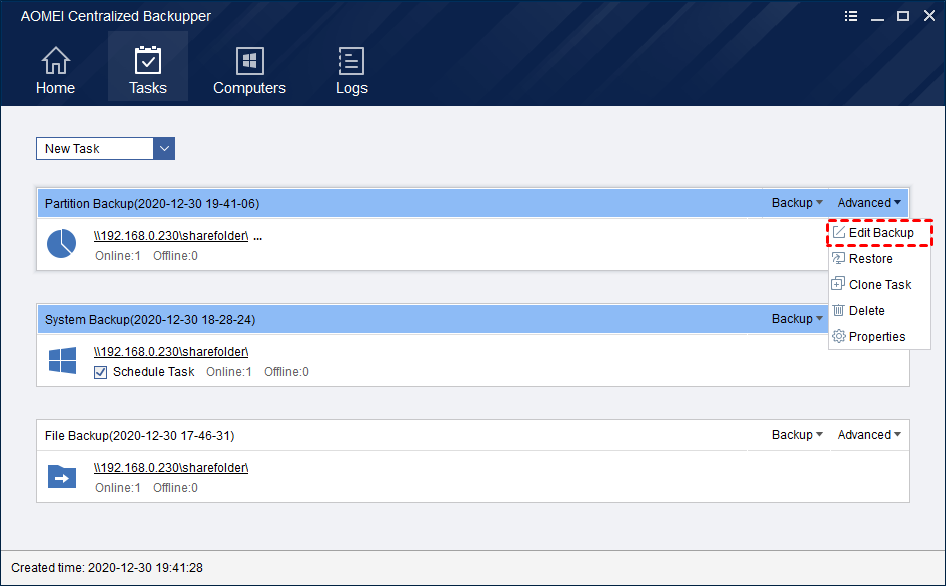
6. The created backup tasks will be listed under Tasks tab, then you can directly manage it here.
Frequently Asked Questions about VMDK file
Q: What happens if I delete VMDK files?
A: If you delete them, you will lose your VM data and corrupt your VM. Unless you no longer need them, please do not delete them.
Q: How to split one VMDK file into several VMDK files?
A: The procedures are similar to the process of merging multiple VMDK files, pay attention to changing -t 0 into -t 1.
Shut down the VM >> open a command prompt in Windows >> C:\Program Files (x86)\VMware\VMware Workstation\vmware-vdiskmanager.exe -r sourceDisk.vmdk -t 1 destinationDisk.vmdk
Summary
If you want to optimize the performance of your VM, I recommend you follow these steps to merge VMDK files into a single one, and do not forget to backup the virtual machine or the original VMDK files in advance before you start any risky operations that may result in unexpected errors.

