


How to Copy ESXi VM to USB Device | Image-Level & File-Level
If you want to keep VM backups offsite, store at least 1 on external USB drive is a good idea. In this article, I will introduce 3 ways to copy ESXi VM to USB drive, and 2 ways to transfer files from VM to USB.
By Crystal / Updated on June 14, 2024
Can you copy ESXi VM files to USB drive
When talking about backups, there is a golden 3-2-1 backup rule: keep 3 copies of data, store on 2 types of media, and keep at least 1 offsite. This explains well the importance of storing backups offsite.
Therefore, you may be wondering, can you copy a VMware ESXi VM or files inside the VM to USB drive?
The answer is YES. However, backing up an entire VM is not the same operation as backing up some of the files inside the VM.
![]()
Available ways for copying ESXi VM to USB device
Basically, there are 3 ways to copy an entire VM (image-level) to USB drive.
- Manually download ESXi VM folder to USB drive
- Export ESXi VM to OVF and save in USB drive
- Copy ESXi VM to USB drive via agentless backup software
And there are 2 ways to copy the files inside a ESXi VM (file-level) to USB device.
- Enable USB passthrough to copy files from ESXi VM to USB drive
- Use agent-based software to backup files or drives inside VM
In this article, I will introduce the specific steps of these ways, and you can click on the anchor text to jump to the section you need.
Note: please do not use a regular USB flash drive to store your VMs, as the USB controllers and flash cells cannot afford the constant reads and writes.
How to copy entire ESXi VM to USB drive
If you want to copy an entire VM which can be restored to an instantly usable new VM, what you are doing is performing image-level backups. To do this, you can download VM files, or export VM to OVF. Both of these need to be done manually, so if you have a large number of virtual machines or need to do this frequently to keep the latest copy, then you can also use virtual machine backup software to simplify the whole process.
In this section, I will demonstrate all the 3 different ways to back up an entire ESXi VM to USB drive at image level.
Way 1. Manually download VM files to USB drive
1. Access VMware ESXi web client, and power off the VM you want to backup.
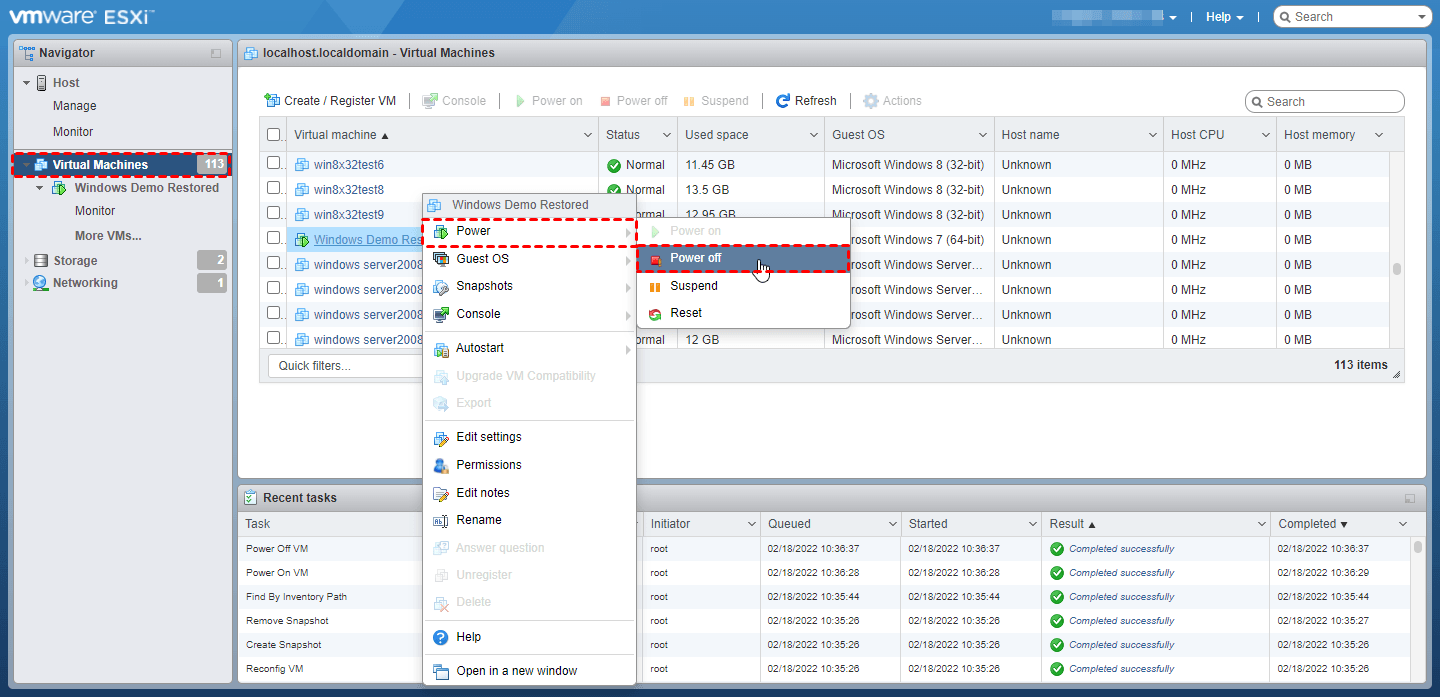
2. Navigate to Storage > Datastore browser.
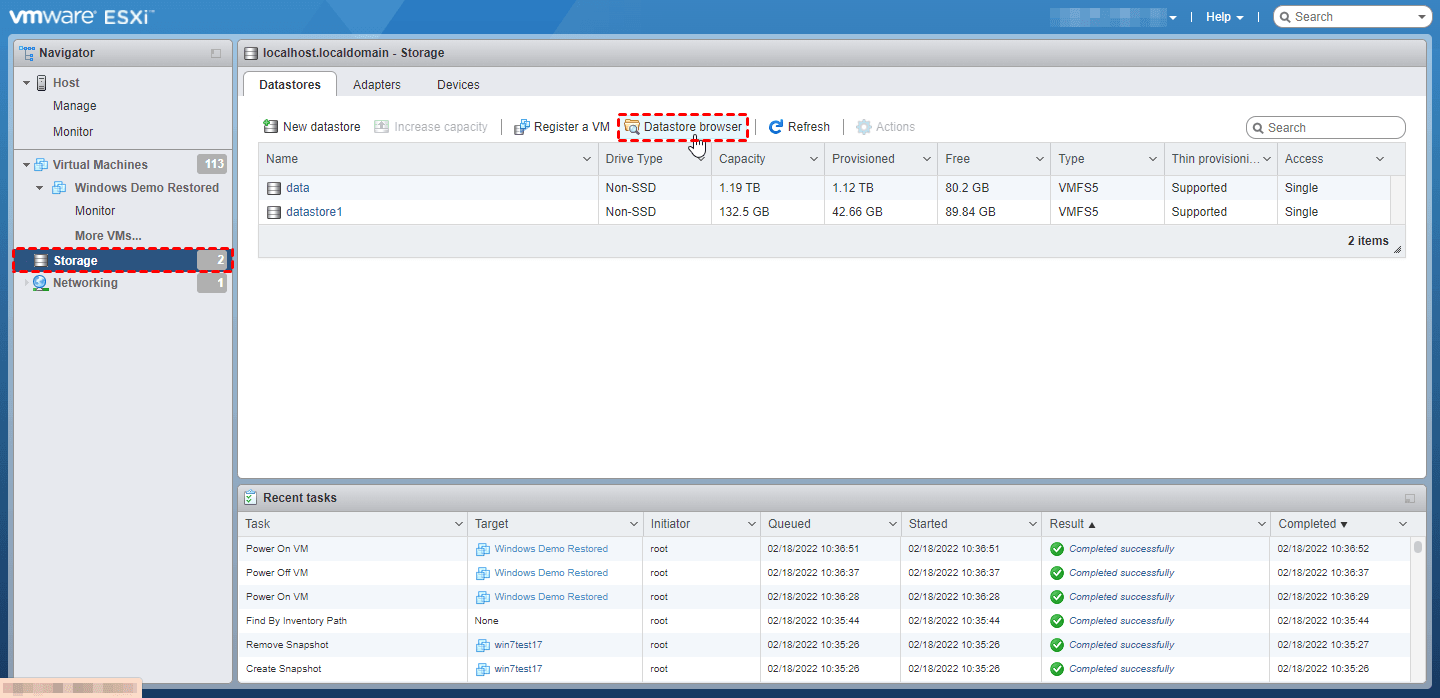
3. Find and open the folder of the VM you want to copy, select the files and click Download.

4. In the pop-up window, specify the USB drive as the destination storage, click Save to download.

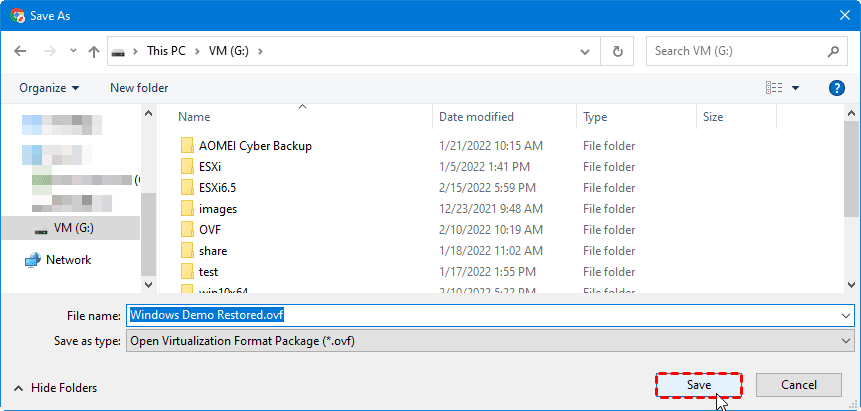
Way 2. Export ESXi VM to OVF and save in USB
1. Access the VMware ESXi web client, and navigate to Virtual Machines. Power off the VM you want to backup.
2. Right-click on the VM name and select Export.
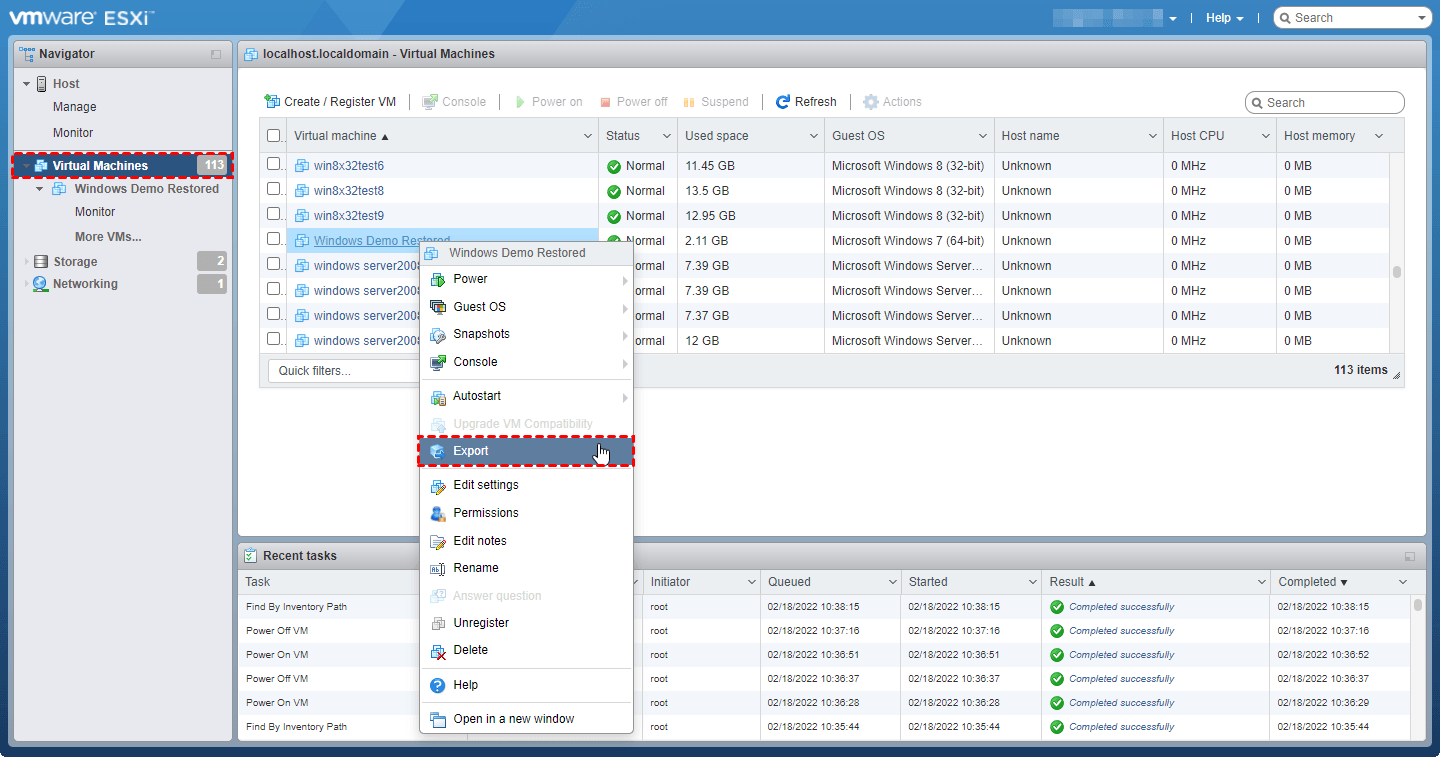
3. Click OK to download the .ovf file and .vmdk file respectively.
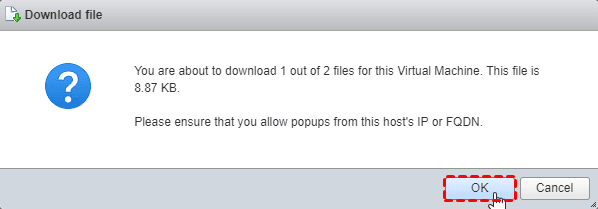
4. In the pop-up window, specify the USB drive as the destination storage, and click Save.
Way 3. Copy ESXi VM to USB drive via agentless backup software (free)
AOMEI Cyber Backup is an image-level backup freeware for both paid and free versions of VMware ESXi and Hyper-V. It runs in an agentless manner that can centrally back VMs in a bound host to USB drive, local disk, network location, and Amazon S3. In addition, you can automate the backup process of VMs, monitor the status and send email notifications if there's an error.
With a very intuitive user-interface, you can create a backup task in several simple steps, and restore the entire VM from the backup. You can download this perpetual free edition to experience these features:
*You can choose to install this VM backup software on either Windows or Linux system.
1. Access the AOMEI Cyber Backup web client, navigate to Source Device > VMware > + Add VMware Device to add vCenter or Standalone ESXi host as the source device.
Provide the credentials including IP address, username and password, and click Confirm to add the ESXi host. Then click … button next to the host name and select Bind Device for authorization.
Note: You only need to do this step when you first bind the device.

2. Navigate to Backup Task, and click + Create New Task.
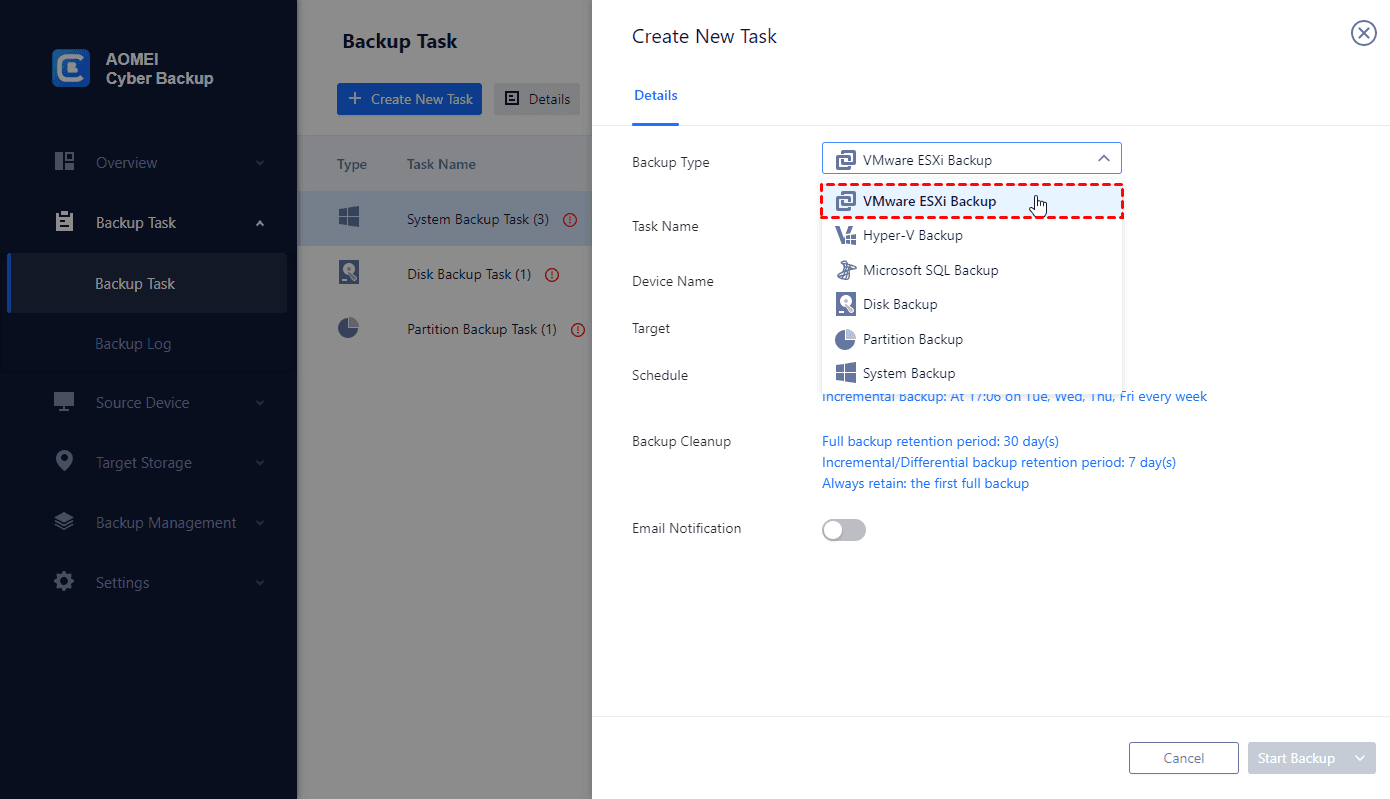
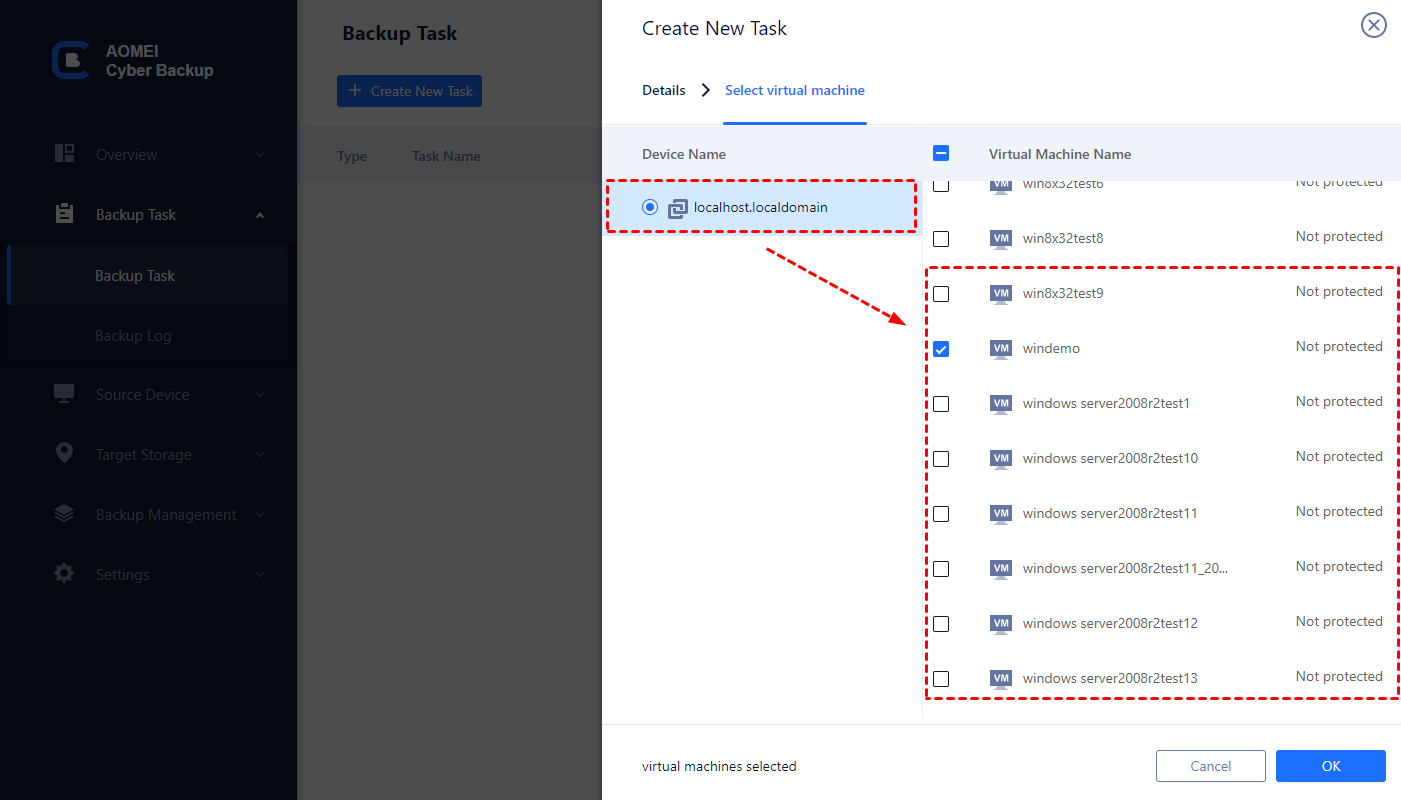
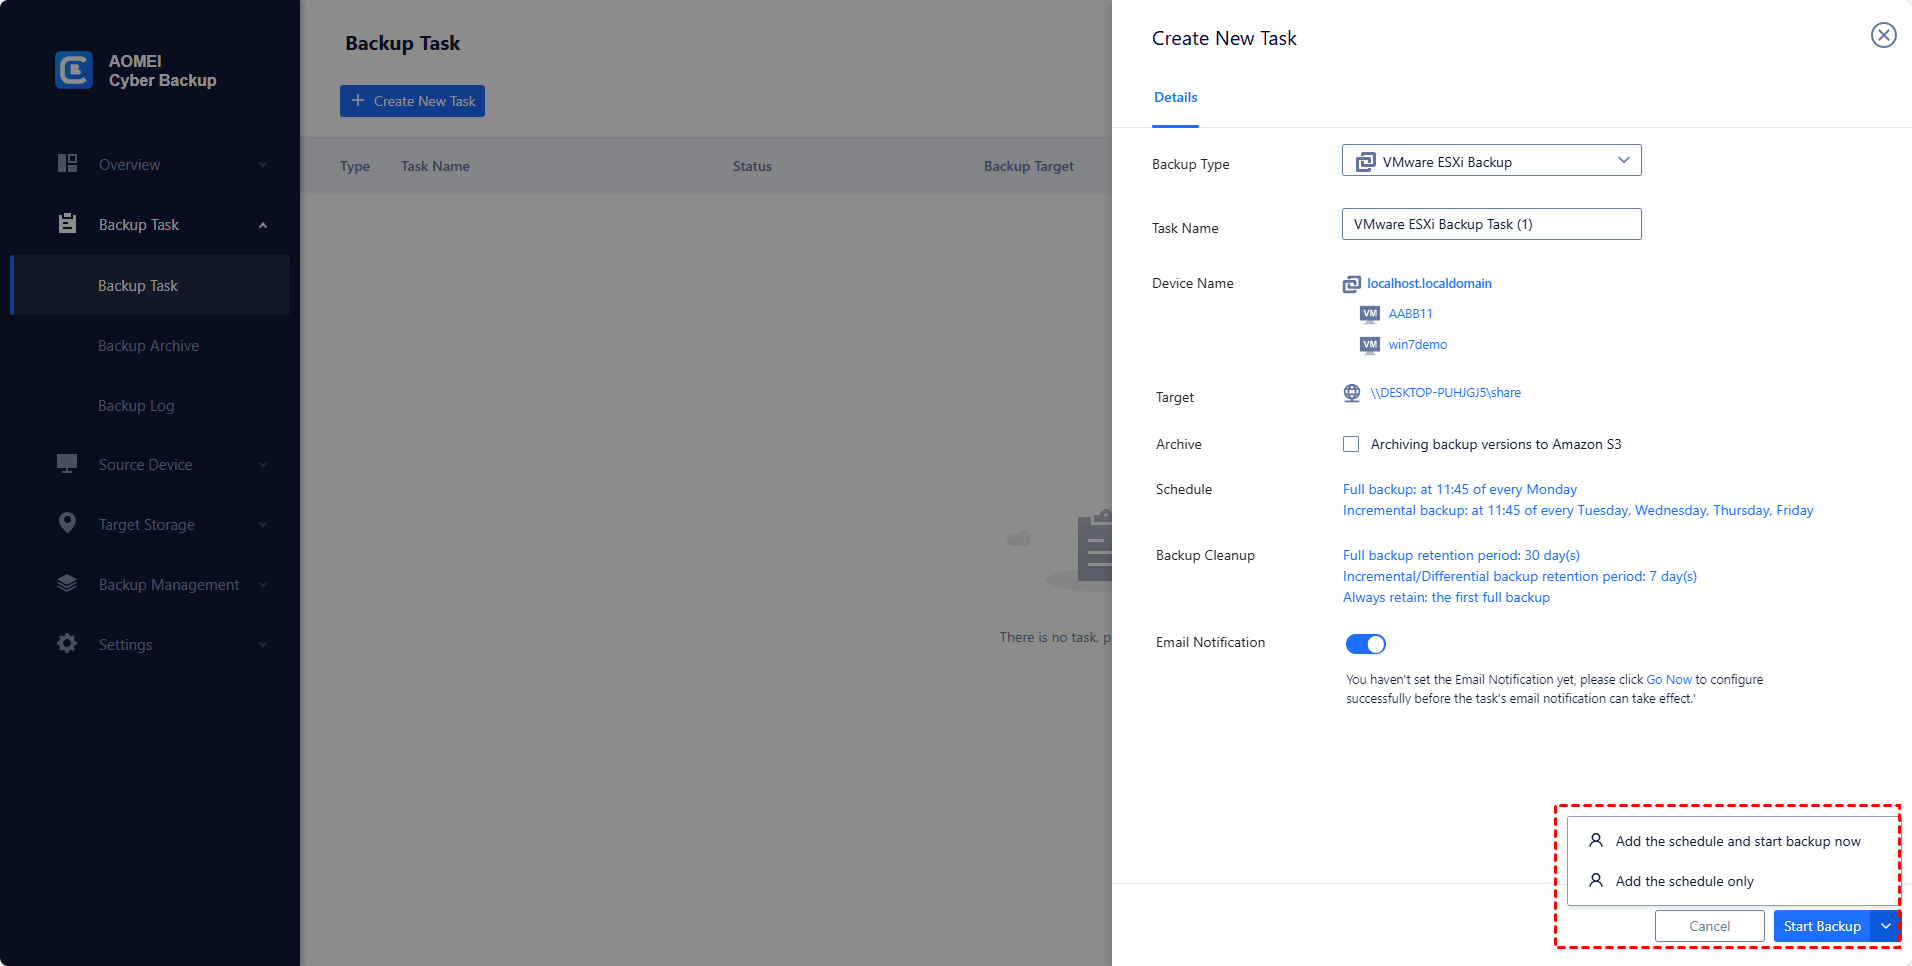
In the pop-up window, click Select + next to Device Name to specify the ESXi host and the VMs you want to back up. Click OK to confirm.
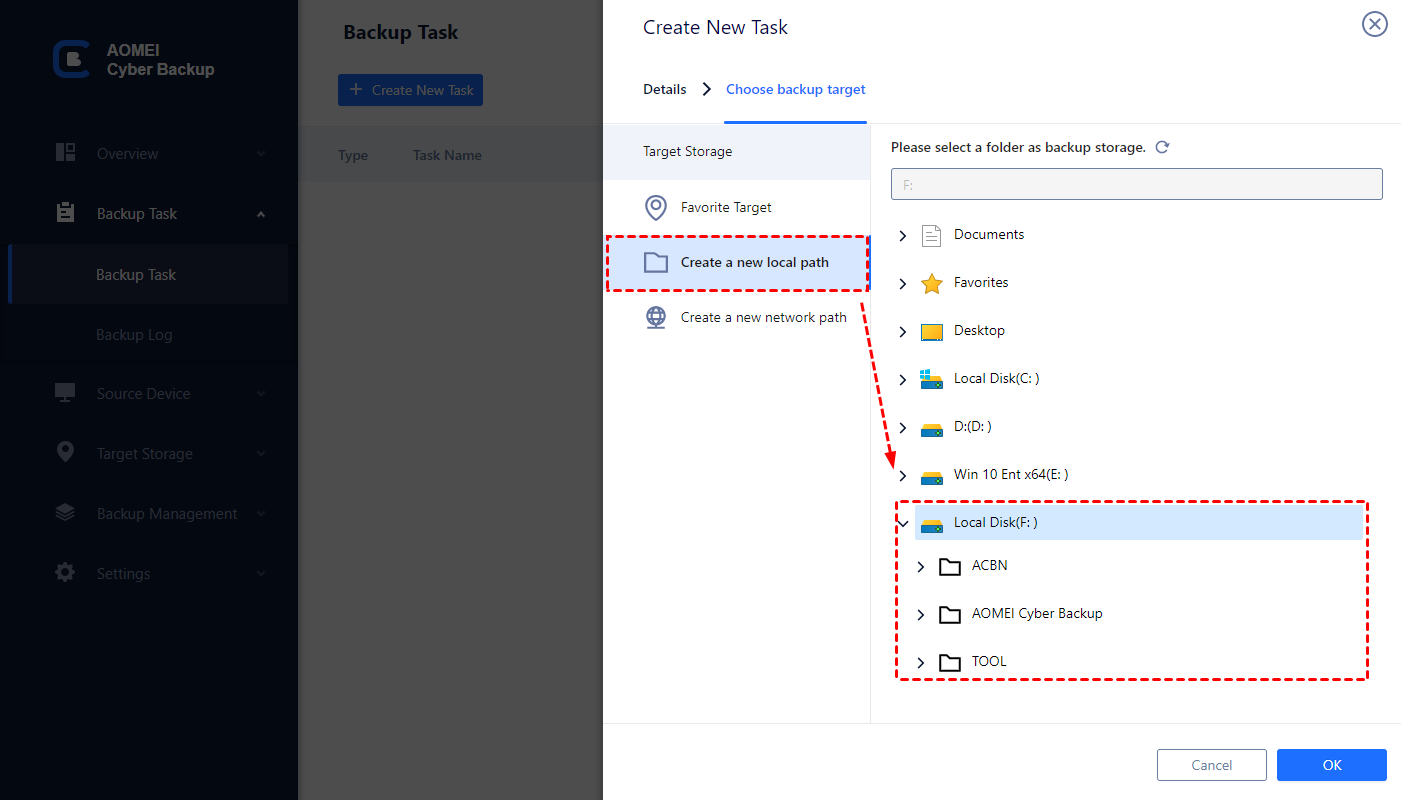
3. Click Select + next to Target and specify the USB drive as the destination storage.
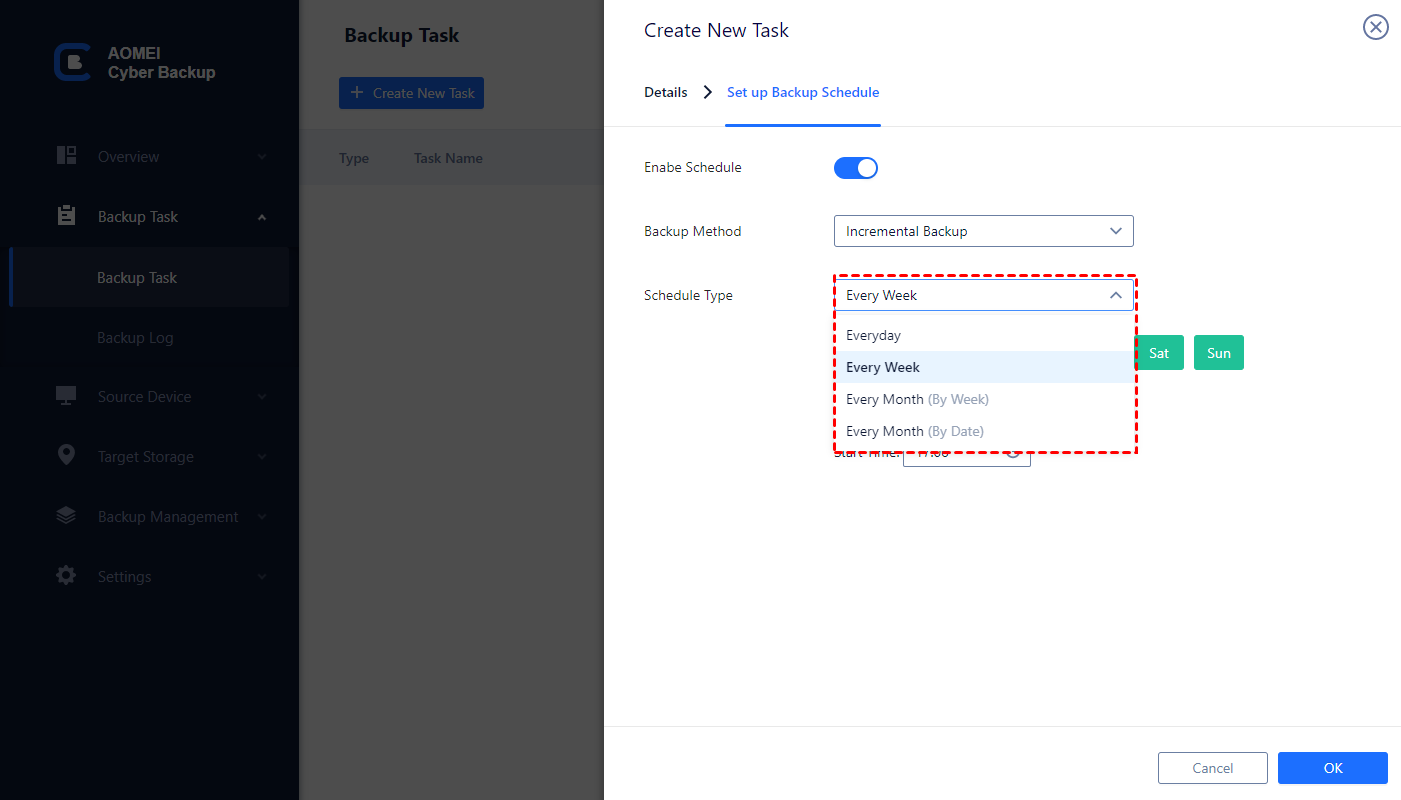
You can also specify Backup Schedule for this task (daily/weekly/monthly).
If you only want to perform full backup for once, turn off Enable Schedule and click OK.
✎If you want to save storage space by auto deleting old backups, you can also upgrade to Premium Edition to enjoy the Batch Backup and Backup Cleanup feature.
4. Now you can click Start Backup to back up these ESXi VMs to USB drive.
How to copy files or folders inside ESXi VM to USB device
If you just want to transfer files from VM to USB drive, the most convenient way is accessing USB drive directly from the VM. Luckily, ESXi USB passthrough allows you to do that with simple steps.
In addition, by installing a backup agent on VMs, you can backup them flexibly as they were physical machines.
Way 1. Copy files from VM to USB device via ESXi USB passthrough
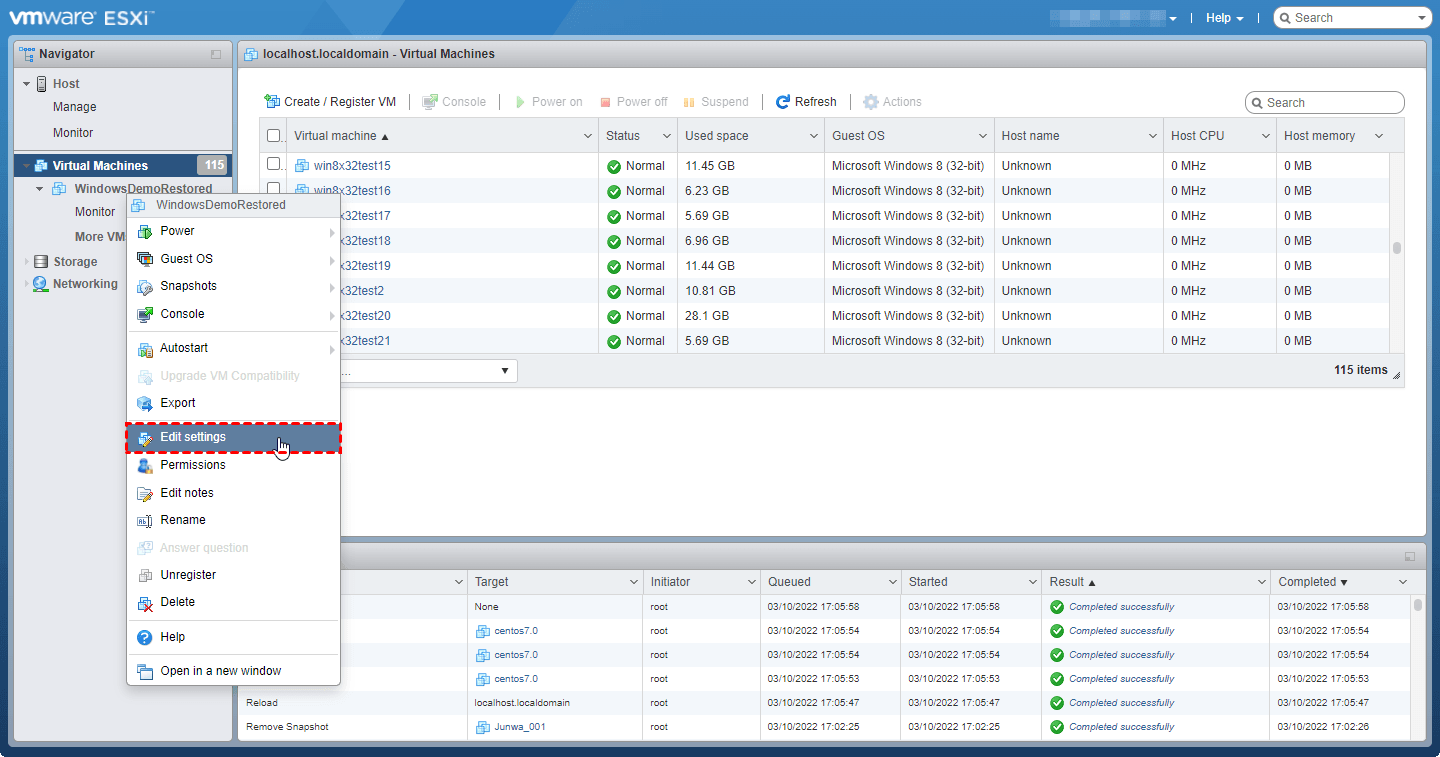
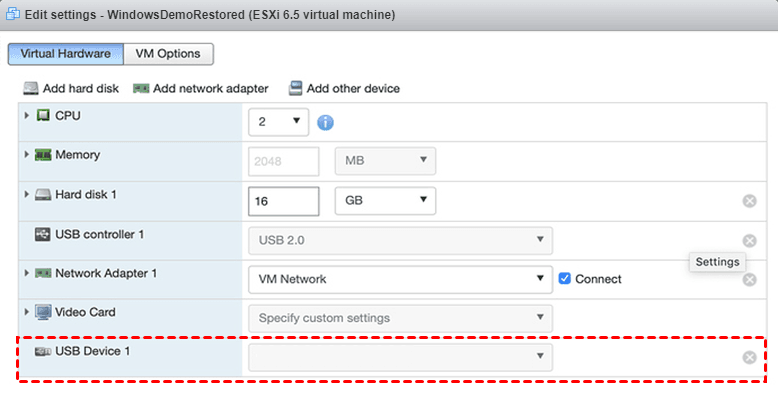
1. Access the VMware ESXi web client, navigate to Virtual Machines and right-click on the VM name, select Edit Settings.
2. In the pop-up window, Virtual Hardware tab, click Add other device > USB device.
Then a New USB device column will be added in the device list.
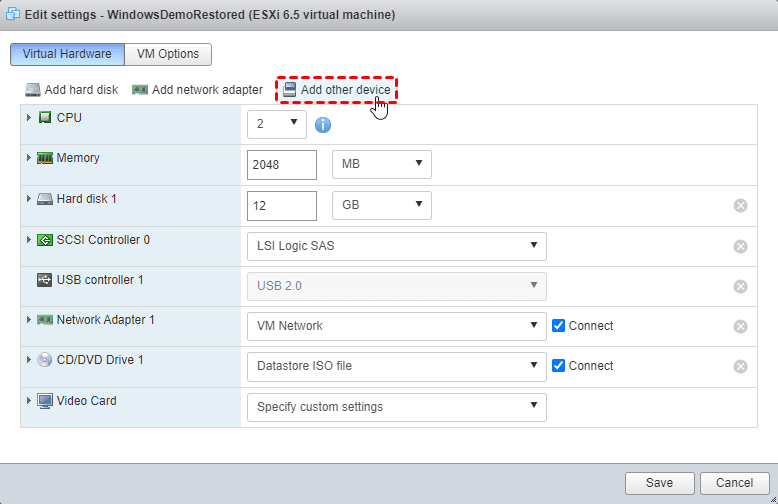
3. Click on New USB device to specify the USB device from the dropping menu. Click Save.
Way 2. Backup files or drives inside VM via agent-based software
Agent-based and agentless backups are two different sets of solutions. When you are using the free version of ESXi, or when you want to specifically select the files to be backed up in a virtual machine, you need agent-based backup solution.
AOMEI Centralized Backupper is such a mechanism that allows you to use one computer as the central console, and install Agent on all the client computers/VMs to back up them as physical machines.
You can download the 30-day free trial and follow the tutorial below to have a try:
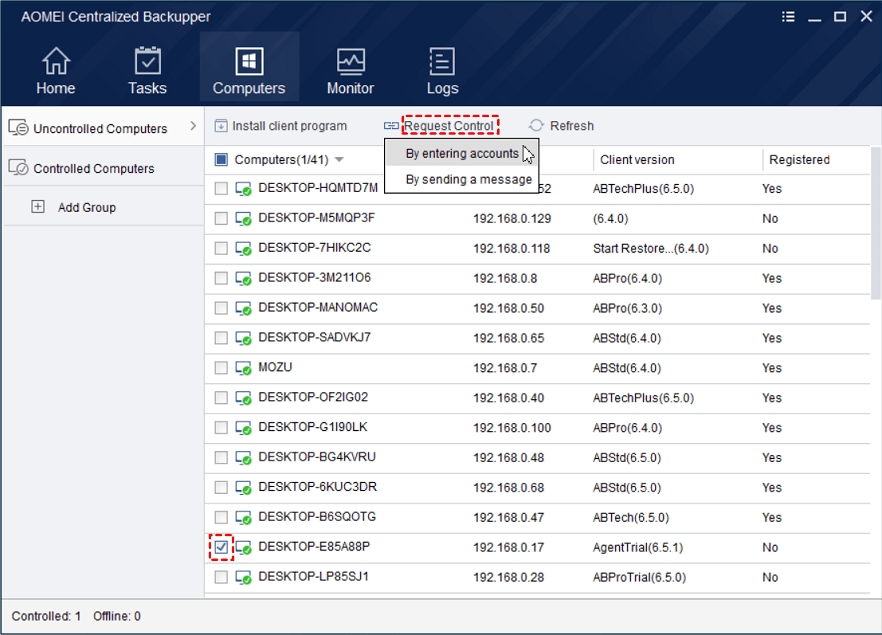
1. Install and launch AOMEI Centralized Backupper on a computer as the central console, ,then install Agent packages on these VMs you want to backup. After that, you can navigate to Computers > Uncontrolled Computers, check your VM (with a static IP) and click Request Control.
It will pop up a request window on the VM. Once you are authorized you can perform backups whenever you like without request again.
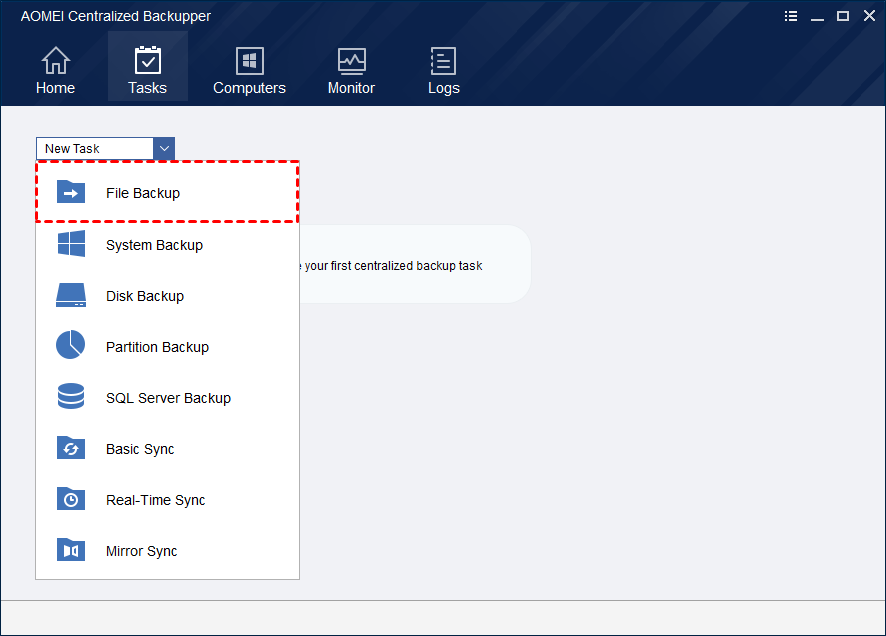
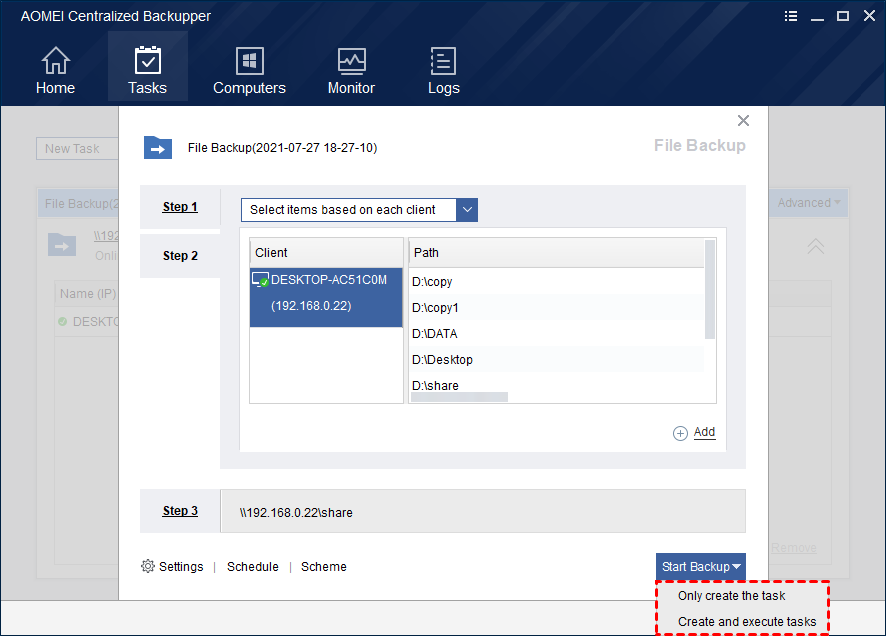
2. Navigate to Tasks, click New Task > File Backup to create a file backup task.
3. Follow the 3 steps to specify the VM, the files you want to backup, and a share folder on the USB device to store the backup.
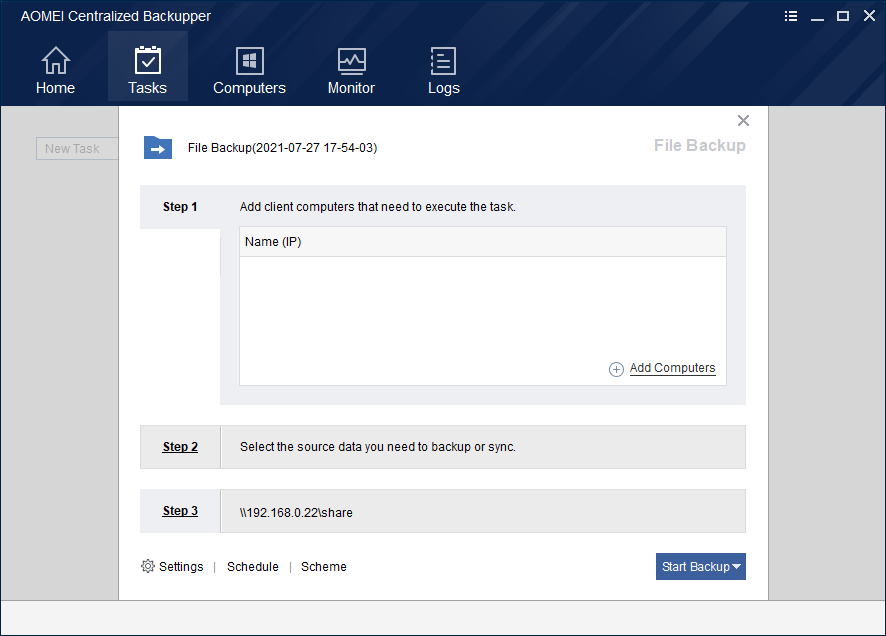
Note: Click Settings you can also encrypt or compress the backup.
4. Click Start Backup, the task will be listed separately for later manage or restore.
Tips for backing up ESXi to external USB hard drive
Backing up ESXi (VMware vSphere hypervisor) to an external USB drive is a smart way to ensure data protection and disaster recovery readiness. But don't forget a few things when using USB as a storage medium:
- Choose a high-quality external USB hard drive with enough storage capacity to accommodate ESXi backups, and make sure the drive is ESXi-compatible
- Before using an external USB drive for backups, format it to a compatible file system supported by both ESXi and your backup software. Common file systems include FAT32, NTFS, or exFAT.
- Use specialized ESXi-compatible backup software to simplify the backup process and ensure data integrity. Commonly used ESXi backup solutions include those listed above, as well as highly effective software such as AOMEI Cyber Backup.
- Develop a backup plan that suits your organization's needs. Consider scheduling daily, weekly, or monthly backups, depending on the frequency of data changes and the criticality of your virtualized environment.
- Choose incremental backups whenever possible to minimize backup time and save storage space on external USB drives.
Summary
Keeping at least 1 VM backup offsite protects VM data from unexpected local drive corruptions. You can either backup VM to Synology NAS, to cloud, or to external USB devices.
In this article, I demonstrated 2 ways to copy ESXi VMs to USB drive, and 2 ways to transfer files from ESXi VM to USB. You can choose a suitable way according to how much data you need to backup.

