


Backup and Restore vCenter by Using NFS | Detailed Steps
Backing up vCenter by using NFS is to protect your vCenter from accidents, and it allows you to restore vCenter easily. This article explains the basic knowledge about vCenter backup and detailed steps on how to back up vCenter to NFS.
By Crystal / Updated on October 23, 2023
The necessity of vCenter NFS backup
NFS, or Network File System, is a protocol and network-based file system that allows remote users to access and interact with files and directories on a server as if they were stored locally on their own computers. NFS enables the sharing of files and resources across a network, typically in a Unix or Linux environment.
The necessity of vCenter NFS backup is an important consideration for organizations that rely on VMware's vCenter Server and Network File System (NFS) for their virtualization and data storage needs, especially when running multiple vCenter Servers in a large-scale virtual environment of enterprise.
In this article, I will introduce how to backup vCenter Server appliance to NFS as an example.
How to backup vCenter Server Appliance to NFS
Since vSphere 6.7 U2, you can directly backup to seven possible protocols: HTTP, HTTPS, FTP, FTPS, SCP, NFS, and SMB.
Tip: If you want to do it in earlier version, such as backup vCenter Appliance 6.5, you cannot set up a schedule, but you can still create backup manually in VAMI (VMware Appliance Management Interface).
◉ Steps to schedule vCenter Server backup using NFS:
1. Log in to VMware Appliance Management Interface, then enter the root and password.
2. Select Backup >> CONFIGURE.
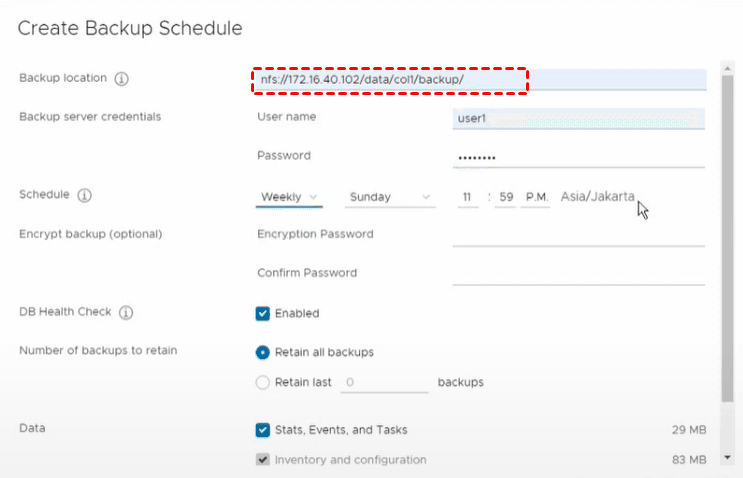
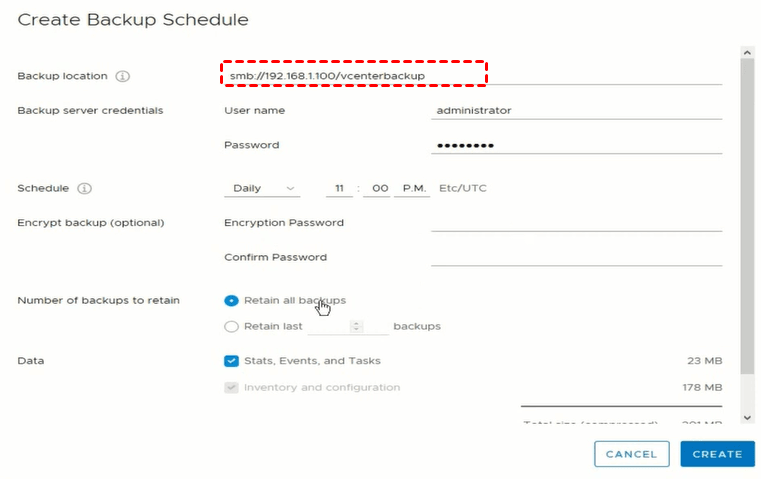
3. In the Create Backup Schedule, you can do following configurations:
- Select the Backup location from nfs:// protocol.
- Enter the username and password for Backup server credentials.
- Schedule: Set a time to run the task automatically.
- Encrypt backup: If you encrypt your backup files, please enter a password for restoring procedures, which is optional.
- Number of backups to retain: Retain all backups or Retain last___ backups.
- Select the default option State, Events, and Tasks to backup additional historical data from database. Then Create.
After finishing all these steps, you’ve created a scheduled backup task for VCSA. It will automatically start backup at its schedule. But if you want to execute the backup task for once manually, you can try the following method.
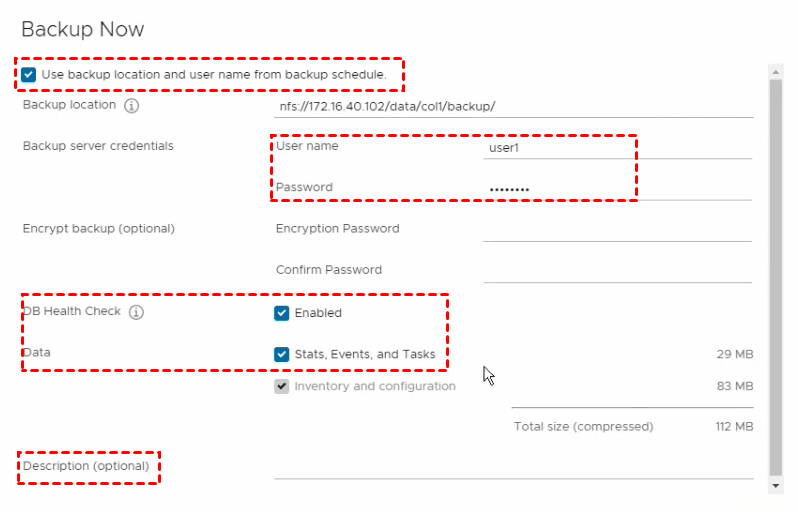
◉ Steps to back up VCSA manually:
1. Click BACKUP NOW.
2. In the opening wizard, click Use backup location and username from backup schedule.
3. Enter Password> Enabled> Data> Description.
4. Click START.
5. You can check the status of backup task in the Activity section.

This part illustrated how to backup vCenter Appliance 6.7. After making a backup, you may need to restore VCSA from it sometimes.
How to restore vCenter from NFS step by step
After these steps, you don’t need to worry about something happens to your vCenter Server Appliance since you can restore VCSA anytime from NFS.
1. First, find your “installer.exe” and launch it.
2. Click Restore.
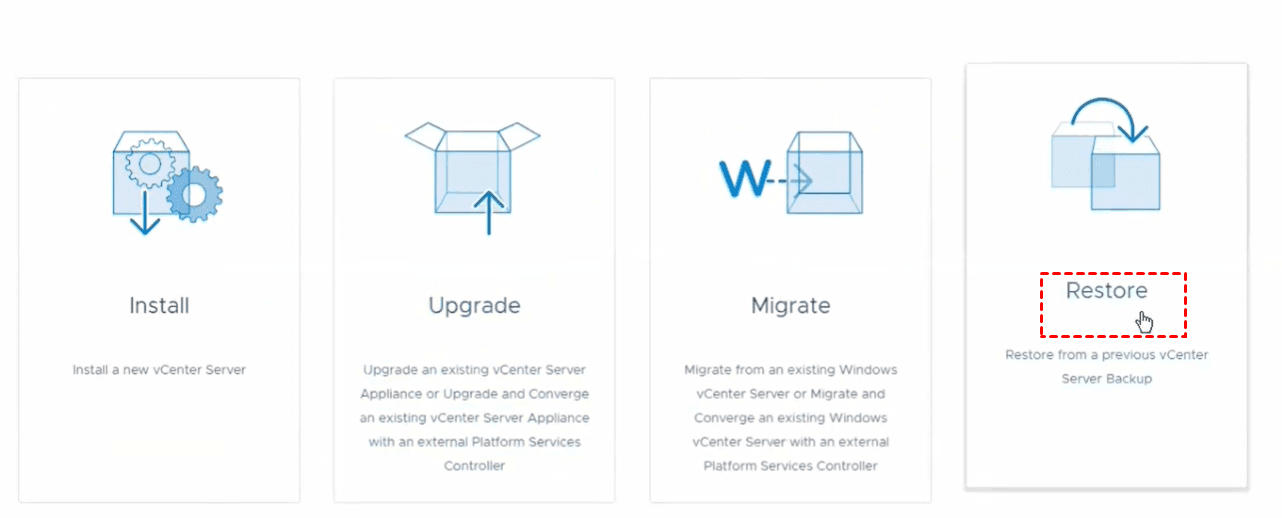
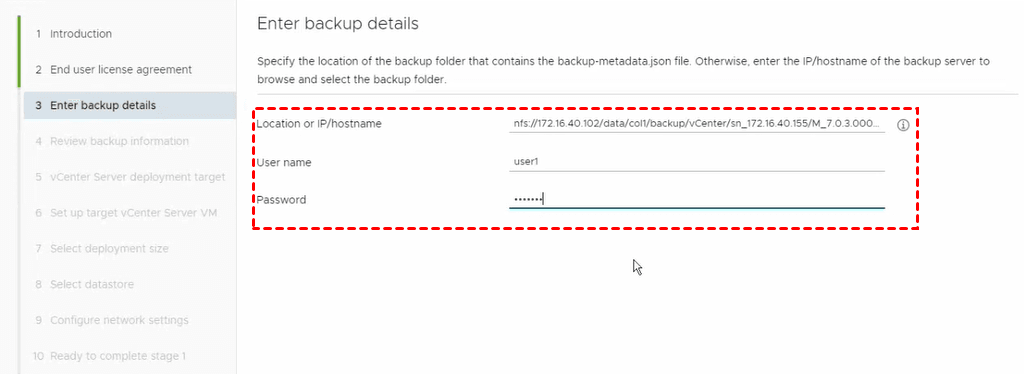
3. Accept the terms of the license agreement, then go to select the location to store your VCSA backup files and enter the User name and Password of the backup task, click Next.
4. Check the backup information is correct, then deploy the target vCenter server, and set up the target vCenter Server VM, click Next.
Note: The name of the new virtual machine should be different from the current one, then enter root password and confirm it, click Next.
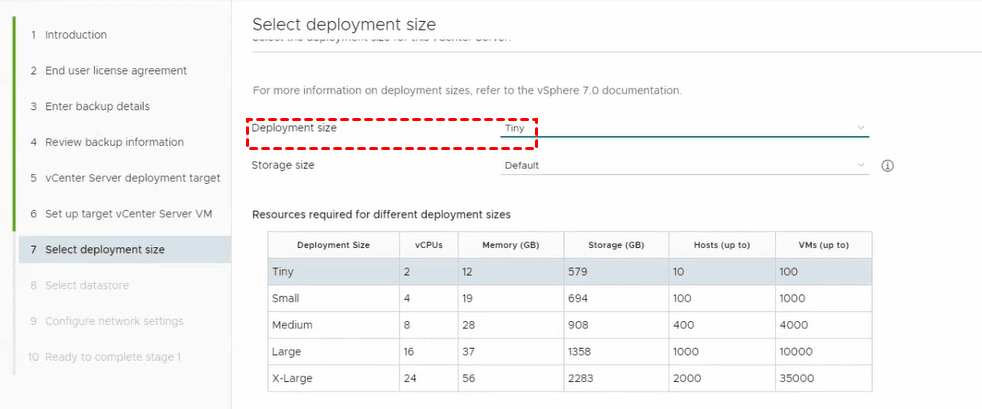
5. Choose the deployment size according to your infrastructure and click Next.
6. Select the datastore with sufficient space and click Next.

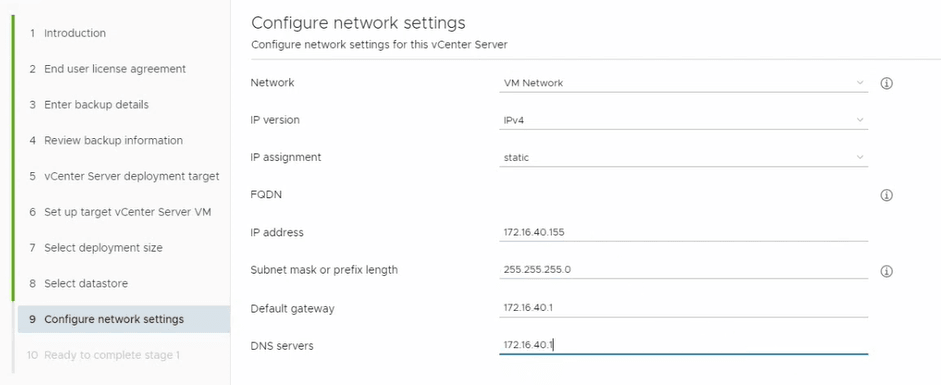
7. Check network configuration which should be matched to the running vCenter server appliance since we are restoring it and click Next.
8. In Ready to complete stage 1, check all the information is correct and click Finish.
It takes a few minutes to complete the deployment process. After successful deployment, click CONTINUE to go to the Stage 2.
In Stage 2, check all information of restoring and click Finish.
Note: The original appliance needs to be shut down in order to avoid any network conflicts.
9. A warning is displayed that once the restore process is started it cannot be paused or stopped and click OK.
The restoring process will be completed, then you can power on vCenter.
What’s the difference between NFS and SMB for vCenter backup
Many users are confused about the differences between NFS and SMB protocol. To be honest, they are extremely similar, only subtle differences between the them.
NFS uses the host-based authentication system, while SMB provides a user-based authentication. And if the backup files are medium-sized or small, NFS offers better performance. For larger files, the timings of both methods are almost the same.
In the case of sequential read, the performance of NFS and SMB are almost the same when using plain text. However, with encryption, NFS is better than SMB protocol. So, you can choose the suitable method that fits you best.
Backing up vCenter Server Appliance to SMB is also similar to NFS on operation. Only one different point: choose the smb:// instead of nfs://.
After you finished the steps of creating vCenter backups via SMB protocol, you may confront this question: why my SMB protocol is not supported? Generally, it is due to the default SMB version which is not matched with your original ISO. You can install a suitable one to solve the problem.
How to back up ESXi Virtual Machines to Network Location easily
Backing up ESXi virtual machines to a network location can be a good practice when done correctly. It provides data redundancy, easy recovery, and centralized management. Ensure you follow security and best practices, and regularly test your backups to guarantee their reliability in critical situations.
To simplify the backup process, you can use AOMEI Cyber Backup - an VMware backup solution to back up VMware ESXi virtual machines to a secure network location. It can store VM backups to a network location easily, and supports both paid and free versions of VMware ESXi and Hyper-V. It could also back up multiple VMs at the same time, and allows you to schedule backup tasks. Just hit the button below to enjoy the 30-day free trial:
*You can choose to install this VM backup software on either Windows or Linux system.
Batch back up VM to network location (step by step)
1. Download AOMEI Cyber Backup and Add vCenter or Standalone ESXi host to it as Source Device.

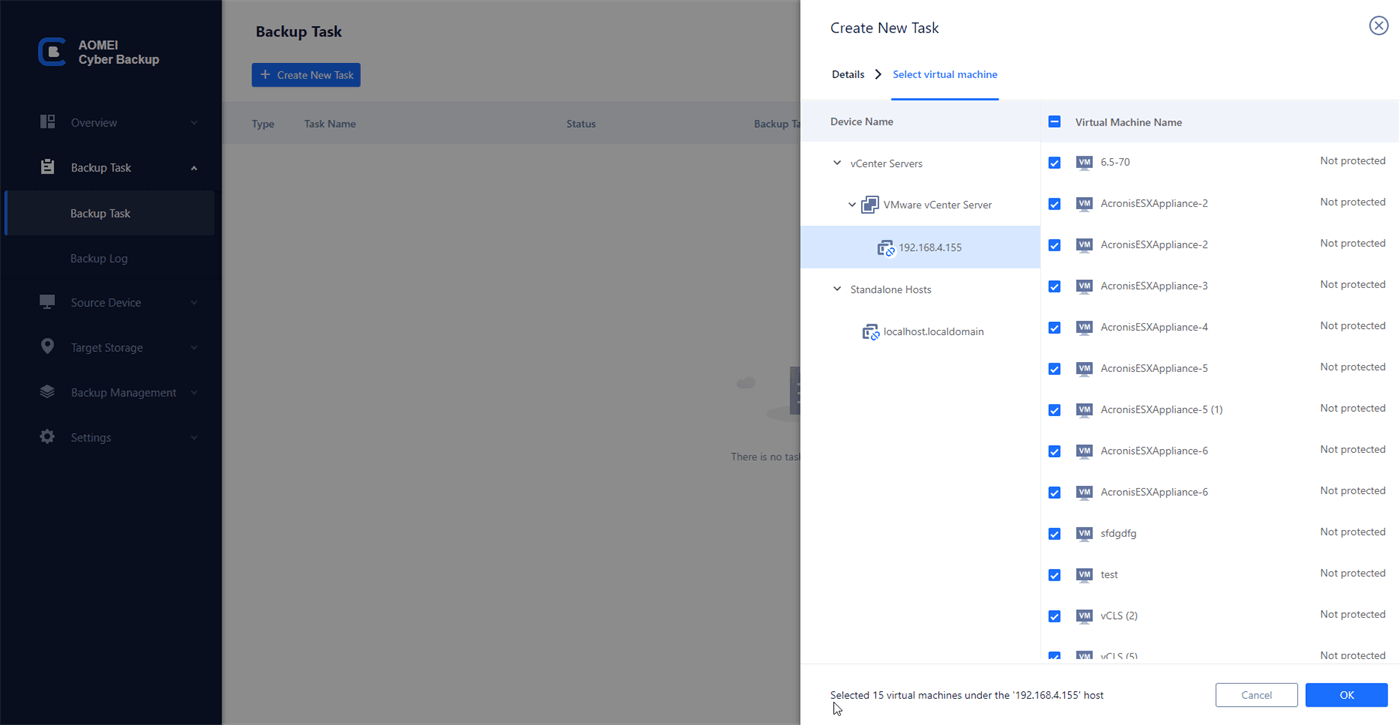
2. Create backup task: click Create New Task >> enter task name >> choose device and VMs >> specify the backup target >> schedule backup >> backup cleanup.
In Device window, batch select large numbers of VMs managed by vCenter Server for centralized backup.
In Target window, you can choose Create a new network path to store VM backup files which saves storage.

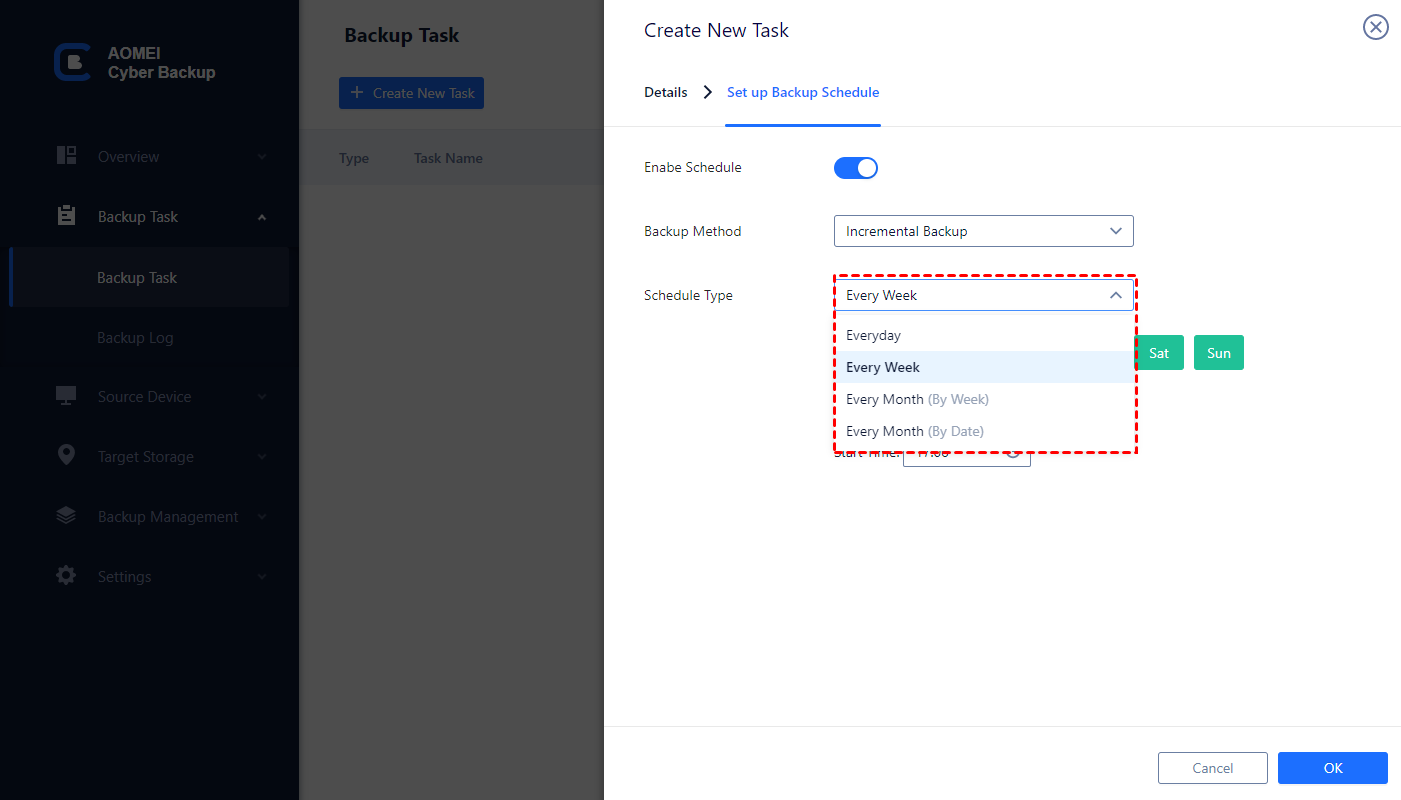
In Schedule window, it offers full / incremental / differential backup methods and flexible time type for backup.
In Cleanup window, it can automatically delete the old backup copies that exceed the retention period you specified.
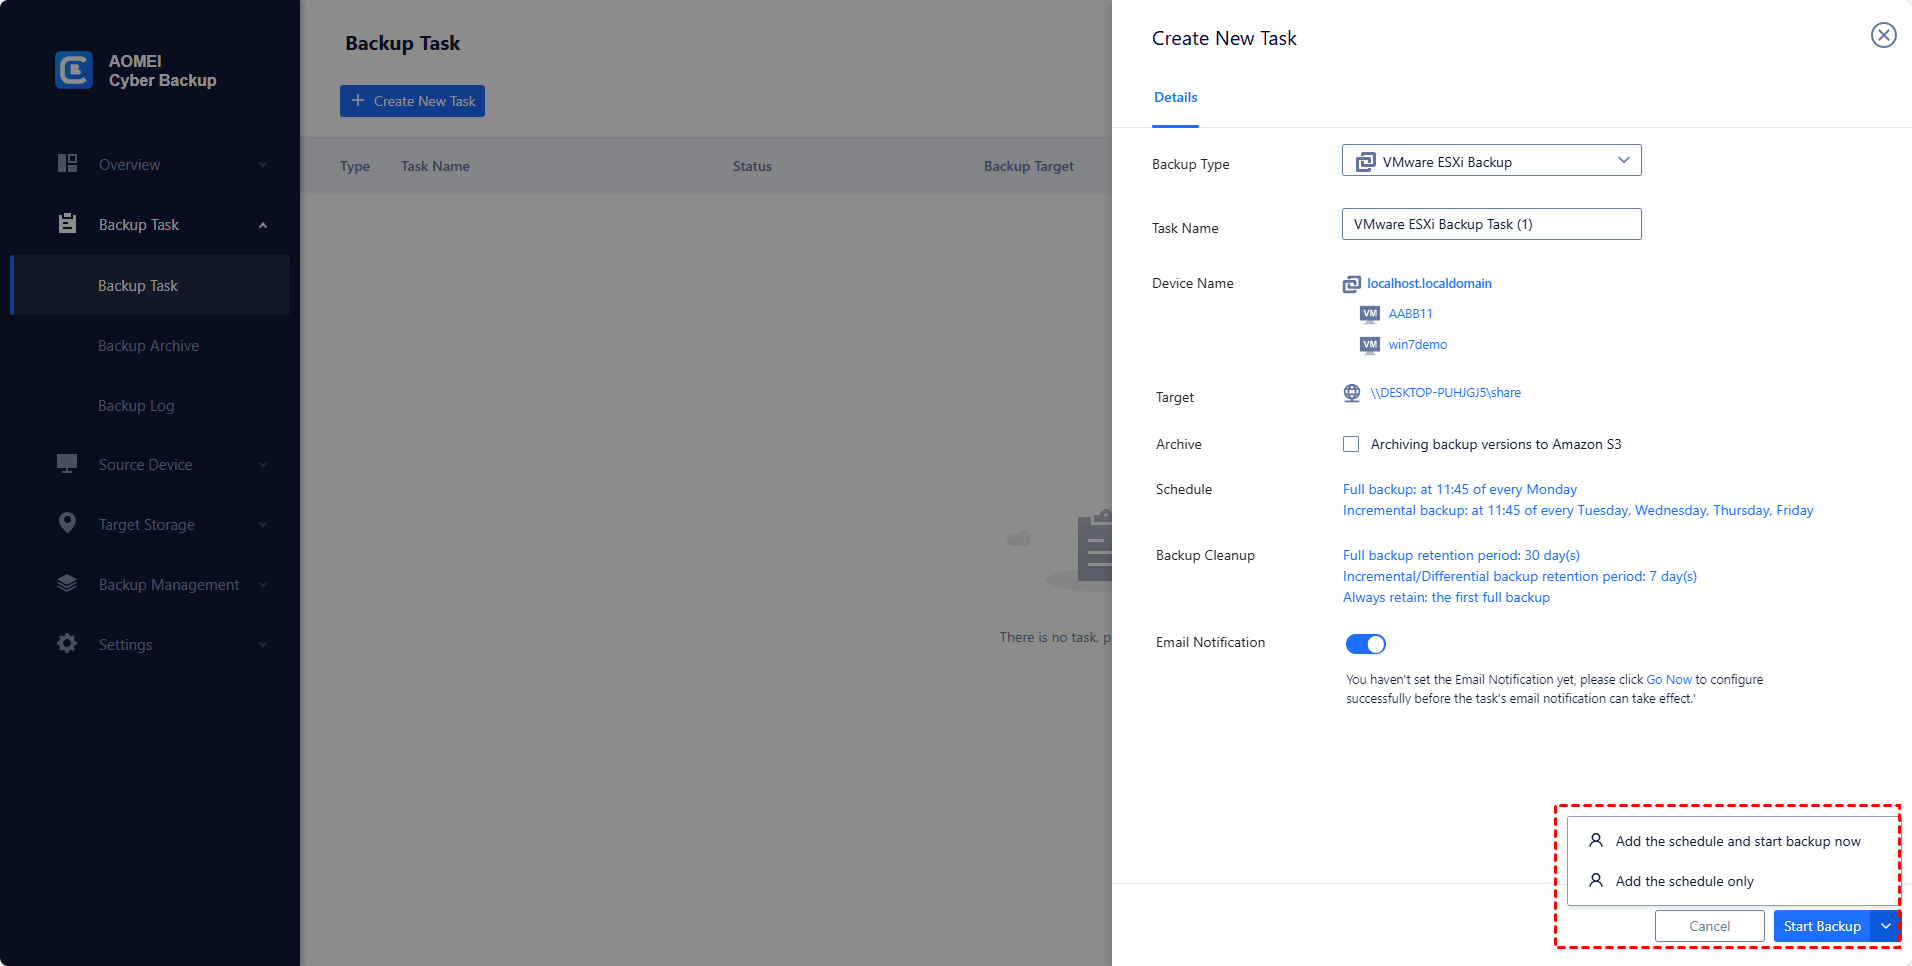
3. Run Backup: Click Start Backup and select Add the schedule and start backup now, or Add the schedule only.
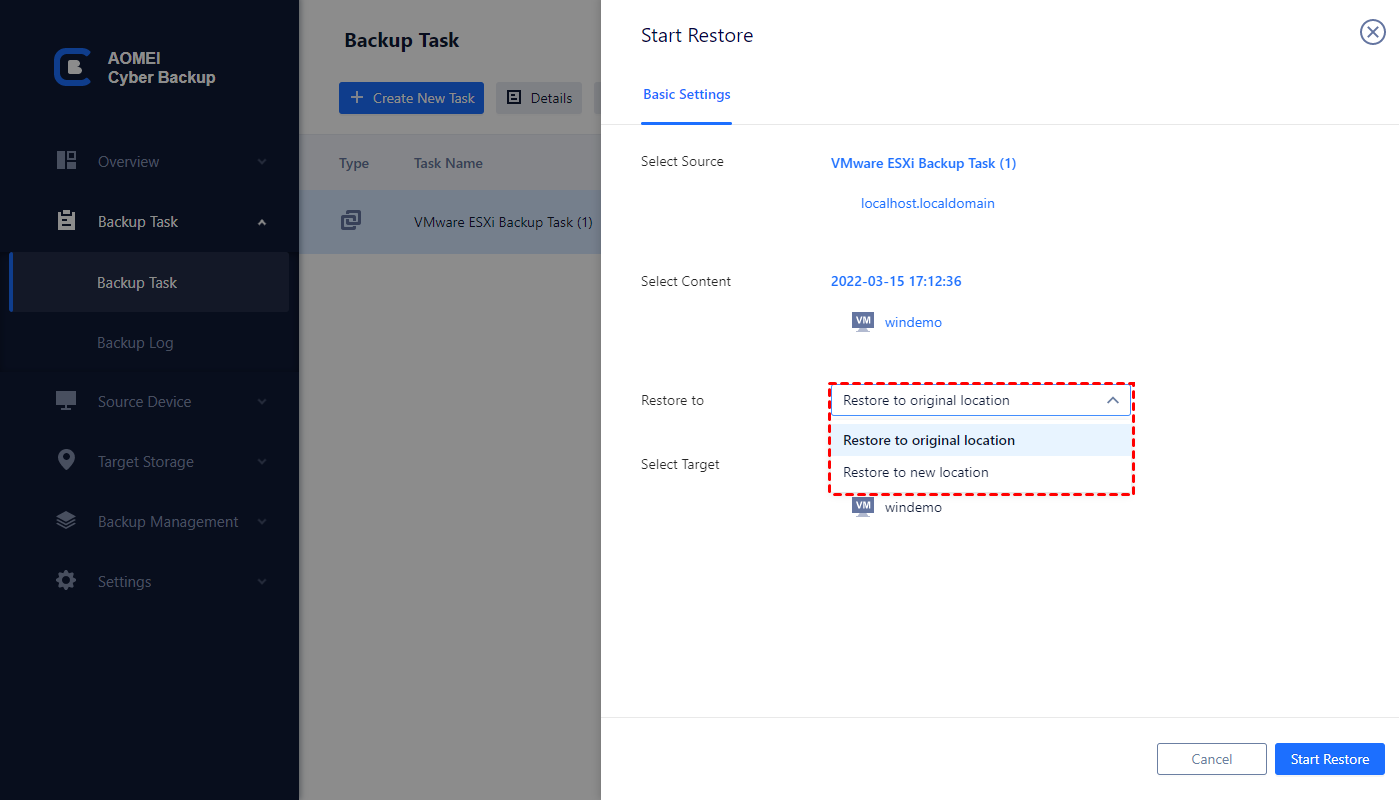
4. Click Restore. You can restore your virtual machine from any point and easily achieve data migration without reinstalling and reconfiguration applications. When your original VM corrupts, you can easily and quickly restore the entire VM to usable state.
When restoring, you can also restore to new location to create a new VM in the same or another datastore/host directly from the backup, saving the trouble of re-configuring the new VM.
Summary
Backing up vCenter by using NFS saves local storage space and allows all to use it by other machines on the network. It is convenient and reliable to protect data security and restore vCenter.
Achieving data backup is critical for businesses, whether it's VMware vCenter backup, VMware VM backup or Hyper-V backup, data security ensures business sustainability.

