


How to Restore VMware VM from Backup | ESXi & Workstation
Backups enable you to restore the VM in time once the original one is corrupted or deleted, ensuring that important data won’t lost. But how exactly should you restore it? In this article I provide the steps for restoring VMDK files or OVF/OVA files on VMware ESXi and Workstation.
By Crystal / Updated on March 8, 2023
How do I restore VMware VM from backup
It's necessary to perform virtual machine backups due to the risk of the work handled by virtual machines. Its purpose, just like all other backups, is to restore the VM and bring back the important data when the original VM fails or is deleted.
Sometimes, you may also want to create a new identical VM from the backup. But how to do that? In fact, it depends on the backup methods you chose.
- Download VMDK files → Create / Register VM using VMDK files
- Export VM to OVF/OVA files → Import OVF/OVA template as new VM
- Backup via specialized software → Restore entire VM via backup software
In this article, I will introduce you how to make VMware restore from backup in different cases. ESXi and Workstation are both included.
How to restore VM from backups in VMware ESXi | 3 cases
VMware ESXi is the most popular enterprise-class Type 1 hypervisor, also known as bare metal hypervisor. It doesn’t need an underlying operating system, runs directly on the physical hardware.
Generally, you can backup VMware ESXi VMs by manually copying the VMDK and VMX files, exporting VM as OVF/OVA file, or using third-party backup software. So the restoring from a backup is also divided into three scenarios accordingly.
In this section, I will introduce how to restore VM from the files in VMware ESXi. Keep reading and you will know how to recover deleted VM in ESXi, or restore VMware ESXi virtual machine to a new host.
Case 1. Restore VM from VMDK file in VMware ESXi
If you've copied the VMDK and VMX files as a backup, you can restore the VMware VM by the following steps:
✎Before you begin, please note that the VMDK file of Workstation VM cannot be directly used by ESXi, you need to convert it with VMware Converter first.
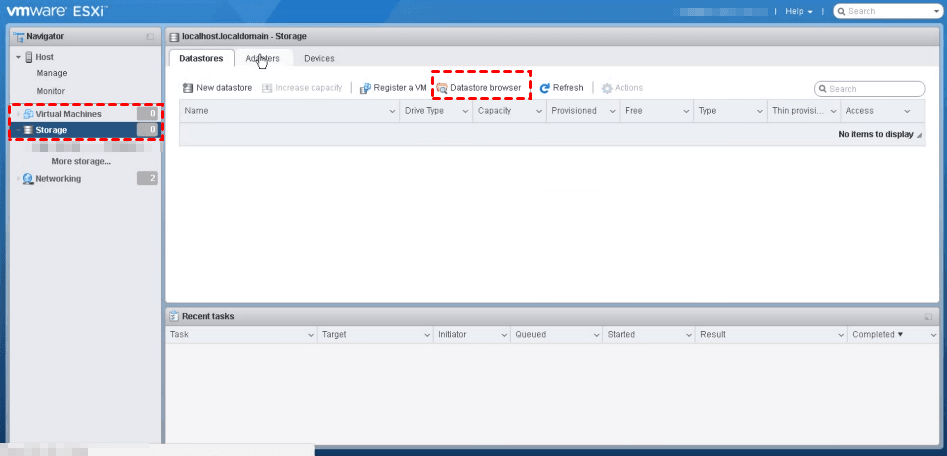
1. Access ESXi Web Client, and turn to Storage page, click Datastore browser on toolbar.
2. In the pop-up window, click Create directory to create a new folder for the new VM. Add the VMDK and the VMX file into this folder.
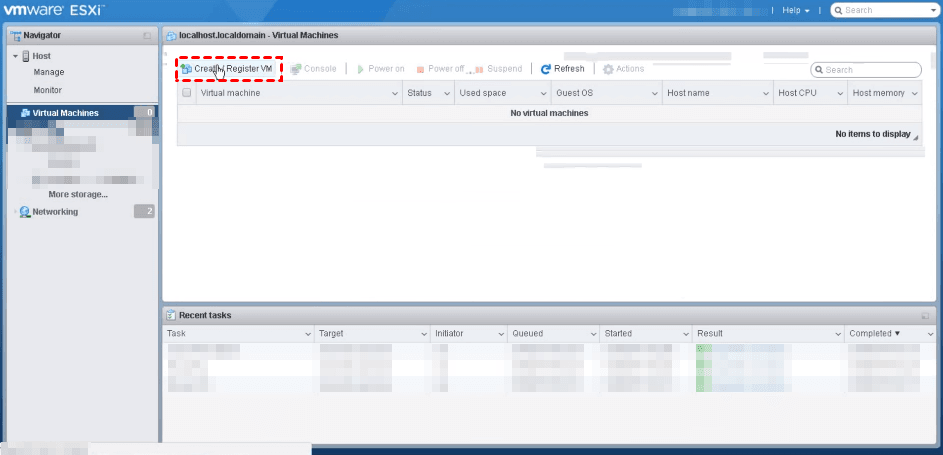
3. Turn to Virtual Machines page, and click Create / Register VM on toolbar to open the wizard.
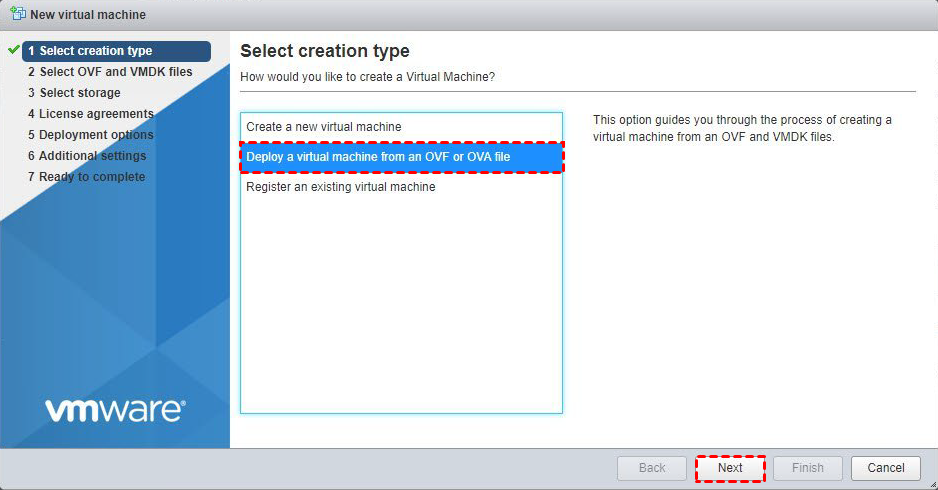
4. On Select creation type page, select Register an existing virtual machine, and click Next.

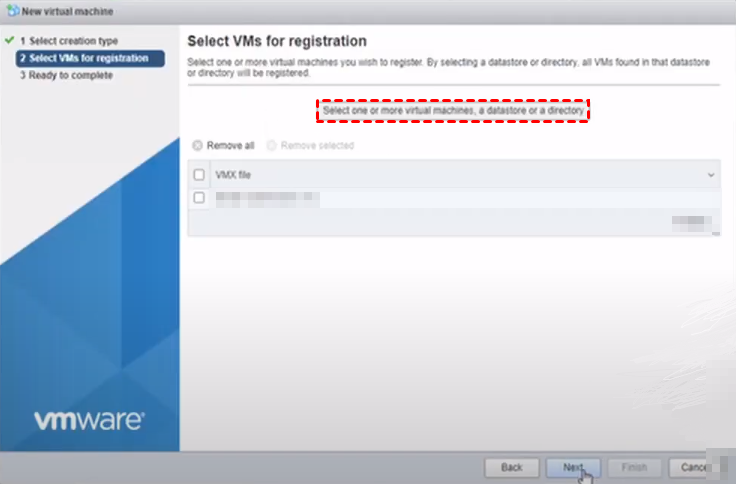
5. On Select VMs for registration page, click Select one or more virtual machines, a datastore or a directory, and select the newly created folder. Click Next.
6. On Ready to complete page, click Finish to close the wizard.
7. Back to the Virtual Machines page, you can see there is one newly virtual machine with the same name as the VMX file. You can right-click the virtual machine and Rename it.
8. Power on the newly created virtual machine. There will be pop-up window, select I moved it and click Answer.
Case 2. Import an OVF template in VMware ESXi
If you've exported the VM to an OVF/OVA file, you can import the template to deploy a virtual machine:
1. Access ESXi Web Client, and go to Virtual Machines page. Click Create/ Register VM on toolbar to open the wizard.
2. On Select creation type page, select Deploy a virtual machine from an OVF or OVA file. Then click Next.
3. On Select OVF and VMDK files page, enter a name (up to 80 characters) for the virtual machine, and then click the blank to select the OVF/OVA file you exported. Click Next.

4. On Select storage page, select the datastore to store the configuration and disk files, then click Next.
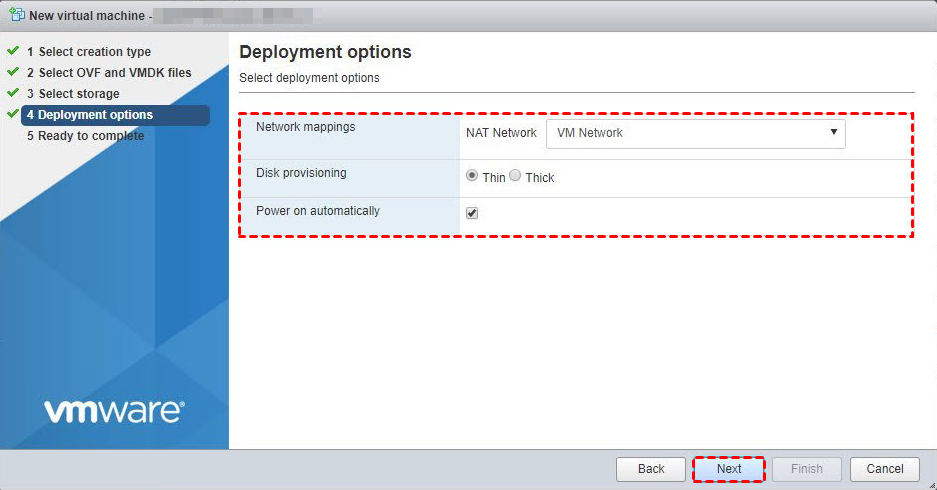
5. On Deployment options page, select the Network mappings, Disk provisioning (as Thin), and click Next.
6. Turn to Ready to complete page, review the settings and click Finish to start. You can see the progress in Recent tasks.
7. When it’s done, back to Virtual Machines page and now you can see the newly deployed VM.
Case 3. Restore entire VMs from VMware backup via simple freeware
The previously described methods can only backup and restore single ESXi VM at a time. It’s inconvenient especially for enterprises that manage a large number of VMs or even multiple hosts. So next I will introduce a reliable and free VMware backup software - AOMEI Cyber Backup, which can easily backup multiple ESXi VMs with flexible backup schedule. With it, you can restore an entire VM from any backup versions by simple clicks.
AOMEI Cyber Backup support both paid and free versions of VMware ESXi. Here I will show you the specific steps to restore from the created backup tasks. You can click the below button to download the perpetual freeware and get started:
*You can choose to install this VM backup software on either Windows or Linux system.
✤2 concise steps to back up multiple VMs at once:
1. Bind Devices: add vCenter or Standalone ESXi host as the source device on AOMEI Cyber Backup to manage all VMs. It supports paid and free versions of VMware 6.0 and all later versions, as well as Windows Server 2012 and all later versions.
2. Create Backup Tasks: click + Create New Task and provide Task Name, Backup Type, Device, Target, Schedule to create a complete automatic backup task.
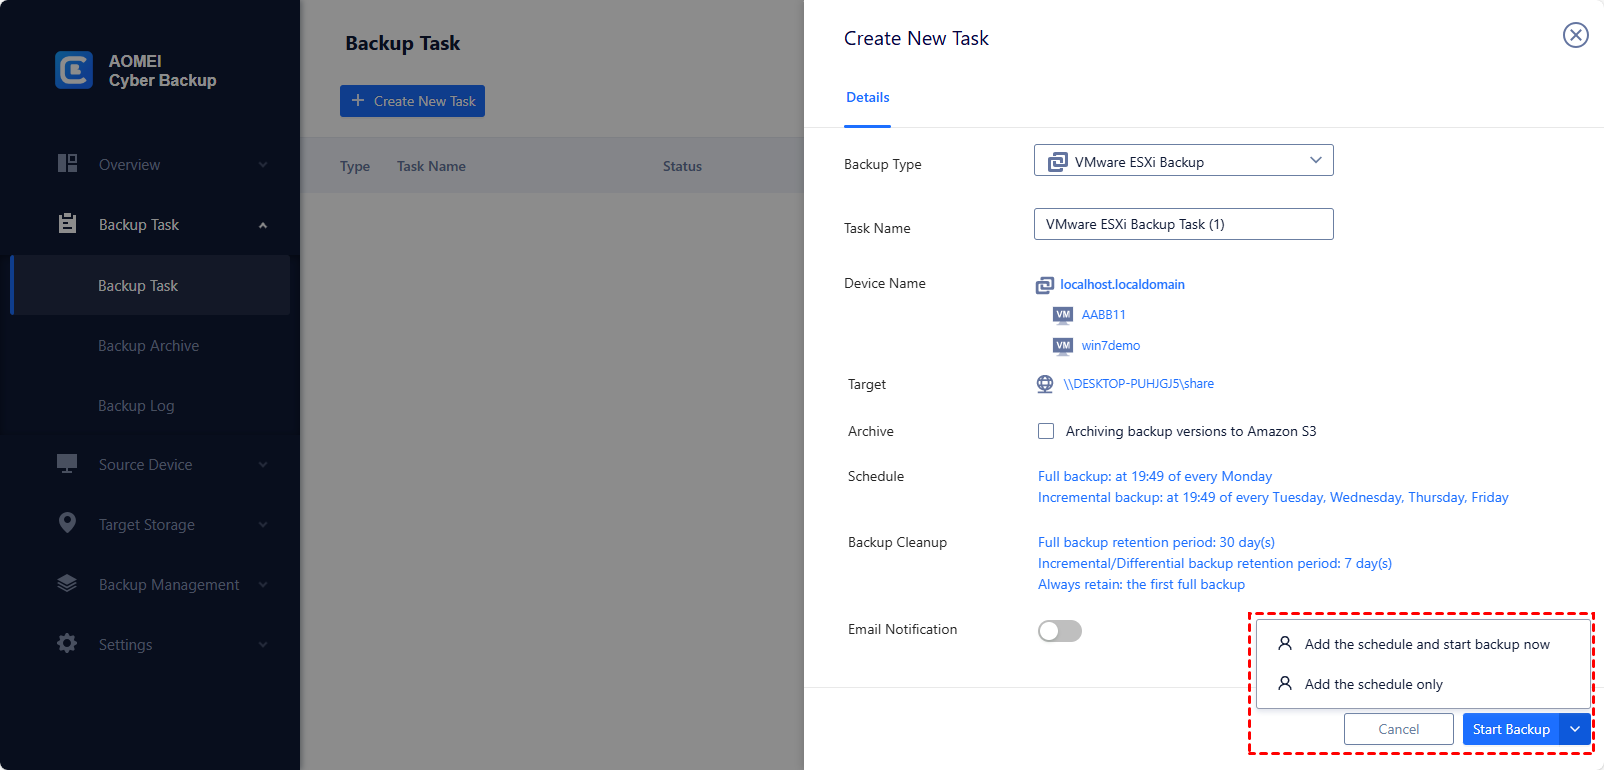
The created backup tasks will be clearly listed with their status and target details, for further managing or restoring.
✤4 simple steps to restore from backup:
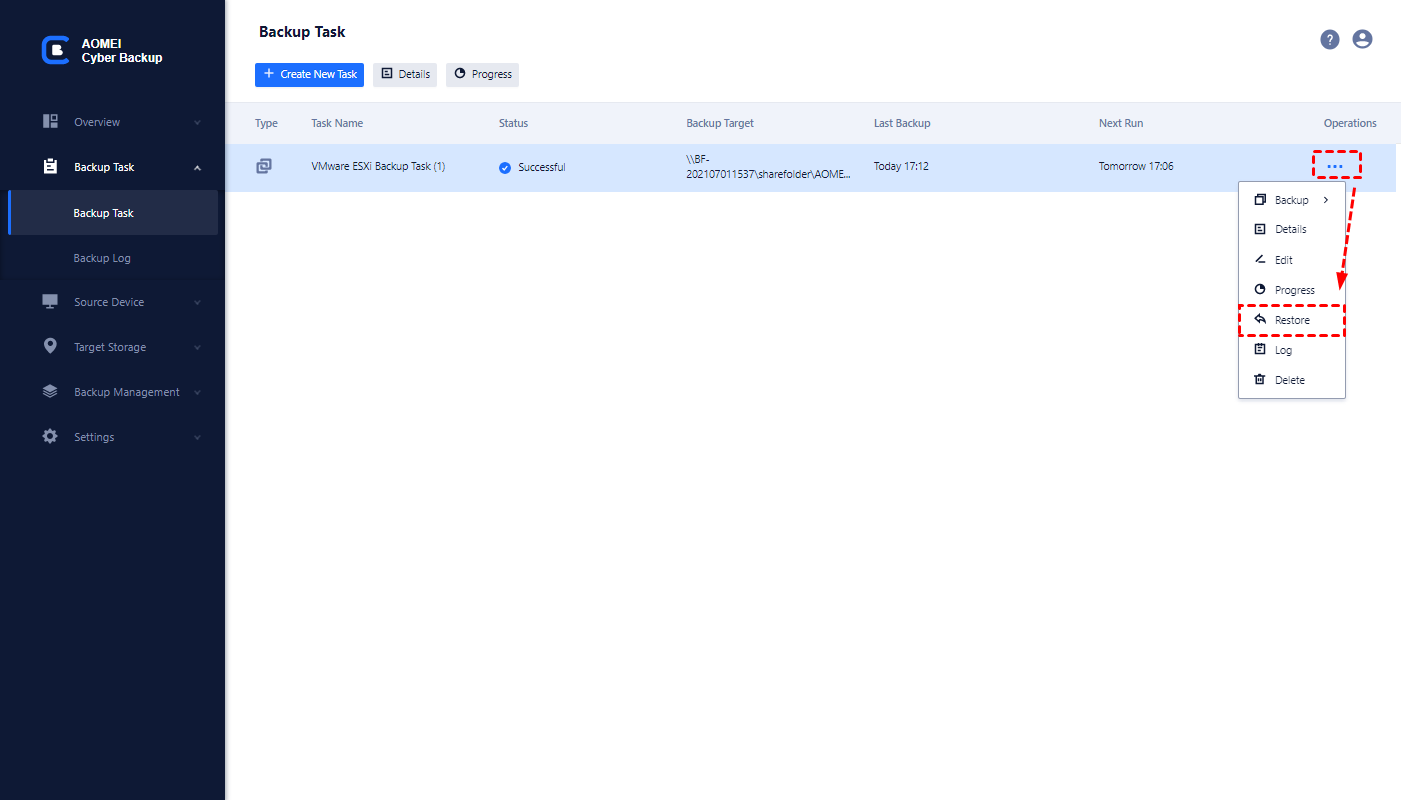
1. Click … > Restore on the left of the backup task to start setting up the VMware data recovery task.
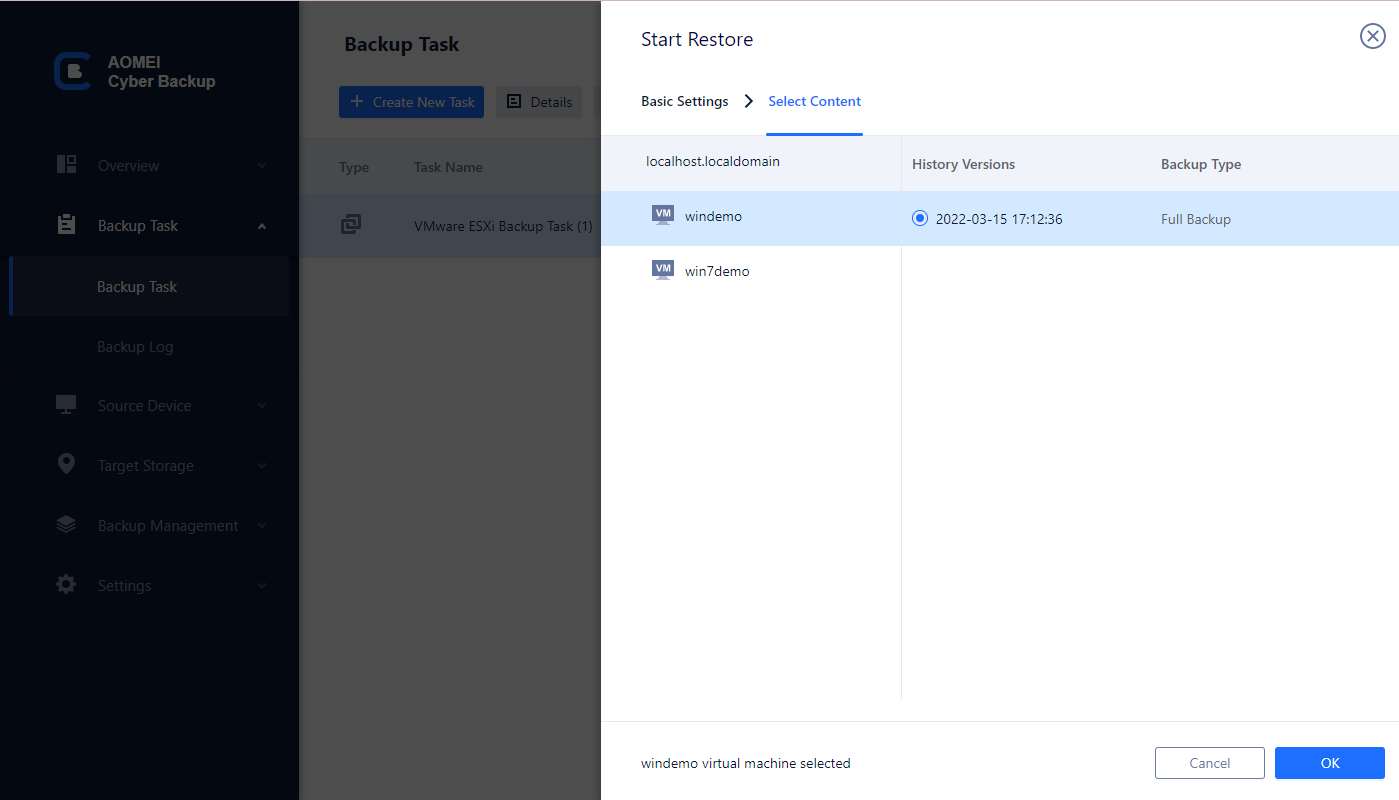
2. Confirm the restore Source task, and click Select Content to specify a restore point.
As you can see, all recovery points related to the VM will be clearly listed with backup type details. Click OK to continue.
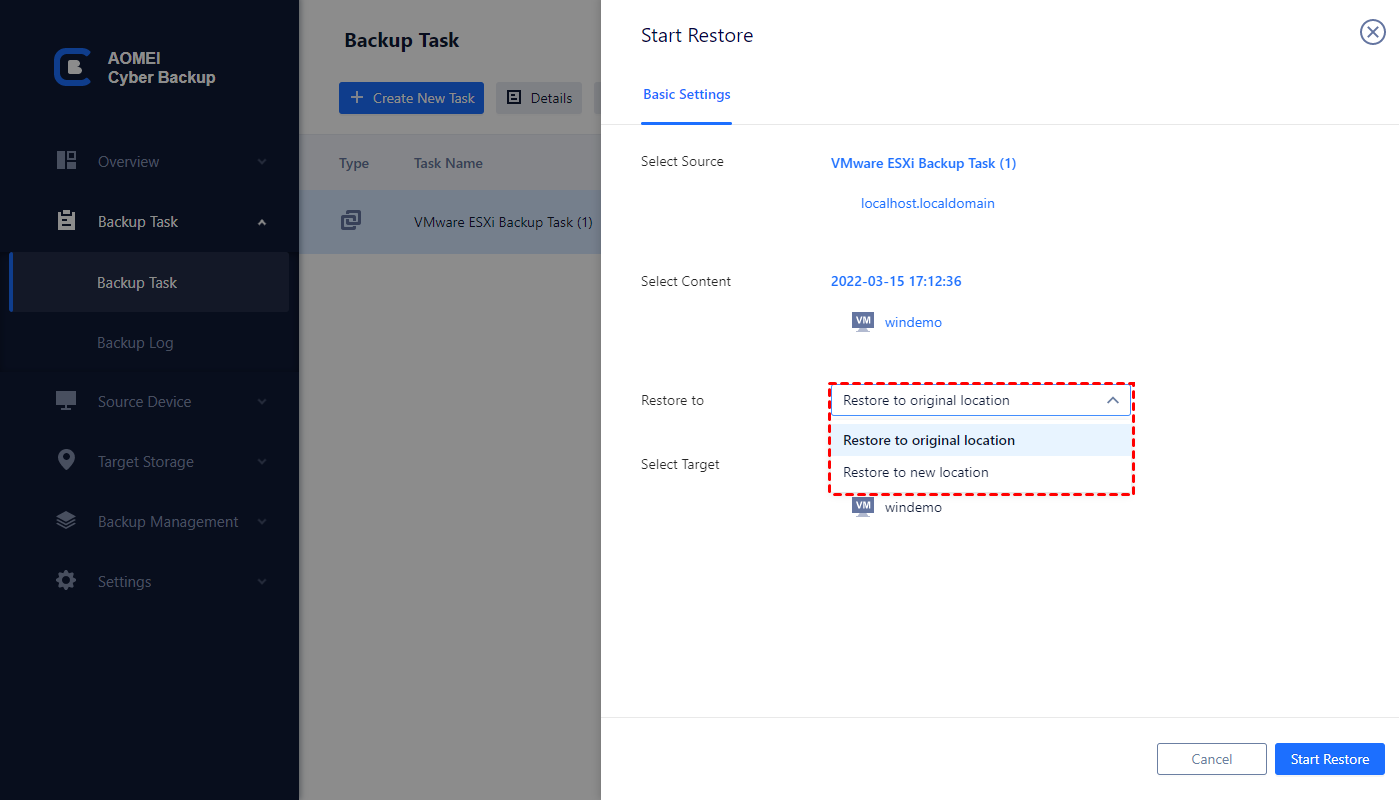
3. Select Restore to original location, and you can restore entire VMs quickly from any backed up history version.
If the task contains multiple VMs, you can restore them to different locations respectively.
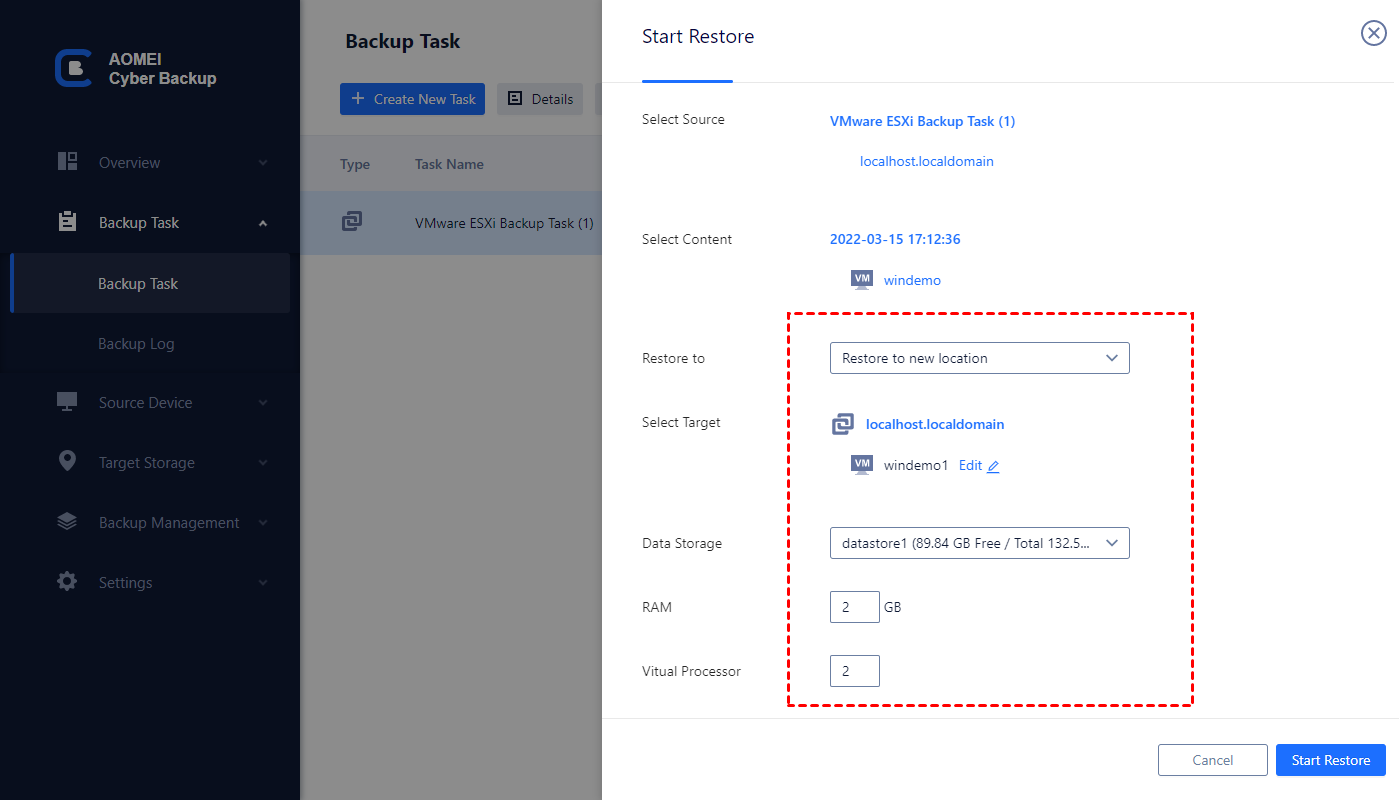
✎If you want to restore a backup to create an identical VM in the same or another datastore/host without any complicated configuration, you can upgrade to enjoy the Restore to new location feature. It also allows you to change the RAM and Vital Processor according to your needs.
4. Now you can click Start Restore. The details of the recovering process will be displayed in Restore Records.
How to restore VM from backups in VMware Workstation | 2 cases
VMware Workstation is the most commonly used Type 2 hypervisor, which is friendly for individual users and runs on the top of an operating system of the host machine. To backup VMware Workstation VMs, copying disk files and exporting to OVF template are also 2 frequently used methods, but the operations are different from VMware ESXi.
In this section, I will introduce you how to restore virtual machine in VMware Workstation.
Case 1. Restore VM from VMDK file in Workstation
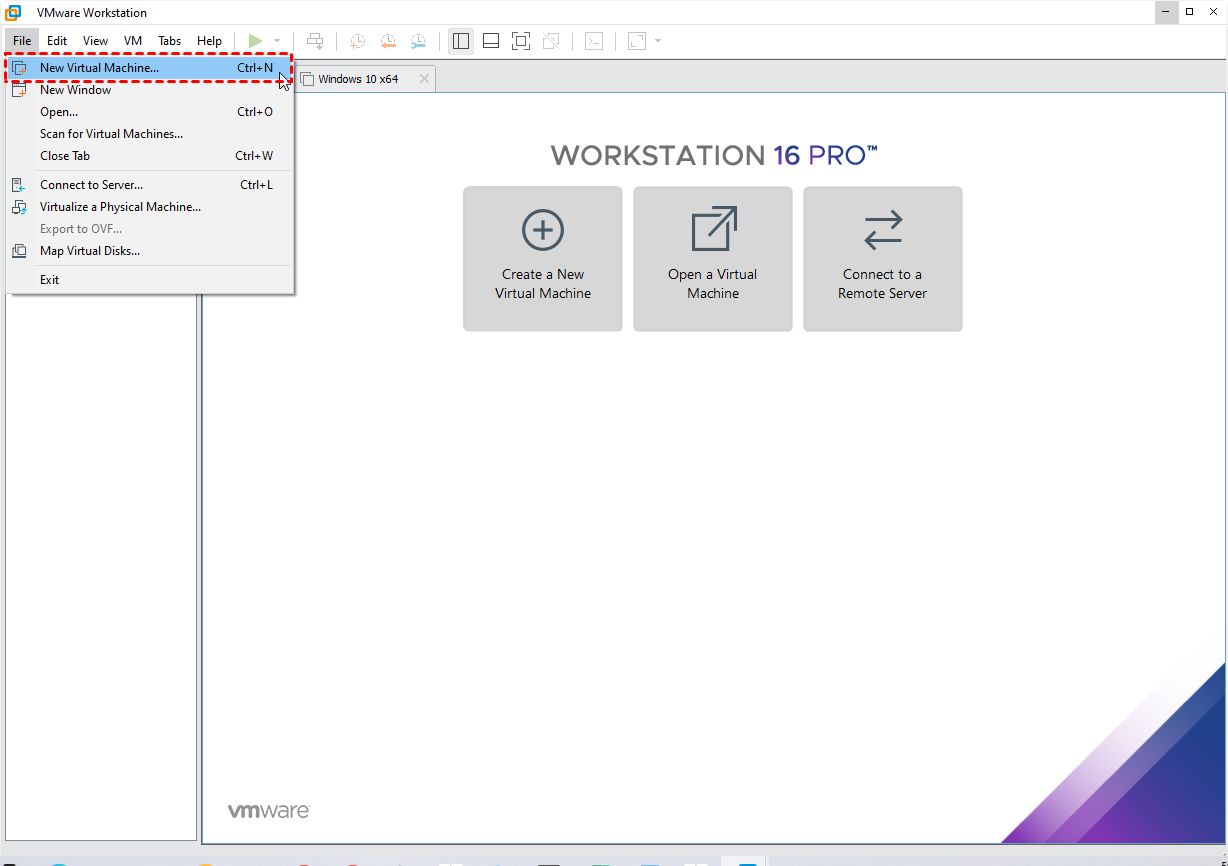
1. Launch VMware Workstation, click File on the toolbar and select New Virtual Machine…
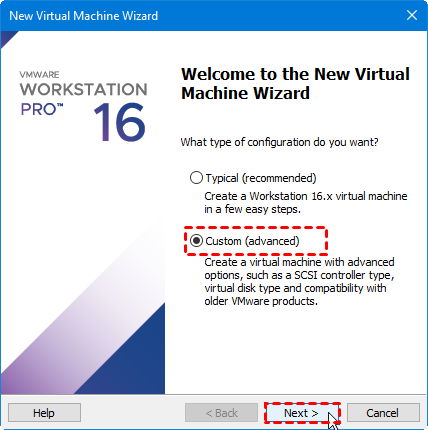
2. In the pop-up wizard, select configuration type as Custom, and click Next.
3. Choose the Hardware compatibility, then click Next.
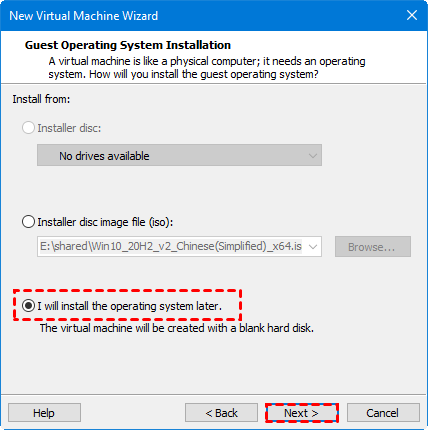
4. On Guest Operation System Installation page, select I will install the operating system later, and click Next.
5. Select a guest operating system you are going to install, then click Next.
6. Provide a name of the VM and the location where you want to store it, then click Next.
7. Specify the number of Processors, the Memory used, and Network Type for the VM, and click Next.
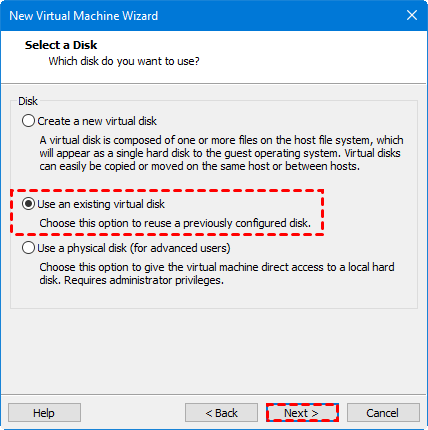
8. On Select a Disk page, select Use an existing virtual disk, then click Next.
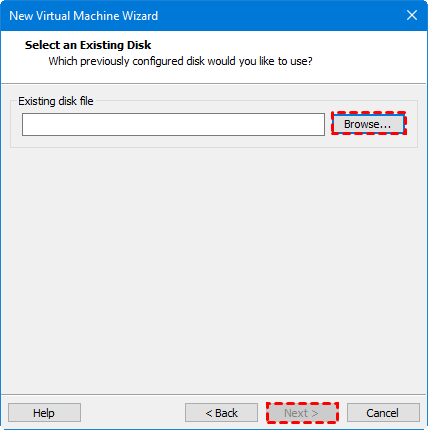
9. On Select an Existing Disk page, click Browse… to select the VMDK file you want to restore.
10. In the pop-up notification, select Keep Existing Format.
11. Review all the settings and click Finish. Now you can see the new VM is created.
Case 2. Import an OVF template in VMware Workstation
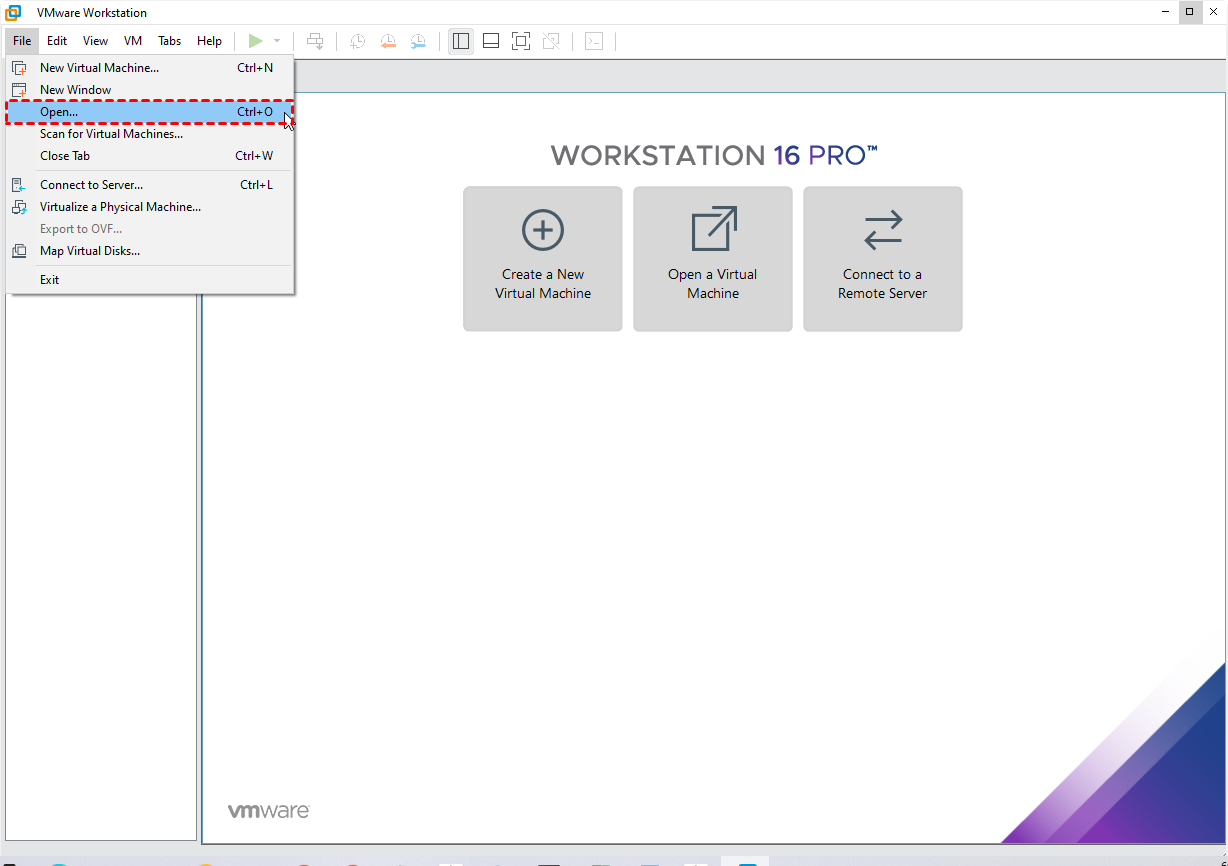
1. Launch VMware Workstation, click File on the toolbar and select Open…
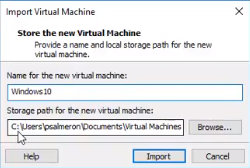
2. In the pop-up window, select the OVF/OVA file you want to import.
3. Provide a name and local storage path for the new virtual machine. Click Import to start.
Summary
Since there's no official backup method of VMware virtual machines, when we want to make VMware restore from backup, we usually need to do it with VMDK and VMX files, OVF/OVA files, or some dedicated backup tools.
In this article, I introduced the specific steps of how to restore virtual machine from VMDK or OVF/OVA file on VMware ESXi and Workstation, to original host or to new host. Hope this could be helpful to you.
And if you want a free tool that allows you to quickly backup multiple VMs with flexible schedule, AOMEI Cyber Backup definitely worth a try.

