Hyper-V Virtual Machine Backup Best Practices | Tips & Methods
There are many things to consider with Hyper-V virtual machine backups, and you may be wondering which are the best practices. In this article I summarized 10 tips and will introduce 2 Microsoft Hyper-V backup solutions.
By Dylan / Updated on July 31, 2024
Case: Best practices for Hyper-V backups
My question is regarding best/easiest/cheapest ways to backup what I've got. Main concern is backing up of the Guest as it is the one that runs all the services and holds the data. The host is only the host with nothing else on it (but would be nice to have it backed up too if possible). Having mentioned that I am looking for the cheapest option I must add that I'd prefer FREE (if possible).
- spiceworks.com
Microsoft Hyper-V is a free, enterprise-class Type 1 (bare-metal) hypervisor that allows you to create and run virtual machines on a single hardware, maximizing the use of hardware resources to provide secure sandbox environments for development and testing.
In order to ensure disaster recovery from accidental loss, you need to implement a smart and appropriate backup strategy. Before developing your backup strategy, you probably have the same question, what are the Hyper-V backup best practices? This article helps you find the answer.
![]()
Backup solutions for Hyper-V virtual machine
To show you the Hyper-V backup best practices, we should first discuss what options are available. It should be noted that Hyper-V checkpoint cannot replace backup, just as VMware VM snapshot ≠ backup. Therefore I will not describe it as a backup method in the following article.
Generally speaking, there are 4 frequently used Hyper-V backup solutions:
◆ Manually copying VM folder: Copying VM folder is enough to recreate VMs, but you cannot restore directly to Hyper-V, instead you need to create new VMs and then attach VHD files. Considering the convenience, I don't think this is the best way to backup Hyper-V VMs for free.
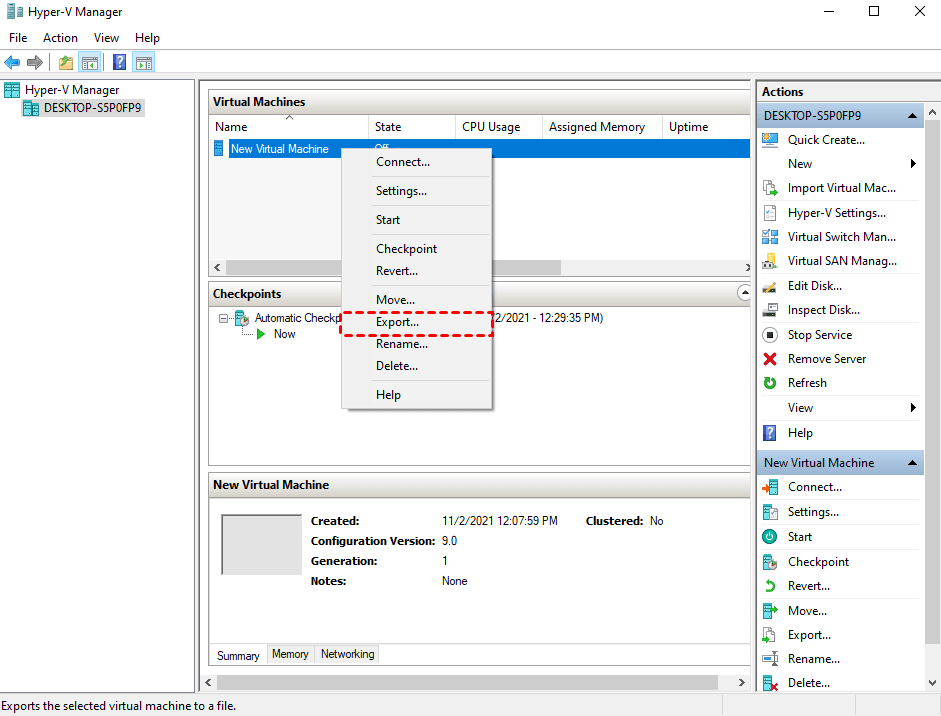
◆ Export and import feature: The Hyper-V export and import feature can also serve the purpose of backing up virtual machines. However, it does not provide basic features such as deduplication, compression, encryption, etc., so it is not considered a perfect backup method either.
◆ Windows Server Backup: In addition to backup once, you can use it to schedule automatic backups while a VM is running, or store backup to a remote shared folder. It is an ideal way for users running a small number of VMs and small to medium-sized companies. However, it still has the disadvantage of not being able to monitor backup progress and verify backup consistency.
◆ Specialized backup software: If you want to achieve more efficient and customizable Hyper-V backup experience, you may need a backup product with better functionality, consider System Center Data Protection Manager (DPM), or reliable third-party software.
Here the last 2 methods are recommended, and I will mainly illustrate them in the following.
Practice 1. Best practice to back up Hyper-V without worries
When it comes to backing up Hyper-V virtual machines, AOMEI Cyber Backup can be the best choice for most conditions. It is a free Hyper-V backup software enabling you to easily save Hyper-V virtual machines to different locations, including local or external hard drives, CDs, USB drives, NAS drives, network shares, etc.
It offers you the following benefits making it the best choice for Hyper-V backup.
✤ Agentless Backup: create complete and independent image-level backup for Hyper-V VMs without the need to install an agent.
✤ Easy-to-use interface: It uses an intuitive interface for backup deployment and management. You can easily backup all or multiple virtual machines from its web console.
✤ Multiple backup storages and cloud archive: AOMEI Cyber Backup supports different storage, like hard drives, and SSDs. and you can archive backup versions to a cloud storage, like Amazon S3 storage.
✤ Preset backup schedules: such as time and other details, and the program will run backup tasks automatically, ensuring consistent backups with minimal manual operation.
✤ Perpetual Free: you can use AOMEI Cyber Backup Free Edition with no time limit.
Next, you can click the below button to download and install this software. We will demonstrate to you how to back up Hyper-V virtual machines (Support Windows 11/10/8/7, Windows Server/microsoftware Hyper-V Server 2012 R2, and later versions).
How to backup Hyper-V virtual machines with AOMEI Cyber Backup:
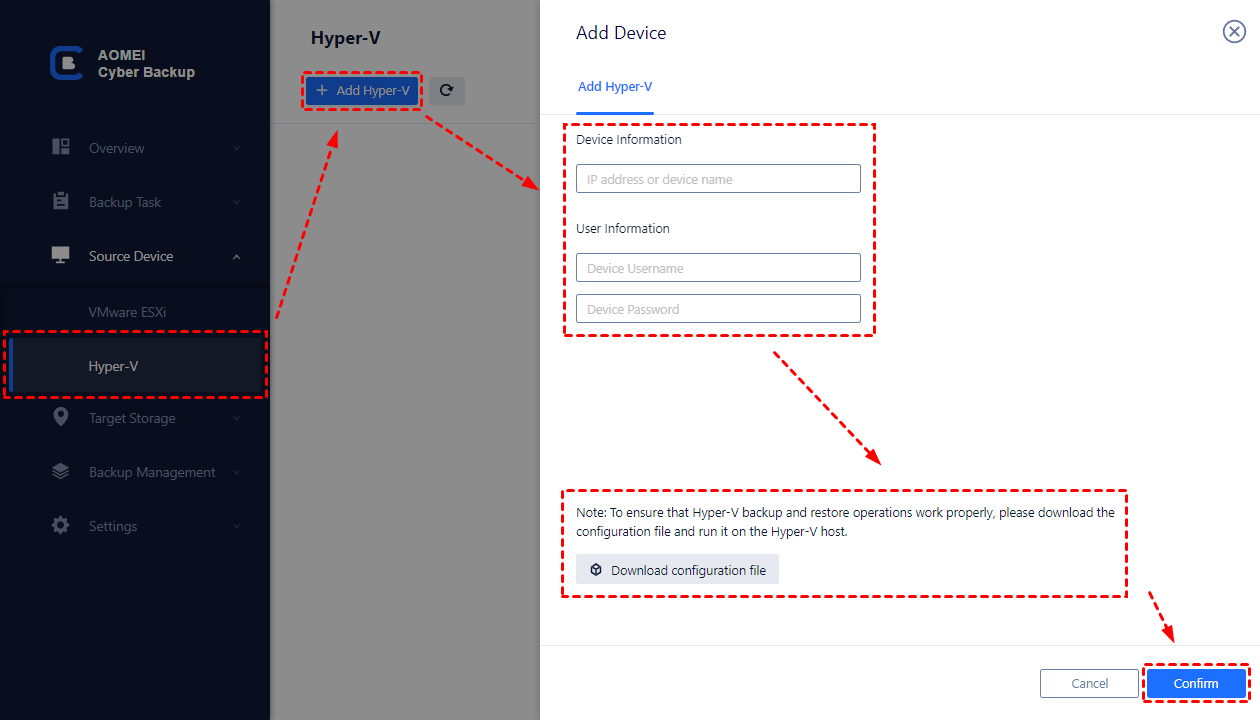
Step 1.Bind Devices: Access AOMEI Cyber Backup web client and navigate to Source Device > Hyper-V > + Add Hyper-V. Enter your Hyper-V host information and click the Confirm button. Then the VMs hosted on it will be added.
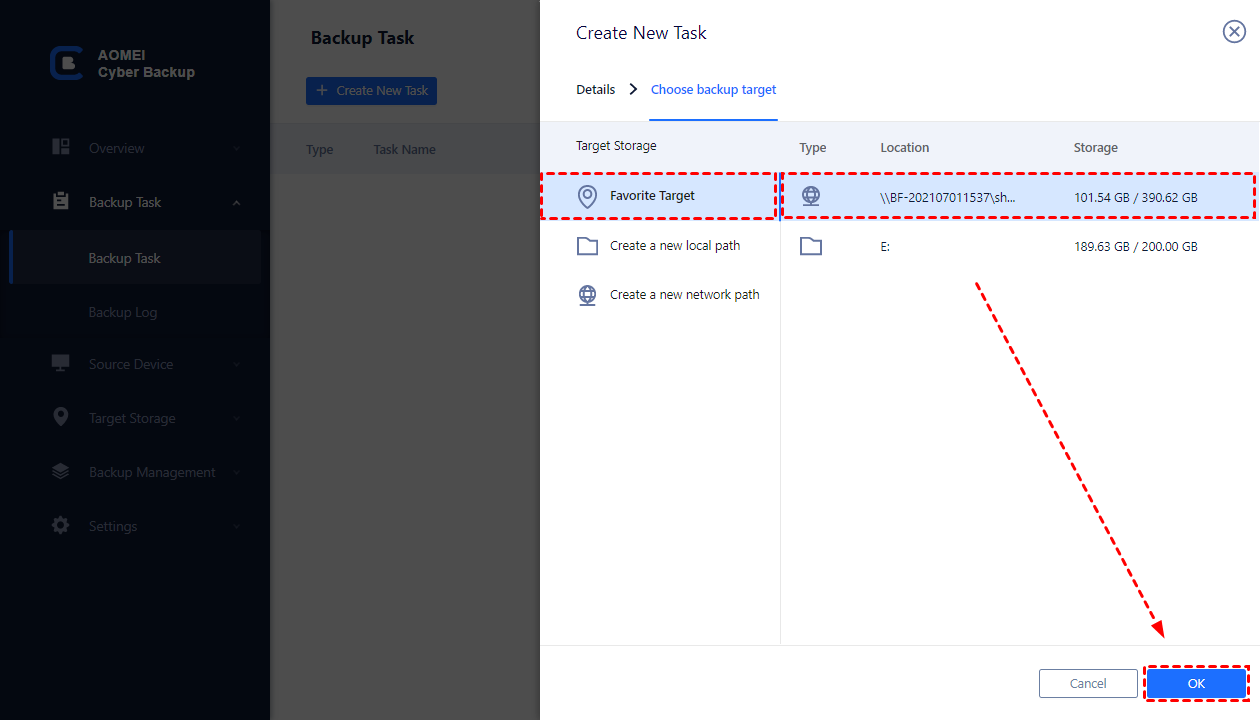
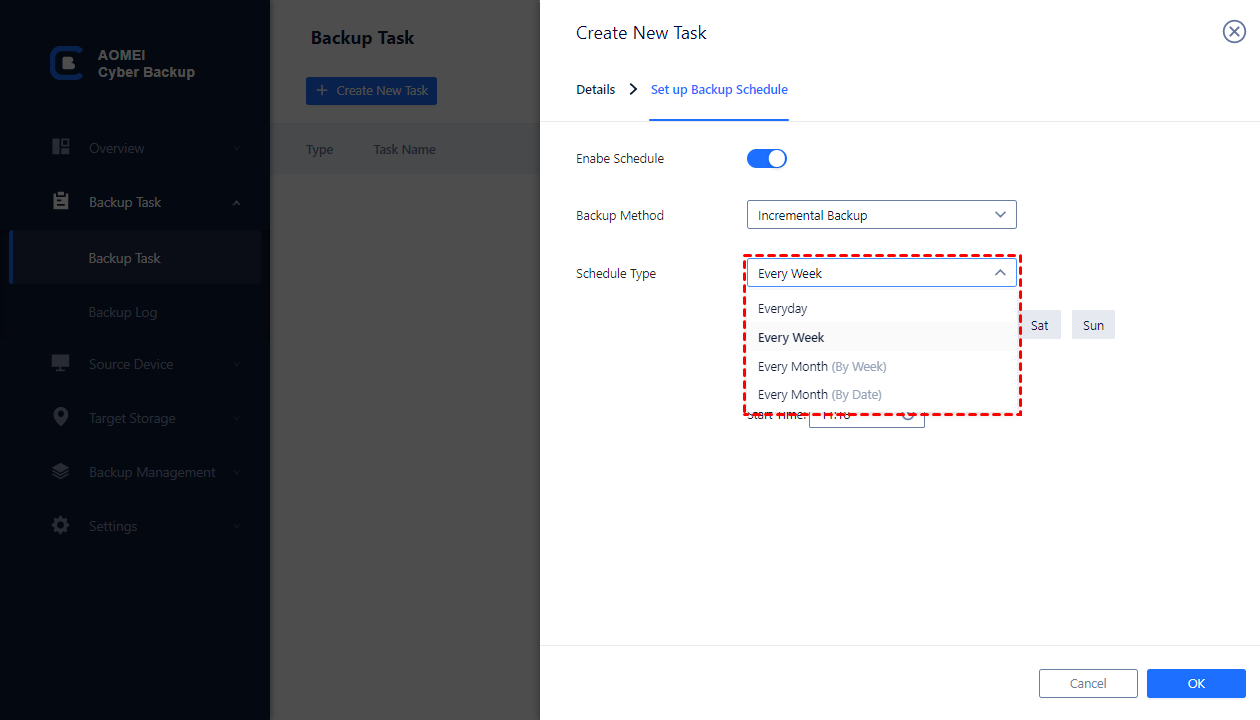
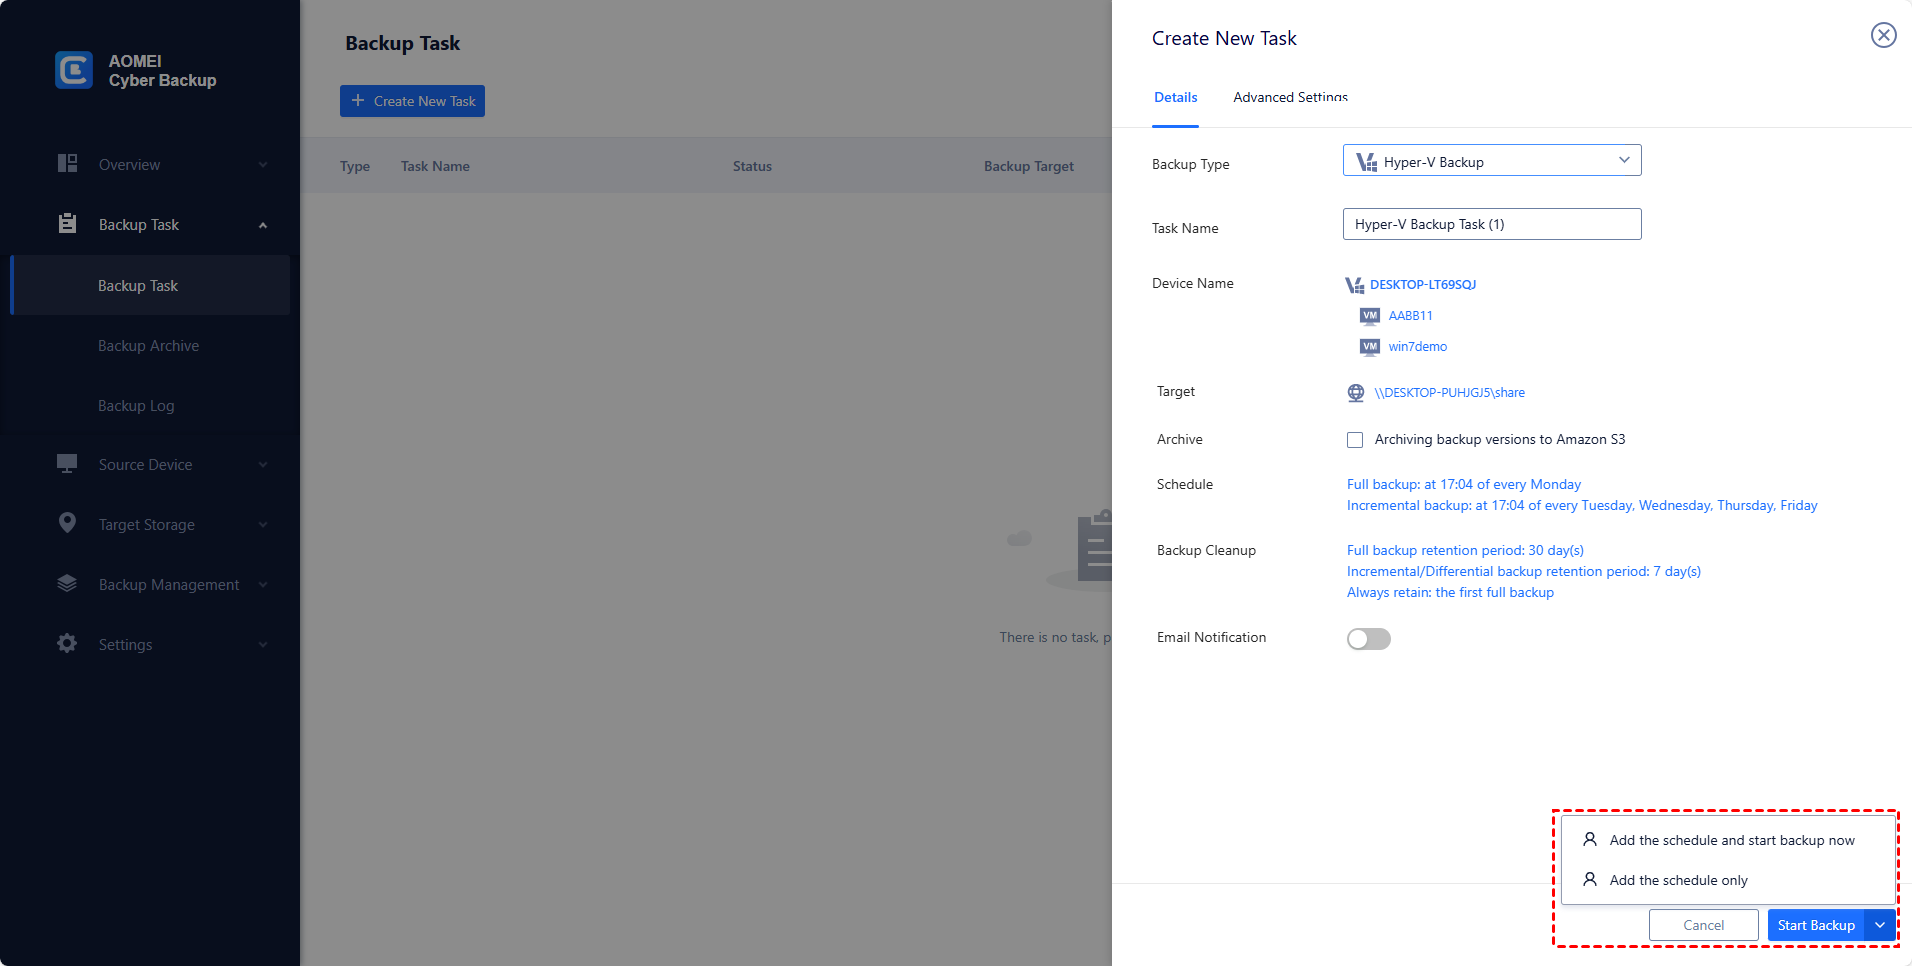
Step 2.Create Backup Tasks: Navigate to Backup Task and click + Create New Task. Specify the Task Name, Backup Type, Device, Target, and Schedule as needed.
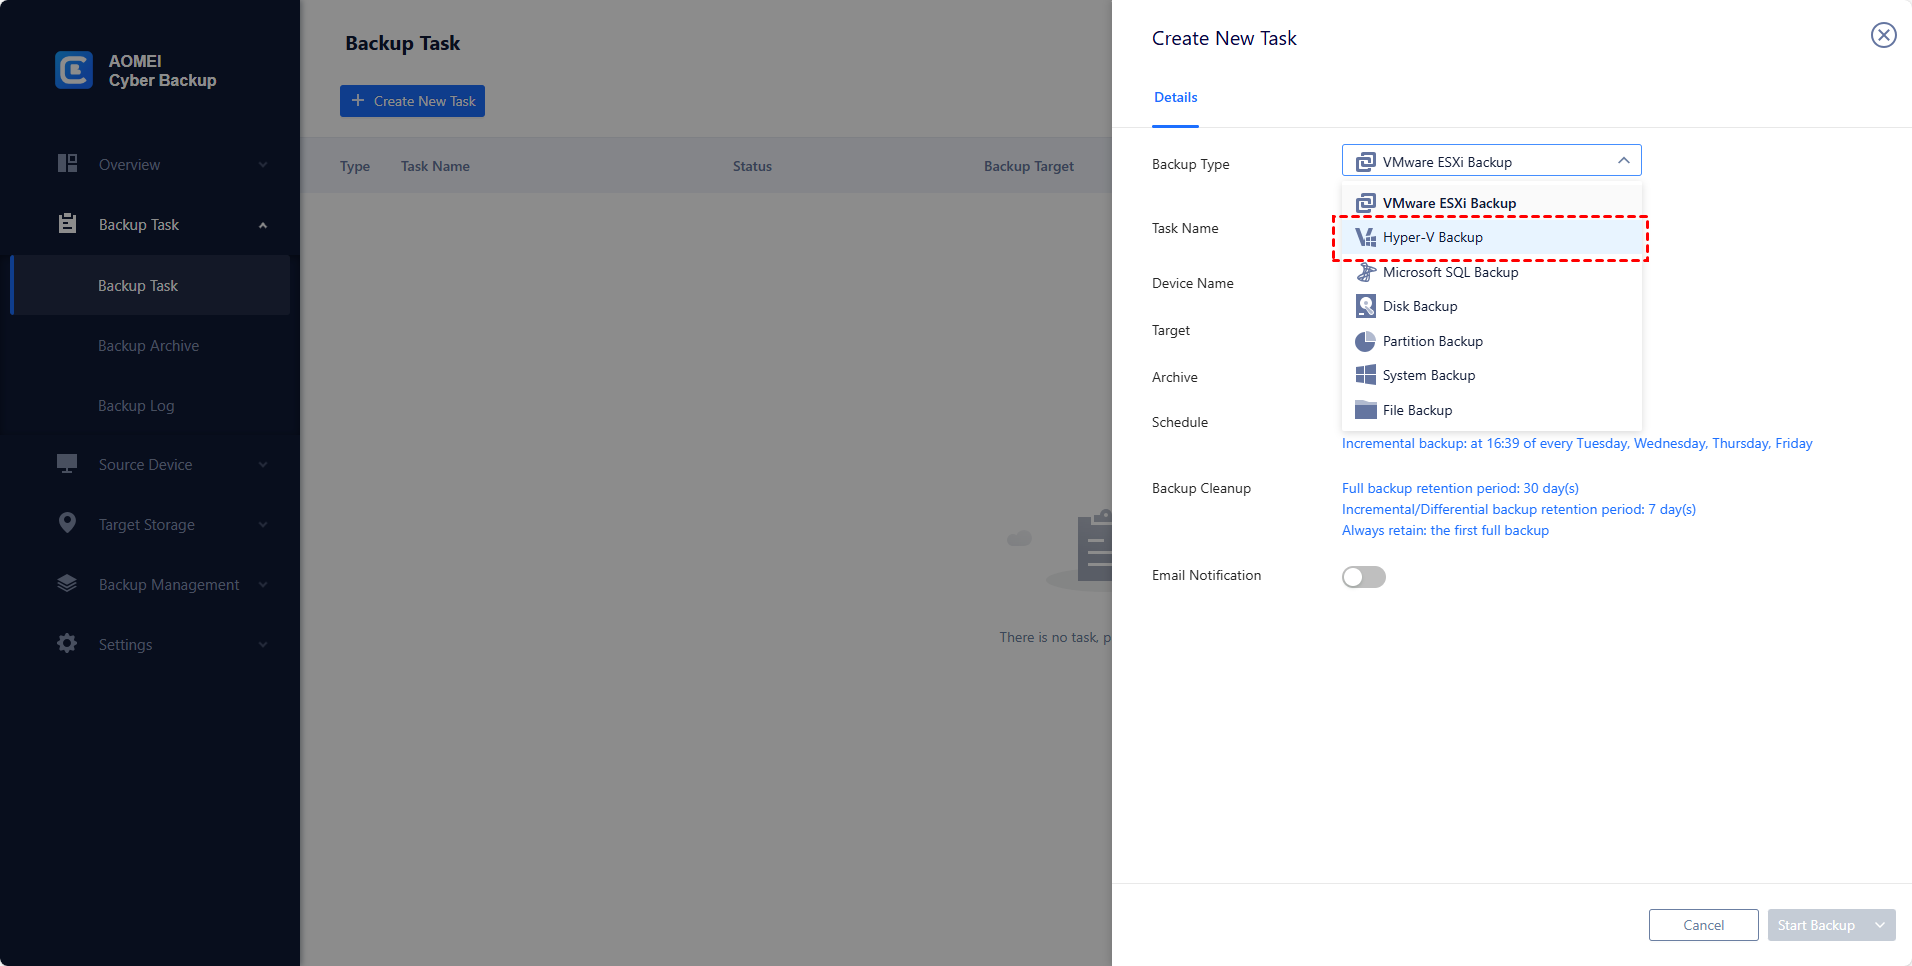
- Device: Specify multiple virtual machines you want to backup.
- Target: You can select to back up to a local path, or a network path.
- Archive: If you need, you can add an Amazon S3. Then save backup files to the S3 storage.
- Schedule: Choose to perform full or incremental backup, and automate execution daily, weekly or monthly according to the frequency you specified.
Step 3. Click Start Backup you can select to Add the schedule only, or Add the schedule and start backup now.
Step 4. When you want to restore VMs: Navigate to Backup Management > History Versions and select the VM you want to restore, all restore points related to the VM will be listed on the left.
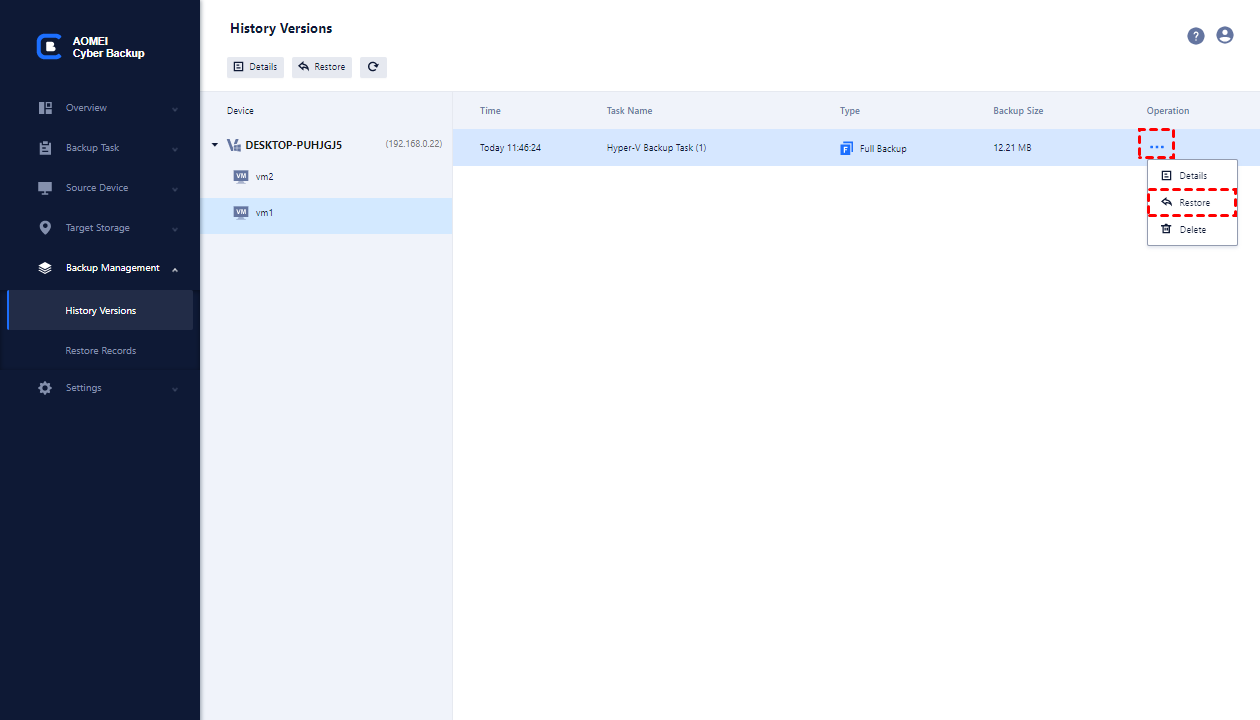
Select one and click … > Restore to open the restore wizard. Specify to Restore to original location, and click Start Restore.
✎While the Free Edition covers most of VM backup needs, you can also upgrade to enjoy:
▶ Backup cleanup: Configure a retention policy to auto-delete old backup files and save storage space.
▶ Restore to new location: Create a new VM in the same or another datastore/host directly from the backup, saves the trouble of re-configuring the new VM.

Practice 2. Use Windows Server Backup for Hyper-V virtual machines
Windows Server Backup is a built-in feature from Windows Server 2008 that provides backup and recovery options for Windows server environments. Here's how to enable it in Windows Server, and use it for Hyper-V backup.
How to add Windows Server Backup from Server Manager:
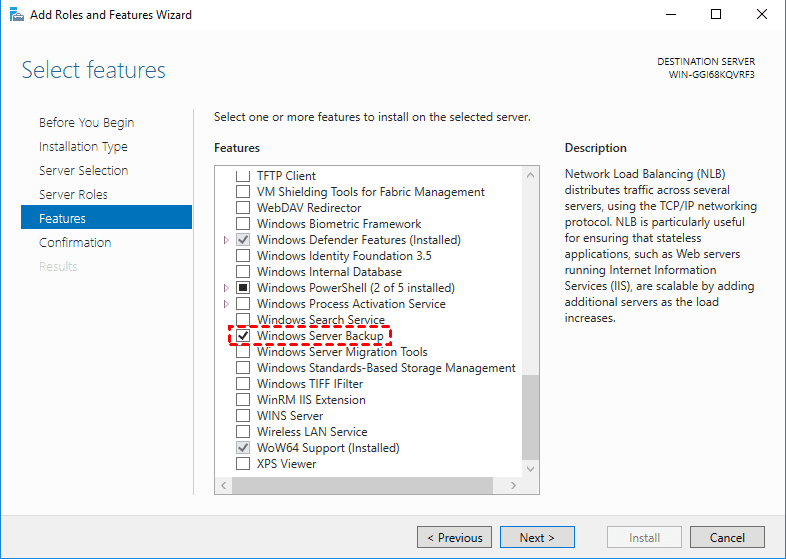
1. Launch Server Manager. Click Manage and select Add Roles and Features. Click Next on the wizard.

2. Select Role-based or feature-based installation as the Installation Type. Click Next.
3. Select the Server from the server pool. And click Next on Server Roles page.
4. On Features page, find and check Windows Server Backup in Features list. Click Next to install.
How to use Windows Server Backup to backup Hyper-V VMs:
1. Back to Server Manager. Click Tools and select Windows Server Backup.
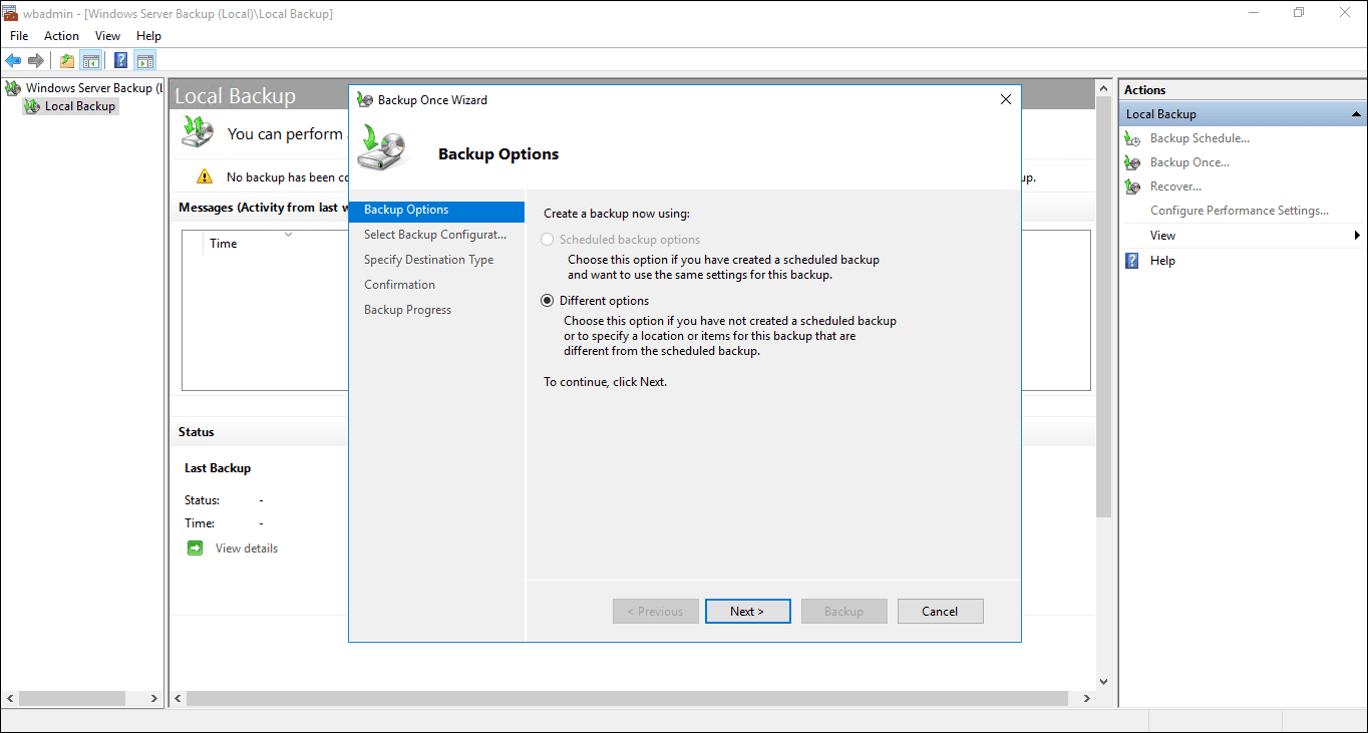
2. As you can see, you can choose Backup Schedule, Backup Once, and Recover in Actions menu. Here we click Backup Once for demonstration.
3. In pop-up Backup Once Wizard, select Different options and click Next.
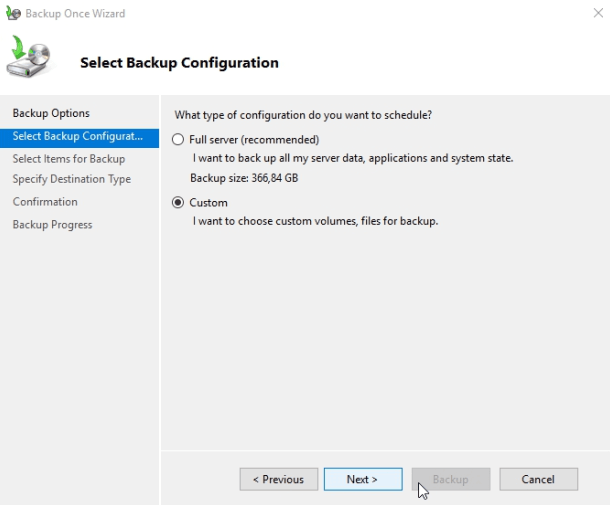
4. In the Select Backup Configuration page, if you want to choose a specific folder or files, select Custom and then click Next.
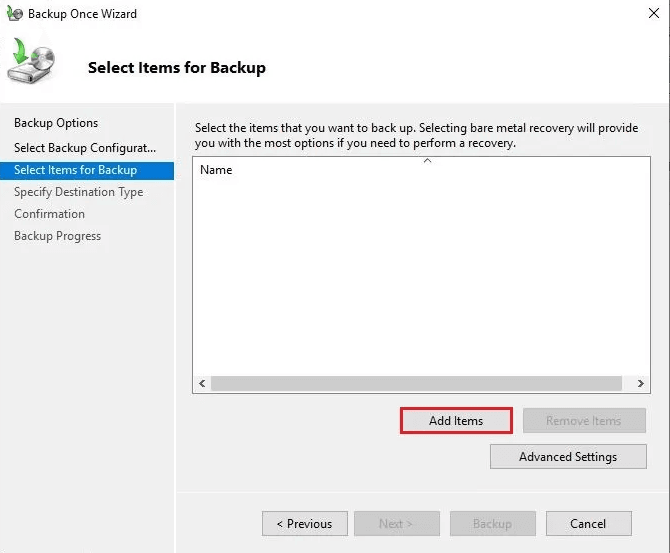
5. Click Add items to select the Hyper-V VM you want to back up.
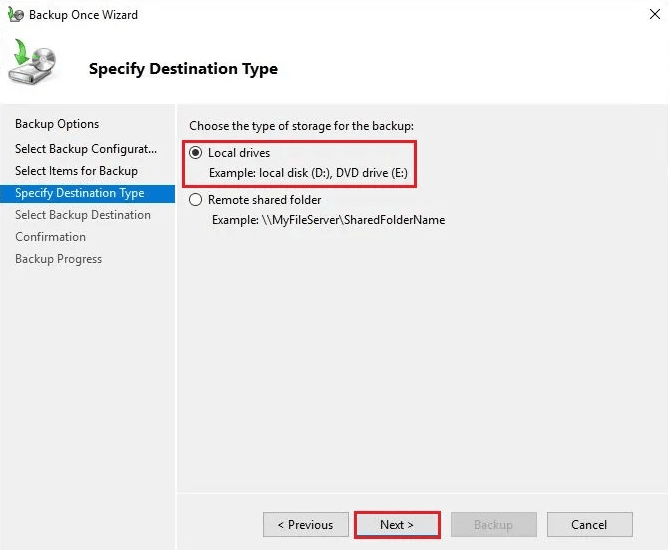
6. Specify the Destination Type and click Next. As you can see, you can choose backup to local drive or network share.
7. Select the Destination location and click Next.
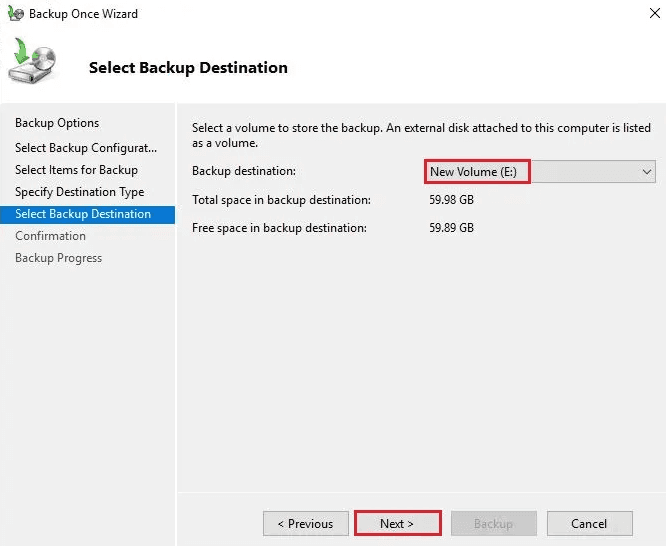
8. Confirm the settings and click Backup to start.
✎Windows Server Backup has some limitations in practice:
For example, it won't shrink the diff area to less than 1/8 of the target volume size, so it may not remove old backups sometimes and therefore cause the "not enough space on the disk" error. Also, the Backup Schedule of WSB only allows for "Once a day" and "More than once a day". Learn details in Windows Server Backup limitations.
10 useful tips for Hyper-V backup best practices
In this section, I summed up 10 useful tips for Hyper-V backup virtual machines. They basically cover the entire process of setting up a Hyper-V backup policy:
- Tip 1 - 3: The preparation before backup
- Tip 4 - 7: The considerations when backing up
- Tip 8 - 10: The maintenance work after backup
Tip 1. Update: Keep Hyper-V and backup software up to date
Windows regularly adds extensions and bug fixes to Hyper-V, many are related to Hyper-V Integration Services. To make sure you have all the latest Microsoft bug fixes and interoperability fixes, you better check that you have applied all Windows updates before backing up.
Tip 2. Services: Enable and update Hyper-V integration services
Hyper-V Integration Services are services that allow virtual machines to communicate with Hyper-V hosts. It works in coordination with VSS services to stop virtual machines and refresh data correctly during the backup run, allowing backups of the guest operating system to be in a consistent state. It is shipped in Windows OS by default, but you still need to keep it up to date.
Tip 3. Resources: Prepare enough disk space, CPU, and RAM
Virtual machine backups can be very large and take up disk space. Ensuring that you have reserved enough free disk space, and providing enough CPU and RAM for backups, can avoid failures due to lack of space, increase backup speed.

Tip 4. Choose host-level backup instead of guest-level backup
There are 2 types of Hyper-V VM backups: host-level backup and guest-level backup.
Guest-level backup is a method of backing up VMs as if they were physical machines by installing agents on each VM, and is not capable of backing up the virtual environment and configurations.
Host-level backup is a method of backing up virtual machines at the hypervisor level, allowing a complete backup of the entire virtual disk without installing agents, and the configuration files that store the CPU, memory, network, and other settings.
So it is recommended to perform host-level backup for Hyper-V because of its efficiency, convenience, and completion.
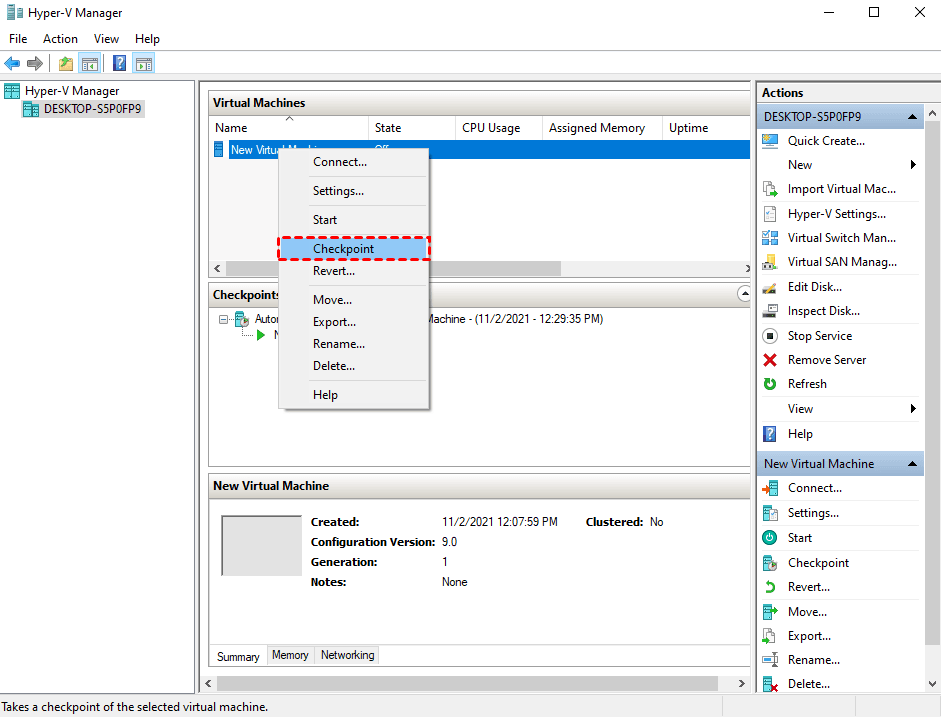
Tip 5. Hyper-V Snapshot (Checkpoint) cannot replace backup
Checkpoint, currently known as snapshots, is a fast and effective way to roll back a VM to the point in time when the checkpoint was taken. It can be used as a temporary, short-term means of VM data protection.
Checkpoint vs backup: What are the differences between Hyper-V snapshot and backup?
Hyper-V backup is to create an exact copy of Hyper-V virtual machine data to recover the VM environment completely. While Hyper-V snapshot is a short-term solution for saving your VM state. It depends on the parent disk, if the parent disk is deleted, the checkpoint itself is insufficient for VMs to restore.
Thus, Hyper-V snapshot or checkpoint can't replace backup. Moreover, the incremental disk files created after creating a checkpoint can grow large and take up disk space, thus affecting the VM performance.
Tip 6. Application-aware mode, forever-incremental backup with RCT, compression and encryption
Application-aware mode relies on VSS to create application-consistent VM backups, providing additional checks during the backup preparation phase, to ensure the correct state of the application (for example, SQL Server, Exchange Server, or Active Directory) is put into the backup.
Forever-incremental backup with Resilient Change Tracking (RCT) allows backup vendors to make use of this native feature for capturing only the changes since the last backup. It can improve the efficiency of copying data, make backup process faster and take up less space.
Besides, if you want to save space and the time for moving backups, you can also consider compressing backups at a certain level. And when you store backups offsite, please always remember to encrypt your backups in order to avoid leaking important data.

Tip 7. Schedule automatic backup and deletion
In practice, the data on your VMs is updated all the time, and you may need to back up more than one VM. Schedule VM backups is the best insurance against accidental loss of up-to-date data.
How often to perform full backups, whether you need incremental backups, when taking backups that do not conflict with other schedules, how long backups need to be kept, etc. are all issues to consider. Besides, it is also necessary to delete old backups regularly to ensure good use of disk space.
Tip 8. Keep 3 copies on 2 types of media with 1 offsite (3-2-1 backup rule)
Usually, if you only have one backup, you may not be able to restore the VM in time once it is corrupted, and you may even lose important data. Therefore, it is recommended that you follow the 3-2-1 principle to keep enough backup copies.
3—Keep 3 copies of data: one original and two backups
2—Store backups on 2 types of media: local server and cloud service (better encrypted)
1—Keep at least 1 backup offsite
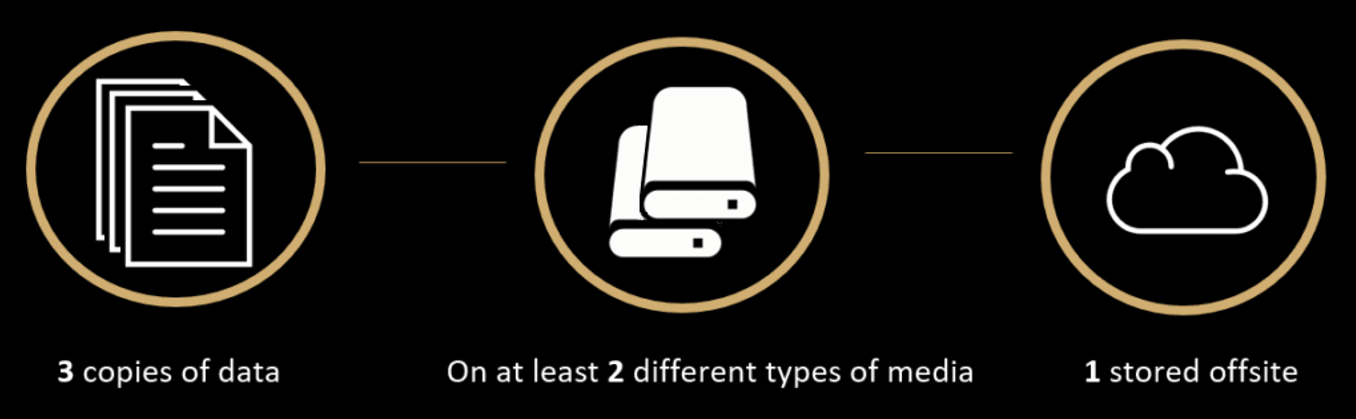
The 3-2-1 backup principle can be the golden rule of backup. This effectively ensures the recoverability of data, you don't have to worry about a single point of failure that makes data unrecoverable.
Tip 9. Verify backup availability regularly
It is also important to regularly test the availability of your backups after they are completed. This prevents data loss due to backup corruption or failure when needed, ensures immediate restore of your VMs, and maintains business continuity.
Tip 10. Distinguish different VM backups
After you backup Hyper-V virtual machines, remember to differentiate between the different backups to avoid errors during Hyper-V VM restore.
Summary
Implementing a good and proper Hyper-V backup strategy can ensure timely disaster recovery and data security, maintains business continuity.
In this article, I summarized 10 Tips for Hyper-V backup best practices, introduced 1 common native tool and 1 dedicated backup tool for Hyper-V backup virtual machines.
Nowadays it is commonly accepted that a dedicated backup tool can better protect your Hyper-V VMs with more comprehensive functionality. If you are looking for an affordable professional backup software, you can try AOMEI Cyber Backup free edition.