


How to Create and Manage Hyper-V Checkpoint | Starter Guide
Checkpoint is similar to an "undo" button which allows you to revert the VM to the previous state. This article will explain checkpoint in detail and how to use it securely and quickly in Microsoft Hyper-V.
By Crystal / Updated on March 8, 2023
What is Hyper-V checkpoint
Hyper-V checkpoint was known as Hyper-V snapshot before Windows Server 2012 R2. This technology has been improved after that and was renamed to checkpoint in Hyper-V.
Checkpoint in Hyper-V records the state of a virtual machine in a given point in time, so it stores the existing data of a VM before any changes are made. This feature allows you to revert a VM back to the original state securely and quickly when the error occurs.
This article introduces how to create, apply and delete checkpoints in Hyper-V Manager and Powershell and distinguishes the difference between Hyper-V checkpoint and backup.
2 types of Hyper-V checkpoint
✦ Standard Checkpoints: A standard checkpoint is previously known as Hyper-V Snapshot before Windows 10. It takes snapshots and records the state, data and hardware configuration of a virtual machine at a specific point in time.
Standard checkpoints do not keep the application performing consistently and may result in incomplete data transactions for virtual machines which are running applications such as Exchange, SQL, etc. But standard checkpoints are very useful in software-testing and development.
✦ Production Checkpoints: Production checkpoints can be used to create consistent backups of data with the help of the Volume Shadow Copy service (for VMs running on Windows) or file system freezing (for VMs running on Linux). It is a method for backup. No snapshot of VM memory state is taken when creating a production checkpoint.
Could we use checkpoint as backup: Checkpoint ≠ Backup
The answer is NO. VM snapshot and backup are different from each other. Microsoft's Hyper-V checkpoint is not a replacement of backup.
When you create a backup, you are creating a copy of your virtual machine. It stores complete data of VM. Backups in Hyper-V can be used to restore a cloned VM and do not affect the performance of VM. Meanwhile, checkpoints are running out of the memory of disk with a rapid speed, which leads to the poor performance of your virtual machines.
In addition, Hyper-V checkpoint works in a manner that is completely different from backup. When you create a Hyper-V checkpoint, what you are really created is a differencing disk based on the original virtual machine hard disk. If the original disk is damaged, the child disk is easy to be lost or damaged as well. All changes made after the checkpoint are re-directed to the child disk and leaves the original virtual machine disk read-only.
In short, Hyper-V checkpoint is just a secure "undo" button. If you want to test something quickly and restore the VM to a stable state, checkpoint in Hyper-V is convenient and fast to execute the process than backup.
How to create checkpoints in Hyper-V
When you need to perform some operation which are potentially dangerous to your VM such as software-testing and applying virus applications and want to make sure the original data is secure, you could create checkpoints in Hyper-V.
Steps to create a checkpoint in Hyper-V:
1. Navigate to your Virtual Machines and right-click on a VM
2. Click Checkpoint
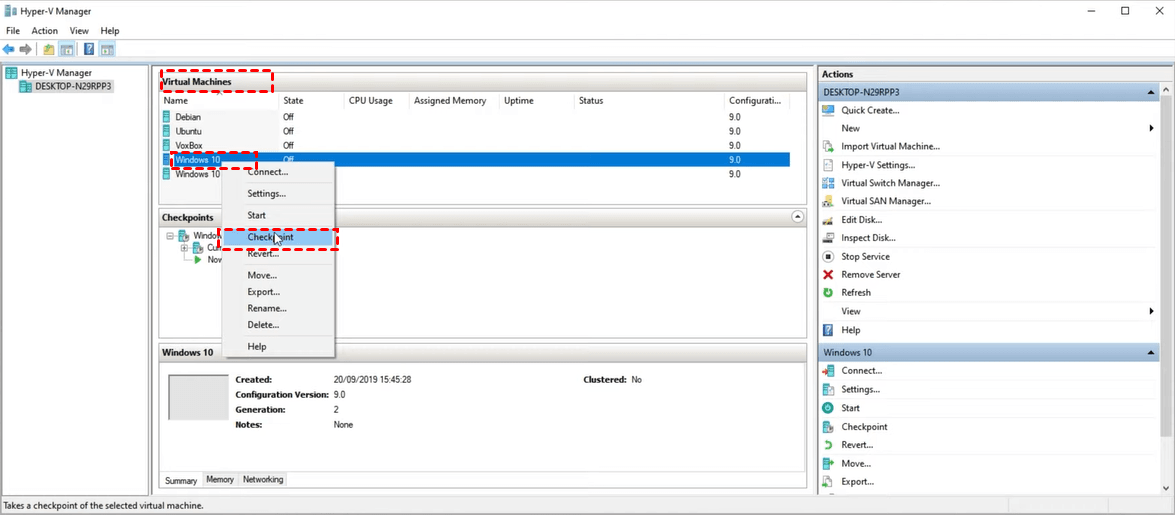
3. The checkpoint will on the Checkpoints section once you create it successfully in the Hyper-V Manager.
Using PowerShell to create Hyper-V checkpoint
Run the command to create Hyper-V checkpoint:
After creating checkpoints, use this command to see the Hyper-V checkpoints:
So, you can use Hyper-V manager and PowerShell to create Hyper-V chekpoints.
Manage checkpoints in Hyper-V (appy, delete, export, rename)
After you created a checkpoint, here comes a question: how do you manage the checkpoint to run our virtual machine well?
How to apply, rename, export and delete a checkpoint is introduced in this part.
How to apply a checkpoint in Hyper-V
If you want to restore Hyper-V VM from checkpoint to a previous point in time, you can apply an existing checkpoint.
1. Select a vrtual machine that you want to revert.
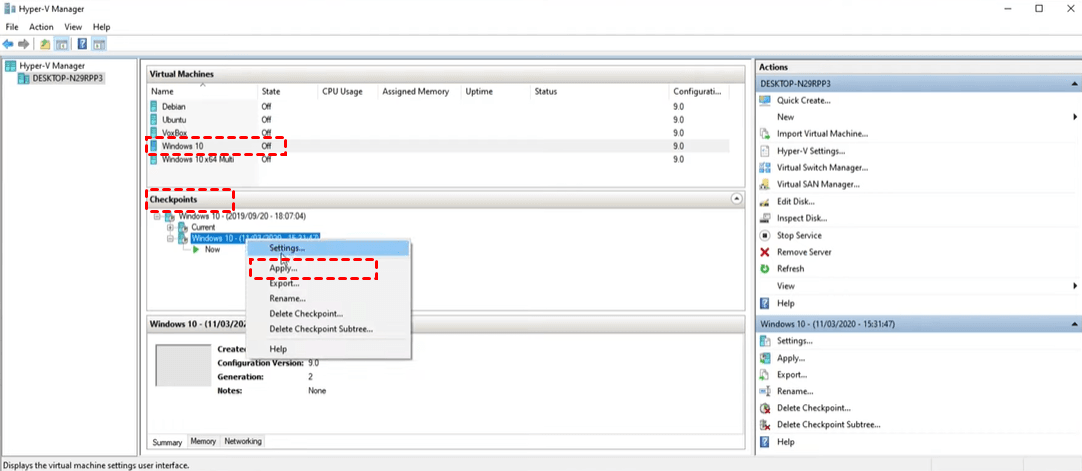
2. In the Checkpoints section, right-click on the checkpoint you want to use and select Apply.
A dialog box will be displayed with the following options:
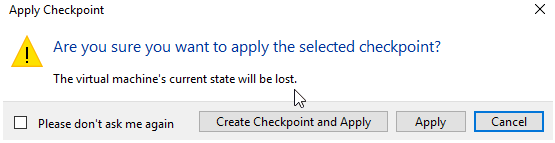
- Create checkpoint and apply: A new checkpoint for the VM will be created before restoring to the selected checkpoint. Even if this operation fails, the VM can be protected in this way.
- Apply: Only the selected checkpoint is applied and you cannot undo the operation.
3. Choose it according to your need.
Use Powershell to apply Hyper-V checkpoint:
How to delete a checkpoint in Hyper-V
Please ensure to delete the checkpoints after using it, otherwise it will run out of your disk space and affect the performance of VM.
1. Select a VM, and go to the Checkpoints section.
2. Right-click the checkpoint and click Delete Checkpoint. You can also click Delete Checkpoint Subtree which means to delete the main checkpoint and all subsequent checkpoints.
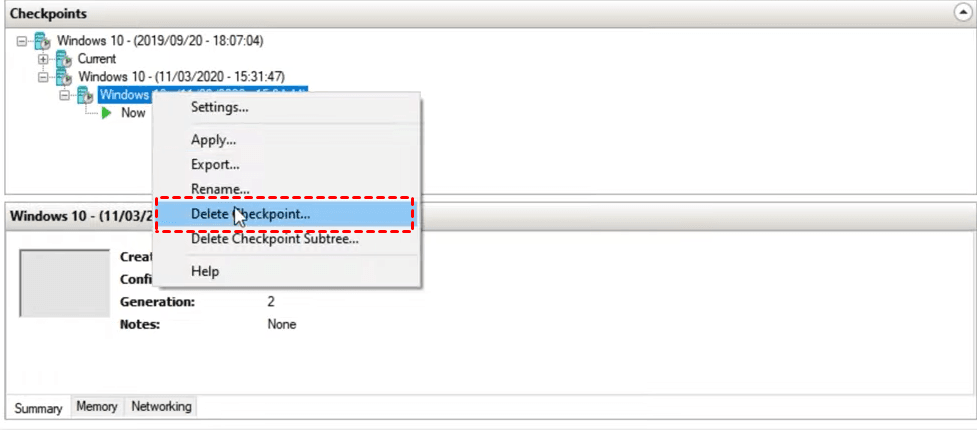
3. Confirm that it is the correct checkpoint and click Delete.
Use Powershell to delete Hyper-V checkpoint:
Run Remove-VMSnapshot cmdlet to deletes all checkpoints of virtual machine TestVM whose names starts with Experiment.
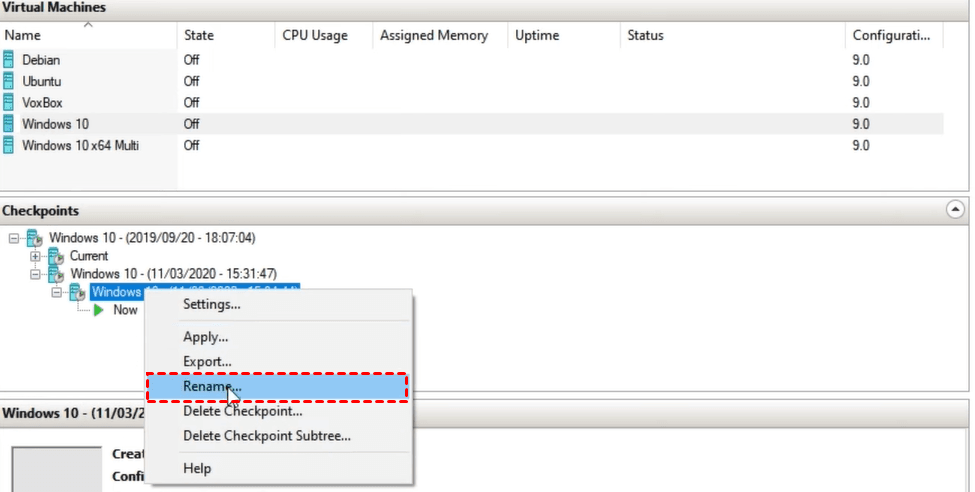
How to rename a checkpoint in Hyper-V
Generally, a checkpoint name consists of its VM name and a time stamp. In order to make the checkpoint name simple and obvious, we could rename it with a special feature.
In the Checkpoints section> right-click on the checkpoint you want to use> click Rename> Enter a new name for this checkpoint.
Note: The name must be less than 100 characters and it cannot be empty.
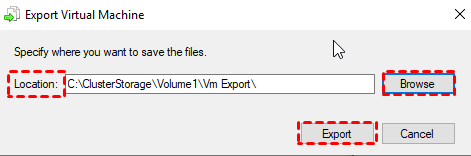
How to export a checkpoint in Hyper-V
If you are planning to export checkpoints from your virtual machine, please shut down the VM for the consistency.
1. Navigate to Hyper-V manager, and select the VM.
2. In the Checkpoints section, right-click the checkpoint you want to export and click Export.
3. Click Browse and choose the Location you prefer.
4. Click Export.
Frequently asked questions about Hyper-V checkpoint
Q: Is Hyper-V checkpoint the same as snapshot?
A: One of the reasons that snapshots can be a bit confusing is that different cloud providers use the term "snapshots" in different ways. Microsoft did rename the Hyper-V snapshot to "checkpoints". Even then, the checkpoint feature is still commonly referred to by its old name, snapshots.
Q: What happens when you delete checkpoint?
A: Behind the scenes, checkpoints are stored as .avhdx files in the same location as the .vhdx files for the virtual machine. When you delete a checkpoint, Hyper-V merges the .avhdx and .vhdx files for you. Once completed, the checkpoint's .avhdx file will be deleted from the file system. You should not delete the .avhdx files directly.
Q: Why does Avhdx keep growing?
A: A differencing disk is a virtual disk that is used to store changes made to its parent virtual disk. Meaning, all ongoing changes are now written to the AVHDX file. This causes the file to grow in size and depending on how much change data is being created on the VM it can grow either fast or slow.
Q: How big are Hyper-V checkpoints
A: The maximum size that an AVHDX file can grow follows the same limitations of a differencing disk, which is limited to the size of its parent VHD. So, if we have a VM using an 80GB VHD and we create a checkpoint, the largest that checkpoint can grow is 80GB.
Best practice for secure Hyper-V backups instead of checkpoints (Free)
As I described above, Hyper-V checkpoints are not the best way to protect your VMs, and can easily be damaged and waste disk space, which affect the VM performance or even cause data loss. So, do you know what is the best way to protect your Hyper-V virtual machines?
The answer is Hyper-V backup. Not just backup once, but also taking regular backups. A good backup strategy can ensure your VM data security, save the storage costs, and maintain the business continuity.
Therefore, I will use AOMEI Cyber Backup, a free Hyper-V backup tool, to backup multiple Hyper-V virtual machines securely.
✦ Auto VM Backup: capable of automating backup tasks with its flexible strategies.
✦ Backup Multiple VMs: You can create and manage multiple VMs backups at the same time from the centalized console.
✦ Instant Disaster Recovery: instantly restore the whole virtual machine to the previous state from any selected history version.
✦ Easy-to-use: With the user-friendly interface, connect, create task, and protect will be completed with a few clicks .
✦ Role-Assignment: allow one administrator to create sub-accounts with limited privilege, effectively reduce administration cost and manual errors.
Please hit the button below to download and use AOMEI Cyber Backup for free:
*You can choose to install this VM backup software on either Windows or Linux system.
3 quick steps to schedule Hyper-V backups for free
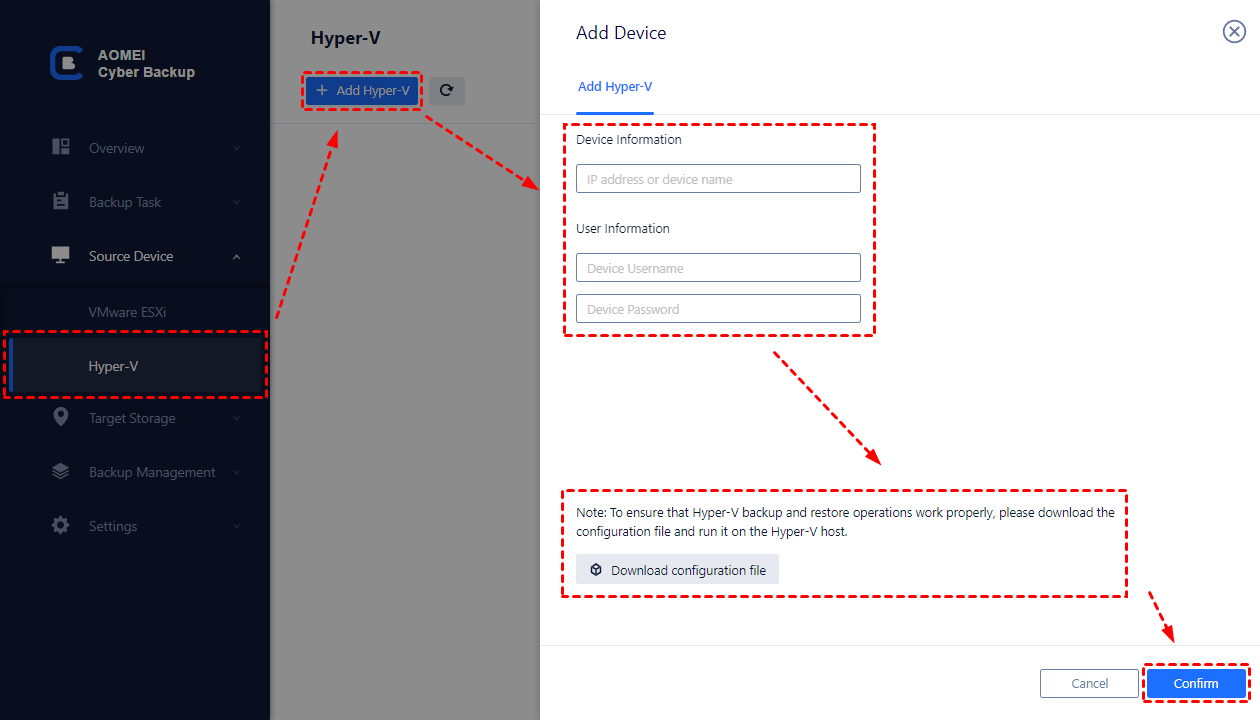
1. Bind Devices: Access to AOMEI Cyber Backup web client, navigate to Source Device > Hyper-V > + Add Hyper-V to add a host. And then click … > Bind Device.
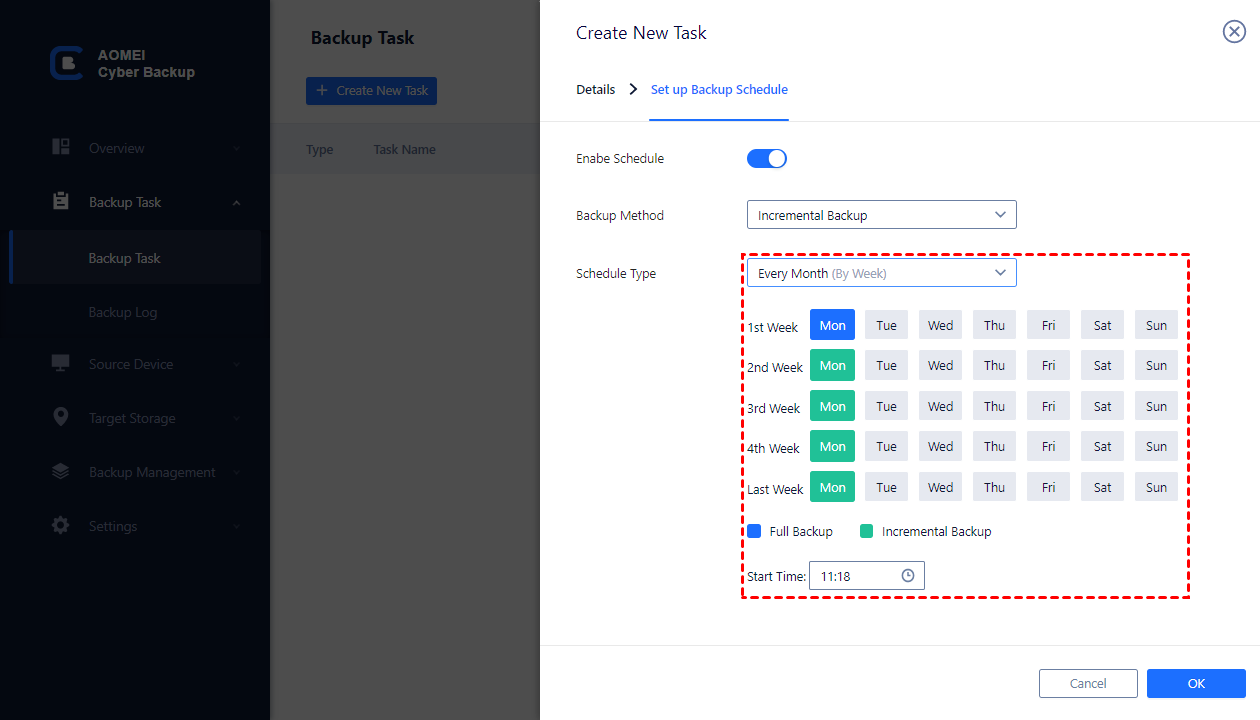
2. Create Backup Task: Navigate to Backup Task > + Create New Task, and then set Task Name, Backup Type, Device, Target and Schedule.
● Device: With AOMEI Cyber Backup, you can backup multiple VMs on the host at once.

● Target: Selecte to back up to a local path, or to a network path. Used paths will be saved in Favorite Storage for handy selection.
● Schedule: Choose to perform full or incremental backup, and automate execution daily, weekly or monthly according to the frequency you specified.
● Run Backup: Click Start Backup and you can select Add the schedule and start backup now, or Add the schedule only.
3. Click Restore: You can restore a VM to original host without any complicated reinstallation and configuration.
✍ While the Free Edition covers most of the VM backup needs, you can also upgrade to enjoy:
✦ Backup Cleanup: Configure retention policy to auto delete the old backup files and save storage space.
✦ Restore to new location: Easily make a clone of a virtual machine in the same or another datastore/host, without reinstalling or configuring a new VM.
Besides, AOMEI Cyber Backup also allows one top administrator to create sub-accounts with limited privileges as we mentioned before. For example, a Backup Operator that can only backup VMs and cannot perform restores, to avoid overwriting the existing VMs. This can further protect your VMs from mis-operations.
Summary
The Microsoft ecosystem is one that most people are very familiar with. Checkpoint in Microsoft Hyper-V is convenient and useful to allow you to roll a VM back to the original state quickly, but it is not the alternative of backup as we said before. To better protect your Hyper-V VM data, regular backups are still essential.
In this article I introduced a professional backup tool AOMEI Cyber Backup, that can automatically backup multiple Hyper-V VMs and clean old backups to save storage space.

