


How to Clone VM in Hyper-V Server | Import and Export
For Hyper-V Server update or data migration, it wastes a lot of time to recreate virtual machines and reinstall OS. So in this article, it introduces the efficient way to clone a server in Hyper-V.
By Crystal / Updated on September 5, 2022
Scenario to clone a VM in Hyper-V server
Hyper-V is provided by Microsoft to create virtual machines and first introduced in Hyper-V Server 2008 R2. With the scalability of Hyper-V, you can easily deploy a large number of virtual machines.
Anyone who's familiar with Hyper-V should know how to create a virtual machine. But if you've have a VM with some valuable data, and want to duplicate it in the same or another host, it would be troublesome to repeat the whole installation and configuration. Therefore, many users would like to clone VM in Hyper-V directly, with the applications include but not limited to:
- Make a copy of Hyper-V VM onto the same server
- Copy and create an identical VM onto another Hyper-V server
There are several ways to do so, but for convenience and security, I would recommend you to export and import Hyper-V virtual machine, or clone VM via backup & restore solution. Then, I will illustate how to clone a server in Hyper-V via the 2 methods.

Method 1. Clone VM in Hyper-V via export and import (built-in)
Export & import is an efficient method for Hyper-V server backup and cloning. With this feature, you can create a Hyper-V VM template including the configuration of software, VM CPU, RAM and other devices, which helps to deploy multiple virtual machines in Hyper-V.
Prerequisites of cloning VM in Hyper-V server
Before cloning a virtual machine in Hyper-V, please perform the following operation to ensure the success of the operation.
◆ Create a new Hyper-V VM with the newly installed operating system, configured software and patches.
◆ Use Sysprep to delete the machine’s SID and clear the information in the Windows registry so as to prepare the Hyper-V VM template.
◆ Delete all the existing Hyper-V checkpoints.
Export and import Hyper-V virtual machine (step-by-step)
Here, I will describe how to copy Hyper-V virtual machine using Export and Import feature.
Tips: If your Hyper-V not show up in system, please check the hardware requirements and OS first.
1. Open Hyper-V Manager, then right-click a virtual machine you want to clone.
2. Select Export to start cloning a virtual machine in Hyper-V.
3. Click Browse to locate the destination where you want to store the exported VM files. Then confirm Export to start the transferring process.
Note: You can also use the Export-VM cmdlet to clone a virtual machine in Hyper-V.
Export-VM -Name \ -Path \
4. After exporting the Hyper-V virtual machine, please continue to import the Hyper-V VM.
Select the Hyper-V host on which you want to deploy the VM. Right-click it and click Import Virtual Machine.
5. In the Locate Folder section, select the folder which contains the Hyper-V virtual machine to import.
6. Select the virtual machine to import and choose the import type as Copy the virtual machine.
7. Specify a location to store the new imported virtual machine. Review the information and click Finish. VM template is efficient to clone a server in Hyper-V.
Besides exporting Hyper-V VM, you can copy VHD manually, but it requires to change hostnames, the IP address (if a static IP address is used) and SID (system identifier) manually. In order to clone Hyper-V virtual machines more conveniently, using an effective backup & restore solution may save you a lot of effort.
Method 2. Clone VM in Hyper-V via backup and restore (easier)
If your virtual machine is running Windows OS, it already has backup solution built-in. For example, you can use Windows Server Backup to backup and restore a VM just as physical machine. However, the whole proccess is time-consuming and error-prone. For convenience and security reasons, it's best to use agentless backup solution.
Among the available choices, AOMEI Cyber Backup is one of the simplest one. It helps to back up numerous virtual machines simultaneously, and restore VM from any point to the same or another server. It will create an identical new VM automatically without any complicated reinstallation and configuration.
As an enterprise-level backup solution, it also offers you convenient, secure and continuous data protection:
Easy-to-use: Backup multiple virtual machines through central console and offers intuitive interface to perform the click-based operation.
Agentless Backup: Simply connect to VMware or Hyper-V host to manage all VMs without installing agent on each of them.
Automate VM backup: Schedule VM backup with flexible backup strategies and delete old backups automatically.
Restore from any point: Restore VM backup from any backed up point and easily restore the VM to the same or another server.
You can download it to enjoy a 30-day free trial, and follow the tutorial below to have a try:
*You can choose to install this VM backup software on either Windows or Linux system.
How to clone a VM in Hyper-V server via backup and restore:
1. After adding your Hyper-V server, click Backup Task >> Create New Task to make a VM copy.
2. Then you can configure the backup as you like within this interface.
◆ Enter Task Name and select Hyper-V Backup for an example.
◆ In Device Name section, select virtual machines on the host, and it allows you to backup multiple virtual machines simultaneously.
◆ In Schedule section, select full / incremental backup and specify the backup frequency by date / week / month.
◆ In Backup Cleanup section, set retention policies for each backup to delete old backups automatically instead of manual operation.
3. Click Start Backup to execute the operation. When it's complete, you can find the task in Backup Task tab, and click Restore to start cloning it.
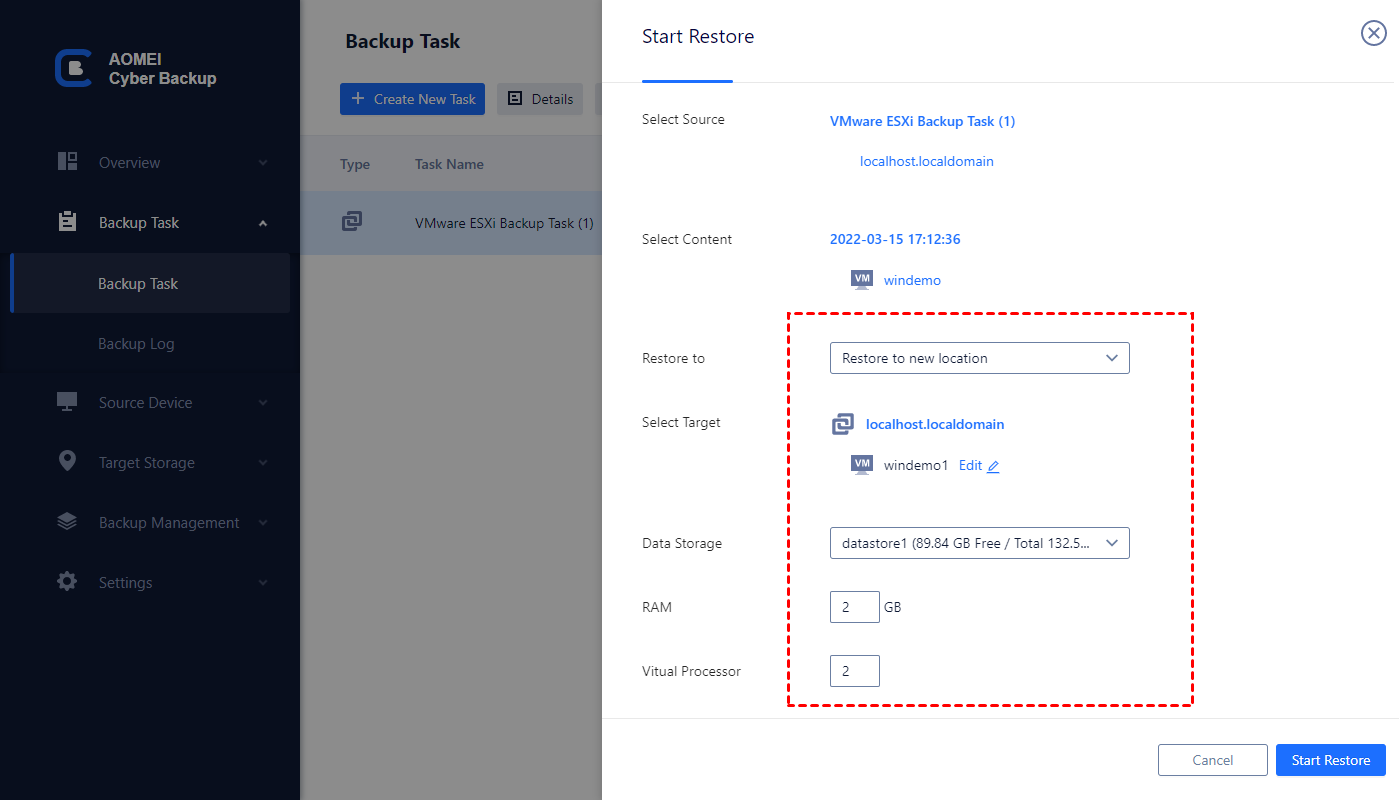
4. In the restore interface, you can Select Content (which VM to clone), and Select Target (which server to clone to). Then you can choose Restore to original location or Restore to new location.
To clone a VM in Hyper-V server, here you should choose the second one. It will create an identical new VM in the selected datastore and host. You can also set the new VM's Name, RAM and Virtual Processor.
This is how to clone a server in Hyper-V. In this way, you can easily copy VM to another datastore, move VM to another host, etc.
Summary
Exporting and Importing Hyper-V virtual machines helps to clone a server in Hyper-V. You can configure and export a VM template which can be used to deploy multiple virtual machines in Hyper-V fast. It’s time-saving and efficient to clone Hyper-V servers.
Besides, if you want to clone Hyper-V VMs more conviniently and securely, please try this professional backup software.

