


How to Copy and Transfer Files to Hyper-V VM (Easiest)
Is there a simple way to copy files to Hyper-V? Absolutely yes! In this article, it provides you several efficient ways to transfer files between host and virtual machine in Hyper-V environment.
By Crystal / Updated on July 19, 2024
Overview: Hyper-V Copy file to VM
Case: ESXI 6.7 - How can I add a physical hard disk to a virtual machine?
Hi All. What is the easiest way to copy a file into a Hyper-V VM from its host?
- Question from Quora
Hyper-V virtual machine is running in an isolated environment that is independent of physical machine. So, some users may wonder how to perform the following operations:
- Copy files from Hyper-V host to VM or VM to local machine
- Transfer folders and files between physical machine and virtual machine
- Transfer files between different Hyper-V VMs...
Next, I will introduce 6 ways to copy files to Hyper-V VM. If you want to auto copy files to Hyper-V VM periodically, or have several physical machines and VMs that you want to transfer files between, there is also a professional solution to try.
How to copy and transfer files to Hyper-V virtual machine [6 Methods]
Here are 6 effective ways to Hyper-V copy file to VM, and these methods can also be used in other scenarios, such as transferring files to Hyper-V virtual machine. If you are transferring non-system files and only want to make a one-time copy, then try any of the methods below.
🔰 Shared Folder
🔰 PowerShell cmdlet
🔰 Remote Desktop Protocol
🔰 Mount the VHD to the Hyper-V host
🔰 Enhanced Session Mode
🔰 Professional Third-party Tool [easiest]
Method 1. Transfer files to Hyper-V via shared network folder
In this way, you can copy files from host to Hyper-V VM via network share.
1. Create a folder in the Hyper-V host and put the files into this folder.
2. Right-click the folder, then select Properties >> Sharing >> Share. Add Everyone and change the Permission Level as Read/Write.
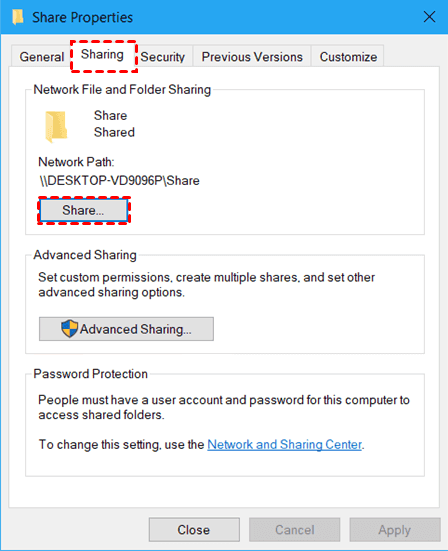
3. Click Share. Review the folder and copy the link of it. Select Done.
You have created a shared folder in the local machine. Then you should access to your Hyper-V to add the network location into virtual machine.
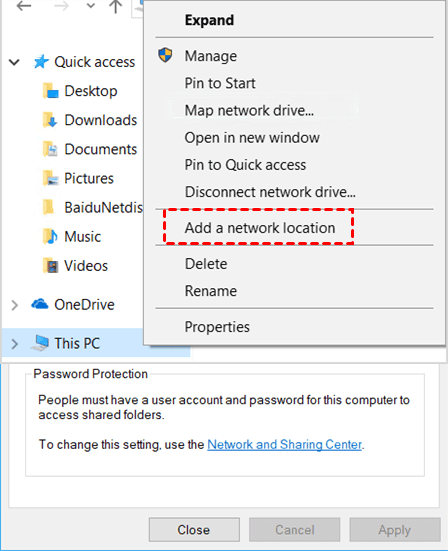
4. Open a Hyper-V virtual machine, open This PC, select Add a network location to this VM, and paste the path of the shared folder into the box, and click Finish.
Now you can easily copy Hyper-V files from host to VM or vice versa.
Method 2. Hyper-V copy files from host to VM via PowerShell cmdlet
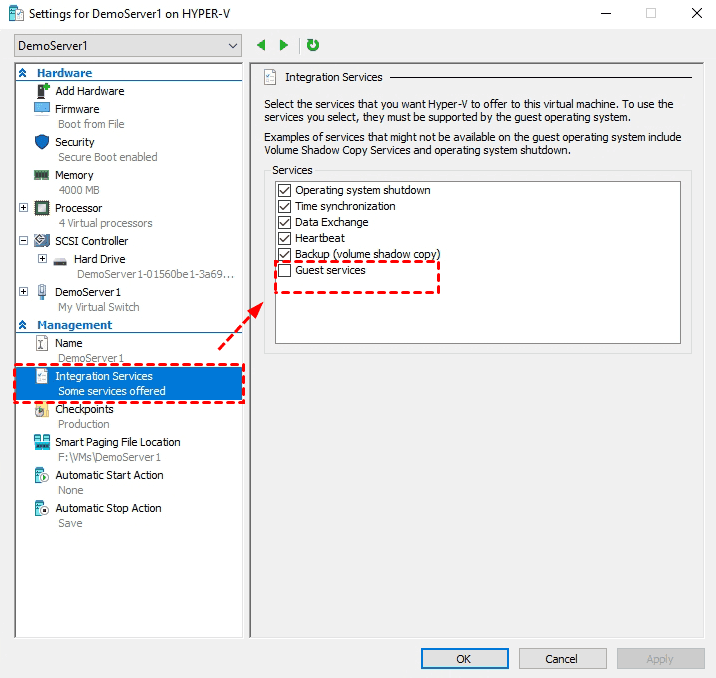
Before you start transferring files to Hyper-V virtual machine, please enable the Guest Services under Hyper-V Manager Integration Services.
You can copy the files from the host (source) to the guest Hyper-V virtual machine (destination) using this Copy-VMFile command.
PS C:\> Copy-VMFile "VMName" -SourcePath "F:\Test.txt" -DestinationPath "C:\Temp\Test.txt" -CreateFullPath -FileSource Host
Tip: The CreateFullPath parameter ensures creation of the destination folder inside the guest operating system if it doesn't exist.
If you need to copy a large number of files to a Hyper-V virtual machine, this method may not be very practical since the command will be error-prone and complicated for management.
Method 3. Hyper-V Copy files to Hyper-V VM via RDP
If your Hyper-V Server operates on a Windows machine with a graphical interface, you have the option to link to this host using Remote Desktop Protocol (RDP) and link your local machine's local disks. This permits the transfer of required files. To achieve this, activation of remote desktop connections on the destination server is necessary. This approach facilitates file copying to the Hyper-V server from another Windows-based physical or virtual machine.
To transfer files in Hyper-V via RDP (Remote Desktop Protocol), you can try these steps:
1. Access to Start menu, then navigate to Settings >> System >> Remote Desktop and enable Remote Desktop.
2. Run the Windows Remote Desktop client, whose location is %windir%\system32\mstsc.exe
Type mstsc in the command line or Run dialog and press Enter.
3. Enter the IP address or hostname of the remote computer and the username. Input the username, either in full format (e.g., domain\user or computer\user).

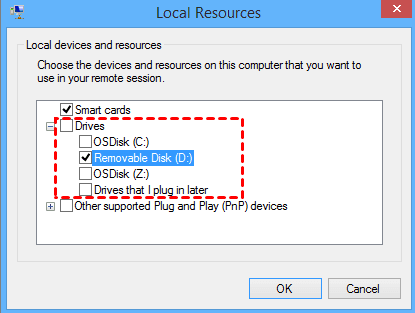
4. Go to the Local Resources tab and click on More.
5. Choose the local resources you want to map from your computer to the remote host. Under the "Drives" section, choose the specific disk drive you wish to map. For instance, if the needed files are on disk E:\ of your computer, select the disk E: for mapping during the RDP connection.
6. Confirm your choices by clicking OK to save the settings. Then click Connect to establish the remote desktop session.
7. Once the remote desktop session is active, navigate to My Computer / This PC in Windows Explorer. You'll observe the mapped disk drive from your local computer. Use this mapped drive to access the necessary files from your local machine and copy them to the Hyper-V host.
Please note that this approach can also be used for virtual machines (VMs) as long as they are connected to the network.
Method 4. Mount the virtual hard disk to host or guest machine
1. Shut down the virtual machine first, then go to mount the VHD to the Hyper-V host.
2. Locate the path of virtual disk file and right-click it, then select Mount. It will map the VHDX file as a local disk drive.
You can also use the command to mount a VHD virtual disk in PowerShell:
3. Copy the files to the virtual hard disk as you want. When completed, right-click the mounted disk drive and select Eject to dismount the VHD.
You can power on the virtual machine and access to the copied files in Hyper-V VM.
Method 5. Use enhanced session mode to copy files from host to VM
This method is simple to copy and redirect local devices and resources to guest VMs, and it allows a VM connection tool to connect to VMs using Remote Desktop Protocol (RDP). This feature doesn’t require network connection between Hyper-V host and guest VM and could be used in Windows Server 2022, Windows Server 2019, Windows 10, Windows 8.1, Windows Server 2016, Windows Server 2012 R2.
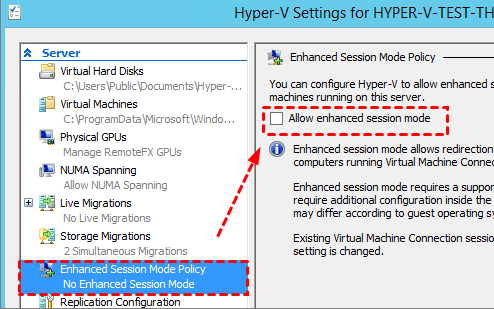
1. Enable Enhanced Session Mode Policy in Hyper-V Settings.
2. Right-click a VM and select Connect.
3. Select Show Options >> Local Resources >> More. Then select the drive that you want to use on the Hyper-V VM, and click Ok.
4. Back to the Display page, select Save my settings for future connections to this virtual machine. Then click Connect.
5. Access to This PC and locate to Redirected drives and folders to copy files to Hyper-V VM as you need.
Method 6. Easily copy files to Hyper-V VM via centralized backup software
Beside the 5 ways for Hyper-V coping file to VM, you can also use a professional and efficient tool for Hyper-V and recovery. For some enterprises who need to run large amounts of workloads, data security is also important for business. A robust enterprise-level software can safeguard the data and simplify the copying procedures.
Now, I will give you an example to copy files to virtual machine with AOMEI Cyber Backup. It can centrally manage backup & restore for multiple Windows physical and virtual machines on the network. For example, you can:
- Auto copy (changed) files from host to VM in real time, or vice versa
- Create a task to backup multiple VMs (computers) at once
- Create a system image from physical machine and restore it to VM, etc.
You can download and install AOMEI Cyber Backup on the host computer as the central console, and install the Agent package on all client computers & VMs. Then you can centrally create File Backup, Partition Backup, Disk Backup, System Backup, SQL Server Backup for all of them.
Download the 30-day free trial to try it out:
✍ How to copy files from Hyper-V host to VM with one central console
1. Add Hyper-V host to AOMEI Cyber Backup first, and install agent on computers/VMs.
2. Launch the backup tool, click Backup Task >> Create New Task.
>> To create a system/disk image and restore it to the VM, choose System Backup or Disk Backup accordingly.
>> Click Device to specify the computer to copy files from, then you can select the disk you need.
>> Select Target. Enter the path of the network share you created on the target VM and click OK.
>> To store backups to cloud, check the Archive box and enter your Amazon S3 credentials.
>> To auto copy files with a specific schedule, set up backup way as Full / Incremental Backup and schedule types as Daily, Weekly, Monthly.
🚩 Useful Tips (Optional)
If you want to auto copy files to Hyper-V VM at a certain frequency, you can perform Basic Sync, and set up the schedule and scheme as you like:
✦ On Backup Cleanup page, set up the retention policy to automatically remove history backup versions, saving storage space.
✦ On Email Notification page, enable it to receive email notifications when the task is abnormal or successful. It currently supports Gmail Server, Hotmail Server and Custom SMTP Server.
3. Then you can click Start Backup to create and execute the task. Similarly, you can copy files from Hyper-V VM to host, or VM to VM.
✍As a centralized backup software, it enables you to create a system/disk backup and restore it to another client computer (VM). This way you can also perform P2V or V2V easily. To resolve compatibility issues between different hardware, this's also a Universal Restore option.
Summary
This article introduces the convenient methods of Hyper-V copy files to VM. If you plan to transfer large amounts of host files in your production environment, trying this professional backup software is more economical and efficient.
Besides file backup, you can also perform disk backup to convert physical to VM in Hyper-V.

