


How to Convert Physical Machine to Hyper-V VM | P2V
If you have numerous physical machines and want to convert physical to Hyper-V VMs, there are some useful tools to achieve P2V migration. This article introduces the efficient ways to solve your problem.
By Crystal / Updated on June 4, 2026
Why to convert Hyper-V physical to virtual machine
The conversion of Hyper-V physical to virtual is also called Hyper-V P2V migration. For companies with many physical servers, converting physical to Hyper-V VM is necessary, since there are numerous benefits about Hyper-V P2V.
Facilitate migration: Migrate data from physical machine to Hyper-V VM without reinstallation and configuration.
Rationalize resource consumption: It utilizes hardware resources and reduces the unnecessary waste of resources.
Reduce hardware expenses: Converting physical to Hyper-V virtual machine can greatly reduce additional expenses in terms of hardware.
Simplify management: You can centrally manage multiple virtual machines through a central console.
Precautions about Hyper-V physical to virtual migration
When you convert physical machine to virtual in Hyper-V, you may confront common problems such as BSOD or licensing issues. These unpredictable issues may cause the conversion failed. So, before you prepare for conversion, please pay attention to the followings.
1. Make a full backup of the OS. If you delete or lose the necessary files while converting, you cannot restore to the original physical machine. So, it is crucial to back up system and useful files.
2. Delete useless drivers and files. Remove the unused divers and programs, it can help you reduce the possibility of BSOD and save the disk space.
3. Do not run physical and virtual machine (created by the physical machine) simultaneously. It may lead to network conflicts.
Tips: Make sure that the virtual machine is fully capable before you delete the physical machine.
How to convert physical to virtual in Hyper-V
When you get ready for Hyper-V physical to virtual machine, the next step is how to implement it. Generally, there are 2 methods in Microsoft for Hyper-V P2V including Microsoft Virtual Machine Converter (MVMC) and Disk2VHD. But now, MVMC is not available to download from Microsoft website, so in this article, I will explain how to convert a physical to virtual machine in Hyper-V using Disk2VHD.
If you want to convert Hyper-V physical to virtual more flexibly, you can also consider the backup and restore way.
Use Disk2VHD to convert physical to Hyper-V VM
Disk2vhd is a tool to create virtual hard disk of physical disk for Hyper-V virtual machine or Microsoft Virtual PC. It works to use Window’s Volume Snapshot feature to produce consistent point-in-time snapshots of the volumes of a physical machine. It allows you to run Disk2VHD on the system and use VHDs to create a new virtual machine conveniently.
Here are the detailed steps about converting physical to Hyper-V VM.
Convert physical machine to .VHDX file
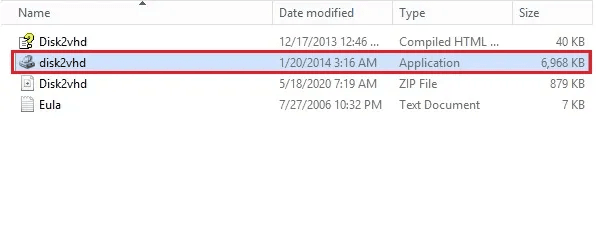
1. Download Disk2vhd, then unpack the Disk2vhd and execute it on the physical machine you want to convert.
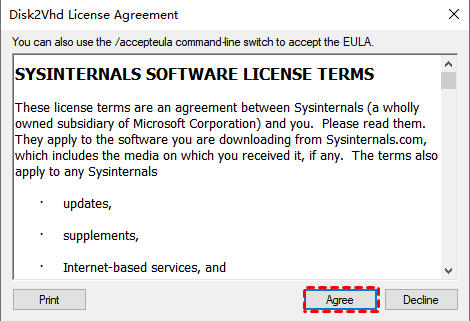
2. Click Agree in the Disk2Vhd license agreement page.
3. Select Use Vhdx and Use Volume Shadow Copy. Then click “…” to select a destination for the created .VHDX file and choose the volumes you want to convert. Click Create.
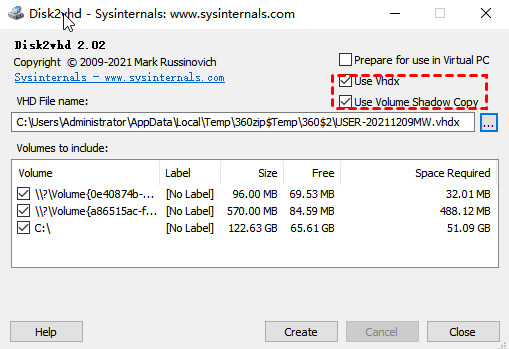
Tip: Ensure that there is sufficient space for required storage, otherwise the conversion will fail to start.
4. Start converting disks to VHDX format, and the converting process may take a while.
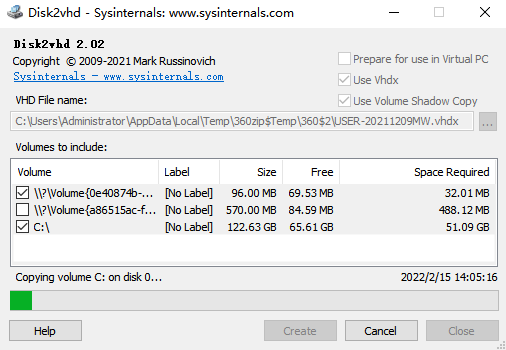
5. When you notice that Disk export to VHD completed successfully, you can click Close to finish it.
6. Navigate to the destination folder of virtual machine .VHDX file. Copy the file to the Hyper-V VM folder.
Create Hyper-V virtual machine using the .VHDK file
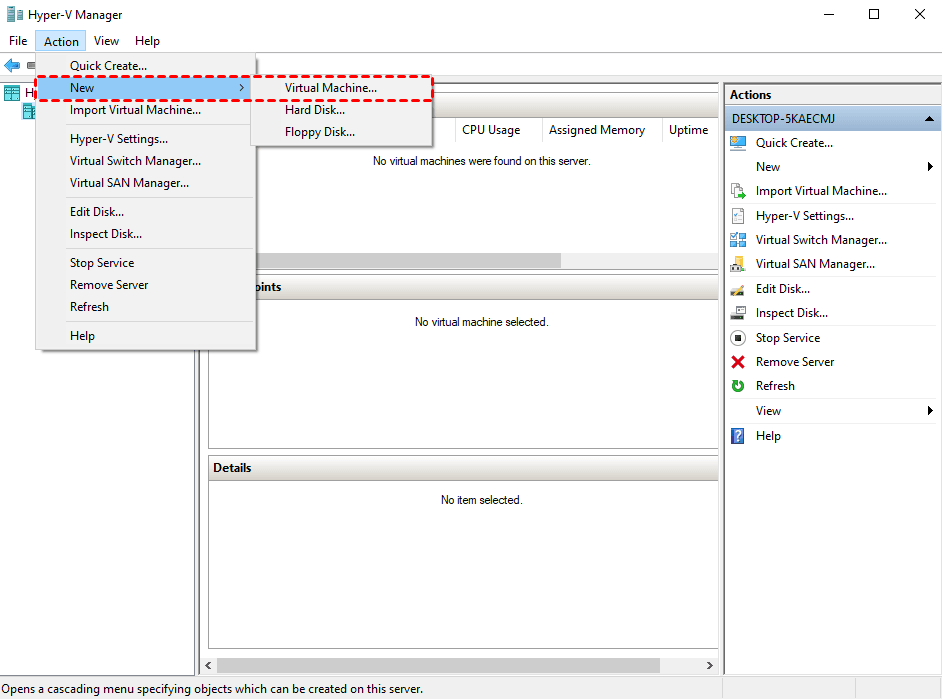
1. Access to Hyper-V manager. Click Hyper-V host >> New >> Virtual Machine to create a new VM.
2. Click Next to create a virtual machine with a custom configuration.
3. Specify Name and Location: Enter a name for the virtual machine.
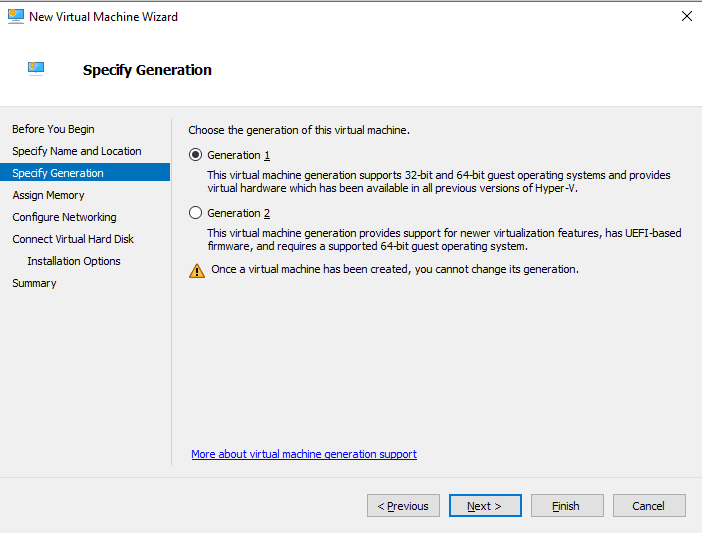
4. Specify Generation: Choose the generation as Generation 1 or Generation 2. It is recommended to select Generation 1 for VM. Generation 2 is first used in Windows 2021 R2, it doesn’t support a guest OS older than Windows 8, and only for Windows 8/8.1 or Windows Server 2012/2012 R2 and only for 64-bit builds. So, you’d better choose Generation 1 unless you are 100% sure you need to use Generation 2.
5. Assign Memory: Specify the amount of memory of the VM. You can also select Use Dynamic Memory for this virtual machine which will reassign RAM automatically.
6. Configure Networking: Configure the network adapter for virtual machine or keep it disconnected.
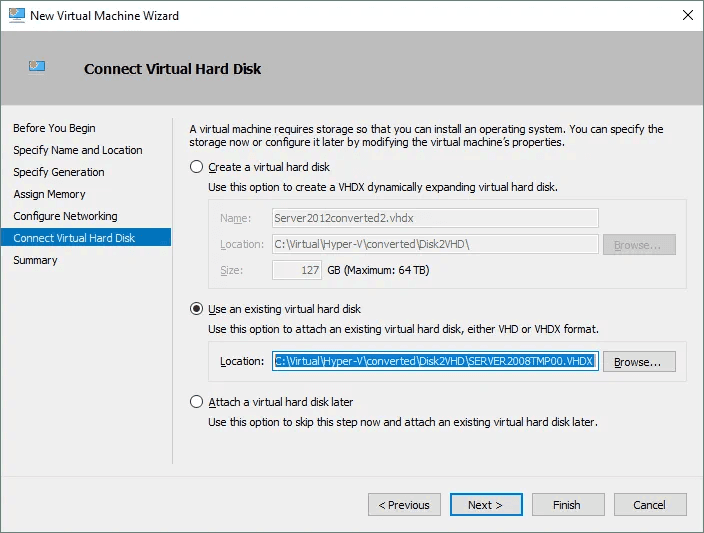
7. Connect Virtual Hard Disk: It comes the crucial step to click Connect Virtual Hard Disk. Select Use an existing virtual hard disk and click Browse to find the location file. Click Next.
8. Check all information are correct, click Finish.
You can navigate to Hyper-V VM and right-click the virtual machine to start it.
Use backup and restore way to perform Hyper-V P2V flexibly
Besides Disk2VHD, you can take a backup and restore way for data migration. The advantage of this is that you have the flexibility to choose what data you want to migrate (systems, partitions or files) from physical to virtual machine. And after the migration is complete, you can continue using this backup & recovery solution for daily physical and virtual data protection.
The software I use here is AOMEI Centralized Backupper. It can centrally back up any physical or virtual machines running Winodws OS, and the supported backup options including File Backup, System Backup, Disk Backup, Partition Backup and SQL Server Backup. For instance, if you want to perform Hyper-V p2v entirely, you can create a disk backup of the physical machine, and retore it to the VM.
This software also includes some useful options such as backup comment, compression, encryption, email notifications, schedule backup, automatic backup cleanup, etc.
You can experience these features with this 30-day free trial:
*Please install ACB on the computer you want to use as the central console, then install the Agent package on all client computers to backup. In the case of P2V, you can first create a VM with Windows OS (and assign a separate IP to it), and install Agent on it. Then, launch ACB and Request Control over all the network connected computers (VMs) you want to manage.

Thus, all the selected clients will receive the remote control request. Once they Agree to the apps, you can create backup tasks for these computers from the central console.
Steps to perform Hyper-V P2V via backup and restore:
1. Click Task >> New Task >> Disk Backup.
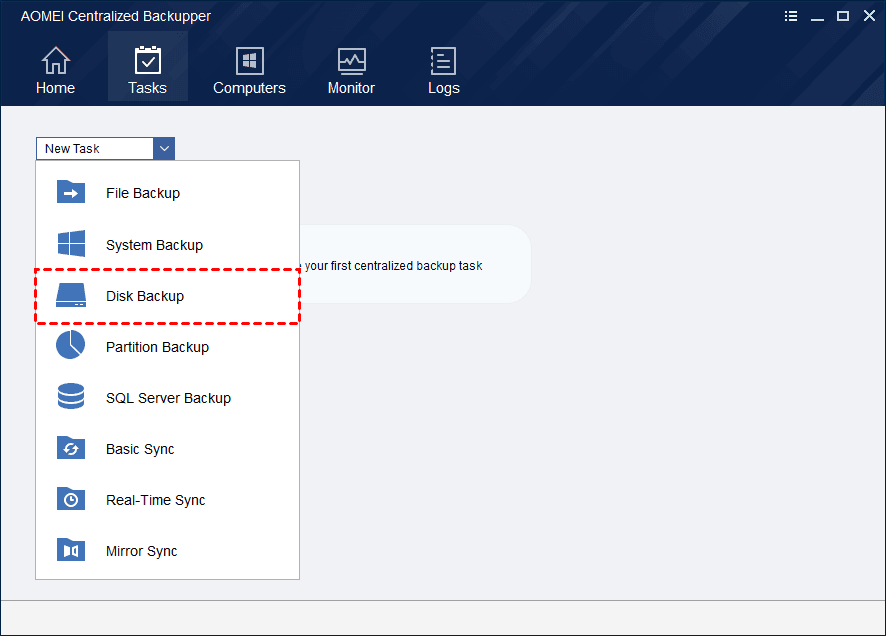
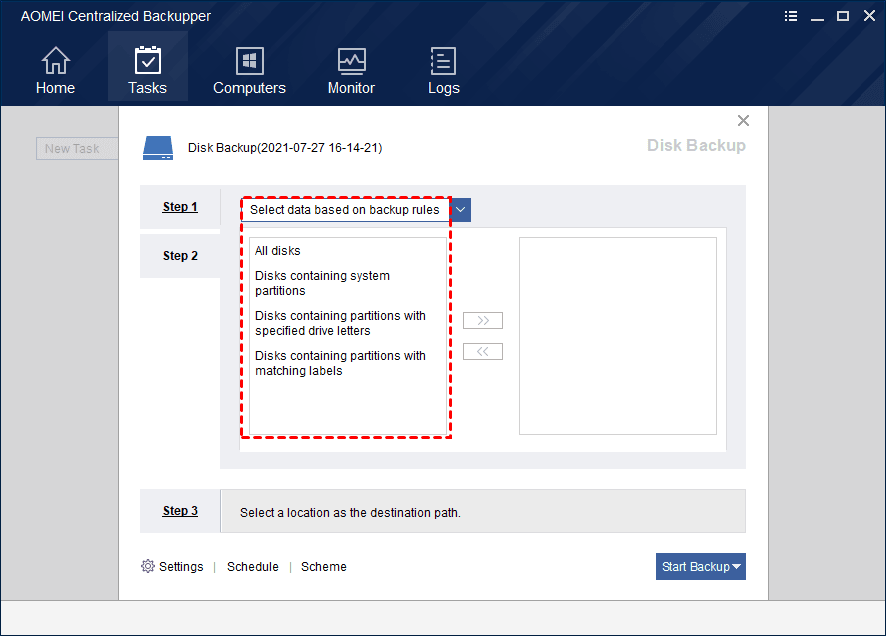
2. Type a task name, and click Add Computers to select the physical machine you want to backup. Then you can Select data based on the client or Select data based on backup rules.
3. Select a network location (NAS or share folder) as the destination to save the backup image, then click Start Backup to create and execute the task.
✎Tips: According to your needs, you can manage more backup Settings, set up automatic backup Schedule, or create a retention policy in Scheme.
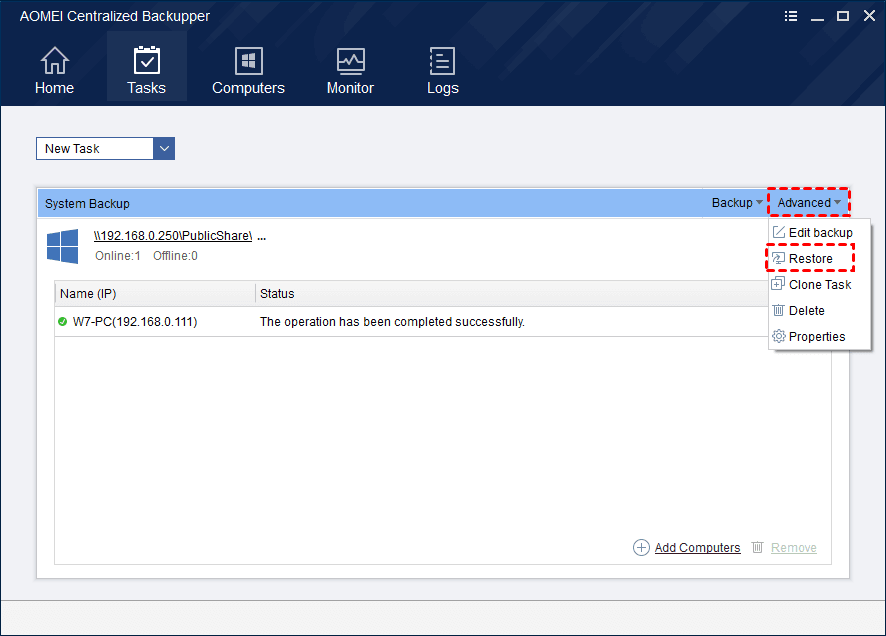
4. Find the created backup task in the Tasks tab. Click Advanced on the top-right corner, and then select Restore.
5. Follow the on-screen prompts to proceed, and choose Restore to another computer when asked. You can select the Hyper-V virtual machine you created on the same network as the target.
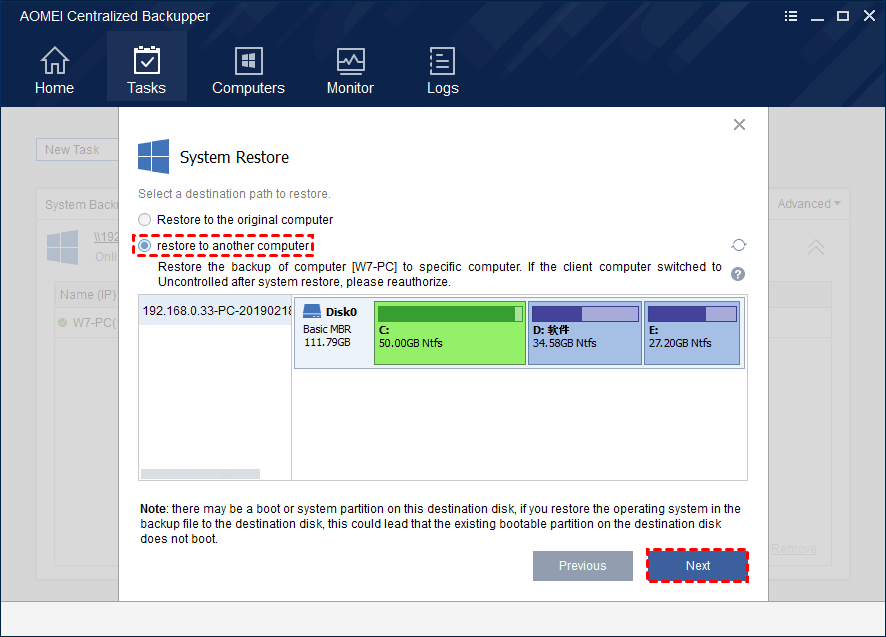
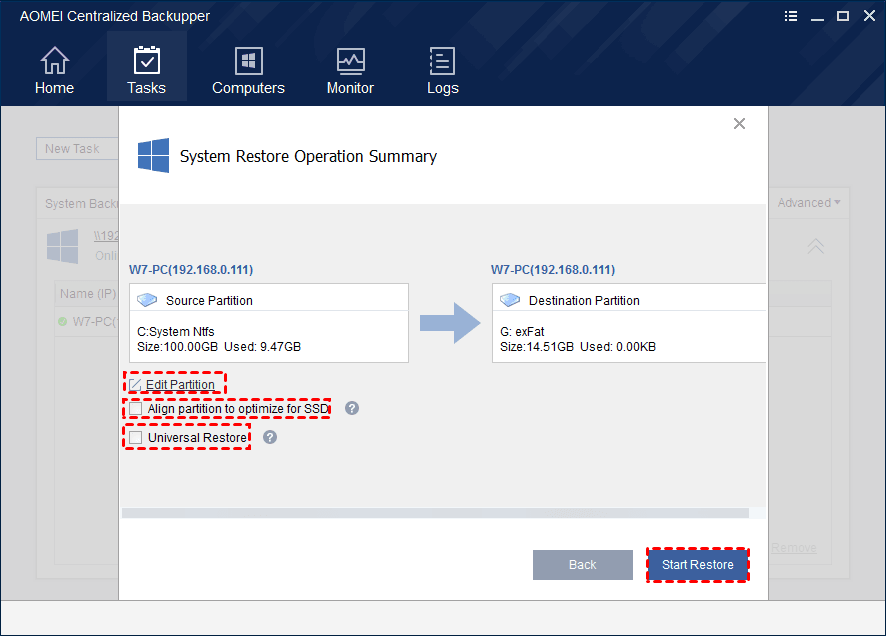
6. Preview the operations and choose advanced settings as needed. If you want to restore only one system drive, there is an Edit Partition option that allows you to change drive letter, partition type, and adjust partition size. If you restore the system to dissimilar hardware, it is recommended to check the Universal Restore option.
Then, click Start Restore to execute the operation. When it's finished, your Hyper-V p2v migration is also complete.
Summary
Disk2VHD can convert Hyper-V physical to virtual disk efficiently, it improves utilization of hardware resources and saves problems for reinstalling and configuring a new VM.
For enterprise with numerous physical servers, you can also use this professional software to perform centralized backup when performing Hyper-V P2V.

