


How to Perform Hyper-V Live Migrations Step by Step (2 Cases)
If you want to move Hyper-V VM to another server with minimized downtime, maybe Hyper-V Live Migrations is the feature you are looking for. In this article, I will introduce this feature with 3 ways to perform it.
By Crystal / Updated on July 1, 2024
Does Hyper-V support Live Migration?
Business continuity is a critical concern especially for enterprises, and any downtime may bring considerable costs. When it comes to Hyper-V migration, many users would also like to move running virtual machines from one host to another without causing downtime, which is so called live migration.
Luckily, Microsoft does offer a Hyper-V Live Migration feature in Windows Server. It offers great flexibility, so that running virtual machines are not dependent on a single host. Especially when used with Failover Cluster, Hyper-V live migrations permits a high-availability and fault-tolerant system.
So today, I will give a brief introduction, as well as a step-by-step guide to Hyper-V Live Migrations.
How does Hyper-V Live Migration work
To summarize, Hyper-V Live Migrations minimizes the VM transfer time by pre-copying the VM memory to the destination server. It works in a process like the following:
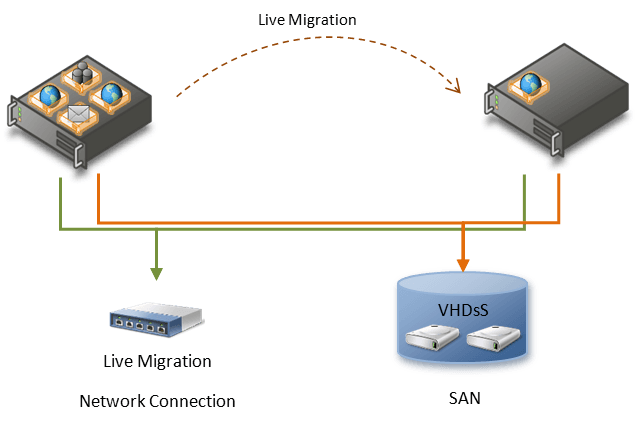
① When initiating a Hyper-V Live Migration, the source server will first create a connection with the destination server, and transfer configuration files to set up a skeleton Hyper-V VM replica.
② Then the memory assigned to the migrating VM will be copied to the destination server. During this process, if you changed the memory page on the running VM, they will be tracked and marked as modified.
③ The migration continues, now it’s time for copying the remaining modified memory pages. The more pages modified, the longer the migration will take, until there’s nothing to copy. In addition, the network bandwidth available between the source and destination servers is also critical to the speed of the Live Migration.
④ Now the last thing that need to be copied to the destination server is the source VM’s state. Powering off the VM and the Hyper-V Live Migration completes. Restoring the VM on the destination server, if it runs successfully, then all traces of the modified pages will be removed.
Live Migration vs Quick Migration in Hyper-V
Quick Migration is only supported by Hyper-V Failover Cluster Manager. With it, there is a small possibility of waiting and service interruptions when accessing virtual machines. The duration of the interruption and the speed of the migration is determined by the capacity of your network and the program you are using.
![]() In comparison, Quick Migration involves the suspension of your virtual machine. If the application running in your VM can handle this, then this is adequate; Live Migration can move a VM without downtime, which is better for workloads that require a particular state, or run a business that cannot be interrupted.
In comparison, Quick Migration involves the suspension of your virtual machine. If the application running in your VM can handle this, then this is adequate; Live Migration can move a VM without downtime, which is better for workloads that require a particular state, or run a business that cannot be interrupted.
Requirements for Hyper-V Live Migration
There are different types of Hyper-V live migrations, such as migration in a cluster, migration using shared storage, or migration with no shared infrastructure. But there are some common requirements for any form of live migration:
✤Two or more servers running Hyper-V that:
- Support hardware virtualization.
- Use processors from the same manufacturer, such as all AMD or all Intel.
- Belong to either the same Active Directory domain, or to domains that trust each other.
✤Virtual machines must be configured to use virtual hard disks or virtual Fibre Channel disks (no physical disks).
✤It's recommended to use an isolated network, physically or through another networking technology such as VLANs for live migration network traffic.
For more details, you can refer to Microsoft document.
Requirements for Live Migration without Failover Clustering
Previously, Hyper-V Live Migrations required related technologies such as Hyper-V Failover Cluster Manager and System Center Virtual Machine Manager. But starting with Windows Server 2012, Hyper-V Live Migrations now can work without Failover Clustering as well. But there are some extra requirements besides the basic ones:
- Hyper-V role in Windows Server 2016 or 2012 R2 installed on the source and destination servers.
- Virtual Machines running on the host must be with Version 5 or higher.
- Hyper-V management tools must be installed on Windows Server 2016 or Windows 10.
Must-step: enable Live Migrations on Hyper-V hosts
To get started, you need to first enable live migrations on the Hyper-V host. Let's see how to do it.
How to enable Live Migration on Hyper-V:
1. Launch Hyper-V Manager, right-click on the name of the host and select Hyper-V Settings…

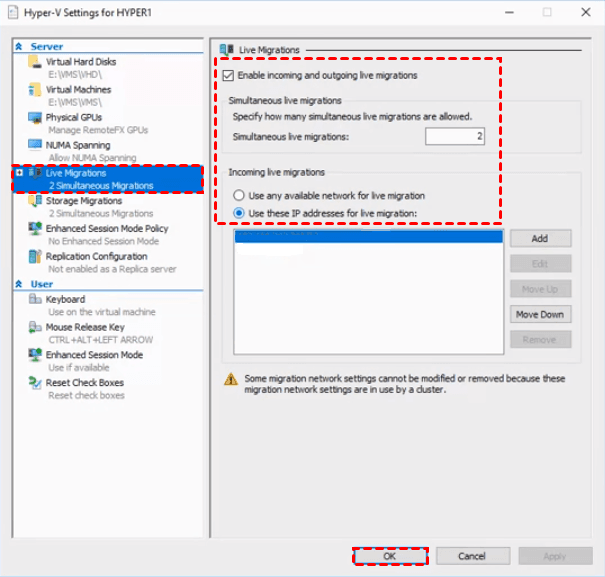
2. Navigate to Live Migrations from the left inventory, and then check the Enable incoming and outgoing live migrations option.
3. Specify Simultaneous live migrations, and select Use any available network for live migration or Use these IP addressed for live migration.
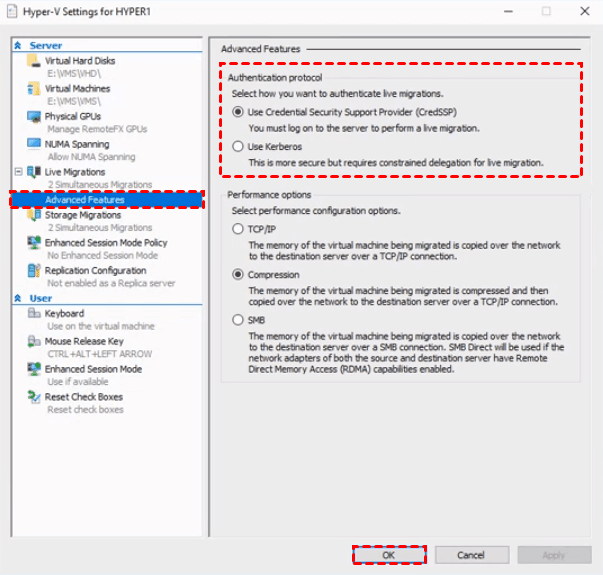
4. Expand Live Migrations and select Advanced Features from the left inventory, select what protocol you want to use to authenticate live migrations.
Case 1. Hyper-V Live Migrations with Failover Cluster Manager
As mentioned above, Live Migration is often used in conjunction with Failover Clustering to achieve high-availability and fault-tolerant system. Here's how to perform Hyper-V Live Migration with Failover Clustering.
1. Launch Failover Cluster Manager from Server Manager, navigate to Roles from the left inventory.
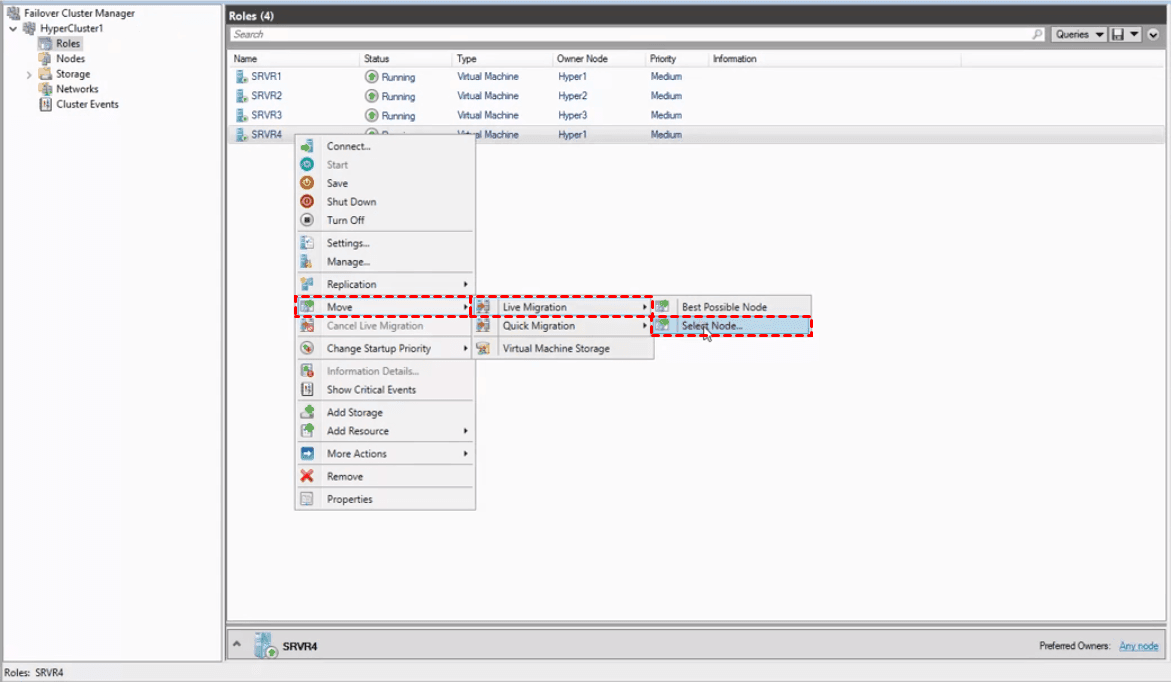
2. Right-click on the name of the source VM and select Move > Live Migration > Select Node…
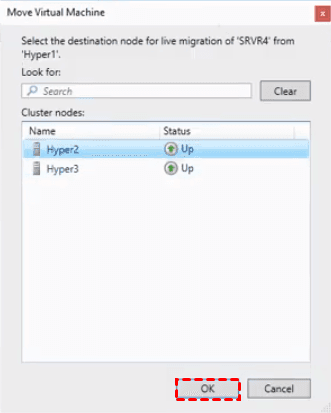
3. Select the destination node for the live migration in the pop-up window, click OK to confirm. You can check the progress in Information.
Case 2. Hyper-V Live Migrations without Failover Clustering
In this section, I will introduce 2 ways to move a VM by Hyper-V live migrations without Failover Clustering. If your Windows Server and host version can met the requirements, then you can try them.
Way 1. Use Hyper-V Manager to live migrate a VM
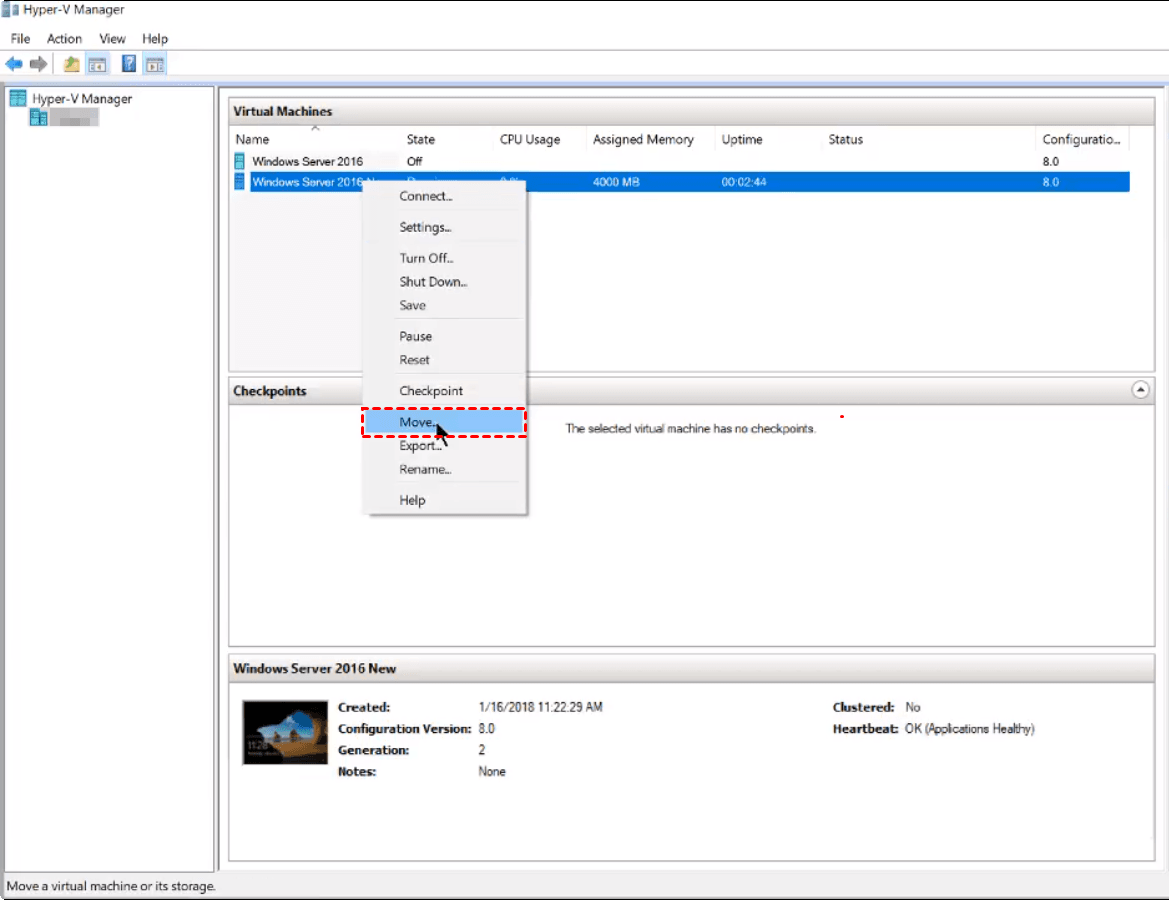
1. Launch Hyper-V Manager, and select the source host from the left inventory.
2. Right-click on the name of the source VM and select Move to open the Move Wizard.
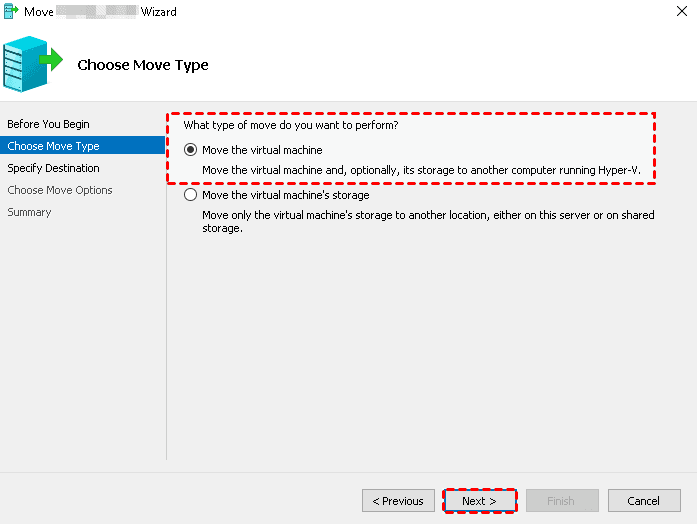
3. Select Move the virtual machine option and click Next to continue.
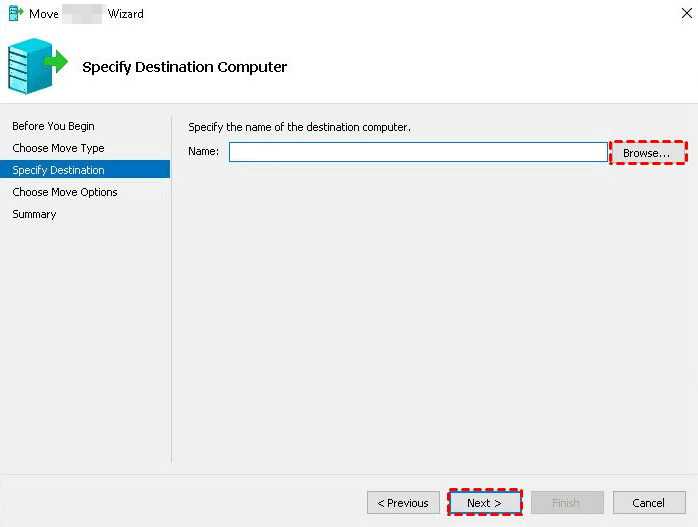
4. Specify the name of the destination node.
5. Review the settings on Summary page, and then click Finish to start live migration.
Way 2. Move a running VM via PowerShell
Using the Move-VM cmdlet you can also move a running VM to a destination server, and move the virtual hard disks and other files with it.
Here is an example of moving a running VM called MyVM to a destination server called Host1, and moving the virtual hard disks and other files such checkpoints and Smart Paging files, to the D:\MyVM directory on the destination server.
PS C:\> Move-VM MyVM Host1 -IncludeStorage -DestinationStoragePath D:\MyVM
An easier solution for regular Hyper-V VM protection (FREE)
Performing Hyper-V Live Migrations can assure unexpectable VM failover and minimizes downtime. However, it is not economical as it represents at least 2 servers and storage costs, especially if your downtime costs are much lower than this.
So for day-to-day virtual machine protection, virtual machine backup may still be the most simple and economical choice. Here I'd like to introduce a free Hyper-V backup software - AOMEI Cyber Backup. It offers you:
✦ Agentless Backup: create complete and independent image-level backup for VMware ESXi and Hyper-V VMs.
✦ Automation: create backup schedules to automate virtual machine protection.
✦ Hot Backup: you can back up virtual machines while running to avoid the downtime.
✦ Automated Execution: automate daily, weekly, or monthly backups and notified by email.
✦ Restore Entire VM: restore immediately available VMs from any selected restore points.
✦ Perpetual Free: you can use AOMEI Cyber Backup Free Edition with no time limit.
You can click the following button to download the freeware.
*You can choose to install this VM backup software on either Windows or Linux system.
3 easy steps to create automatic backup tasks of multiple VMs
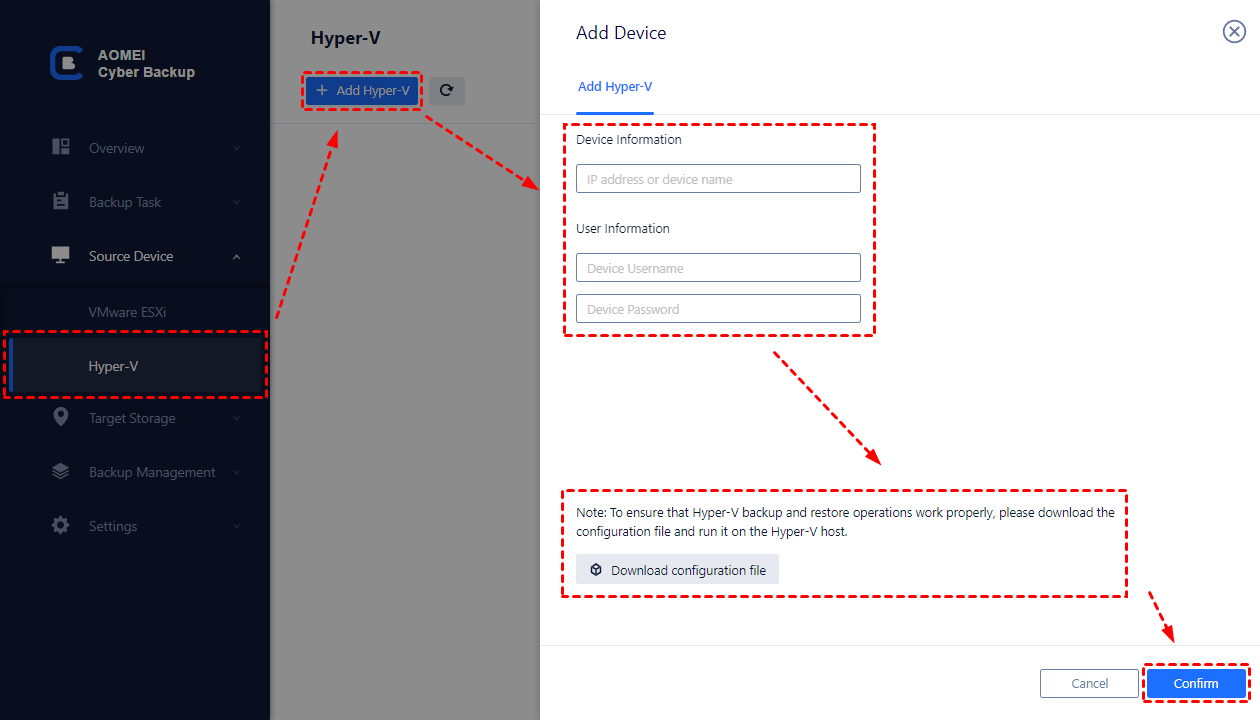
1. Bind Devices: Access to AOMEI Cyber Backup web client, navigate to Source Device > Hyper-V > + Add Hyper-V to add a host. And then click … > Bind Device.
✎Tip: Besides Hyper-V, you can also add devices of VMware ESXi 6.0 and all later versions.
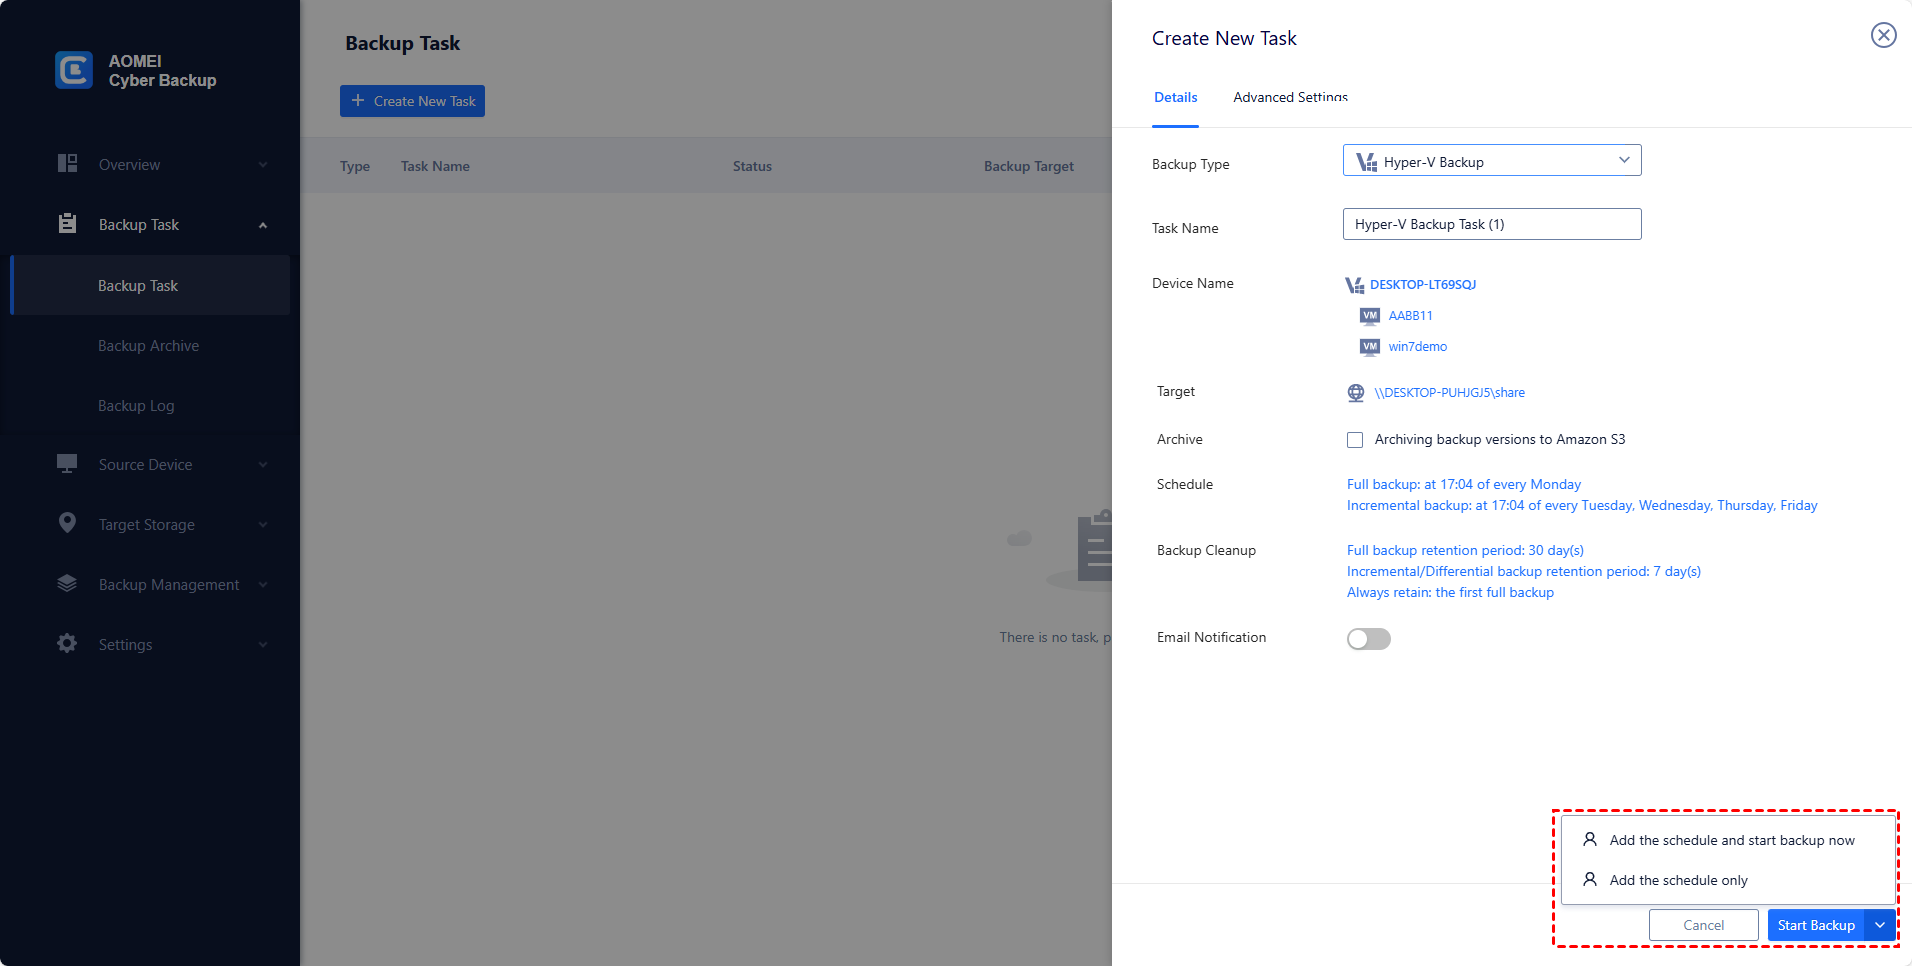
2. Create Backup Task: Navigate to Backup Task > + Create New Task, and then set Task Name, Backup Type, Device, Target, and Schedule.
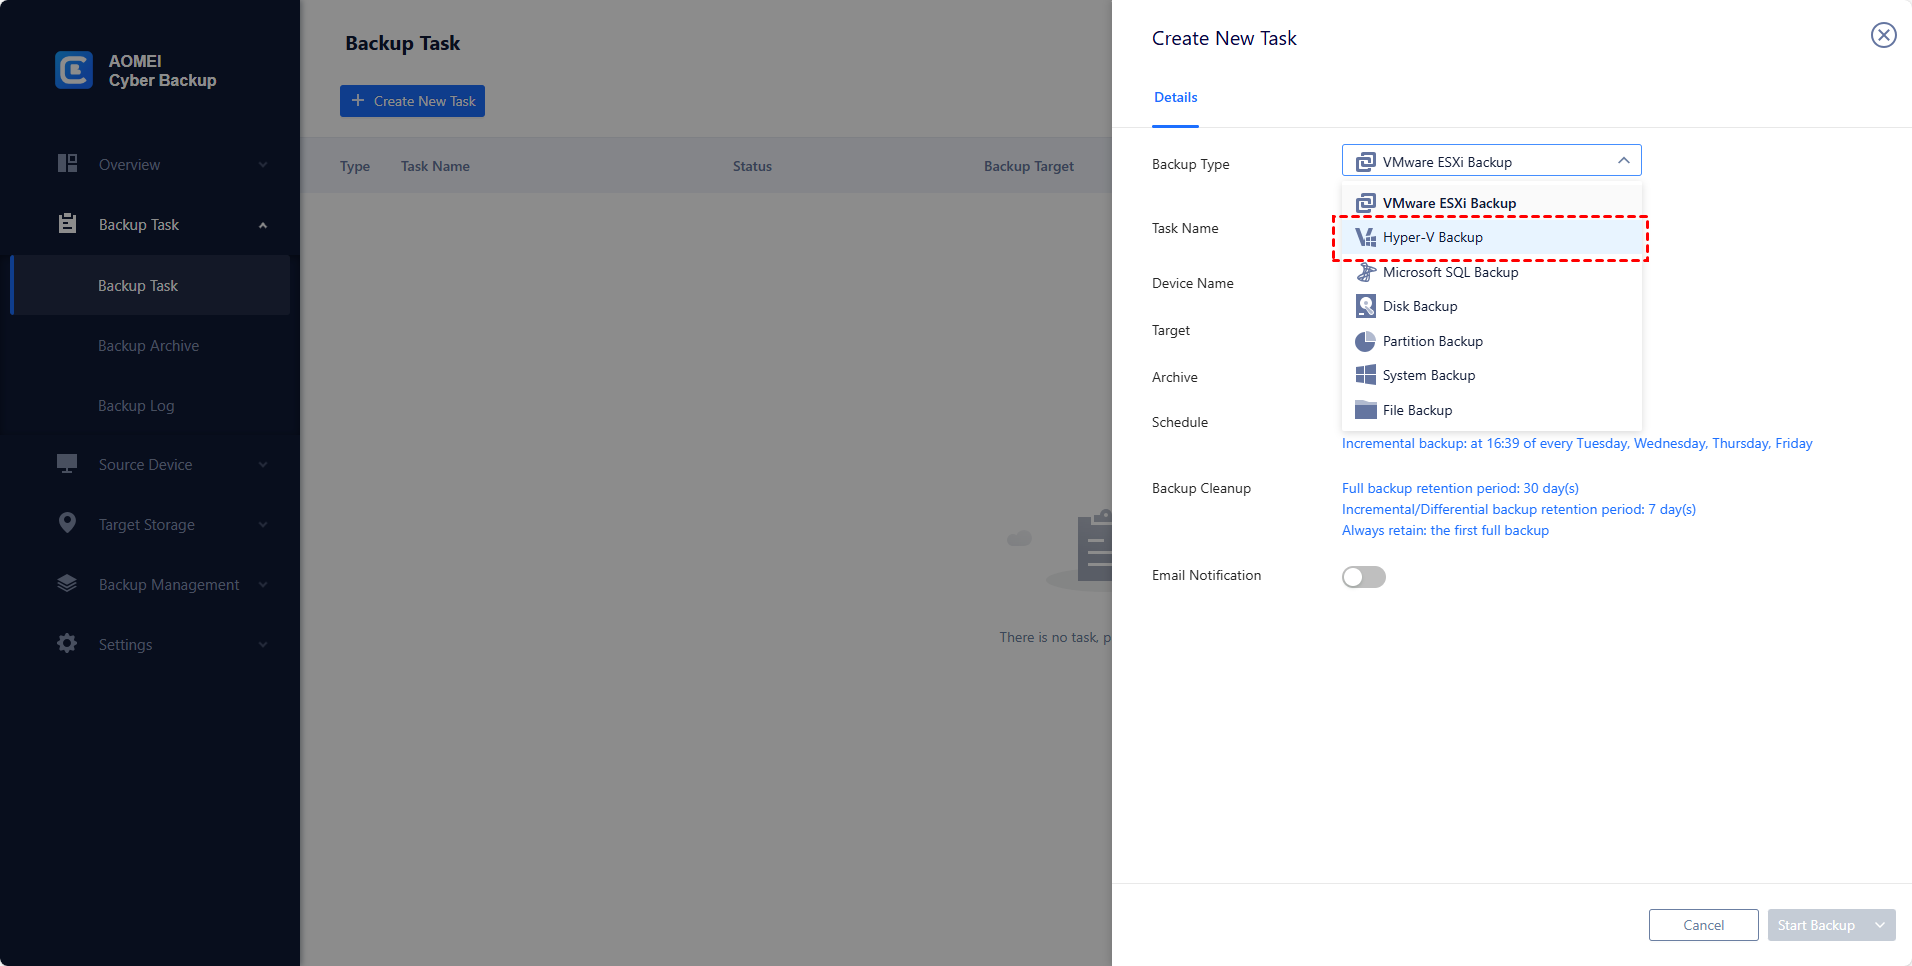
- Device: select VMs on the host to backup in one backup task.
- Target: You can select to back up to a local path, or to a network path. Used paths will be saved in Favorite Storage for handy selection.
- Schedule: You can choose to perform full or incremental backup, and automate execution daily, weekly or monthly according to the frequency you specified.
- Archive: You can add an AWS S3 storage and enable the archive feature. Then this backup files will be saved to the S3 storage.
3. Start Backup: You can select Add the schedule and start backup now, or Add the schedule only.
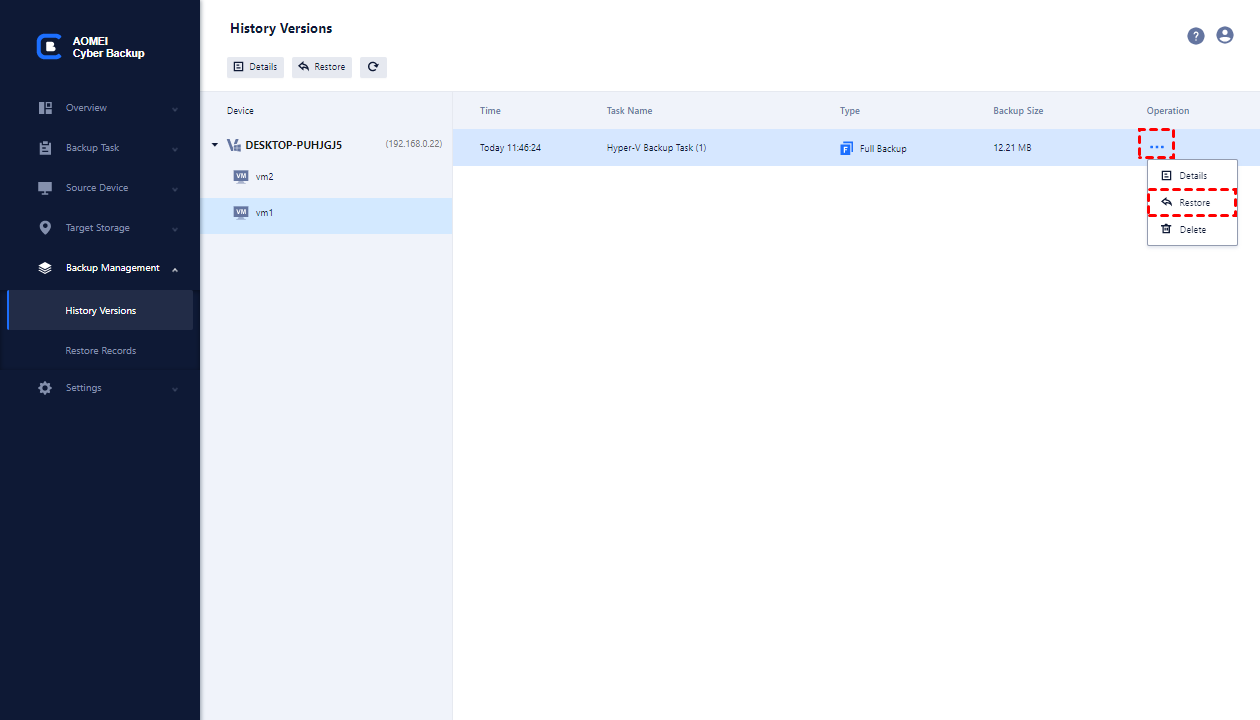
Restore Hyper-V VM from any history version of the backup
The created backup tasks will be listed and monitored separately, for progress checking and schedule changing. You can also choose to Restore from them any time you need.
If you've backed up the VMs for several times, you can simply choose a history version to restore, thus recover you VM to an earlier state precisely.
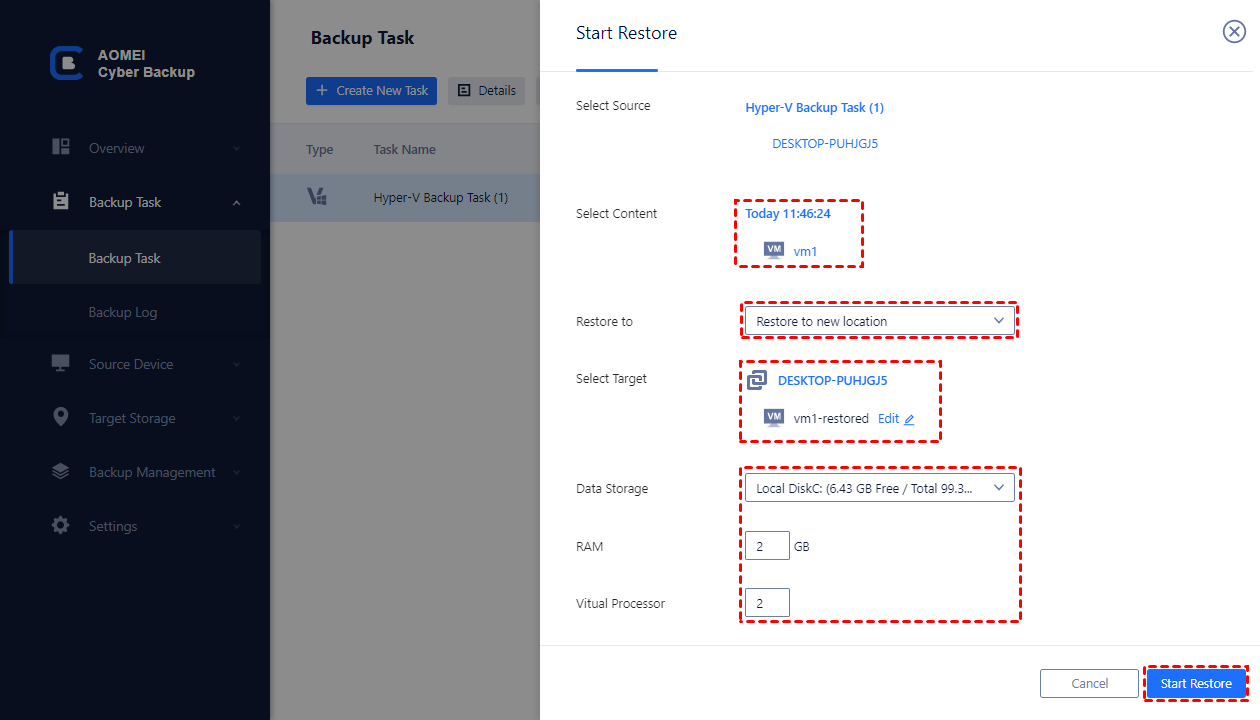
![]() As you know, live migration can be achieved by hot backup and off-site restore. AOMEI Cyber Backup also provides an advanced feature to help you do so - you can upgrade to enjoy the Restore to new location option, which enables you to create an identical VM from the backup to the same or another datastore/host without any complicated configuration. You can also change the RAM and Vital Processor according to your needs.
As you know, live migration can be achieved by hot backup and off-site restore. AOMEI Cyber Backup also provides an advanced feature to help you do so - you can upgrade to enjoy the Restore to new location option, which enables you to create an identical VM from the backup to the same or another datastore/host without any complicated configuration. You can also change the RAM and Vital Processor according to your needs.
Summary
Hyper-V Live Migrations minimizes downtime by pre-copying VM memory to another server. In this article, I introduced what is Hyper-V Live Migrations feature, with detailed steps of 3 ways to move Hyper-V VM to another server using it.
However, it is still not a good replacement to backup Hyper-V VMs, for its server and storage costs. Maybe VM backups suit you more if your downtime costs are much lower than this.

