


How to Clone VM on VMware ESXi with or without vCenter
If you want to create an exact copy of the VM to use as a secure test environment, then there is no better feature than cloning. In this article, I will introduce you how to clone VM on VMware ESXi using vCenter Server, or without vCenter.
By Crystal / Updated on July 22, 2024
Can you clone VM in VMware ESXi?
One of the useful features provided by ESXi is the ability to clone VMs. Cloning a VM creates an identical copy of an existing virtual machine, including its configuration, operating system, and installed applications.
Cloning VMs in ESXi offers several benefits. It allows you to quickly deploy multiple instances of a VM without the need to manually install and configure each one. This can be especially useful for tasks such as creating development or testing environments, deploying virtual appliances, or setting up virtual desktop infrastructure.
Currently there are 4 ways for VMware ESXi clone VM.
- A complicated process on VMware ESXi web client: If you don’t have vCenter Server, VMware ESXi also allows you to clone VM without vCenter, on its web client instead, but with more complicated steps.
- Another complicated method to clone VMs without vCenter: Using the ESXi command line is an additional way to clone virtual machines on an ESXi host without the need for vCenter Server.
- The built-in clone feature provided by vCenter Server: VM Cloning is a simple process with the vCenter Server’s clone wizard. But vCenter Server itself requires additional license.
- An easier and centralized feature on third-party software: Third-party software such like AOMEI Cyber Backup usually centralized VM cloning feature at a more economical price, and have easier steps.
![]()
Way 1. VMware ESXi clone VM without vCenter
This part introduces how to clone virtual machine without vCenter. It will take a little more steps than using vCenter's method.
Note: Before you begin, please commit all snapshots and power off the target VM to create a consistent copy.
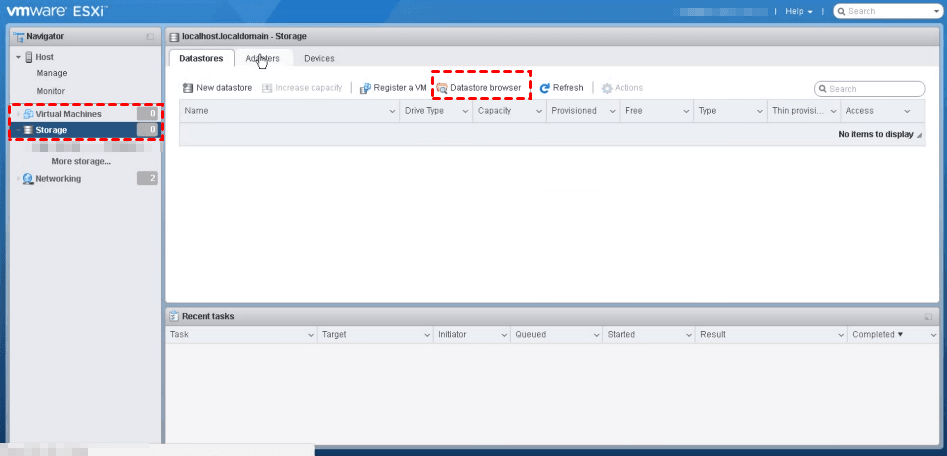
1. Access to vSphere Web Client, click Storage in the left inventory, and then click Datastore browser on toolbar.
2. In the pop-up window, click Create directory, and provide a Name for new VM.
3. Confirm and back to the Datastore browser window. Go to the folder where stores the disk files of the original VM. You can find where they are by right-clicking on the VM name and select Edit settings.
Select the .vmx file and .vmdk file, then click Copy on toolbar to copy them separately to the folder you just created.
Close Datastore browser window, and you can see the progress in Recent tasks.
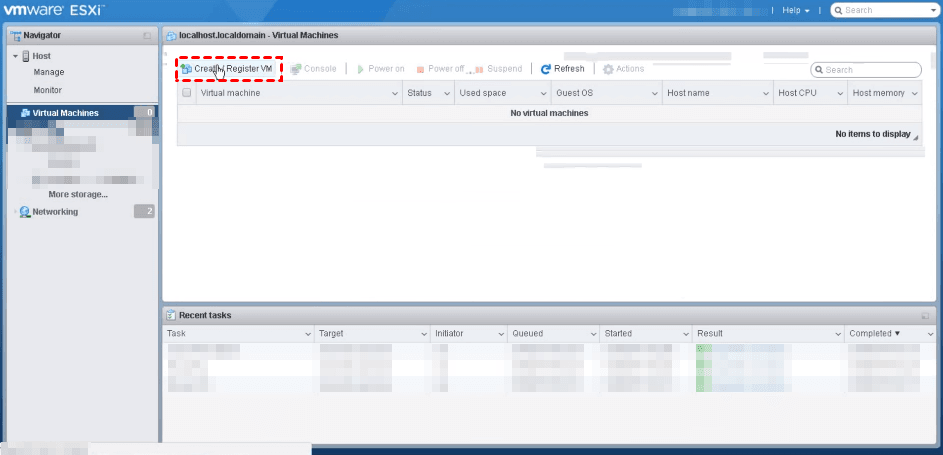
4. Click Virtual Machines in the left inventory, and click Create/ Register VM on toolbar to open the wizard.
5. On Select creation type page, select Register an existing virtual machine, and click Next.

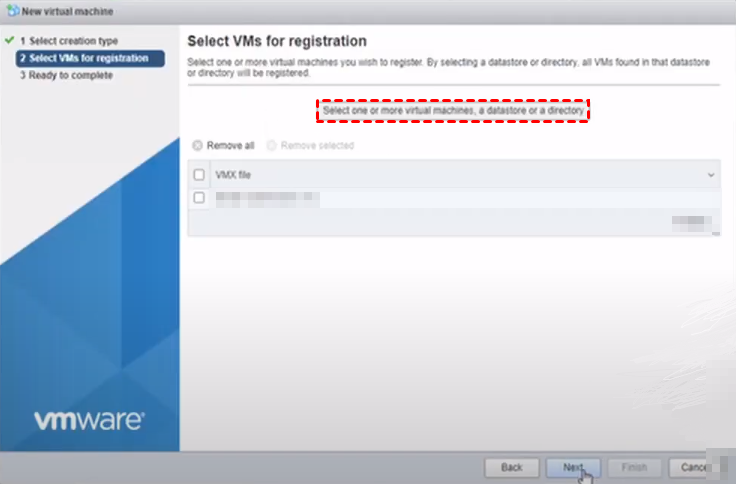
6. On Select VMs for registration page, click Select one or more virtual machines, a datastore or a directory, and select the newly created folder. Click Next.
7. On Ready to complete page, click Finish to close the wizard.
8. Back to Virtual Machines, now you can see there is one newly copied VM with the same name as the old one. That’s because the name comes from the .vmx file. You can right-click the VM and Rename it.
9. Select and Power on the newly created virtual machine. There will be pop-up window, select I copied it and click Answer.
This is how VMware ESXi clone VM on web client. Please note that you cannot change the storage policy if you clone an encrypted virtual machine.
Although VMware ESXi web client provides only the most basic functionality, it can actually meet many special needs if one is willing to put in the effort. For example, vmware esxi clone VM from snapshot.
Way 2. Clone VMware ESXi VM using command line
If you are familiar with command line, you can also clone ESXi VM with the command line. Below is an example to show you how it works:
Step 1. SSH into your ESXi host and create a directory to hold your new clone
#mkdir /vmfs/volumes/datastore1/Host2
Step 2. Clone your Host1 VM to Host2
#vmkfstools -i /vmfs/volumes/datastore1/Host1/Host1.vmdk /vmfs/volumes/datastore1/Host2/Host2.vmdk -d thin
Step 3. Register the virtual machine in ESXi
# vim-cmd solo/registervm /vmfs/volumes/datastore1/Host2/Host2.vmdk
Remember to modify these ESXi clone VM command lines accordingly.
As you can see, while vCenter Server needs additional license, VMware ESXi clone VM without vCenter Server requires more complicated steps. Therefore, in the next part I will present an easier tool with an economical pricing, namely AOMEI Cyber Backup.
Way 3. VMware ESXi clone VM using vCenter Server
This part introduces how to clone a VM in Center. If your virtual machines are managed vCenter you can use this method.
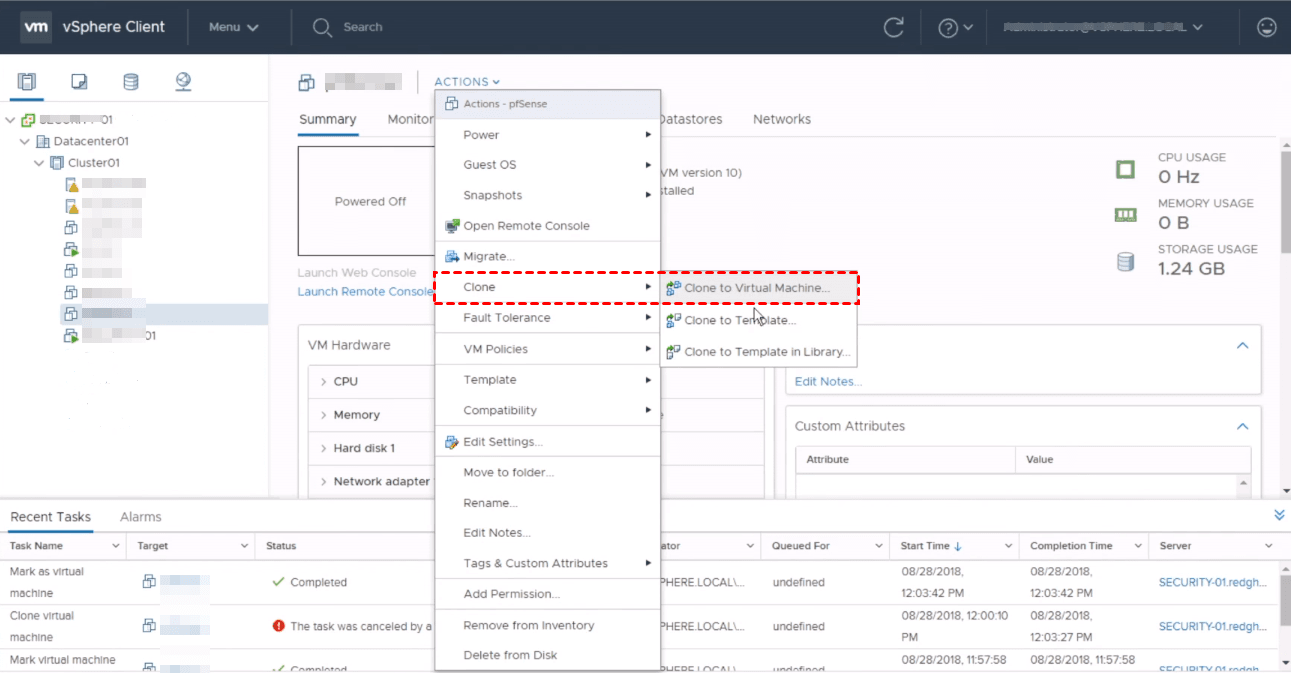
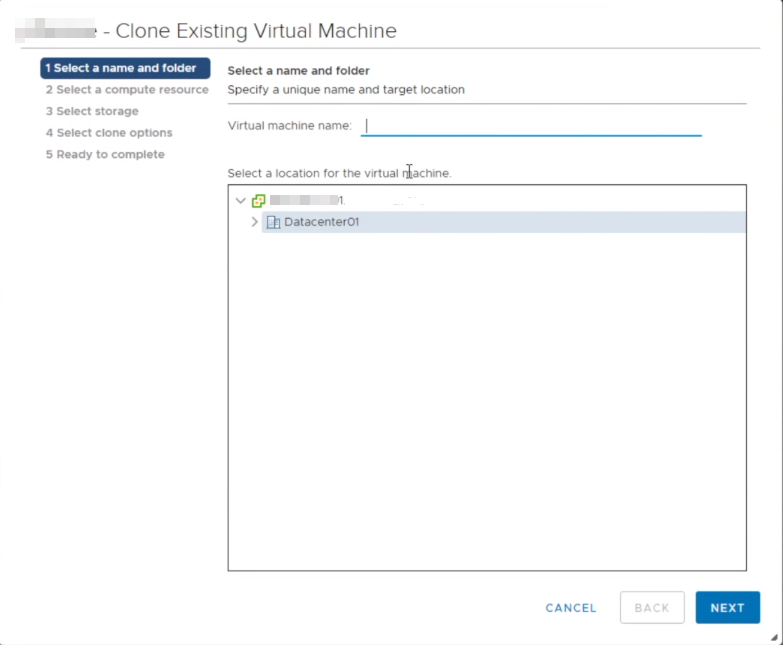
Step 1. Access to vCenter Client, right-click on the VM name and select Clone > Clone to Virtual Machine to open the wizard.
Except for this option, you can also select Clone to Template… or Clone to Template in Library.
Step 2. Provide a Name and select a destination datastore folder location for the new VM. Then click Next.
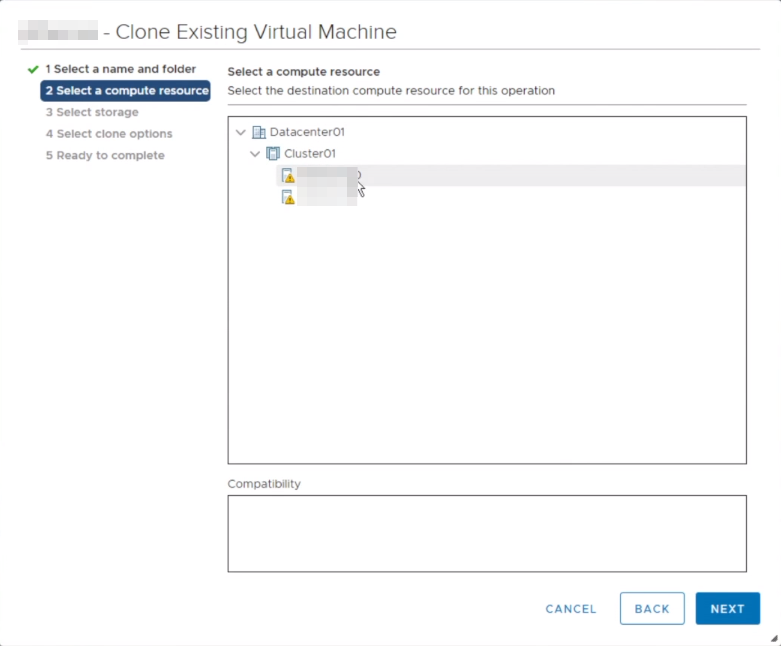
Step 3. Select a destination host for the new VM, click Next.
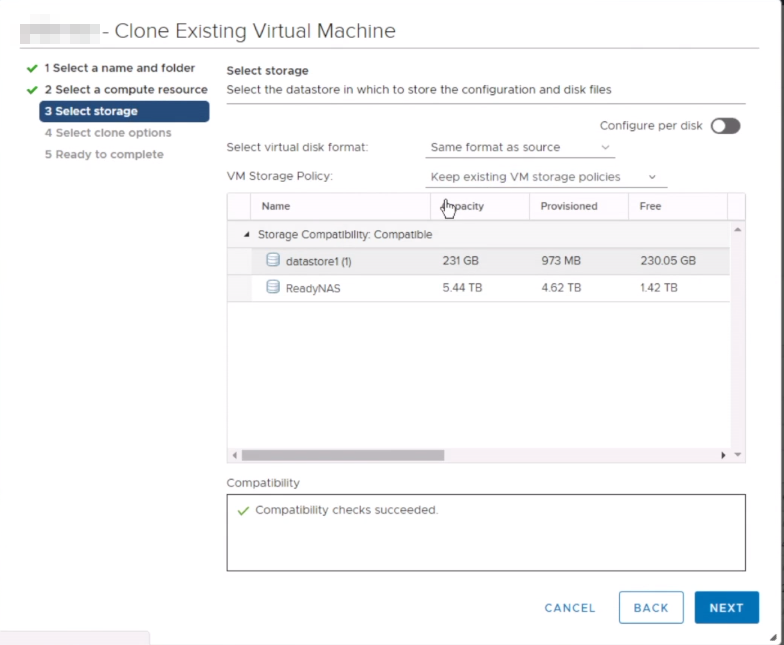
Step 4. On select storage page, Select virtual disk format as Same format as source, and VM Storage Policy as Keep existing VM storage policies. And then select a datastore location to store the VM files. Click Next to continue.
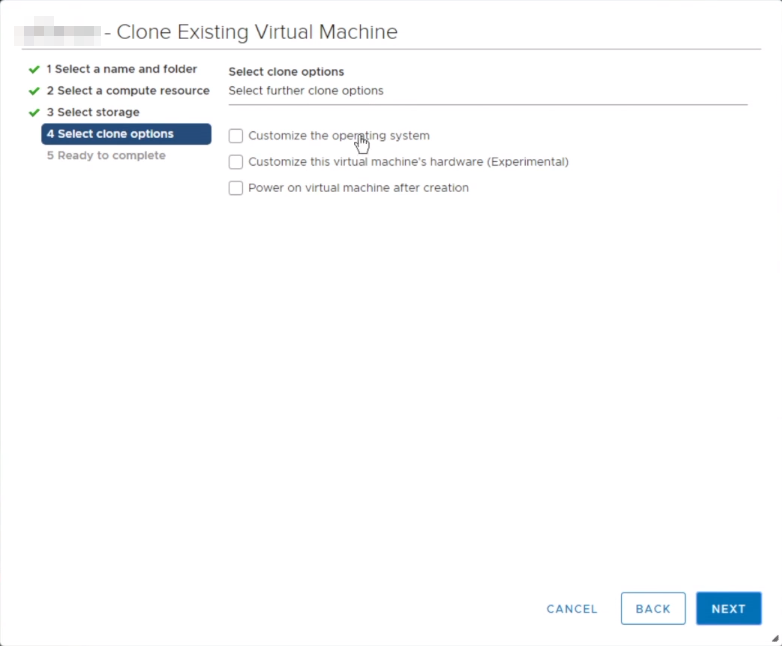
Step 5. Select further clone options, you can customize the operating system, the VM’s hardware, or select whether to power on the VM after creation. Click Next.
Step 6. Review your selections and click Finish to start. You can see the progress in Recent Tasks.
Way 4. Clone ESXi VM with a backup and restore tool (easier)
As you can see, while vCenter Server needs an additional license, VMware ESXi clone VM without vCenter Server requires more complicated steps. Therefore, in the next part, I will present an easier tool called AOMEI Cyber Backup.
AOMEI Cyber Backup's backup and restore feature allows you to create the same virtual machines on the original or another host, with even easier steps than cloning. Compared to the mentioned methods of cloning, it owns additional advantages such as allowing you to perform hot backup VMware virtual machine while running.
- Easy to use: With the user-friendly interface, connect, create task, and protect will be completed with a few clicks.
- Agentless backup: It can hot back up multiple VMs in transit or at rest all at once.
- Support Free ESXi: support both paid and free versions of VMware ESXi.
- Batch VM Backup: batch backup large numbers of VMs managed by vCenter Server or standalone ESXi hosts.
- Schedule backup tasks: It can automatically back up the whole VM and notify by email.
- In-place & out-of-place restore: You can backup a VM and restore it to the same or another datastore/host.
You can download and install the free trial to experience these features and get the exclusive upgrade discount:
*You can choose to install this VM backup software on either Windows or Linux system.
Steps to clone ESXi VM via AOMEI Cyber Backup
Step 1. Launch AOMEI Cyber Backup, navigate to Source Devices >> VMware >> Add VMware Device and enter the required information to add vCenter or Standalone ESXi host as the source device. Then click Confirm.

Step 2. Click Create New Task on the backup task page, and do as follows:
☞ Task Name: enter a backup task name.
☞ Backup Type: choose VMware ESXi Backup or Hyper-V Backup accordingly.
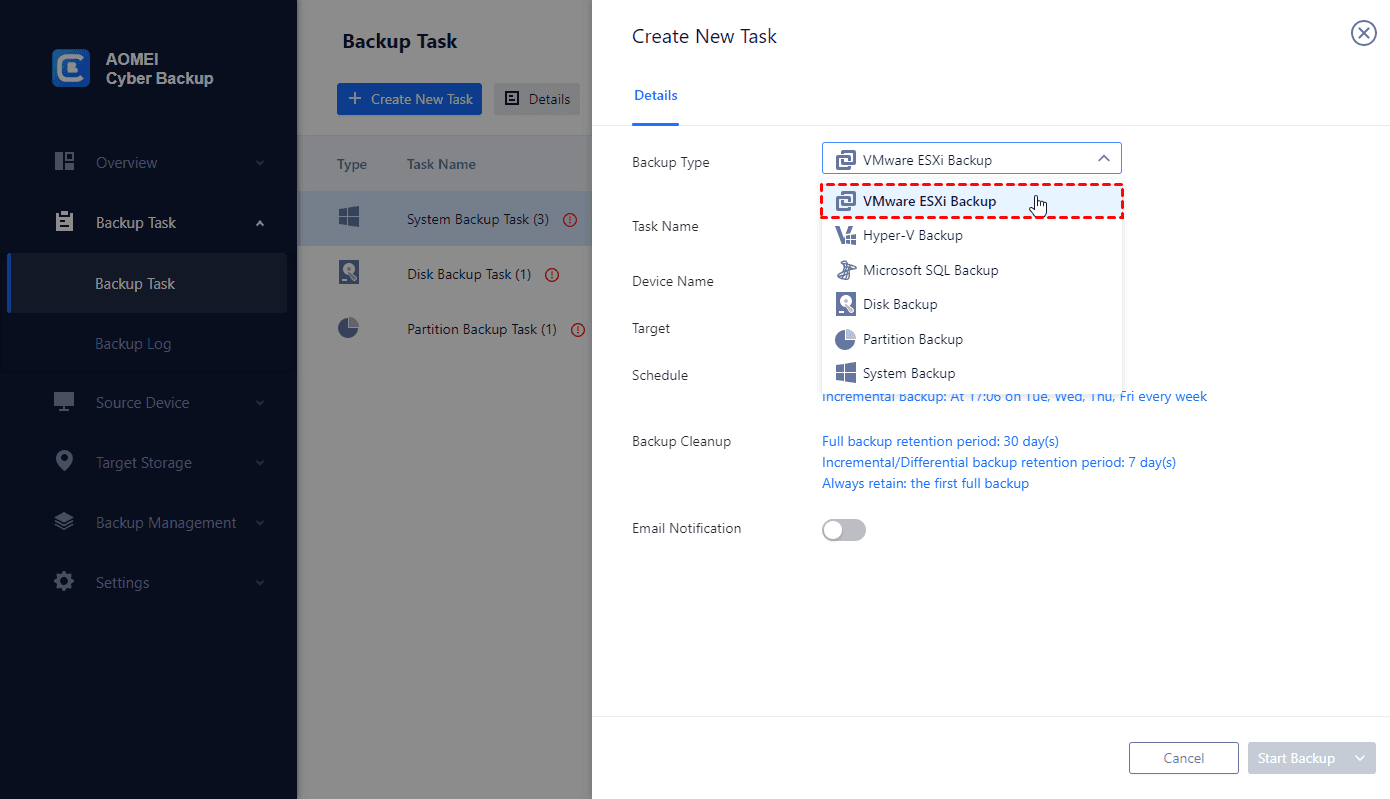
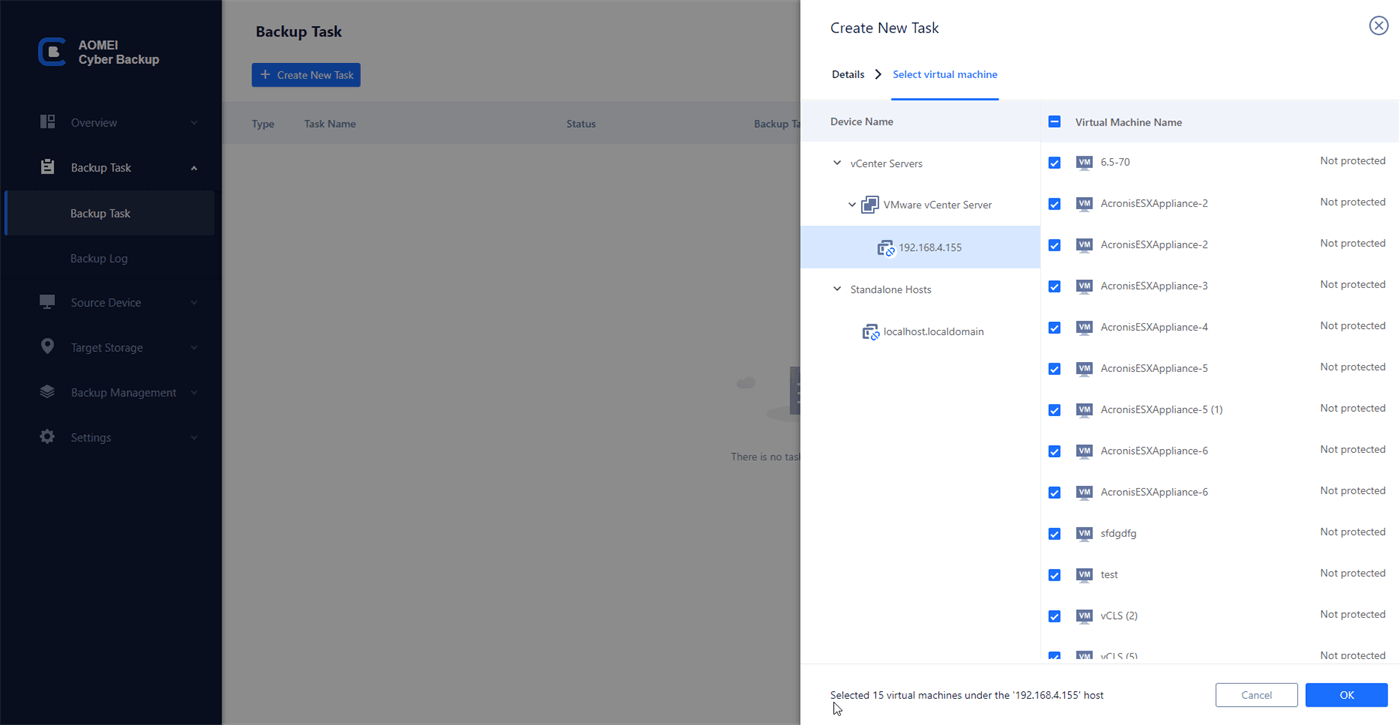
☞ Device Name: select the device and virtual machines you want to back up. Click OK. It allows you to select unlimited virtual machines for backup.
☞ Target: choose a location to store the backup files such as local or network. Click OK.

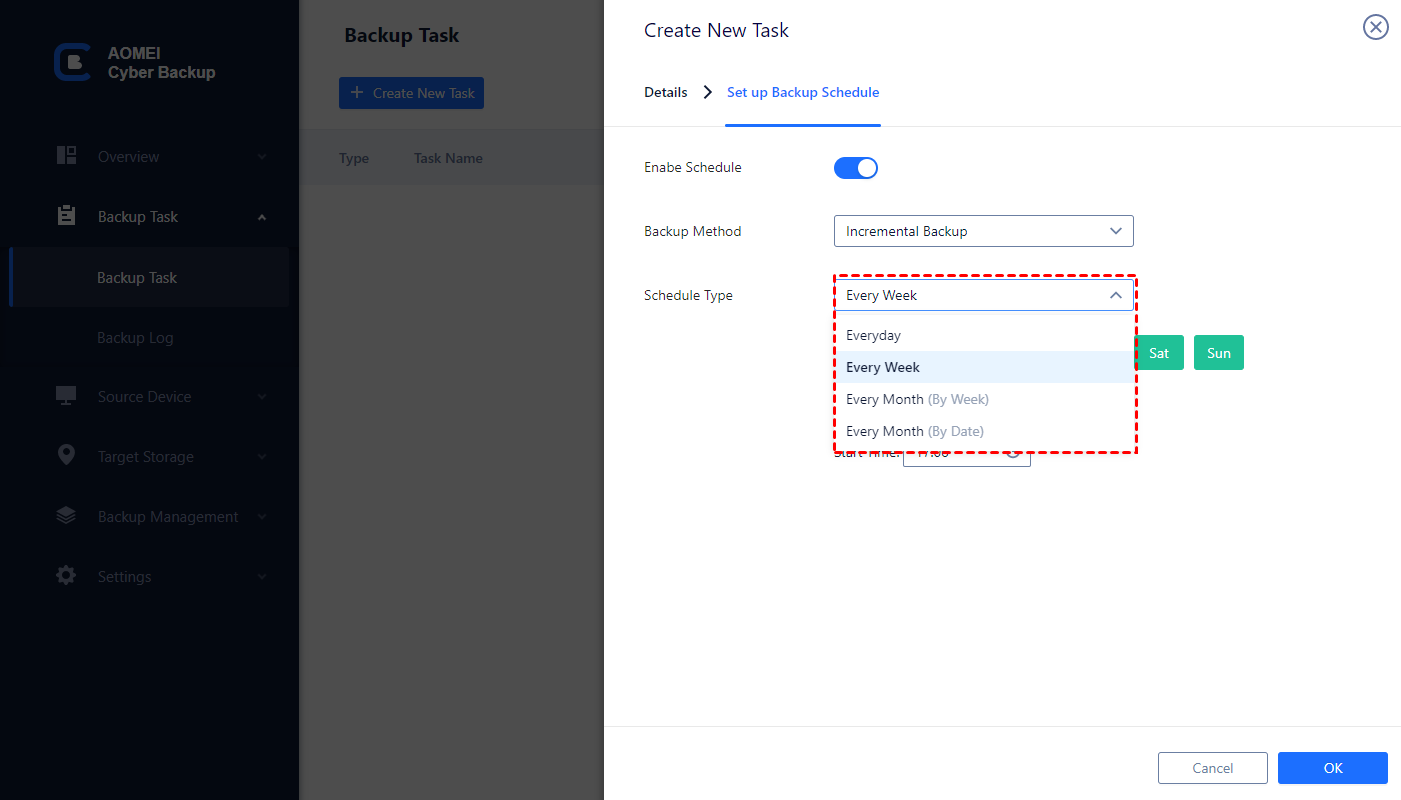
Step 3. (optional). On Schedule window, you can set up different backup strategies based on full, incremental or differential backup.
It also offers daily, weekly, monthly (by date), and monthly (by week) for backup period. You can combine these features to create a flexible backup task according to your need.
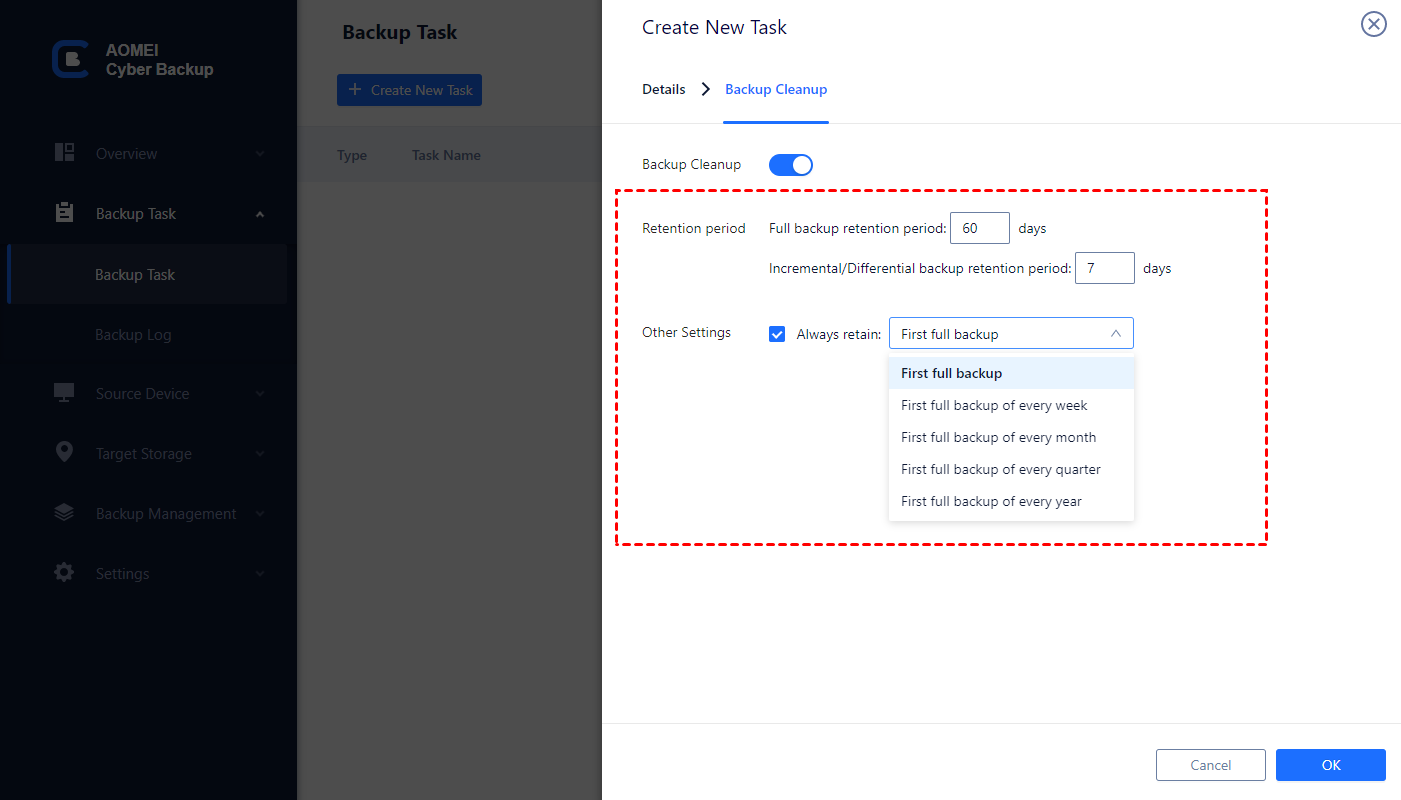
On Backup Cleanup window, enable it and set up the retention policy. It benefits saving storage and reduces your workload since it will delete the old and unwanted files automatically.
Step 4. Click Start Backup to execute the task. After that, you can monitor the status in the Backup Task section, edit the settings by clicking the button on the right side of task, and use the backup to achieve fast recovery from any point.
Step 5. Click “…” right on the task and select Restore to configure the basic information, and select the backup content you want to restore.
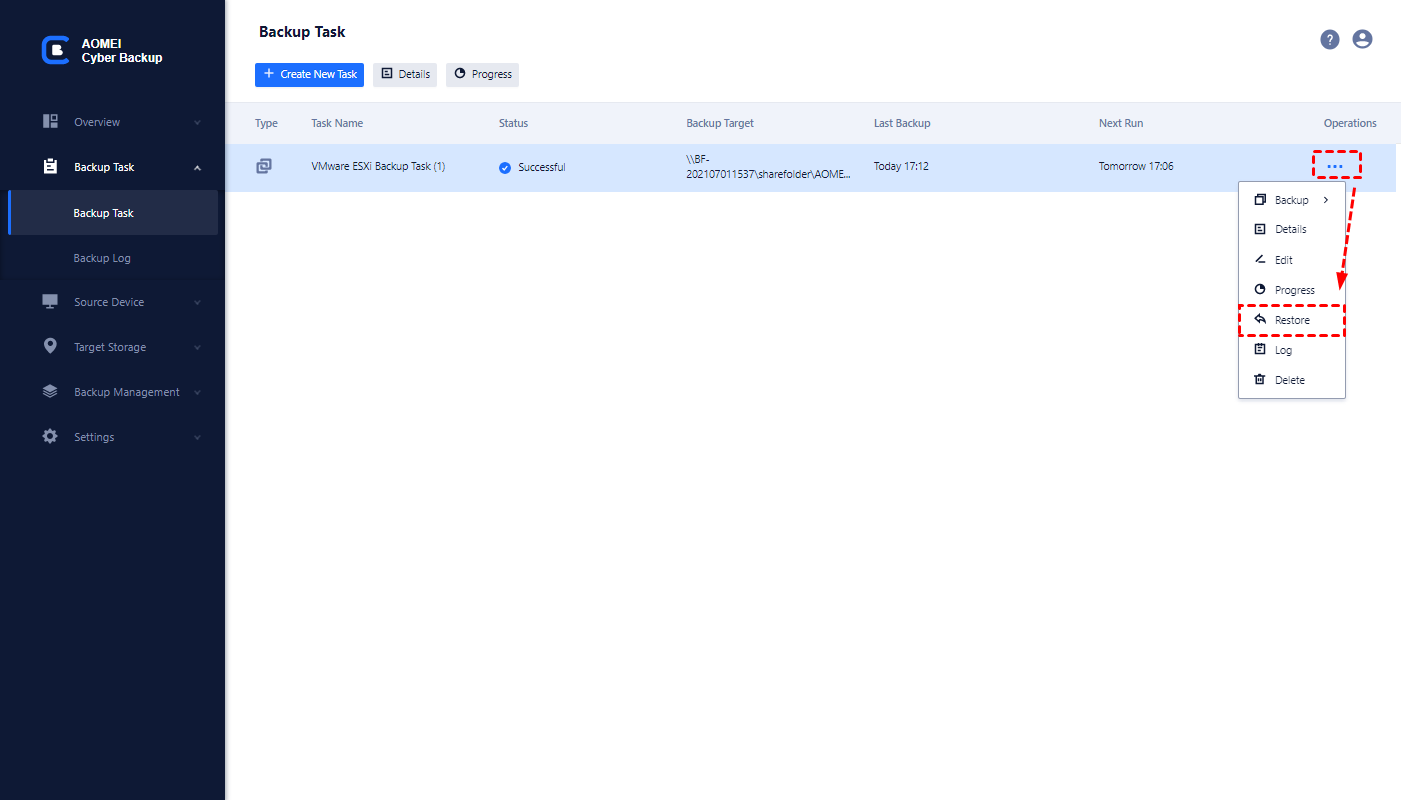
Step 6. Then you will be given the following options for restoring target:
Restore to original location: It will restore the VM to the original location and replace the original VM.
Restore to new location: it will create an identical new VM from the backup to the same or another datastore/host.
Here you should choose Restore to new location to achieve VM cloning. Then specify the target host or datastore, and name the cloned new VM. You can also configure the number of RAM space and virtual processors.
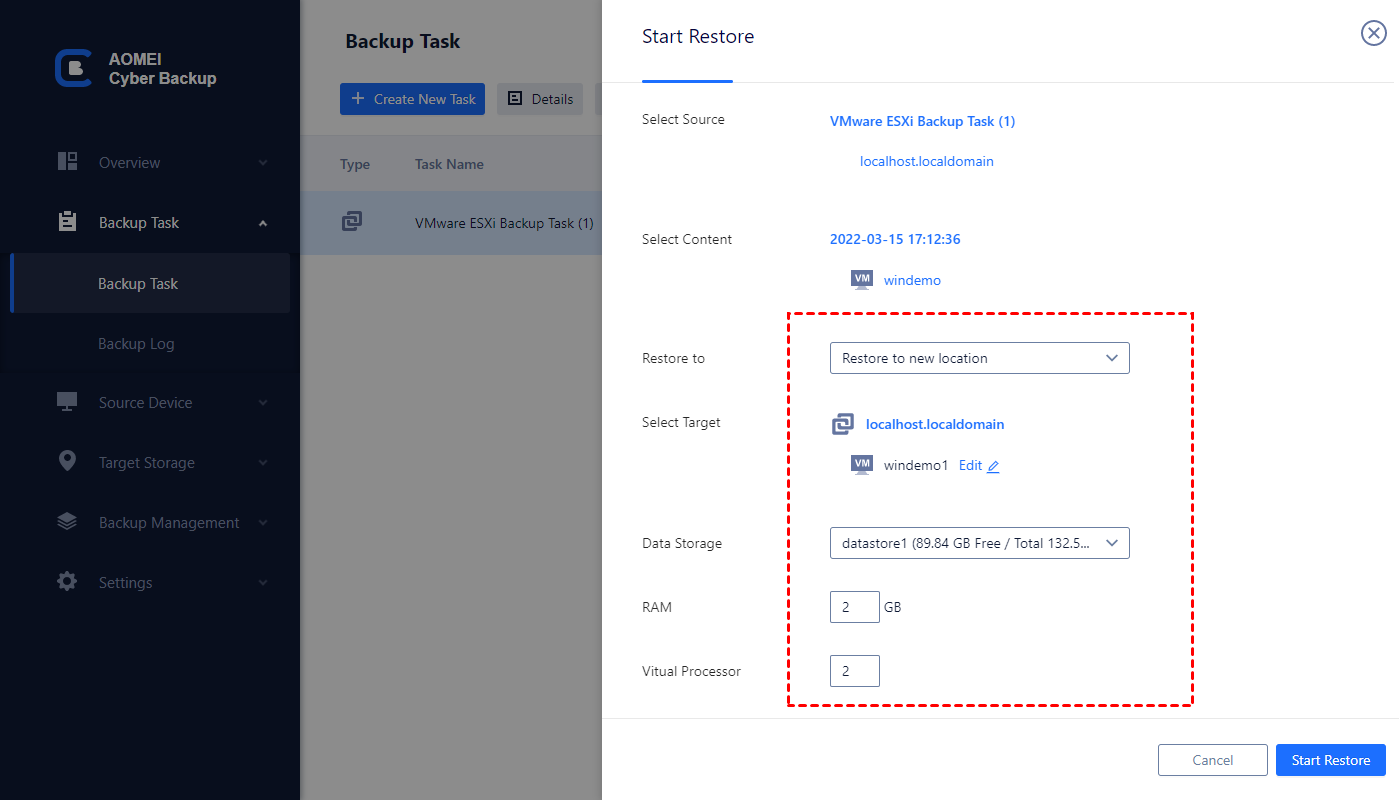
Step 7. Click Start Restore, and wait for the restoration to complete.
When it's done, you've cloned your VMware ESXi VM successfully. You can run the target VM to see if all your data stays intact.
Updated: FAQ about VMware ESXi clone VM
Q: What is the difference between clone to virtual machine and clone to template?
In VMware, cloning to a virtual machine creates an exact, independent copy of an existing VM that can be immediately used, ideal for test environments or additional instances.
In contrast, cloning to a template creates a master copy that cannot be powered on but serves as a baseline for deploying multiple consistent VMs, enhancing efficiency and uniformity in large environments.
Q: What is the difference between VM backup and replication?
As we know, in VMware ESXi, backing up a virtual machine (VM) creates point-in-time copies copy of the VMs, protecting against data loss and ensure data recovery, while replication commonly used to clone a VM to a different site. It ensures high availability and disaster recovery by maintaining real-time or frequent copies of VMs.
Summary
Cloning may be convenient to create an exact copy of the VM, especially when you operate VMware ESXi clone VM with vCenter Server. But if you want to back up multiple virtual machines at the same time, performing clone using a built-in feature only allows you to back up one virtual machine once. So, professional software is necessary and highly efficient.
In this article, I introduced how to clone a VM in VMware vSphere, with or without vCenter Server. Besides cloning, you can also back up VM to another datastore for data protection.

