


How to Export and Import VM from ESXi Host or Command Line
Exporting can save the complete backup of virtual machine. In ESXi, exporting and important are commonly used for data protection. Here, I will introduce the efficient and detailed steps to export and import VM.
By Crystal / Updated on July 30, 2024
Applicable scenarios to export VM from ESXi
Exporting virtual machine is a built-in feature provided by VMware that contributes to data migration or works as a ESXi backup solution. Usually you can export VM from ESXi as OVF template, which captures the state of a VM or virtual appliance into a self-contained package, and the disk files are stored in a compressed, sparse format.
The exporting and importing can be used for the following scenarios:
✤Deploy VMs quickly using exported VM template
✤Migrate VMs from a host to another
✤Backup virtual machine for archival
This article introduces how to export VM from ESXi step by step. If you want to export multiple virtual machines at once, you can also use ESXi command line.
![]()
How to export VM from ESXi step by step
Generally, you can export VM from vSphere Client (vCenter Appliance) or from ESXi management console. Here I will introduce the detailed steps to export VM from ESXi 6.7 as an example.
![]() Prerequisites:
Prerequisites:
1. Make sure the VM does not have any snapshots.
2. Power off the virtual machine or vApp before exporting.
How to export VM from ESXi 6.7:
1. Log in ESXi 6.7 by entering Username and IP address. Shut down the virtual machine you plan to export.
2. Right-click the VM and select Export. When exporting a virtual machine, it cannot export snapshot in VMware. So if you want to export snapshot from virtual machine, you can copy the VM files to register a new VM.
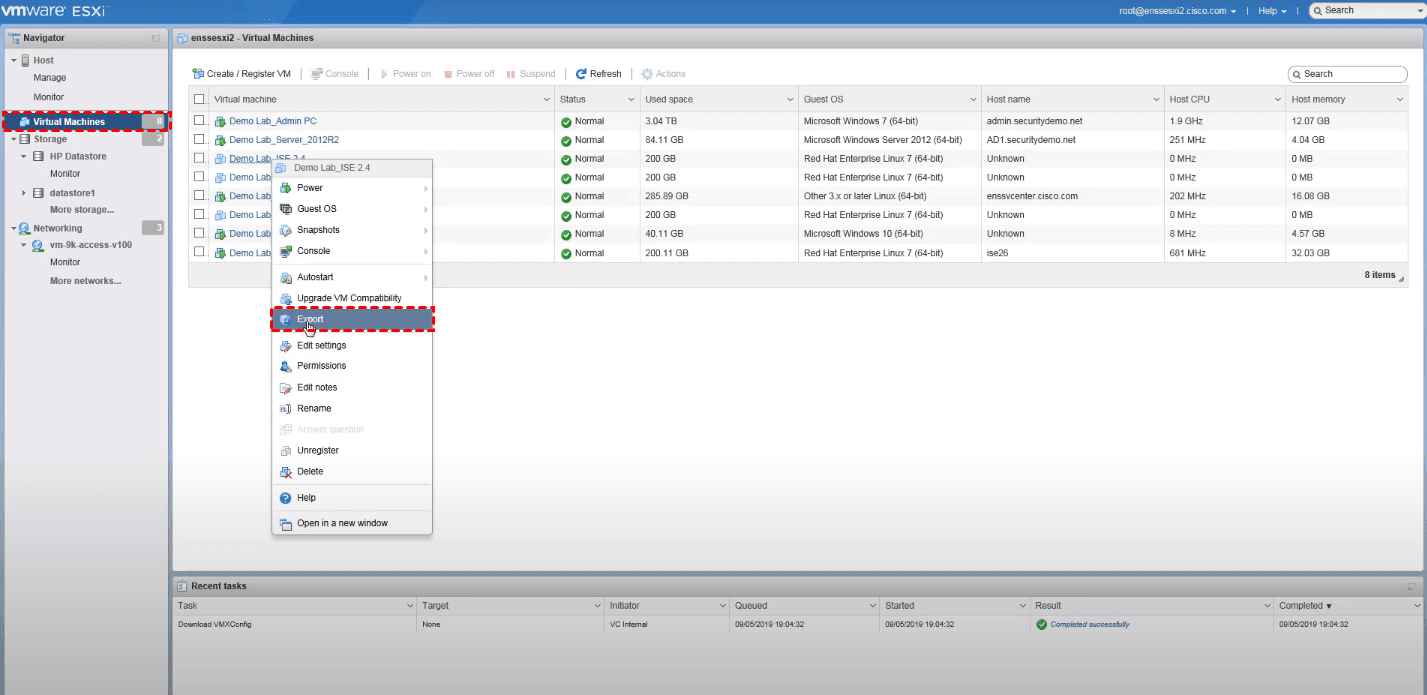
3. In the open wizard, select the related files such as .ovf, .vmdk and .mf. Click OK.
4. Specify a destination to store the files.
5. Check the local path and exported files.
Now you've exported the VM successfully. If you want to do it via vSphere client, please refer to this guide.
How to export ESXi VM from one host to another
After finishing exporting a virtual machine from ESXi, you can register a new virtual machine in VMware, which helps to clone a VM, or migrate a VM from a host to another.
✎Tips: In Hyper-V environment, you can also create an identical virtual machine easily by importing VM the file.
How to import virtual machine in ESXi 6.7:
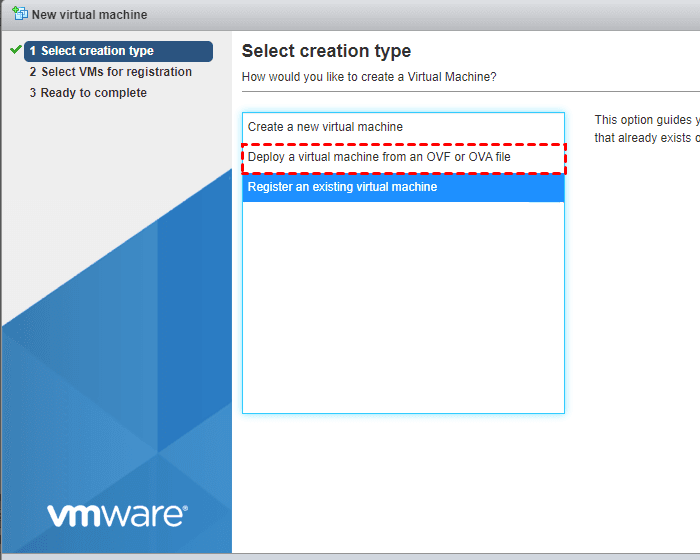
1. Click Create/Register VM.
2. On the Select creation type page, choose Deploy a virtual machine from an OVF or OVA template. Click Next.
3. Type a name for the virtual machine, and then select the exported .ovf and .vmdk files. Click Next.
This way you can easily create a new VM from the exported OVF template.
Updated: Export VM from ESXi command line (in batch)
If you want to export large amounts of virtual machines to OVF or OVA template, the above methods may be insufficient. In fact, you can create a script to export VM from ESXi command line.
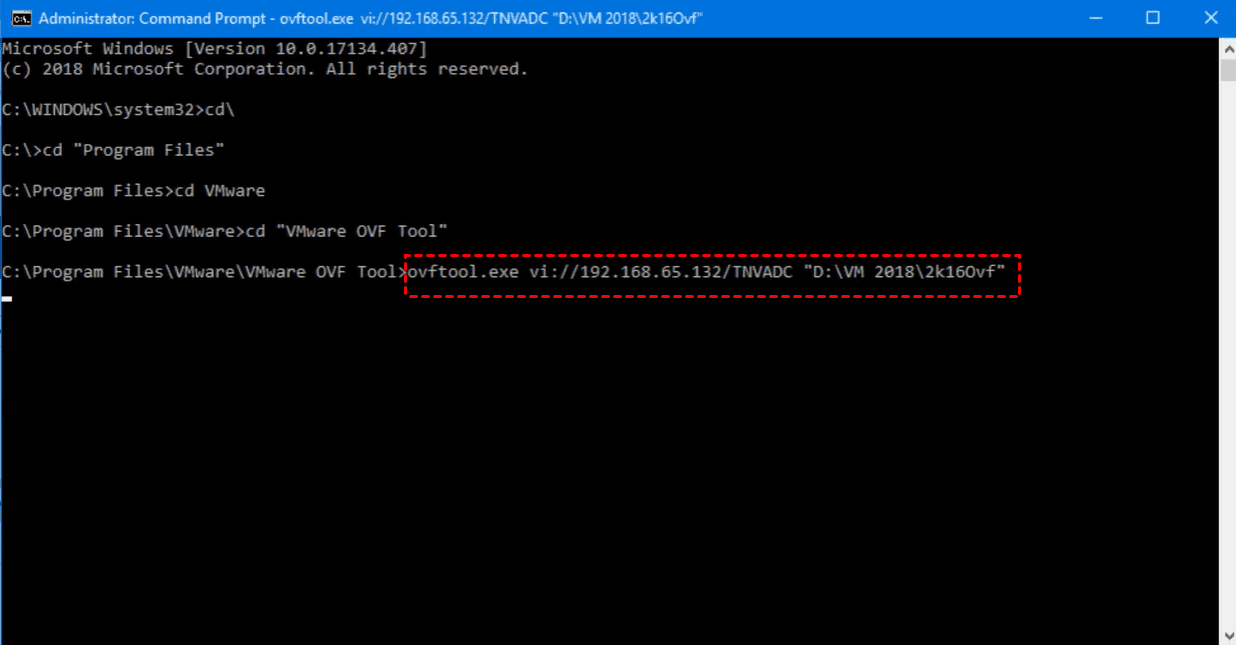
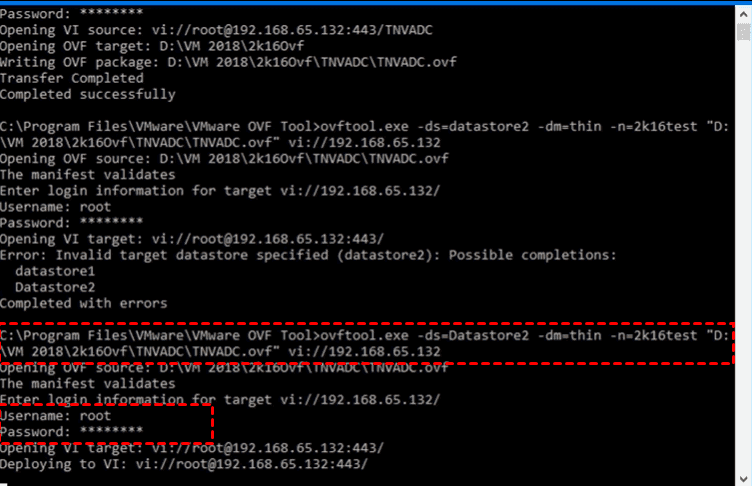
1. Download OVF tool from the VMware website and run it.
2. After installing OVF Tool, open CMD and location the directory. By default, the directory is "C:\Program Files\VMware\VMware OVF Tool" in Windows.
3. To export VM via VMware OVF tool, you still need the vCenter URL with credentials, and the path to your VM. To get the VM path, you can use this command:
Or list all the VMs running on the vCenter Server:
4. Then you can enter "ovftool.exe vi://” with the VM path and local file path to export VM to OVA file:
✎Note: The local file path should end with the ".ova" suffix.
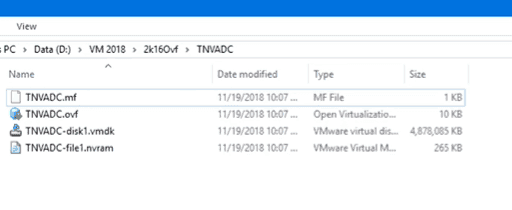
5. Then it will start exporting virtual machine, and you can check the progress of the task. After the transferring process is completed successfully, you can check it in the destination folder.
An OVF package structure should consist of a descriptor file, optional manifest and certificate files, optional disk images, and optional resource files.
Now you can use vSphere client to deploy the virtual machines into your vCenter Server inventory, or import the OVA/OVF files via ESXi command line as well.
How to import OVF templates via ESXi command line
You can also use ESXi command line to import .ovf files to create a VM. Just locate the OVF Tool and use this command:
Then type ESXi username and password. Press Enter.
In VMware ESXi, exporting a VM to OVF template may not be difficult, but if have multiple VMs to export and deploy, things are different. If you are not familiar with ESXi command line, or you want to achieve automatic backup and VM management with simple GUI, a professional backup software is also a good idea.
Easy alternative: Backup multiple VMs for VM protection or migration
Besides exporting VM from ESXi, there are some other built-in VMware backup solutions such as copying VM files from datastore, VM cloning, VM migration, etc. They only allow you to operate one virtual machine at once, which does not facilitate batch management and operation.
Therefore, I'd like to introduce a free VMware backup software - AOMEI Cyber Backup. It automates the image-based backup for multiple virtual machines and facilitates the recovery procedures. Whether you'd like to save the backups for protection or VM migration, this will doubtlessly reduce business downtime and operating error.
It supports both paid and free versions of VMware ESXi (6.0 and above) & Hyper-V (2012 and later) while offering the following benefits:
Perpetual Free: No time limit for AOMEI Cyber Backup Free Edition.
Easy Operation: Backup and restore virtual machines in a concise and user-friendly central console.
Agentless Backup: Create image-based backup of multiple VMs without installing Agent on each VM.
Automatic Backup: Schedule the VMware backups to run the tasks automatically.
Restore VM From Any Point: Restore a whole VM from any backed up point.
Please hit the button below to download and use AOMEI Cyber Backup for free:
*You can choose to install this VM backup software on either Windows or Linux system.
![]() If you want to create a new VM from the backup (in the same or new location), please upgrade to enjoy the out-of-place recovery function.
If you want to create a new VM from the backup (in the same or new location), please upgrade to enjoy the out-of-place recovery function.
Easier steps to backup multiple ESXi VMs for free
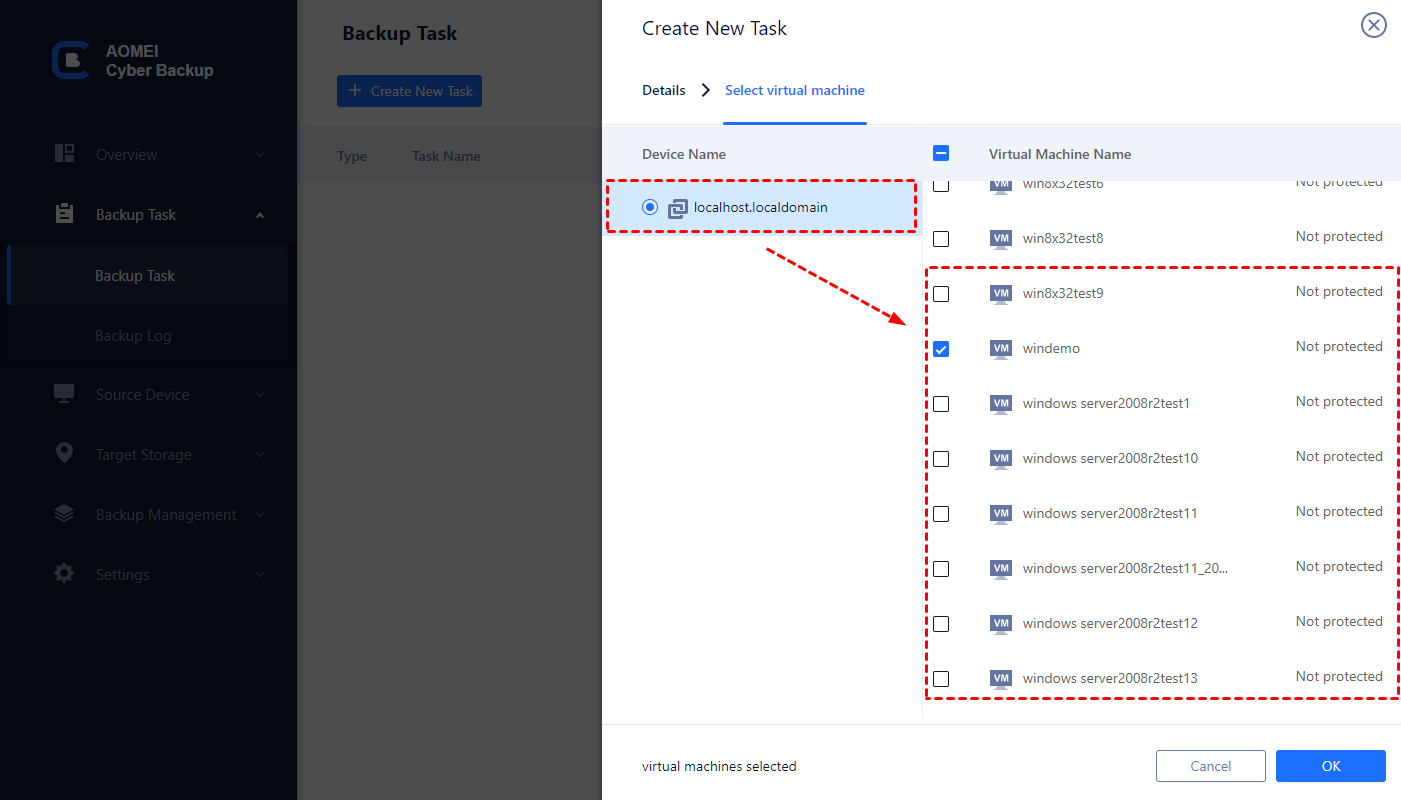
1. Install AOMEI Cyber Backup and add vCenter or Standalone ESXi host as the source device. Access to Backup Task, then click Create New Task to schedule VM backup.

2. In the Device Name wizard, select virtual machines on the VMware device. Click OK.
3. In Target section, choose a network location or local directory to store VM. For example, you can back up VMs to different places such as external hard drive or NAS, which ensures data protection.
✨Tip: If you also want to save backups on a Cloud storage, AOMEI Cyber Backup currently supports archiving backup to Amazon S3. You can check "Archiving backup to Amazon S3" on the task creation interface and add your S3 storage.
4. In Schedule section, select the backup strategies such as full/incremental/differential backup and specify backup time as daily/weekly/monthly (by date)/monthly (by week). You can combine these features to create an ideal VMware backup.
5. To enjoy Backup Cleanup, you can also upgrade to Premium version.

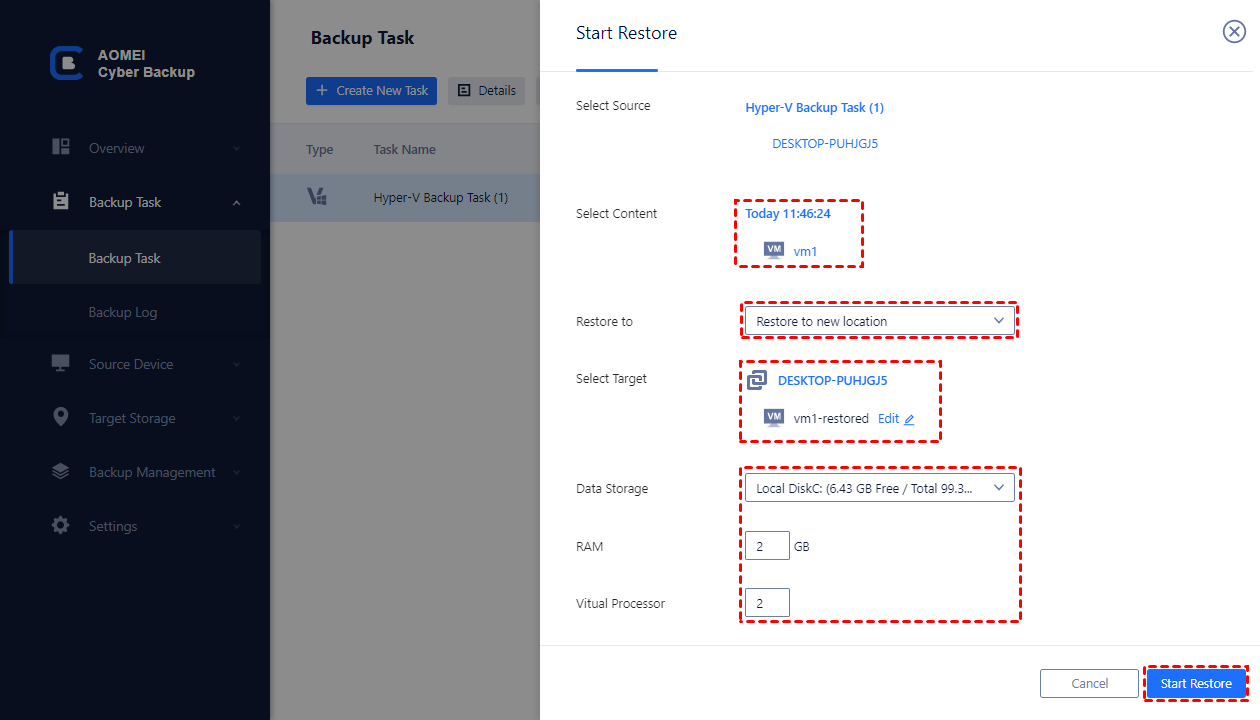
How to restore ESXi VM from the backup for cloning or migration
Optionally, you can upgrade to enjoy the advanced feature - Restore to new location in recovery page. It enables you to create an identical VM from the backup to the same or another datastore/host without any complicated configuration.
Thus, you can easily export VM from one host/datastore to another, with the flexibility to change the RAM and Vital Processor.
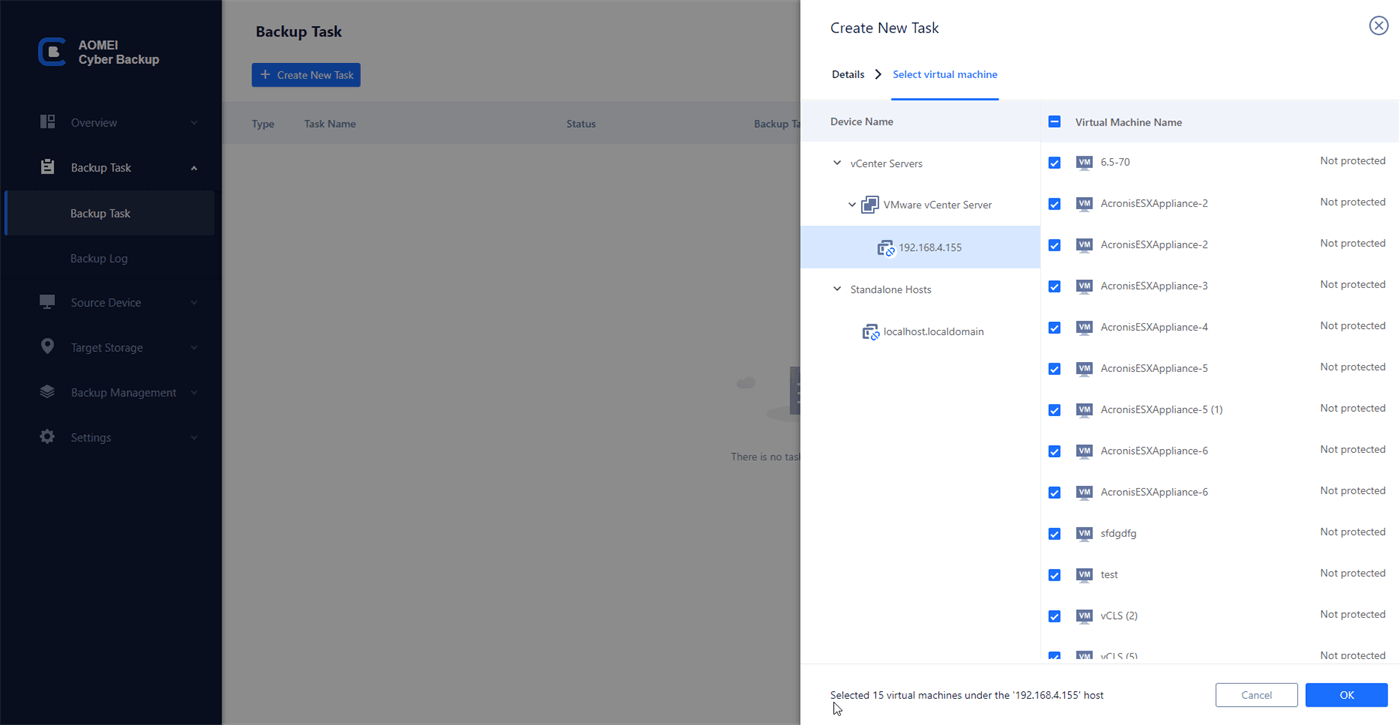
In addition, the premium edition allows you to batch backup large numbers of VMs managed by vCenter Server, or multiple VMs on a standalone ESXi host.
Summary
In VMware, if you want to back up and protect virtual machine data, you can export VM from ESXi. This article covers 2 methods to export vm from vSphere client and command line. Meanwhile, if you want to back up multiple ESXi VMs efficiently, try to schedule the backup tasks with AOMEI Cyber Backup, and it is still accessible to create comprehensive Hyper-V backup.

