


What are VMware Snapshots & How to Work with Them Properly?
Do you know what are snapshots in VMware? VMware snapshots are convenient as quick failsafe rollback points, but have many limitations. In this article I will introduce you how they work, and how to use them properly.
By Crystal / Updated on October 23, 2024
What are VMware snapshots
VMware snapshots preserve the state and data of a VM at a specific point in time. The state includes the VM’s power state, disks, memory, and other devices, such as virtual network interface cards.
You can also take a quiesced snapshot in VMware which captures the state of a virtual machine while ensuring data consistency by temporarily pausing all write operations. This is crucial for applications like databases (e.g., SQL Server, Oracle). Quiesced snapshots can be also useful when archiving data or preparing for migrations.
Is a VMware snapshot the same as a backup?
A VMware snapshot can be used to roll back a virtual machine, so many users tend to achieve VMware backup by snapshot. But strictly speaking, they are 2 different concepts.
- A snapshot does not create a complete, independent copy of the virtual machine. In contrast, a backup is a full copy that can be restored independently.
- VMware snapshots are tied to the parent disk. If the parent disk is deleted or becomes corrupted, the snapshot becomes unusable for recovery.
- Virtual machine backups can be retained for a longer period of time without affecting the performance of the original VM, whereas snapshots become larger files over time and retaining them for a long period of time can degrade the performance of the VM.
Simply put, VMware snapshot cannot replace backup. But you can combine the 2 as a VM protection strategy.
| Feature | VMware Snapshot | VM Backup |
| Independence | Dependent on the parent disk | Independent copy of the virtual machine |
| Storage Method | Stores changes in incremental disk files | Creates a complete copy of the VM |
| Performance | Degrade performance if retained long-term | No impact on the original VM performance |
| Usage | Quick rollbacks and short-term recovery | Disaster recovery and long-term storage |
How do snapshots work in VMware
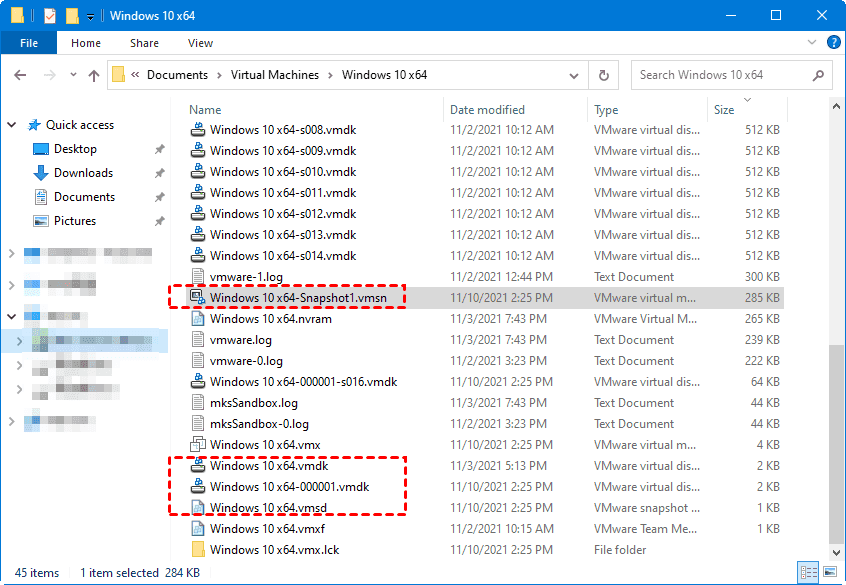
Taking a VMware snapshot, the following files will be created:
- -.vmdk: The -flat.vmdk file that contains the raw data in the base disk.
- -delta.vmdk: The temporary delta disk file created to store all the changes made to the VM since the snapshot was taken. Represented in the format of -00000x.vmdk.
- .vmsd: A database file of the VM’s snapshot information and the primary source of information for the Snapshot Manager. The file contains line entries which define the relationships between snapshots as well as the child disks for each snapshot.
- Snapshot.vmsn: A memory file that contains the current configuration and optionally the active state of the virtual machine, allowing you to revert to a running state of the VM.
When taking a VMware snapshot, the original virtual disk file will become read-only, and a temporary delta disk which points to it will be created, to store all the changes made to the VM afterward.
As more writes are made to the delta disk, it can grow large enough to fill an entire datastore. After the snapshot is deleted, all changes will be merged into the original .vmdk file, and it will return to read-write mode.
VMware snapshots can be used as quick failsafe rollback points, to reduce the hassle of creating multiple VMs. Generally, VMware snapshots are used for development and testing purposes. For example, taking snapshots before performing patches, upgrades, tests and other unsafe operations.
However, they are not recommended to be used in production environments, since running VM on snapshots for a long time can lead to instability and data loss.
VMware snapshot best practices
Although convenient, VMware snapshots have limitations in practical use. For example, VMware snapshot size greatly affects the performance of a virtual machine system.
Performance degradation depends on how long you keep the snapshots, how deep the snapshots tree is, and how many changes you have made to the VM since you took the snapshot.
For better working with VMware snapshots, here I summarized 3 best practices.
Tip 1. Do not use VMware snapshots as backups
VM snapshot vs backup is a long-confusing issue for VM users. The accepted conclusion is that snapshots cannot be used as backups.
As above stated, while VM backup is an independent copy of the VM, and can be safely stored offsite to the cloud or other locations, snapshots depend on the parent disk. If the base disks are deleted, the snapshot files are not sufficient to restore a VM.
Tip 2. Use only 2-3 snapshots
When you create a snapshot for the first time, the first child disk is created from the parent disk. Successive snapshots generate new child disks from the last child disk on the chain.
A maximum of 32 snapshots are supported in a chain. However, for a better performance please use only 2 to 3 snapshots.
Tip 3. Do not use a single snapshot for more than 72 hours
Generally, you need to reserve 20-30% extra storage for a single snapshot. As more changes you made to the VM after a snapshot, the delta disk file can even run out of space, and affect the performance of your VM system.
Therefore, please delete the snapshots in time to merge the changes to the parent disk when they are no longer useful, or before creating backups of your VM.
How to take, revert and delete VMware snapshots [complete guide]
Now you have known when should you take VMware snapshots, and how to keep them in optimal use. The next thing you need to know is the specific steps of the basic VMware snapshots operations.
In this section, I will demonstrate how to perform the basic operations of VMware ESXi snapshots as an example.
Case 1. How to take a snapshot in VMware
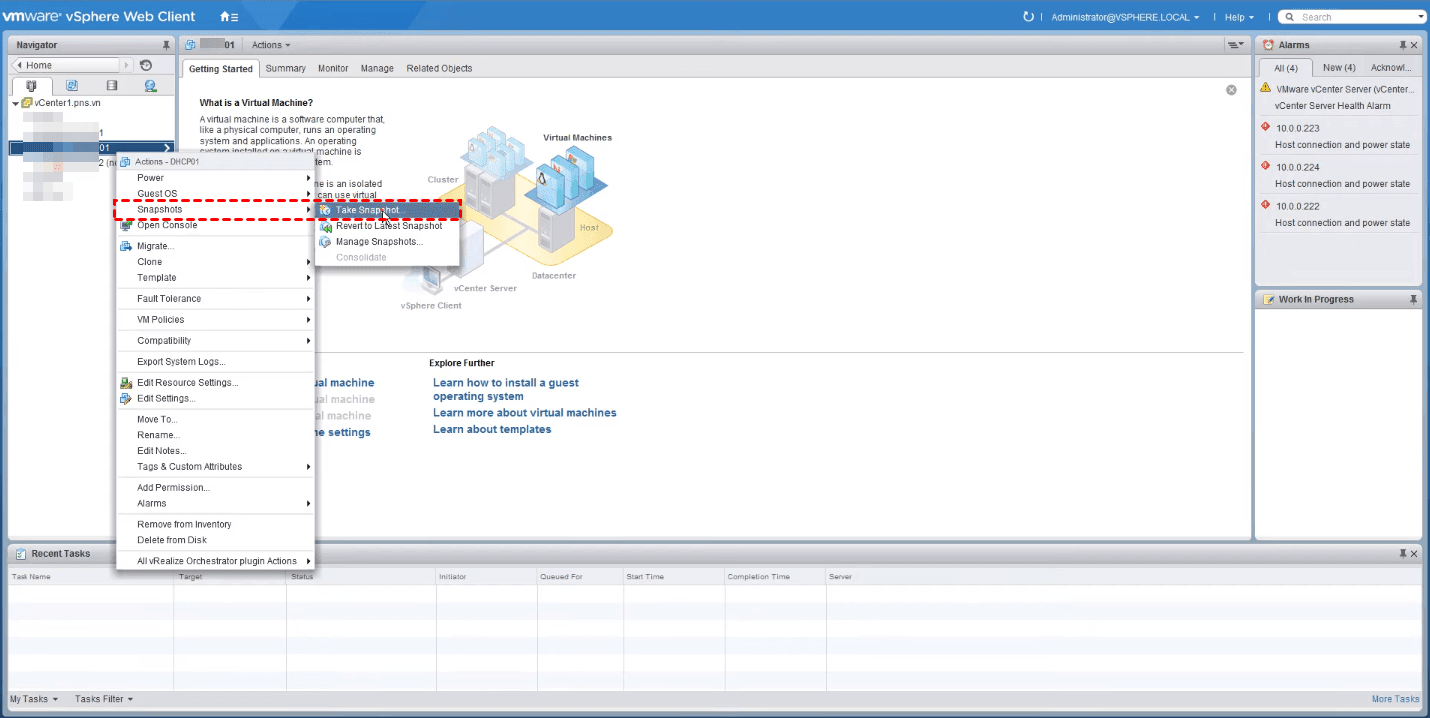
1. Access to vSphere Web Client. Right-click on the VM name in the inventory and select Snapshots > Take Snapshot…
2. In the pop-up window, provide a Name and optionally a Description for the snapshot. You can Edit them later in Snapshot Manager.
3. There are 2 options to check:
- Snapshot the virtual machine’s memory: record the VM’s memory, allowing you to roll back the VM to the exact running state when the snapshot was taken, but takes longer. If you leave this option unchecked, then the VM will be powered-off after you roll back.
- Quiesce guest file system (needs VMware tools installed): pause the state of the processes that are running, or may modify the information stored on disk when the snapshot was taken, to guarantee the consistency. Quiescing and Memory snapshots are mutually exclusive.
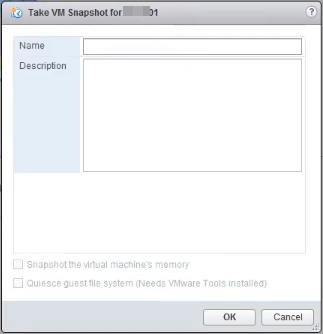
4. Click OK to take the snapshot. You can see the progress in Recent Tasks.
Case 2. How to revert to a snapshot
1. Access to vSphere Web Client. In this step, operations are different according to different needs.
✦ If you want to revert to the latest snapshot: Right-click on the VM name and select Revert to Latest Snapshot.
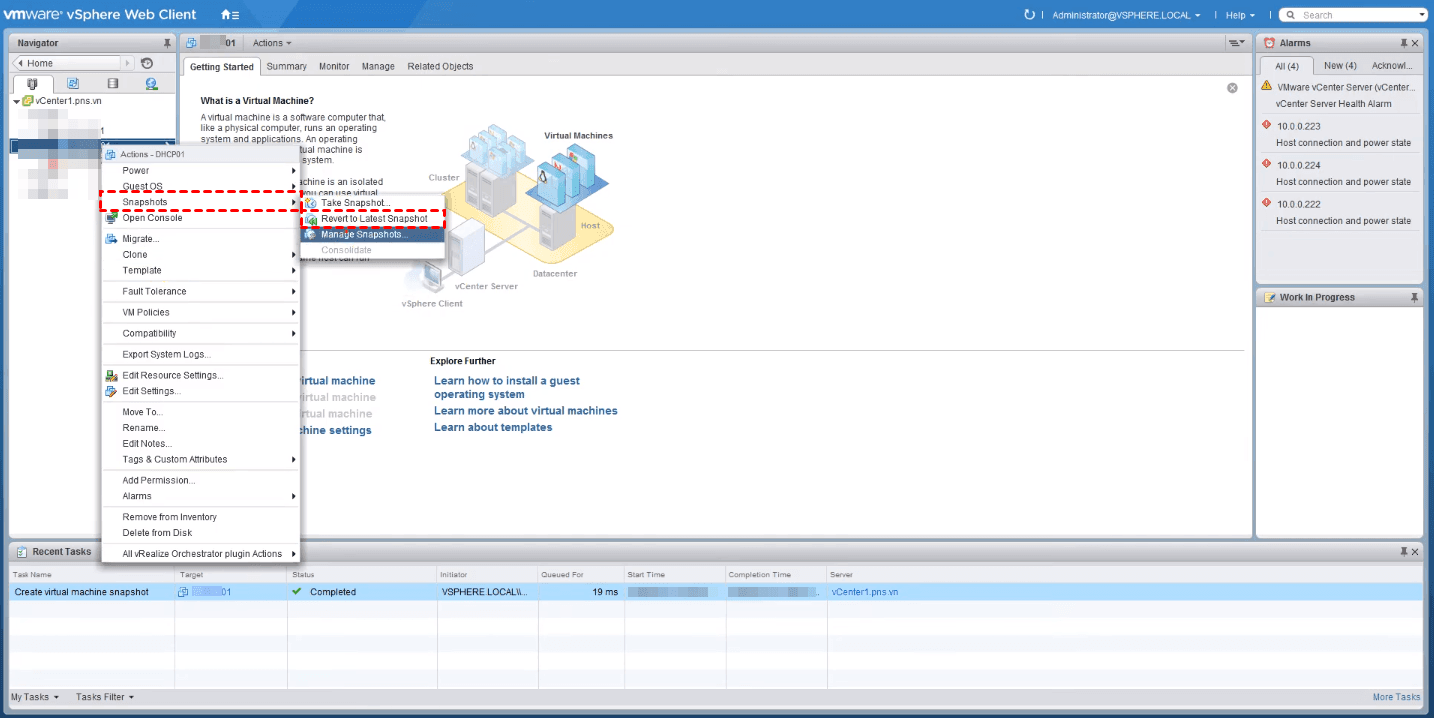
✦ If you want to revert to another previous snapshot: Right-click on the VM name and select Manage Snapshots…
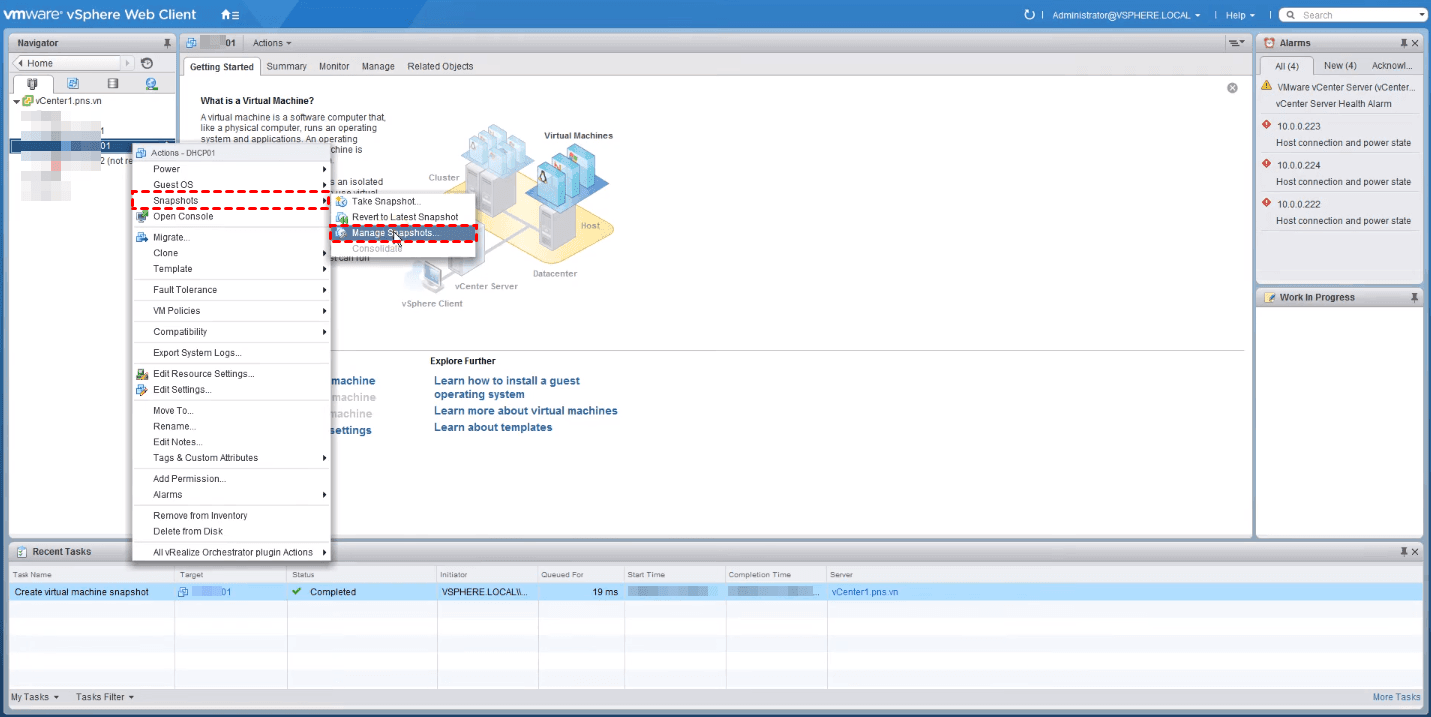
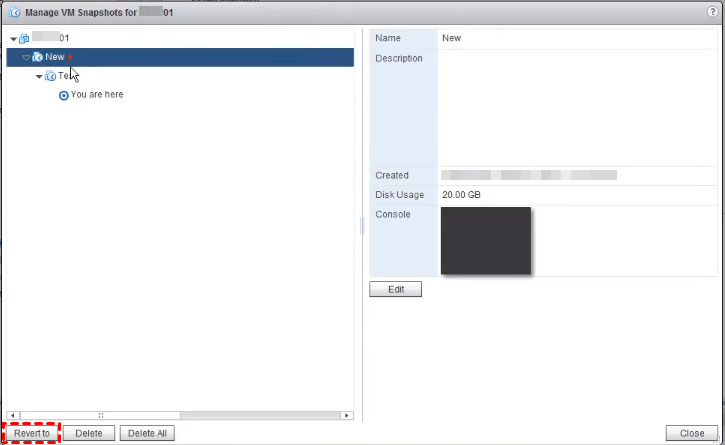
Select the snapshot you want to revert in Snapshot Manager, and click Revert to.
2. It will pop up a Confirm window notifying the loss of the current state. If it is a memory snapshot, then there will be one more option to suspend this VM when reverting to selected snapshot. You need to manually power on the VM later if you check this option.
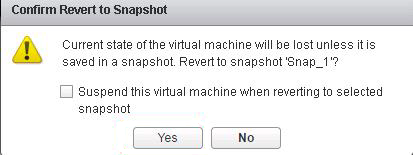
3. Click Yes to revert to the selected VMware snapshot. In Snapshots Manager you can see the current state represented by You are here.
Case 3. How to delete one or all VMware snapshots
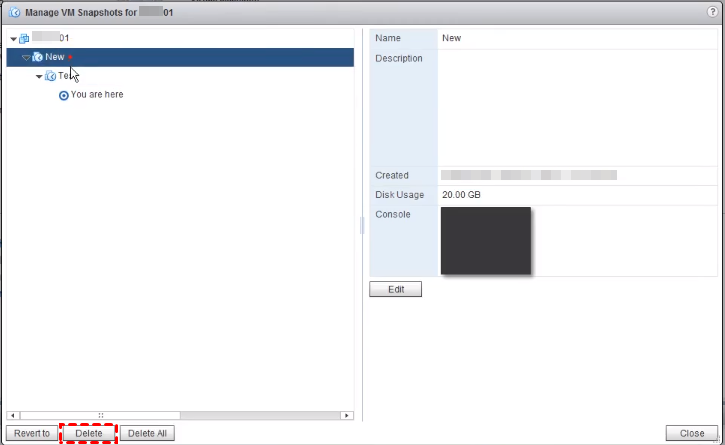
1. Access to vSphere Web Client. Right-click on the VM name and select Manage Snapshots…
2. In this step, operations are different according to different needs.
✦ If you want to delete one snapshot: Select the target snapshot and click Delete. Click Yes in the pop-up Confirm window.
✦ If you want to delete all snapshots: Click Delete All in Snapshot Manager and click Yes in the pop-up Confirm window.
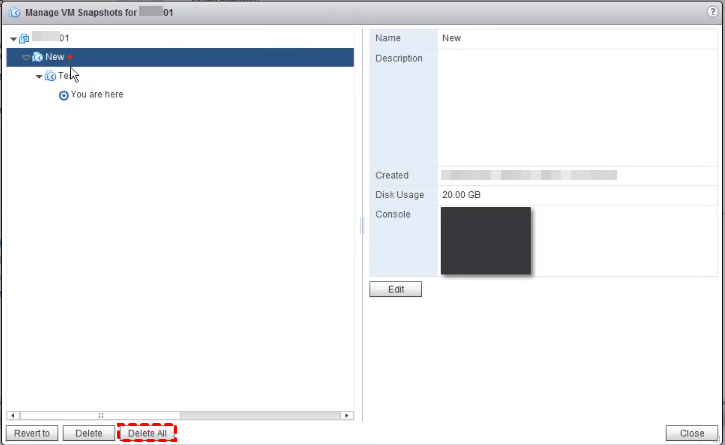
3. Click Close to exit the Snapshot Manager.
Solution: This could be due to a missing virtual machine disk .vmdk descriptor or data file, or incorrectly deleting snapshots causing the VMware snapshot chain to become inconsistent. To avoid severe data loss, you can recover deleted snapshots on VMware.
How to properly backup VMware ESXi virtual machines
While snapshots are useful for short-term changes or quick rollbacks, they are not suitable as a standalone backup solution due to their limitations in independence, performance, and disaster recovery scenarios.
There are different VMware backup solutions to create independent and complete VMware VM backups.
- Manually copy/download VM files: using the copied (or download on ESXi) VM files you can create a new VM on the original or another host.
- Export VM to OVF/OVA templates: By exporting VMs to compressed Open Virtualization Format (OVF) files, you can achieve faster downloads, and import VMs to the original or another host.
- Clone VMs: clone is a way to create multiple same VMs that are immediately usable.
Today, specialized backup tools have emerged to enhance VM backup capabilities, addressing limitations of VMware's built-in features.
Free but powerful VMware backup tool to protect your data
For example, AOMEI Cyber Backup is a free VMware backup software, offering robust and user-friendly VMware backup options. This free software enables automatic backups of multiple VMs across both paid and free versions of VMware ESXi, making it a popular choice among VM users.
| 🚩Centralized Management: A centralized web console to manage your VMware virtual machines regardless of sockets and hosts. |
🔔Fast Disaster Recovery: Restore the entire VMware VM to a usable state quickly without re-creating and configurating a new VM, greatly reduce business downtime and possible financial loss. |
| 🐱💻Role-Based Management: Assign other team members with different permissions to team-up efficiently and safely. |
📅Automatic Backup Cleanup: Keep backups up to date and remove old backup versions automatically to save storage space. |
Click the button below to download the the freeware of AOMEI Cyber Backup and get started!
*You can choose to install this VM backup software on either Windows or Linux system.
3 easy steps to backup multiple VMware ESXi VMs
Step1. Bind Devices
Access to AOMEI Cyber Backup web client, navigate to Source Device > VMware > + Add VMware Device to add vCenter or Standalone ESXi host as the source device, and then click … > Bind Device.
Note: This step is only needed when you bind the host for the first time, you do not need to repeat after successful binding.

Step 2. Create Backup Tasks
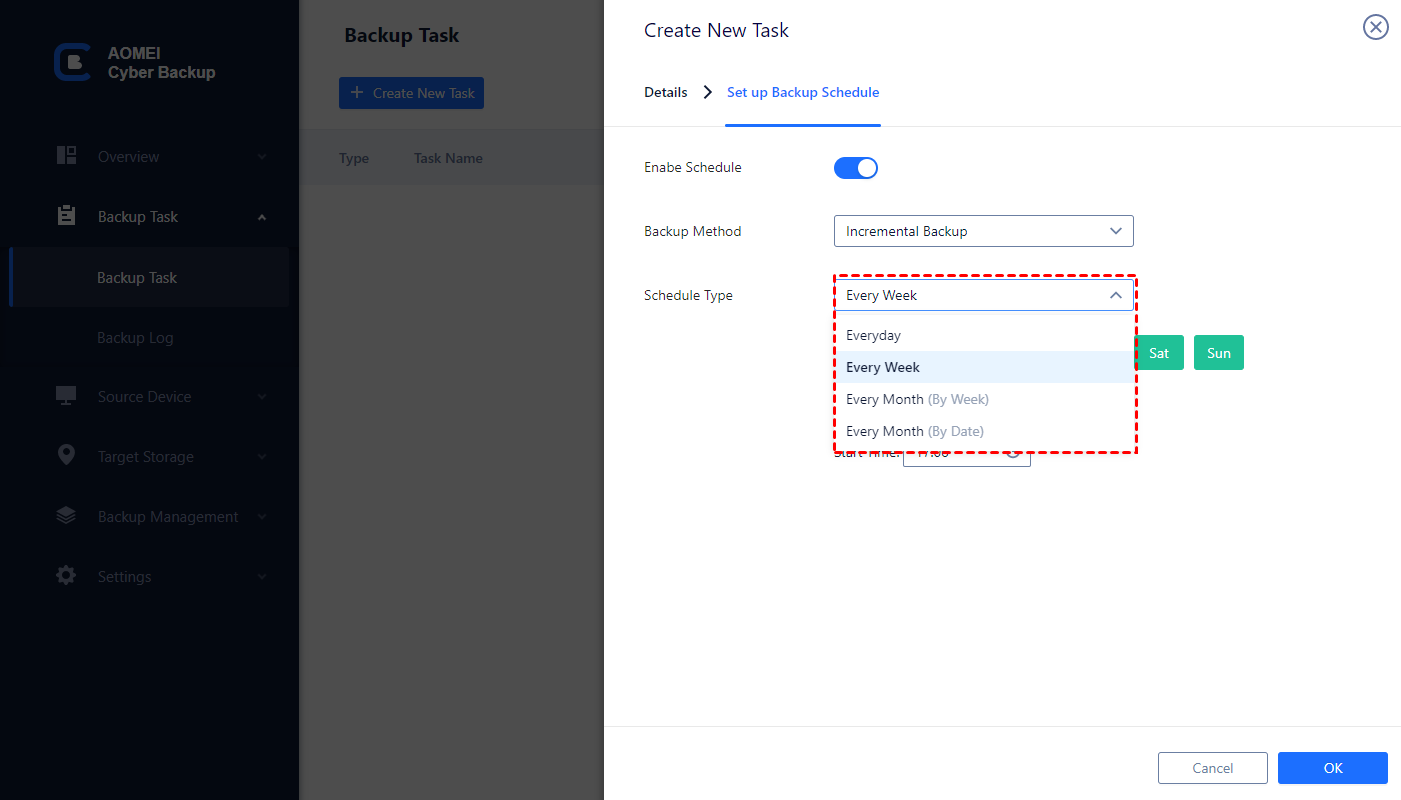
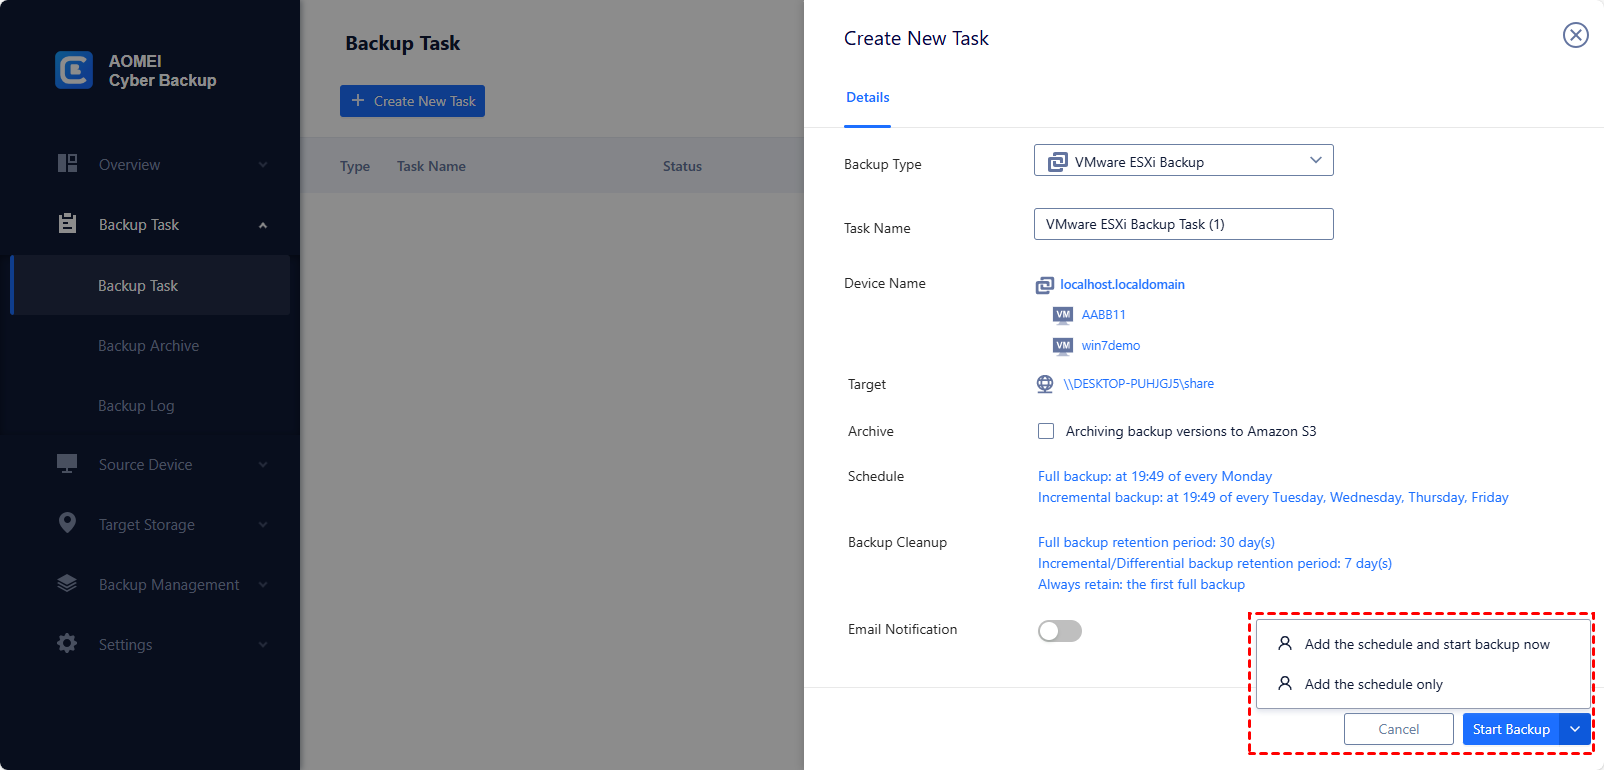
✔Navigate to Backup Task > + Create New Task, and provide Task Name, Backup Type, Device, Target, and Schedule as needed.
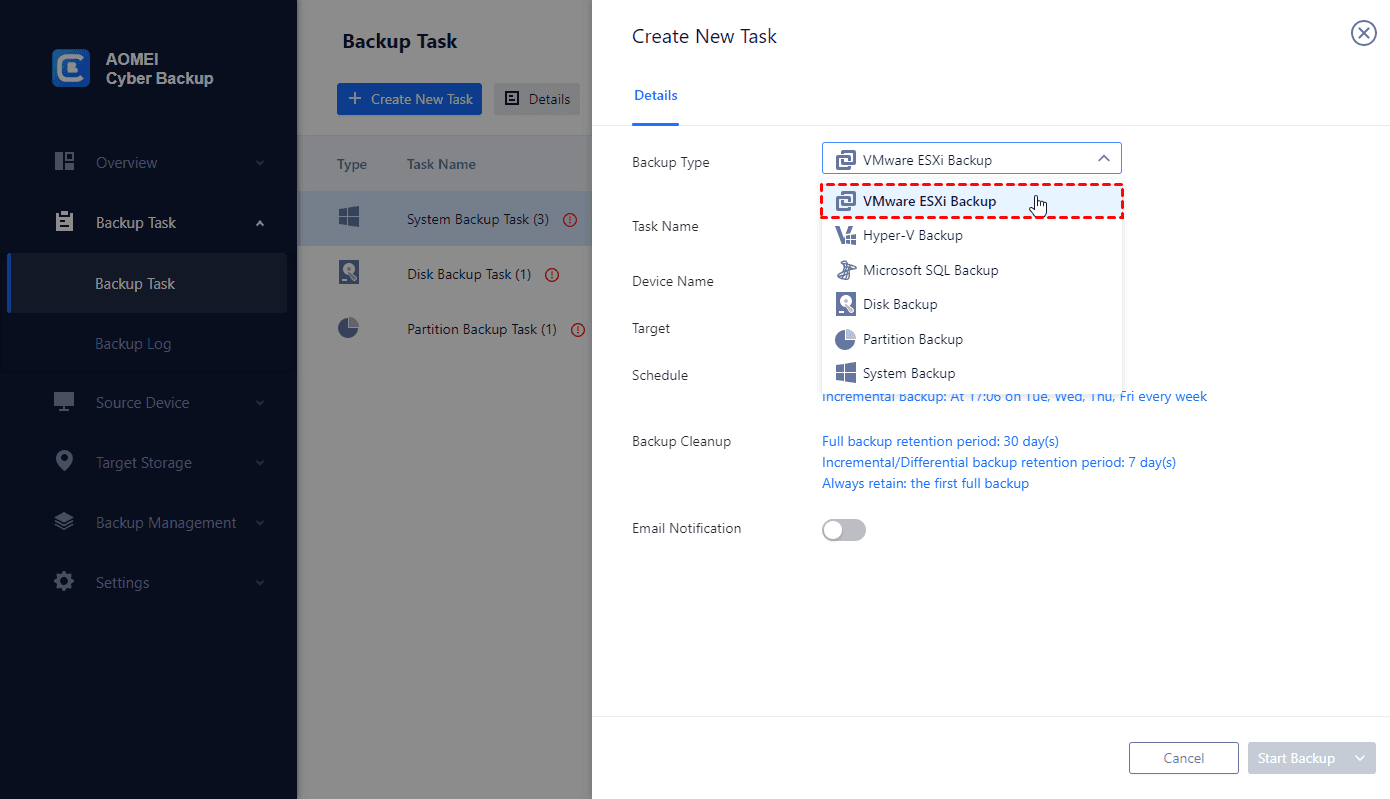
- Device: cover multiple VMs on the host in one backup task.
- Target: you can select to back up to a local path, or to a network path. Used paths will be saved in Favorite Storage for handy selection.
- Schedule: you can choose to perform full, differential or incremental backup, and automate execution daily, weekly or monthly according to the frequency you specified.
Step 3. Start Backup
Click Start Backup to select to Add the schedule and start backup now, or Add the schedule only.
Created backup tasks will be listed separated for further log checking, task changing, or restoring.
While the Free Edition covers most of VM backup needs, you can also upgrade to enjoy:
▶ Batch VM Backup: batch backup large numbers of VMs managed by vCenter Server or standalone ESXi hosts.
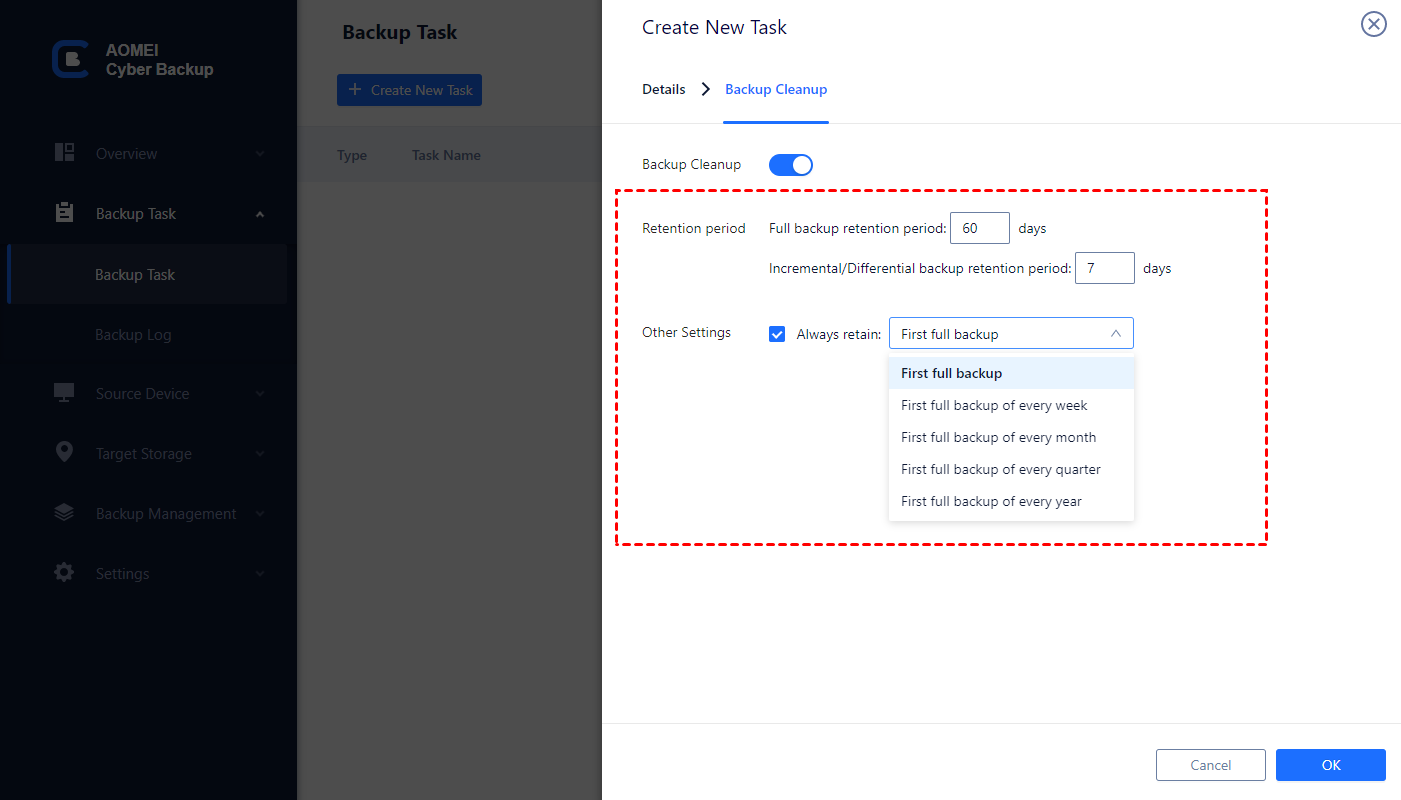
▶ Backup cleanup: Configure a retention policy to auto delete old backup files and save storage space.
▶ Restore to new location: Create a new VM in the same or another datastore/host directly from the backup, saves the trouble of re-configuring the new VM.
Summary
Many people confuse VMware backup with snapshots. In fact, they are 2 different things. Although VMware snapshots are convenient for quickly rolling back the VM to a specific point in time, they cannot replace backups, and need to be used properly to maintain the VM system performance.
In this article, I introduced what are snapshots and the best practices to use them, including the detailed steps of how to create, revert, and delete them. Snapshots cannot replace backups, but using them in conjunction with backups can greatly improve your work efficiency.
To properly backup VMware ESXi VMs, you can choose AOMEI Cyber Backup to help you schedule automatic backup tasks for multiple VMs. Except for VMware ESXi VMs, it also supports Microsoft Hyper-V.

