


How to Solve Hyper-V Cannot Delete Checkpoint | 5 Solutions
What to do if you cannot delete checkpoint in Hyper-V? This post explains why this problem occurs and offers 5 proven solutions help you to securely and successfully remove Hyper-V checkpoint.
By Crystal / Updated on September 5, 2024
Hyper-V delete checkpoint not showing
My Hyper-V host is Server 2012 R2. I have a virtual machine (Server 2012 R2) with a checkpoint. When I right click on the checkpoint, there is no "Delete checkpoint... " option. I need to delete this checkpoint so that it is merged with the parent VHDX. What is the best method for doing this?
- Question from social.technet.microsoft.com
Symptoms: Hyper-V cannot delete checkpoint
Hyper-V checkpoint, is a feature in Microsoft's Hyper-V virtualization platform that allows users to capture the state of a VM at a specific time. For some purposes such as creating a Hyper-V backup, avoiding VM sprawl, freeing up storage, etc. you need to delete your Hyper-V checkpoint.
However, lots of people encounter the "Hyper-V cannot delete checkpoint" issue. There are some common symptoms and scenarios for being unable to remove Hyper-V checkpoint:
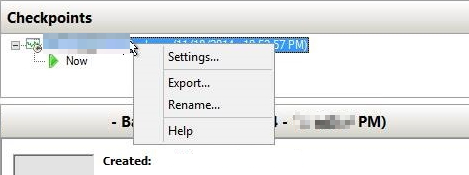
• Hyper-V delete checkpoint not showing in the options. There are only "Settings", "Export", "Rename" and "Help" options left, just like the above scenario shows.
• Recieve an error like " the system cannot find the file specified 0x80070002" or "An error occurred while attempting to delete the selected checkpoint", "catastrophic failure (0x8000ffff)", "The operation failed because the file was not found", and so on.

No matter what the symptom is, you can keep on reading, we will explain why this issue occurs and provide 5 solutions helping you to delete your checkpoint successfully.
Why cannot delete checkpoint in Hyper-V?
Many reasons may cause the checkpoint cannot be deleted, such as a connection error with the host, or a backup tool failure. The most likely scenario is that the checkpoint created by a third-party tool was not deleted properly by the same tool.
More specifically, the checkpoints and associated .AVHDX files should be merged and deleted at the end of a backup - only the newer .AVHDX files should be kept. However, sometimes the checkpoints may be corrupted because the VM is in a locked or backed up state, or some other reason is preventing the deletion and merging. In this case, you may find the delete option missing, and Hyper-V cannot delete this checkpoint.
How to fix this? I will provide you with 5 proven solutions, you can try them one by one. *They also work for cleaning up after a failed Hyper-V checkpoint.
How to solve Hyper-V cannot delete checkpoint (5 solutions)
When you are unable to delete checkpoint in Hyper-V, you can first try some regular troubleshooting means. We list them in the Solution 1. Then you can try the other solutions.
Tip: Some solutions are risky and prone to mistakes, so I strongly recommend you back up your Hyper-V virtual machines in advance. Even if things don't work out or make a mistake accidentally, you can easily restore your virtual machine and won't lose data.
Solution 1. Troubleshooting steps that you should try first
Before taking other measures, you can try some simple ways in Hyper-V Manager to see if you can make snapshot removal work. That is:
- Right-click on the host name in Hyper-V Manager and select Refresh.
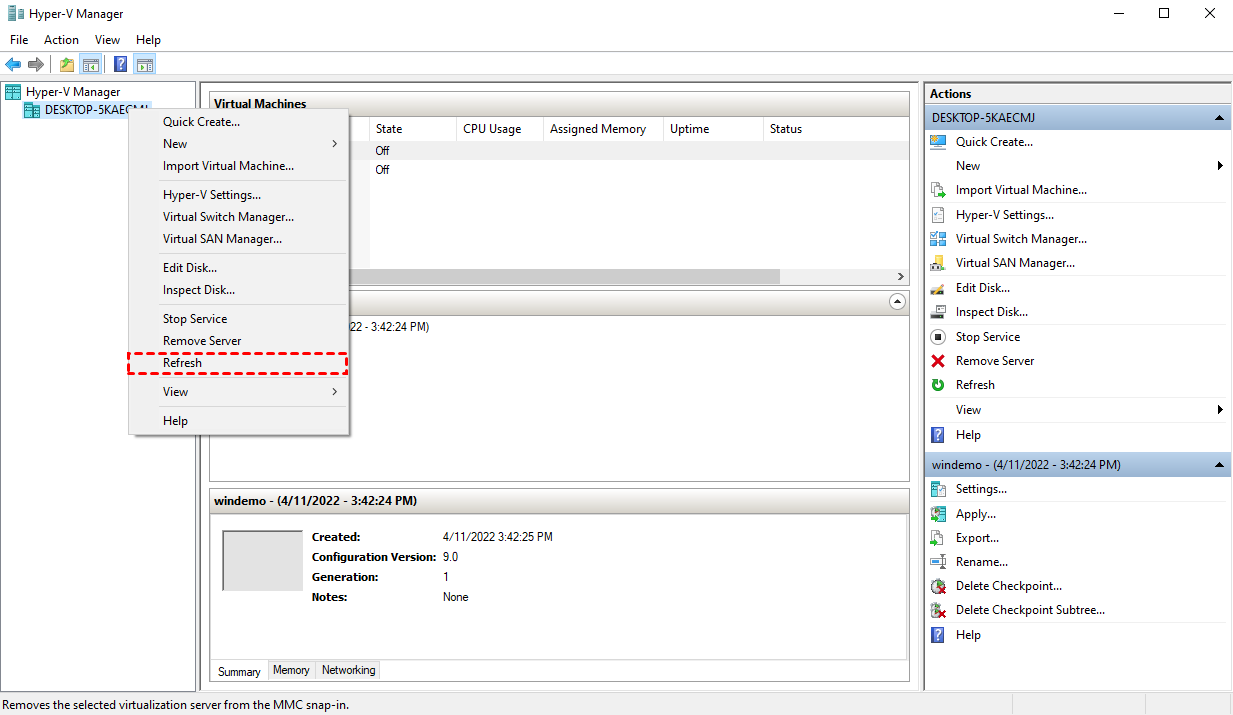
- Close and restart the Hyper-V Manager.
- Highlight the target checkpoint and use the [Delete] key on the keyboard. It should pop up a window confirming whether to delete the checkpoint or not.
If none of these ways can help, then you may need to try delete checkpoint Hyper-V with PowerShell.
Solution 2. Create a new checkpoint and delete
Sometimes, I create a new checkpoint and then delete it. This process usually forces the system to delete the new and old checkpoints. It can be the easiest way to deal with this problem.
You can just right-click on the VM and choose Checkpoint to create a new checkpoint. And delete it to see if it can solve this problem.
Solution 3. Delete Hyper-V checkpoint with PowerShell
Hyper-V PowerShell module is a bundle of cmdlets for creating, configuring, and managing Microsoft Hyper-V hosts and virtual machines.
When there is no option to delete a checkpoint in Hyper-V Manager, it is related to the broken recovery checkpoint remaining after a Data Protection Manager (DPM) backup process. In this case, you can manually merge and delete checkpoints using PowerShell Command. Here follow the steps below.
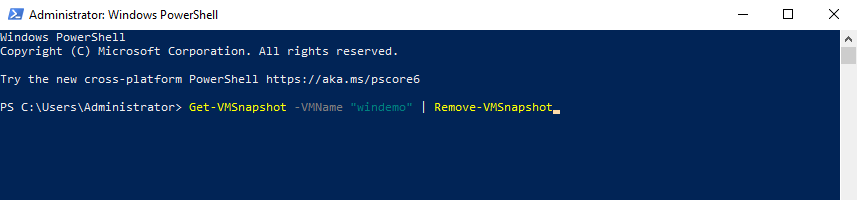
Step 1. Launch Windows PowerShell as administrator on the Hyper-V host.
Step 2. Type and execute the following command to delete the checkpoint:
Get-VMSnapshot -VMName | Remove-VMSnapshot
Please replace the <VMName> with your target virtual machine name.
Tips:
1. If you need to specify a host, you can add a parameter of -ComputerName. The command looks like this:
Get-VMSnapshot -ComputerName <ComputerName> -VMName <VMName> | Remove-VMSnapshot
2. If you want to delete a specified checkpoint, you can first run the command to get the checkpoint name:
Get-VMSnapshot -ComputerName <ComputerName> -VMName <VMName>
Then use the name to delete the specified checkpoint, the command will be like:
Get-VMSnapshot -VMName <VMName> -Name <CheckpointName> | Remove-VMSnapshot
Once the command succeeds, you can see the merge progress for the particular VM. It may take some time depending on the snapshot size. After that, you should be able to modify the virtual machine configuration again.
If this method still cannot delete your Hyper-V checkpoint, turn to the next one.
Solution 4. Export a new checkpoint and delete the VM with the old checkpoint
You can create a new checkpoint. Then delete the VM, and create a new virtual machine with the exported checkpoint. VHD file. This will create a new identical virtual machine from the newly created checkpoint without checkpoints left.
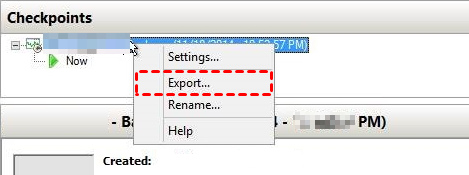
Step 1. Launch Hyper-V Manager. Shut down the virtual machine. Right-click on the virtual machine and choose Checkpoint. This creates a new checkpoint.VHD/VHDX file.
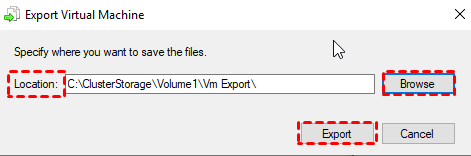
Step 2. Right-click on the newly created checkpoint. and select Export…
Step 3. In the pop-up window, click Browse to specify a network share as the storage destination to the exported files. And then click Export.
Step 4. Right-click on the virtual machines and choose Delete.
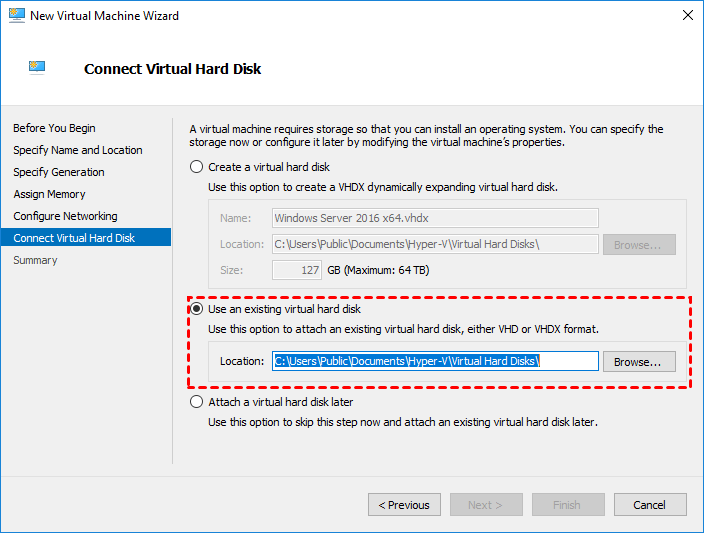
Step 5. After the deletion. Click Action from the top of the Hyper-V Manager interface > New > Virtual Machine.
Step 6. When the New Virutal Machine Wizard is run. Configure it with the same properties. In the "Connect Virtual Machine Hard Disk" step, choose Using an existing virtual disk. Select the checkpoint VHD/VHDX file you just exported.
Then follow the wizard prompts to complete the Hyper-V VM creation. After that, you can check if the checkpoint is successfully deleted.
Solution 5. Manually merge Hyper-V checkpoint
This is the last resort. if you are being prompted an error occurred while attempting to delete the selected checkpoint, and above solutions can't help you, you can manually merge the checkpoint.
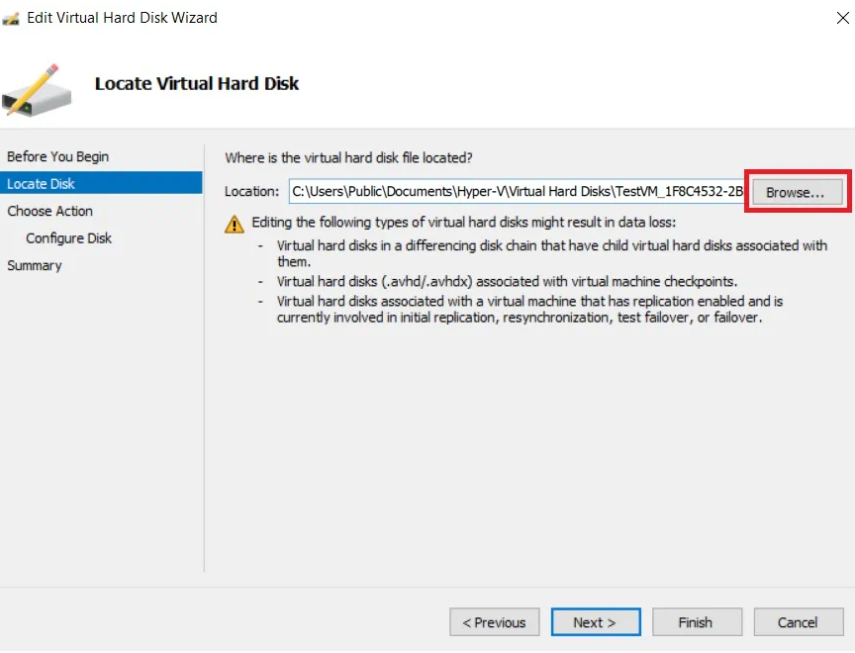
Step 1. On the Hyper-V Manager, select the VM and then click Edit Disk in the Action tab.
Step 2. When you see the Edit Virtual Hard Disk Wizard, click Next. and browse and select the checkpoint file on the next screen.
Step 3. Select Merge and click Next.
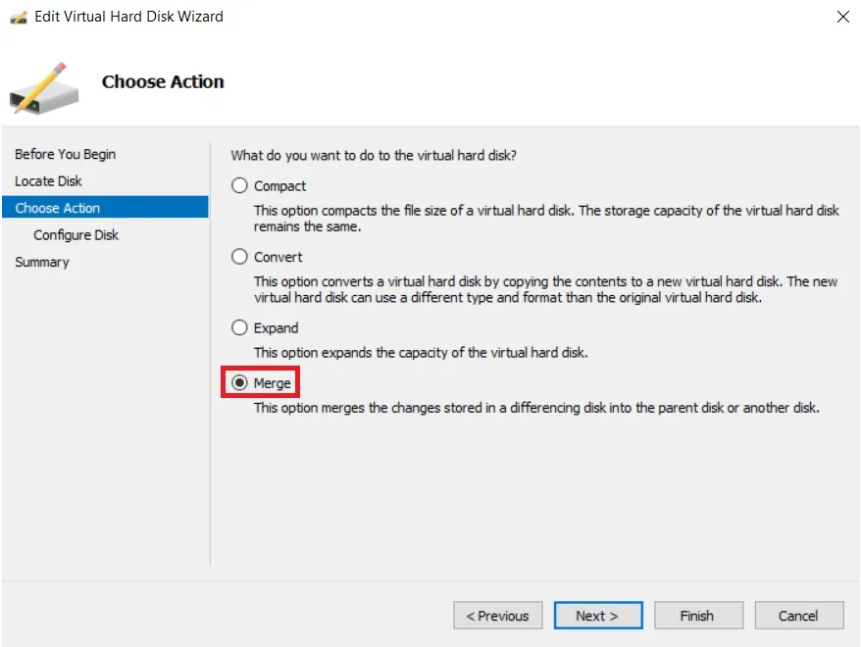
Step 4. Then select To the parent virtual hard disk option.
Wait for the process to get finished. Besides, you can also manually merge Hyper-V checkpoint using PowerShell, you can go to this article to learn more details: How to Merge Hyper-V Snapshot (2 Detailed Ways) and Why.
Best Way to Protect Hyper-V Virtual Machines without data loss worries
Hyper-V checkpoint can't replace the backup. Before you get down to fixing an issue, like the "Hyper-V cannot delete checkpoint" problem or worry about VM corruption/loss, it is necessary to have regular backups for your Hyper-V virtual machine with a professional enterprise backup solution, such as AOMEI Cyber Backup. This free Hyper-V backup solution offers long-term data protection and quick recovery, maximizing data security and ensuring business continuity.
AOMEI Cyber Backup is designed to protect virtual machines from any data threats, whether you are using Hyper-V in Microsoft Windows Server 2022 / 2019 / 2016 / 2012 R2, Microsoft Windows 11 / 10 / 8 / 8.1 or Hyper-V Server 2019 / 2016 / 2012 R2. And it offers you the following benefits:
Easy-to-use: User-friendly interface to complete backup and restore process based on several clicks.
Perpetual Free: No time limit for AOMEI Cyber Backup Free Edition.
Auto Backup Schedule: Create a schedule to backup virtual machines automatically at your preset time.
Centralized Management: Back up all or multiple Hyper-V virtual machines and easily manage from the central console without installing agents on each VM.
Flexible Backup Strategy: Flexibly tracking data and storing backups in different storages.
Role-based Management: Allows the creation of sub-accounts with different permissions and you can assign them to your other team members.
Please hit the button below to download and use AOMEI Cyber Backup for free:
*You can choose to install this VM backup software on either Windows or Linux system.
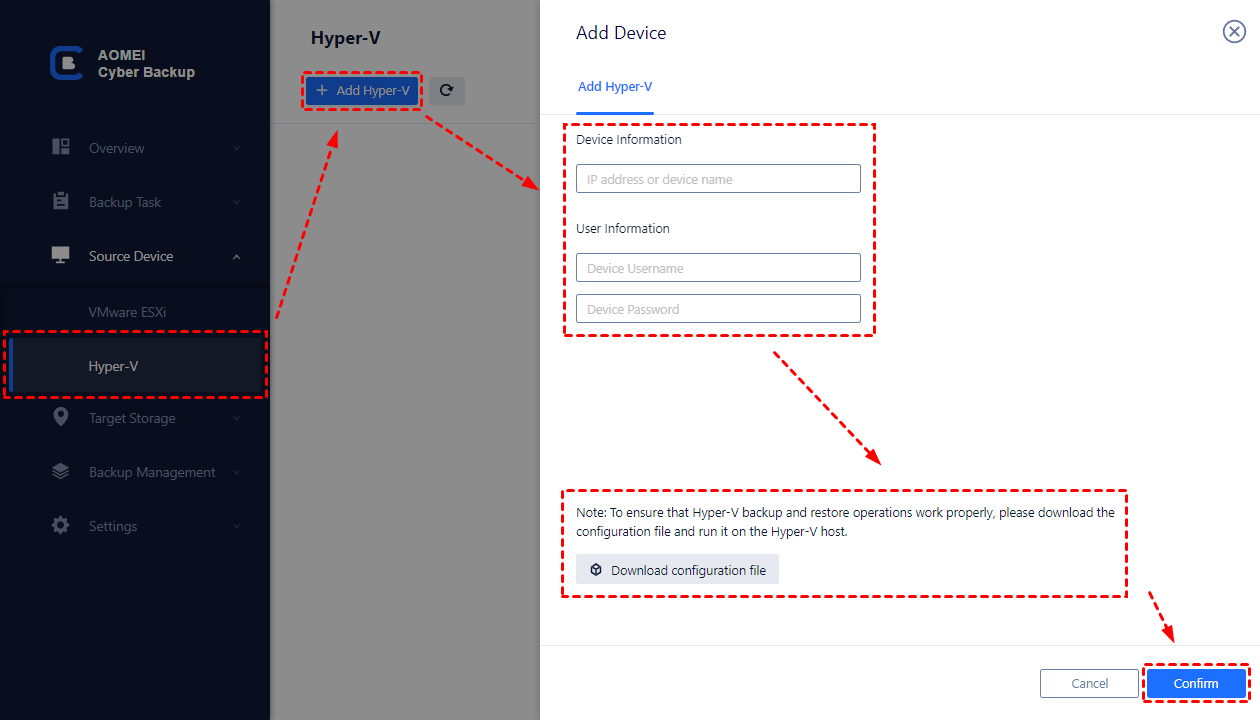
Step 1. Open the AOMEI Cyber Backup web client, and click Source Device >> Hyper-V >> Add Hyper-V to bind your Hyper-V host, then enter the required information and click Confirm to add virtual machines.
Step 2. Access to Backup Task >> Create New Task to configure your Hyper-V backup task. In the opened wizard, you can select Hyper-V virtual machines to back up, the storages to save the backups.
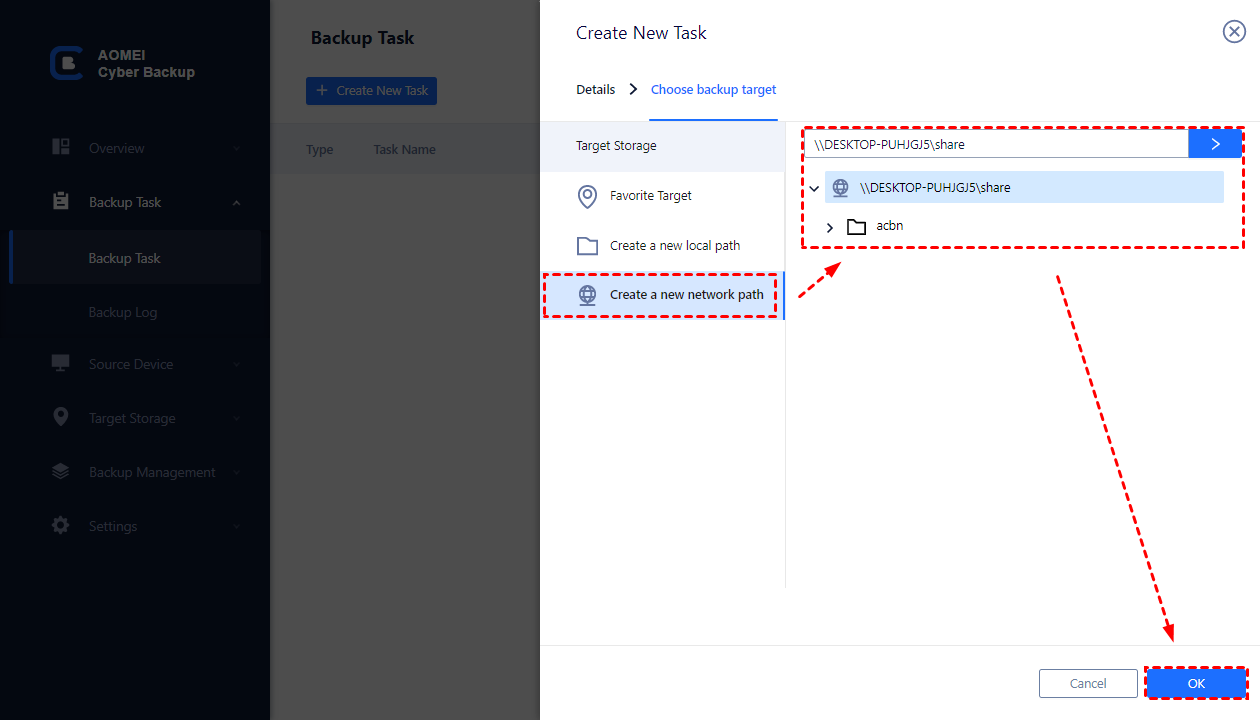
Also, you can configure the Schedule to select "Full Backup", "Differential Backup", and "Incremental Backup". Specify the backup frequency on basis of daily / weekly / monthly to automatically run the Hyper-V backup task.

Step 3. Click Start Backup and select Add the schedule and start backup now, or Add the schedule only.
When completing the Hyper-V backup solution, you can monitor the backup process on the main interface, and you can also check the "Backup Log" to see if any errors result in your backup failure.
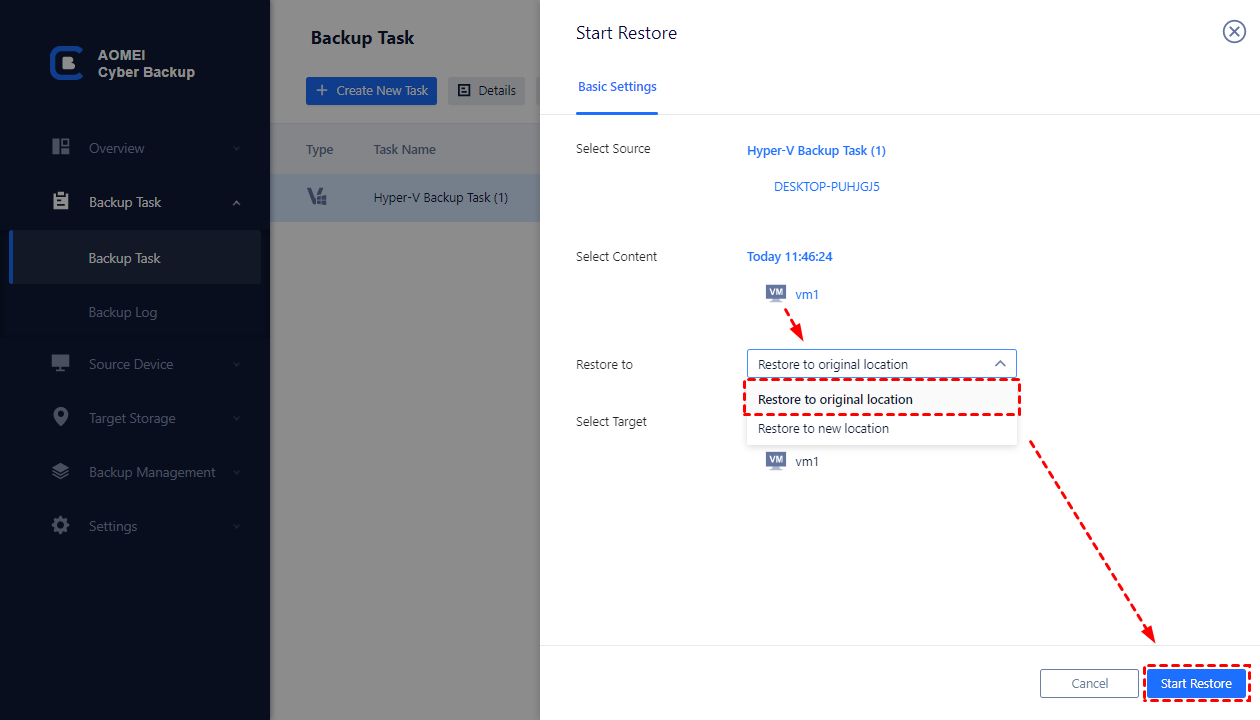
When you want to Restore a VM from the backup, you can select any backup version from the history, and Restore to original location easily.
✍While the Free Edition covers most of the VM backup needs, you can also upgrade to enjoy:
- Batch VM backup: batch backup large numbers of VMs managed by vCenter Server or on standalone ESXi hosts.
- Backup Cleanup: Specify retention policy to delete old VM backups automatically, thus saving storage space.
- Restore to a new location: Make a clone of a virtual machine in the same or another datastore/host for Hyper-V VM cloning, without reinstalling or configuring a new VM.
FAQs about Hyper-V delete checkpoint
The above describes how to solve the problem that the delete option disappears and the hyper-v checkpoint cannot be deleted. Besides, many users may have some other confusion about checkpoints. I have compiled some common questions and their answers here.
Q: Where are checkpoints stored on a Hyper-V host?
In general, the default location for storing checkpoint configuration files is:
%systemroot%\ProgramData\Microsoft\Windows\Hyper-V\Snapshots
And the default locations for storing AVHDX files (checkpoint storages) are:
Windows Server 2012R2 / Windows 8.1: C:UsersPublicDocumentsHyper-VVirtual Hard Disks
Windows Server 2012 / Windows 8: C:ProgramDataMicrosoftWindowsHyper-VNew Virtual MachineVirtual Hard Disks
Q: Can you directly delete checkpoint files (.avhdx)?
Whenever a checkpoint is deleted, Hyper-V merges the .vhdx and .avhdx files automatically, and the .avhdx files should be removed from the disk after the Hyper-V checkpoint merging process is complete. So a proper checkpoint deletion does not result in data loss.
It's not a good idea to delete the .avhdx file in VM folder directly, because it may cause the checkpoint tree to fail.
The normal steps to delete a checkpoint are:
Open the Hyper-V Manager -> Select the virtual machine for which you need to remove checkpoints -> Locate the Checkpoints tab -> Right-click on the desired checkpoint -> Click "Delete Checkpoint". If asked to confirm the action, make sure the checkpoint is correct and click "Delete" again.
Note if you need to delete all subsequent checkpoints, right-click the earliest checkpoint and click "Delete Checkpoint Subtree".
If you find some orphaned Hyper-V AVHDX files in the VM folder, but no snapshots on that VM, this may be because of incomplete deletion or merging, you can refer to: delete Hyper-V AVHDX file without checkpoints.
Q: Hyper-V checkpoint delete vs merge: What are the differences?
A checkpoint is any new change or save between the old state and the present, it stops writing to the actual disk and writes to the change disk.
Once you are satisfied and delete the checkpoint, the changes are written back/merged to the actual disk and are write-enabled again. Therefore, deleting a checkpoint and merging a checkpoint are actually the same thing.
If you don't want the changes, you just need to revert them and any changes since the checkpoint will be deleted.
Q: Can Hyper-V checkpoints be used as regular backup means?
The answer is NO. VM snapshot and backup are different from each other. Microsoft's Hyper-V checkpoint is not a replacement for backup.
► When you create a backup, you are creating a copy of your virtual machine. It stores the complete data of the VM. Backups in Hyper-V can be used to restore a whole VM and do not affect the performance.
► When you create a checkpoint, you are creating a different disk based on the original virtual machine hard disk. If the original disk is damaged, the child disk is easy to be lost or damaged as well. All changes made after the checkpoint are re-directed to the child disk and leave the original virtual machine disk read-only.
Meanwhile, checkpoints are running out of the memory of the disk at a rapid speed, which will gradually to the poor performance of your virtual machines.
In short, Hyper-V checkpoint is just a secure "undo" button. If you want to test something quickly and restore the VM to a stable state, checkpoint in Hyper-V is convenient and fast to execute the process. But, if you want long-term and independent protection for VMs, you still need to find effective Hyper-V backup solution.
Summary
If you encounter the "Hyper-V cannot delete checkpoint" issue, you can fix using the solution provided in this post. You can refresh and restart the manager, or delete the Hyper-V checkpoint using the PowerShell command.
Hope these solutions can help you when you find your Hyper snapshot no delete option. Besides this, many virtual machine issues can hamper your business and work, such as Hyper-V VM running slow, stuck at restoring or saved state, Hyper-V VM no internet, failing to change state, etc. To prevent your virtual machines from getting all kinds of errors and eventual crashes, it's always recommended to back up your VMs that are loaded with important data.

