


Install Hyper-V PowerShell Module on Windows 10 or Server
Hyper-V PowerShell module needs to be installed separately even if you have enabled the Hyper-V role. In this article, I will introduce 3 ways to install it on your computer.
By Crystal / Updated on March 8, 2023
What is Hyper-V PowerShell module
Hyper-V PowerShell module is a bundle of cmdlets for creating, configuring and managing Microsoft Hyper-V hosts and virtual machines. It can be more a time efficient method than using GUI.
Hyper-V PowerShell module is not installed with Hyper-V by default. It needs to be installed specifically, or there’s even a chance that Hyper-V backups fail with error “Hyper-V PowerShell Module is not installed”. Normally, you can install this module separately, or install it along with Hyper-V role via PowerShell or Windows GUI.
In the following part, I will introduce how to install Hyper-V PowerShell module on Windows 10 or Windows Server 2016. The steps are basically the same on other editions, such like Windows 11, Windows Server 2019, and 2022.
![]()
✎Note: Hyper-V cannot be installed on Windows 10 Home edition.
Method 1. Install Hyper-V PowerShell module via PowerShell
Running a PowerShell command to enable Hyper-V and install Hyper-V PowerShell module is much fast than using GUI. In this part, I will introduce how to install Hyper-V PowerShell module, or how to install Hyper-V role along with the module via Powershell.
Since the commands to install Hyper-V and PowerShell module differ in Windows Client OS and Server OS, I will use Windows 10 and Windows Server 2016 as examples respectively.
![]() Note: Before installing, you can first enter the following command in PowerShell (as Administrator) to check whether the Hyper-V role has been enabled on your computer. Then you can pick a method accordingly.
Note: Before installing, you can first enter the following command in PowerShell (as Administrator) to check whether the Hyper-V role has been enabled on your computer. Then you can pick a method accordingly.
Get-WindowsOptionalFeature -Online -FeatureName Microsoft-Hyper-V
How to install Hyper-V PowerShell module on Windows 10
✦ Install only Hyper-V PowerShell module
If you've enabled Hyper-V in Windows feature, you can then use this command to install PowerShell module separately. Launch Windows PowerShell, run the following commands and press Enter:
Enable-WindowsOptionalFeature -Online -FeatureName Microsoft-Hyper-V-Management-PowerShell

✦ Install Hyper-V with Hyper-V PowerShell module
If you haven't enabled Hyper-V role on Windows 10 computer, you can try this way instead. Launch Windows PowerShell, and run the following commands to install Hyper-V and Hyper-V PowerShell module:
Enable-WindowsOptionalFeature -Online -FeatureName Microsoft-Hyper-V-All
This command enables the specified Hyper-V Windows features, including all dependencies and management tools. It prompts you to reboot your system to complete the installation, where you can type "Y" to reboot immediately or "N" to reboot manually later.

How to install Hyper-V PowerShell module on Windows Server 2016
✦ Install only Hyper-V PowerShell module
Similarly, if you have installed Hyper-V role in your Windows Server, you just need to launch Windows PowerShell, and run the following commands to install the Hyper-V PowerShell module only:
Install-WindowsFeature -Name Hyper-V-PowerShell

✦ Install Hyper-V with Hyper-V PowerShell module
If you have not installed the Hyper-V module yet, then launch Windows PowerShell, and run the following commands to install Hyper-V along with Hyper-V PowerShell module:
Install-WindowsFeature -Name Hyper-V -IncludeManagementTools
This command installs Hyper-V, including all features and management tools on the Windows Server operating system.

Method 2. Install Hyper-V Role with PowerShell module via GUI
Except for PowerShell, you can also install Hyper-V and Hyper-V PowerShell module via GUI. The steps to do it are also different in Windows 11/10 and Windows Server 2016/2019.
Here I will also give you 2 examples to install Hyper-V PowerShell module via Windows 10 Settings (Control Panel) or Windows Server 2016 Server Manager.
How to install Hyper-V PowerShell module on Windows 10
In Windows 11 or Windows 10, you should enable Hyper-V via Windows features. To do this, you can directly search for "windows features" on taskbar or follow the steps below:
1. Open Programs and Features in the Start menu or Settings > Apps.
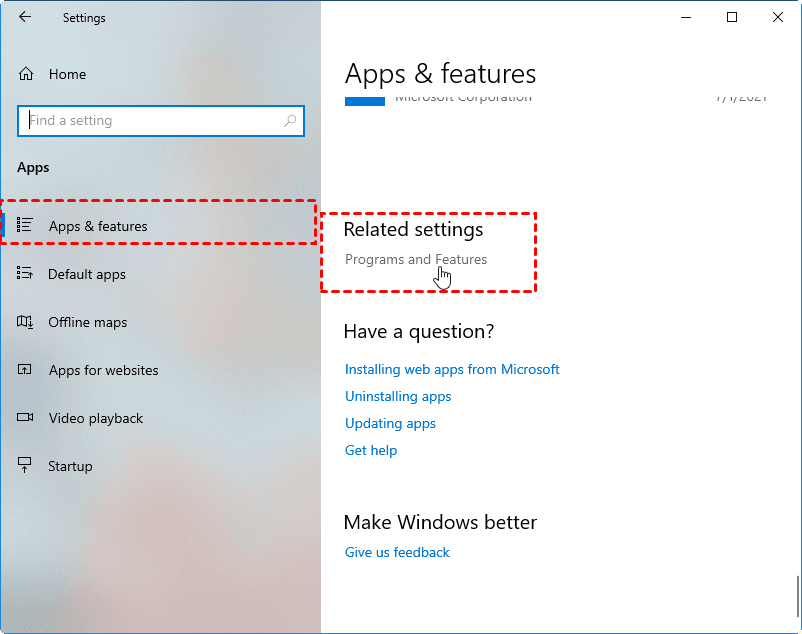
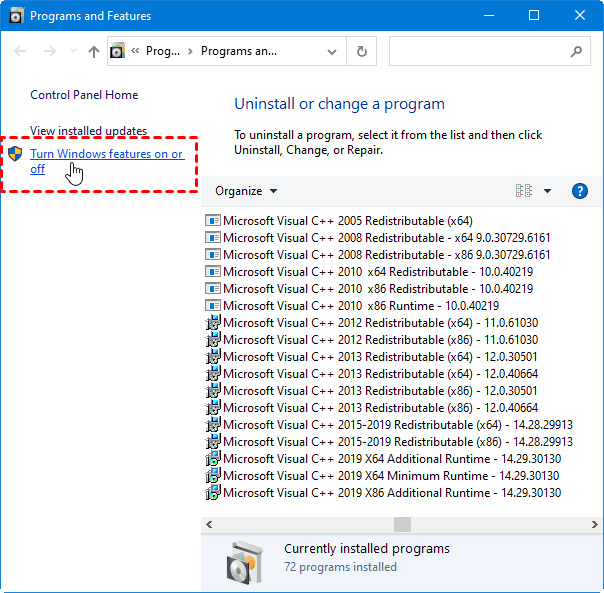
2. Click Turn Windows features on or off on the pop-up window.
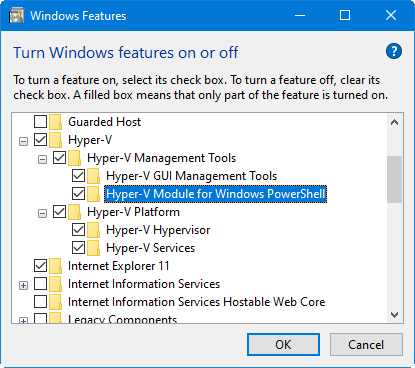
3. In Windows Features, you can enable Hyper-V by checking the box. But to ensure the PowerShell being installed together, you can expand Hyper-V > Hyper-V Management Tools and make sure the Hyper-V Module for Windows PowerShell option is ticked. Click OK to save.
Your computer may prompt you for a reboot to allow Windows features to take effect, confirm this and wait for the restart to complete, then Hyper-V and Hyper-V PowerShell on your computer should be started successfully.
✎Tips: If you cannot find Hyper-V option in Windows features, there may be some hardware and system requirements not met. Please refer to Windows 11 Hyper-V not showing.
How to install Hyper-V PowerShell module on Windows Server 2016
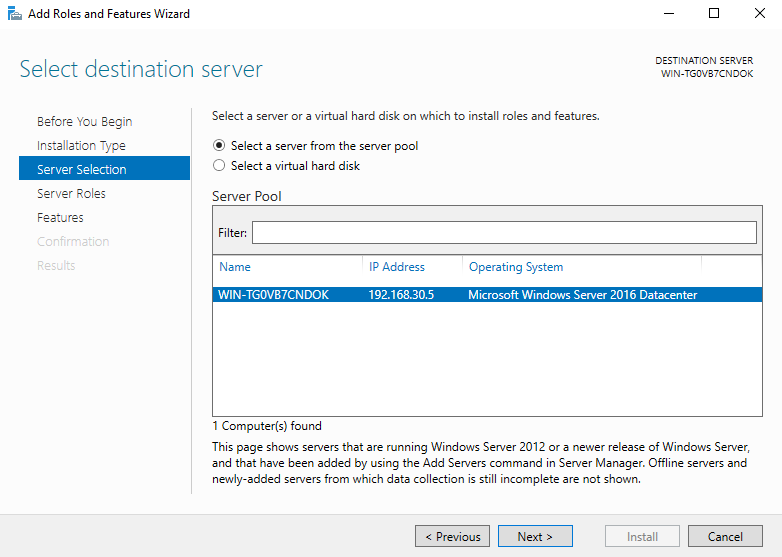
For Windows Server, you need to add roles and features in Server Manager. Try the following steps:
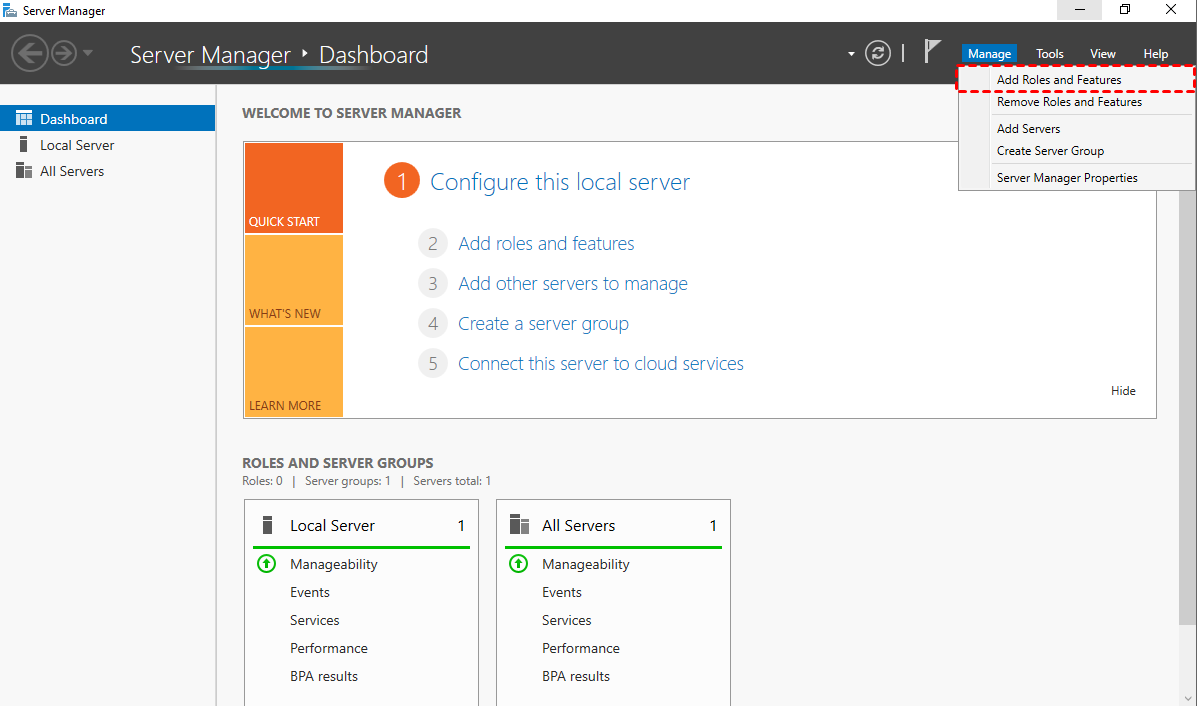
1. Open Server Manager, click Manage > Add Roles and Features, and click Next on the pop-up wizard.
2. Select a server you want to install Hyper-V PowerShell module, click Next to continue.
3. On Server Roles page, check the Hyper-V option from the features list.
4. Check Include management tools (if applicable) option and click Add Features on the pop-up window. Click Next to continue.
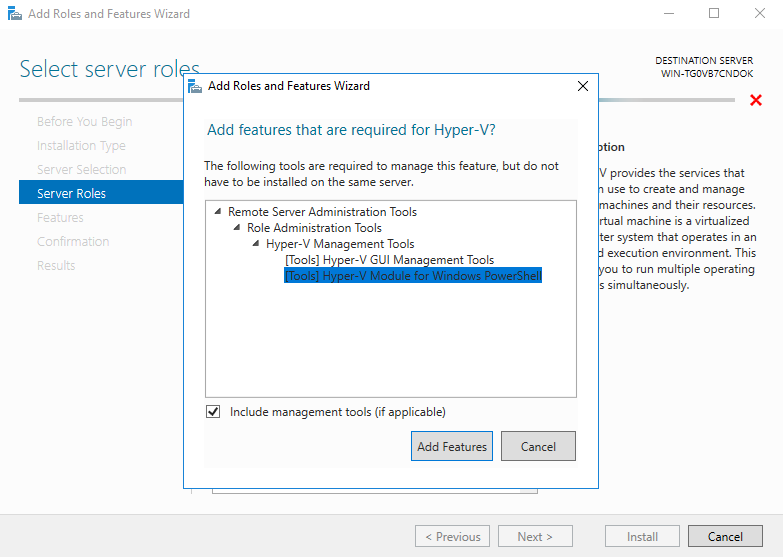
After you add these features successfully, the Hyper-V role and Hyper-V PowerShell module should be enabled altogether. You can then continue to use them.
✎Always Remember to Protect Your Hyper-V VMs
With Hyper-V enabled and configured properly, there are still many possible reasons that may cause your VMs to go wrong. To avoid data loss and reduce business downtime, you can use the free Hyper-V backup software to backup your Hyper-V VMs in case of disaster recovery. More »
Summary
PowerShell is a very convenient way capable of perform some of the Hyper-V management automatically. In this article, I introduced 2 ways to install Hyper-V PowerShell module (separately or along with Hyper-V role) on Windows 10 or Windows Server 2016.
If you want to try other hypervisors like VMware Workstation, you can also disable Hyper-V in these ways.

