


Restoring Deleted VM on Hyper-V from VHD(X) or Exported Files
If you accidentally deleted a VM from Hyper-V Manager, is there any way to restore the deleted VM back? In this article, I will introduce the detailed steps to do this.
By Crystal / Updated on December 25, 2023
Case: Recover data of a vm with only vhd file in Hyper-v
Hi, I have accidently deleted my vm without taking backup. I have a vhd file, avhd file, one vsv file in my snapshots folder. The virtual machines folder inside my vm folder is empty. When I checked, xml file seems to be missing. How do I recover a deleted VM in Hyper-v? Is there a way to restore my vm or at the least the data that is in there?
- Question from social.technet.microsoft.com/Forums
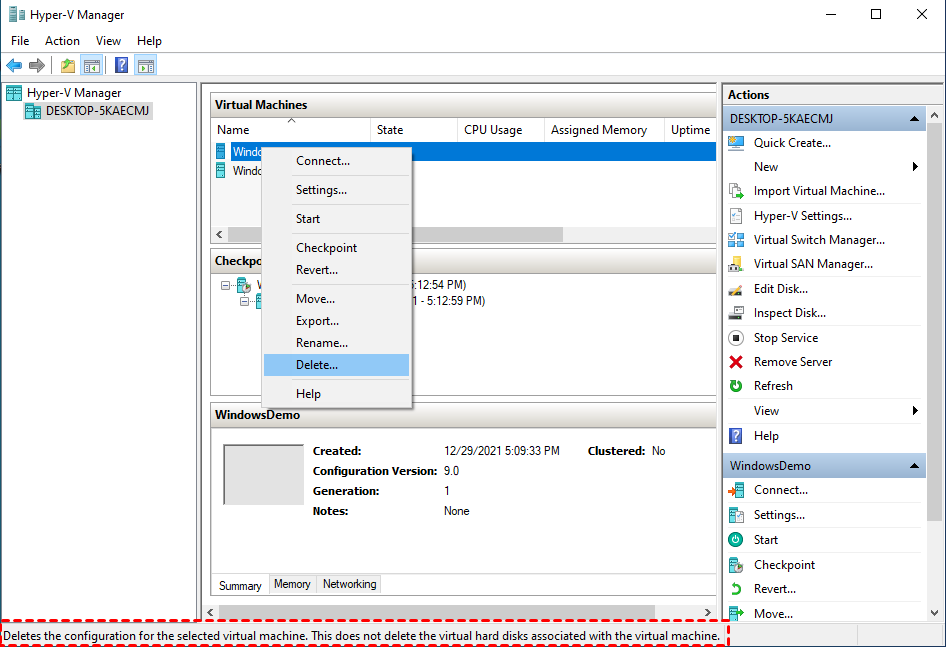
What happens if you delete a VM on Hyper-V Manager?
You may have the same experience as the above case, accidentally deleted Hyper-V VM without taking any backup.
When you delete a VM from Hyper-V Manager, the configuration files will be deleted, but left the virtual hard disk VHD(X) file as a failsafe, the differencing disk AVHD(X) files of the Hyper-V checkpoint (if had) will be merged into the single VHD(X) file.
This is definitely an emergency. Without backup, you may lose your critical VM data. Is there any way else that can be used to restore entire VM back?
In fact, there are some remedies. For example, you can restore the deleted VM by creating a new VM and associating the VHD(X) with it.
What to do if you accidentally delete a VM on Hyper-V Manager?
If you accidentally deleted a VM on Hyper-V, the first thing you need to do is calm down, and think about whether you’ve backed up Hyper-V VMs recently, whether using third-party software, Windows Server Backup (WSB) or System Center Data Protection Manager (DPM), or just exported the VM. As long as you take regular Hyper-V backup, you can find the most recent backup and restore it by the usual process.
But if you are not in the habit of backing up, or just forgot to take backup recently, there is no need to panic. Because Hyper-V provides you with the final insurance, it only deletes the configuration, and won’t delete the virtual hard disks associated with the VM. You can still restore Hyper-V virtual machine from VHDX files.
But it is not secure and effective enough than restoring from image-level virtual machine backups. In this article, I will introduce the detailed steps of how to restore from backups or exported files, and how to restore VHD file in Hyper-V.
Most effective way to prevent accidental deletion: regular backups
Data loss due to accidental deletion happens all the time. According to Cybint’s stats in December 2020, 95% of cybersecurity breaches are due to human error. To prevent more serious consequences from human errors, it is necessary to auto backup VMs to redeem the situation.
The best way to protect all data on the VMs is to perform image-level backups. They are complete and independent, allowing you to restore an instant usable VM. Here I recommend you a professional backup software AOMEI Cyber Backup. It allows you to create image-level automatic backup tasks in 2 concise steps.
* To get a quick walkthrough, please watch the video.
● Bind Devices: binding your Hyper-V devices on AOMEI Cyber Backup to manage all VMs. It supports Windows Server 2012 and all later versions, as well as VMware 6.0 and all later versions.
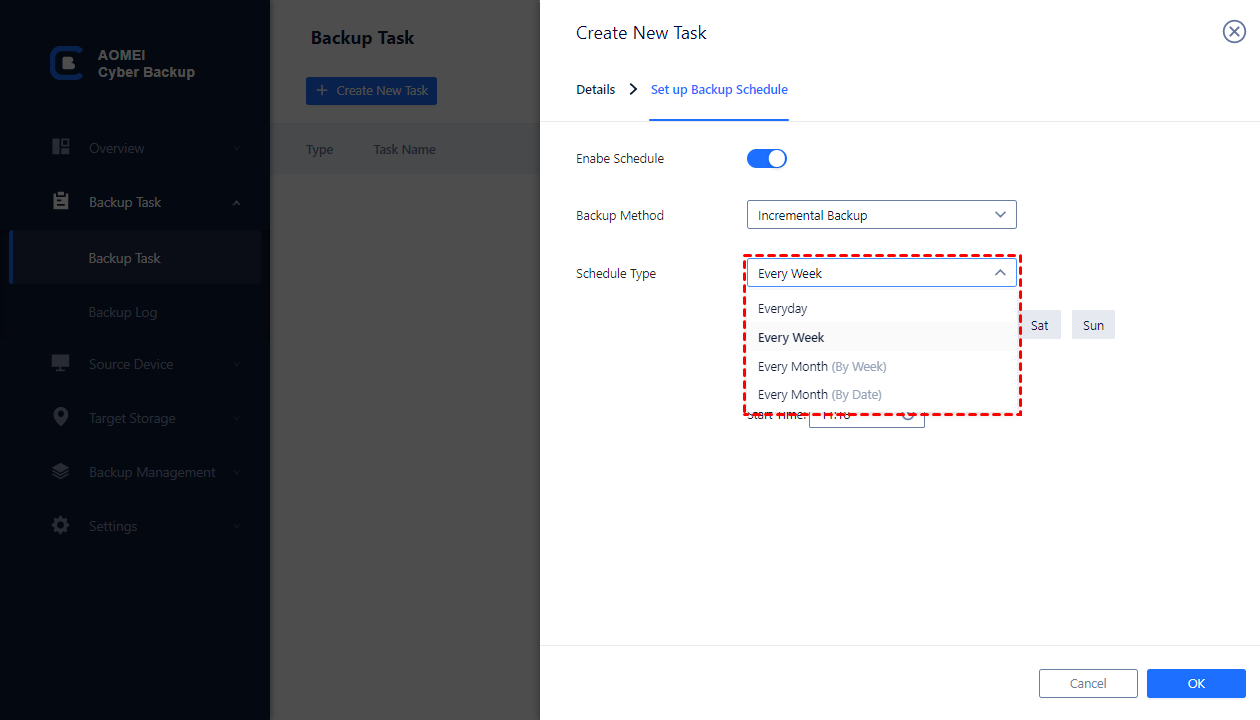
● Create Backups: clicking + Create New Task and provide Task Name, Backup Type, Device, Target, Schedule, and Backup Cleanup to create a complete automatic backup task.
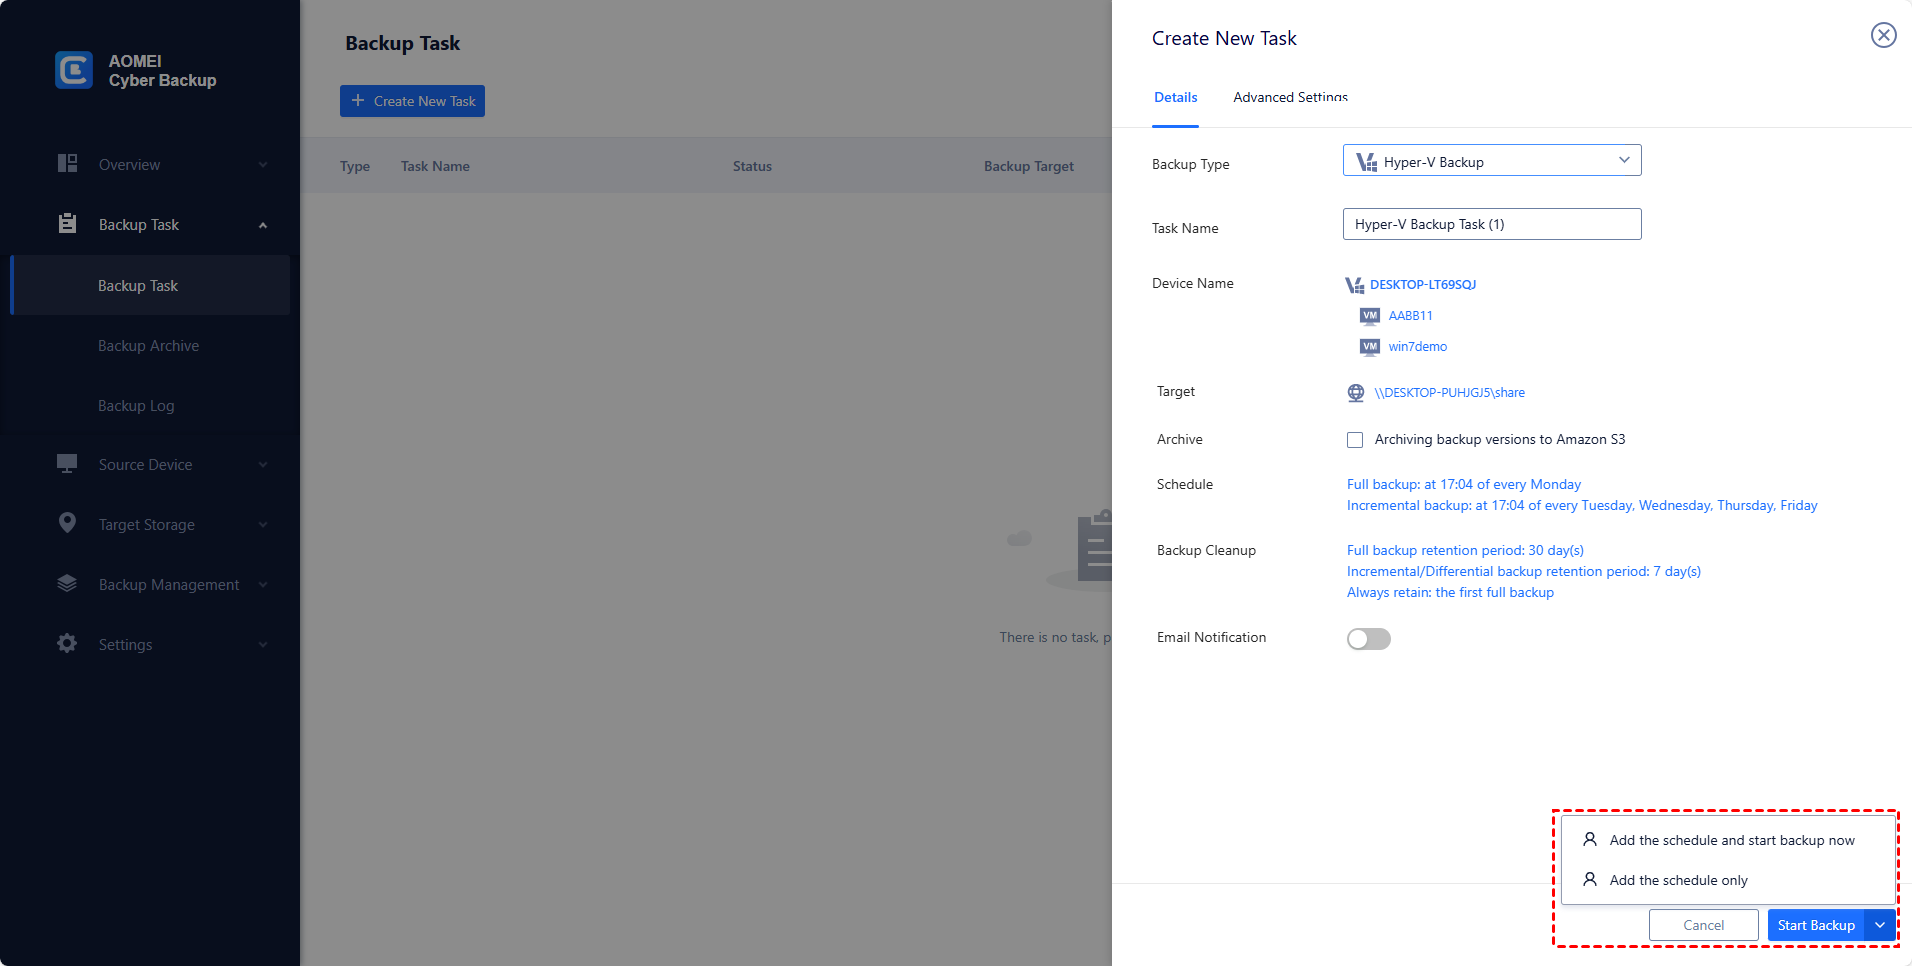
With Backup Schedule it can auto backup VMs daily, weekly, or monthly. The created restore points will be clearly listed with dates for further restore.
How to restore deleted VM via AOMEI Cyber Backup
1. Click … > Restore on the left of the backup task to open the restore wizard.
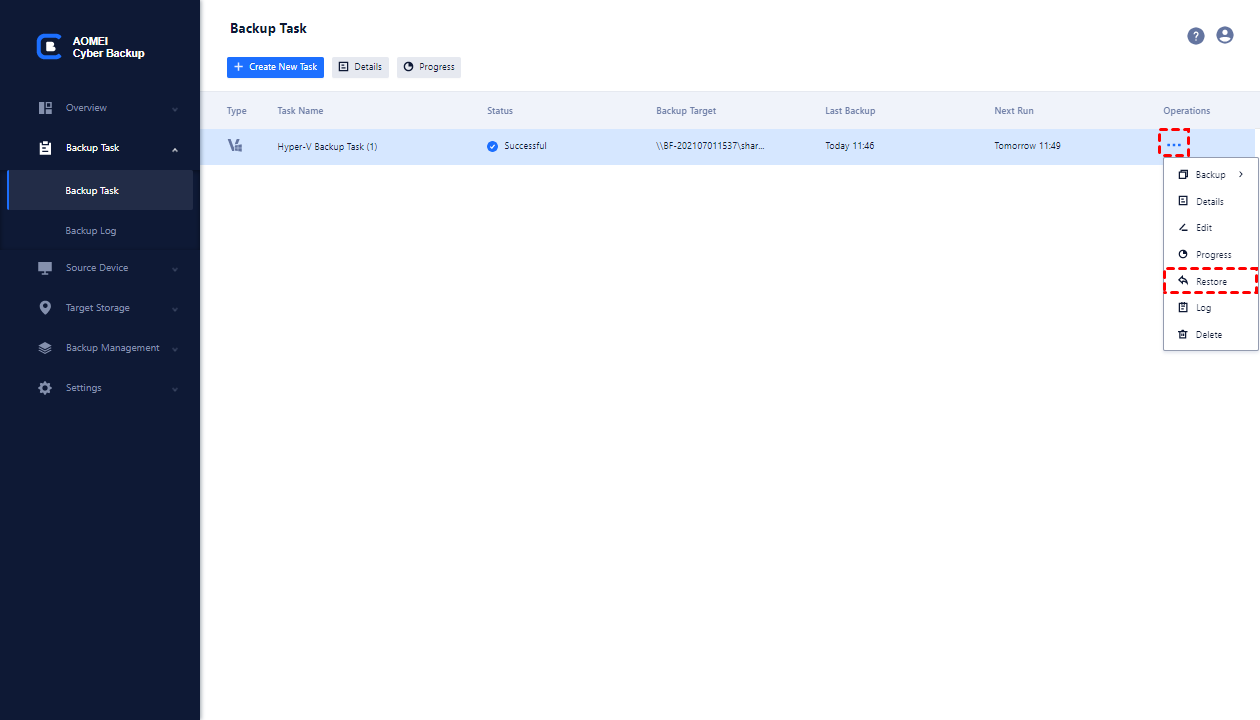
2. Confirm the restore Source task, and click Select Content to specify a restore point, click OK to continue.
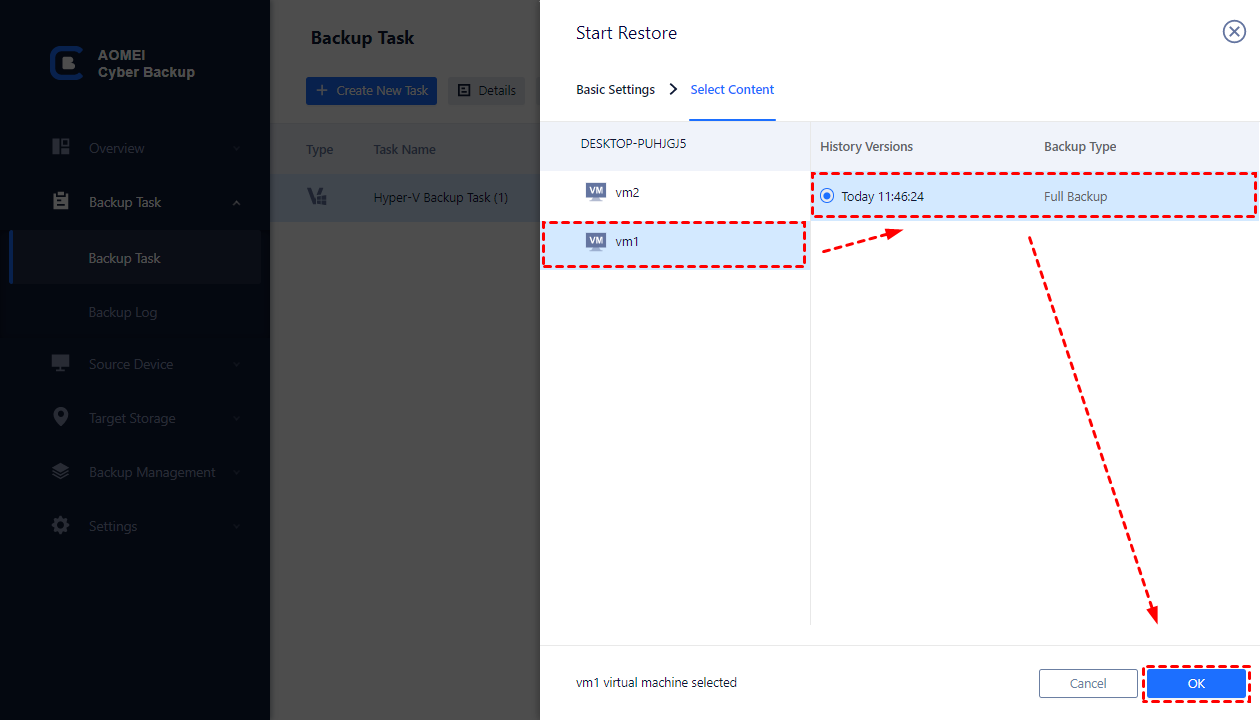
3. By selecting Restore to new location you can restore the deleted VM to new VM on same or another datastore, host, and change the RAM and Virtual Processor according to your needs.
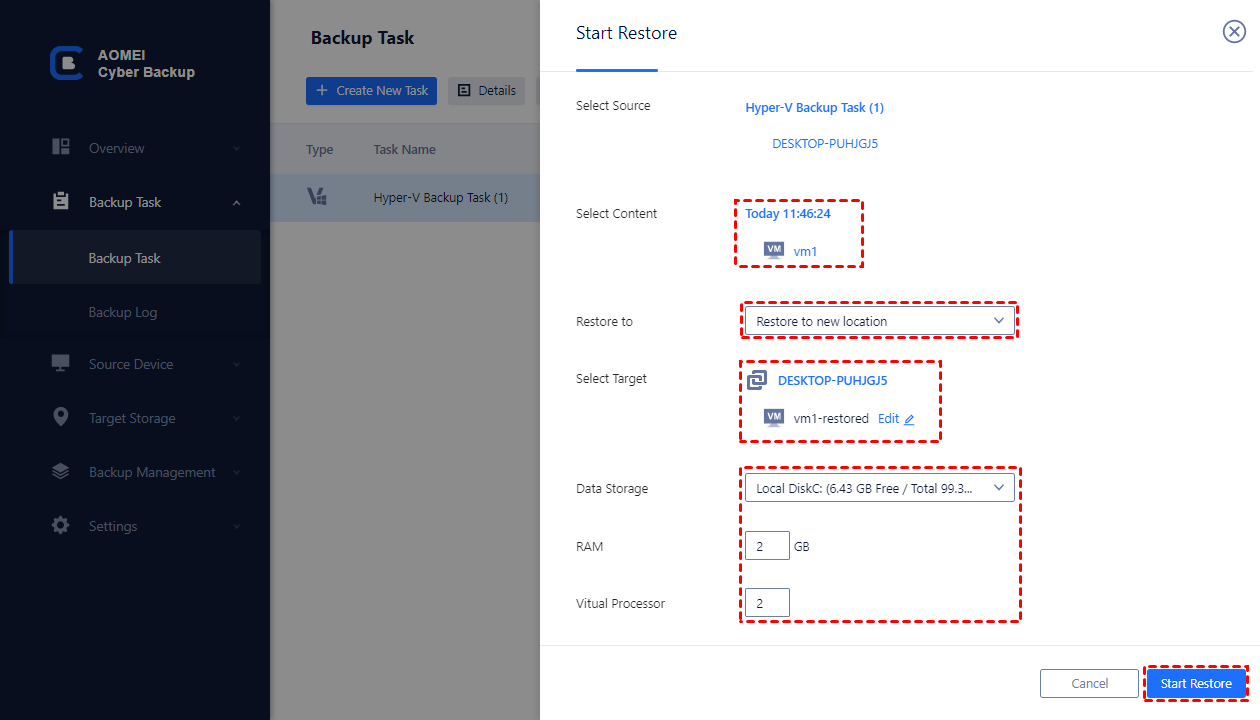
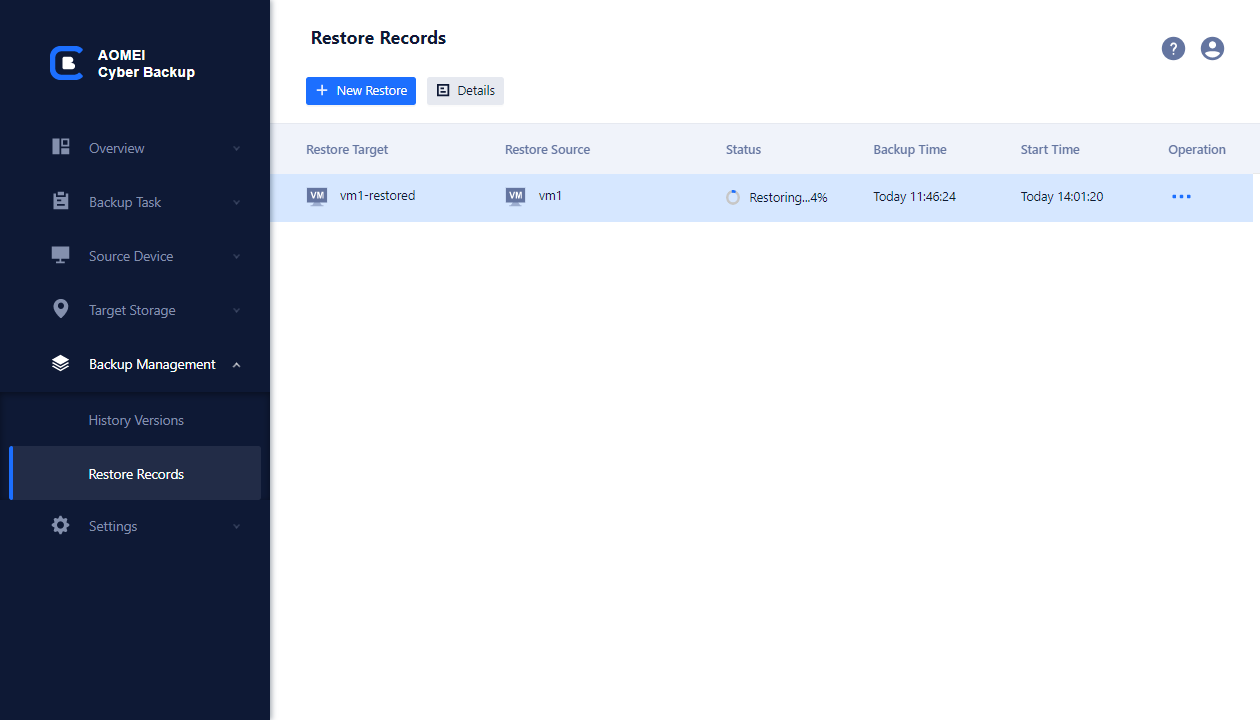
4. Now you can click Start Restore. The process details will be displayed in Restore Records.
2 remedies for Hyper-V restore deleted VM
To restore deleted VM on Hyper-V Manager, if you did not back up the VM in advance, you can create a new VM with the same configuration, and when going to the connect virtual hard disk step, select use an existing virtual hard disk and navigate to the reserved VHD(X) file.
If you backed up the VM beforehand, it will be much easier for you to restore the VM in normal process. Here are the detailed steps.
Restore deleted VM on Hyper-V from existing VHD(X) files
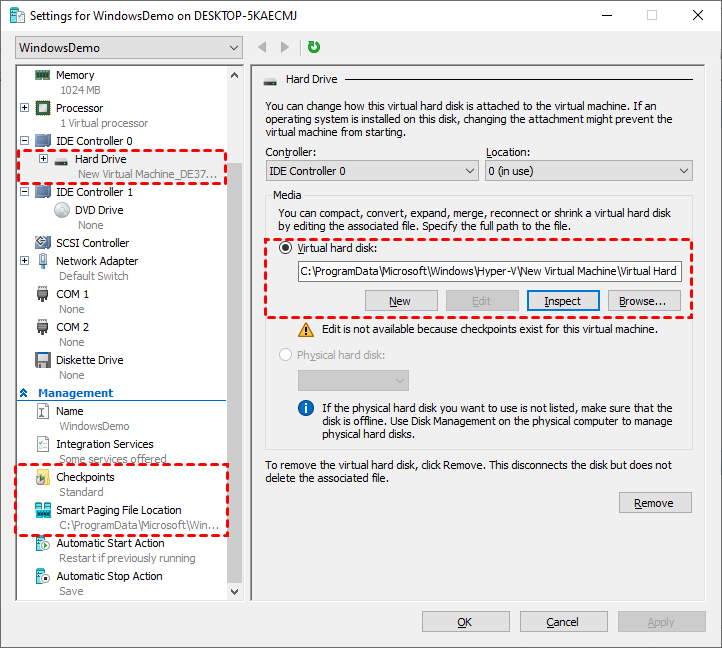
Unlike other hypervisors such as VMware, Hype-V does not store all the VM files to the one folder, but keeps them in different locations. You can right-click on the VM name and select Settings to check where these files are stored.
- The default location for Hyper-V to store virtual hard disks is:
C:\Users\Public\Documents\Hyper-V\Virtual hard disks
- The default location for Hyper-V to store the checkpoints, smart paging, and other configuration files is:
C:\ProgramData\Microsoft\Windows\Hyper-V
✦ Restore Hyper-V virtual machine from VHDX
1. Launch Hyper-V Manager and connect to your server. Right-click on the server name and select New > Virtual Machine…
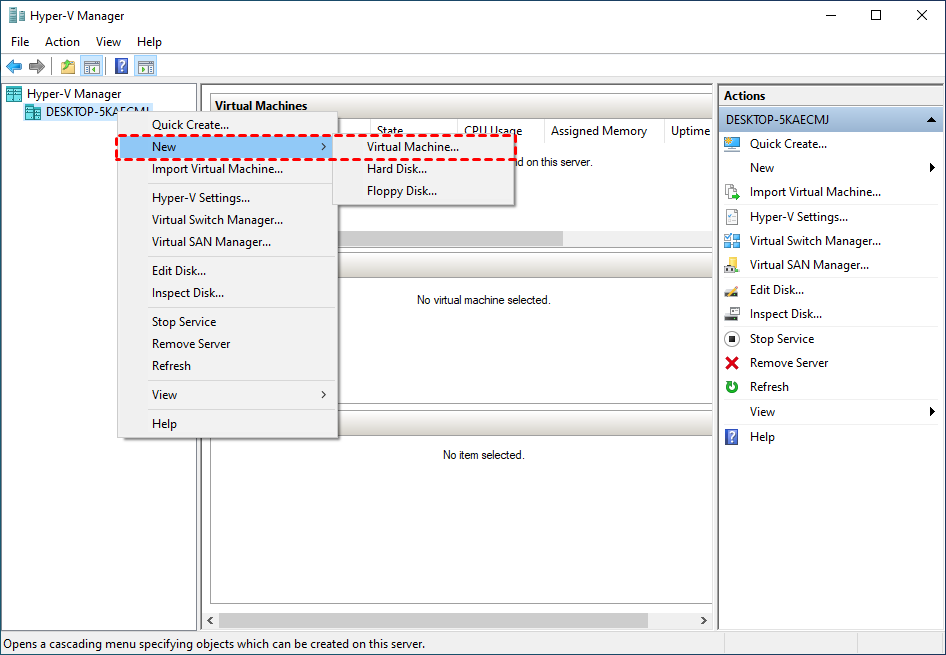
Click Next on the pop-up wizard.
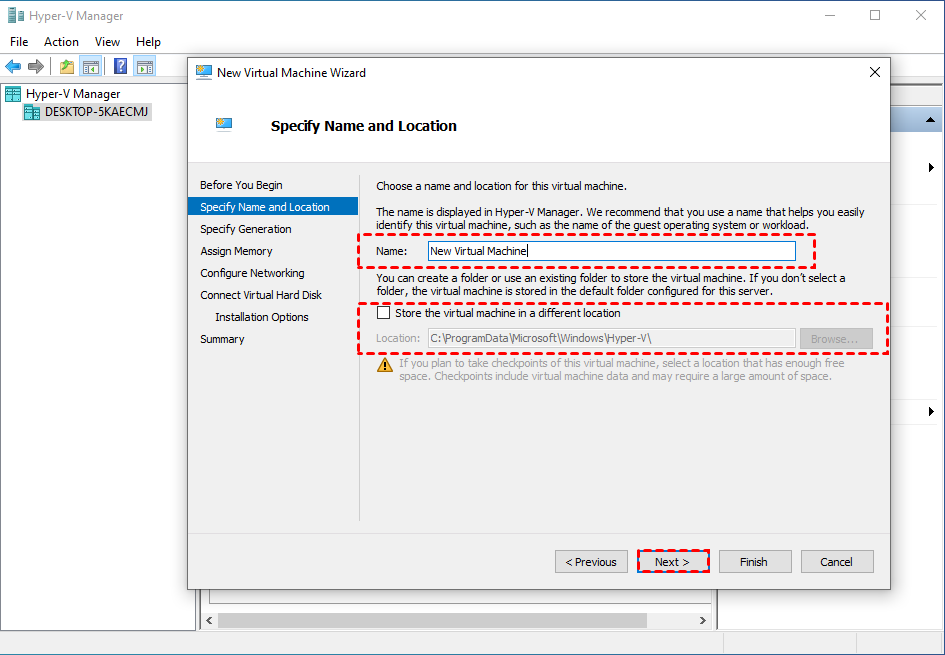
2. On Specify Name and Location page, provide a Name for the VM, and leave the Store the virtual machine in a different location option unchecked. Click Next to continue.
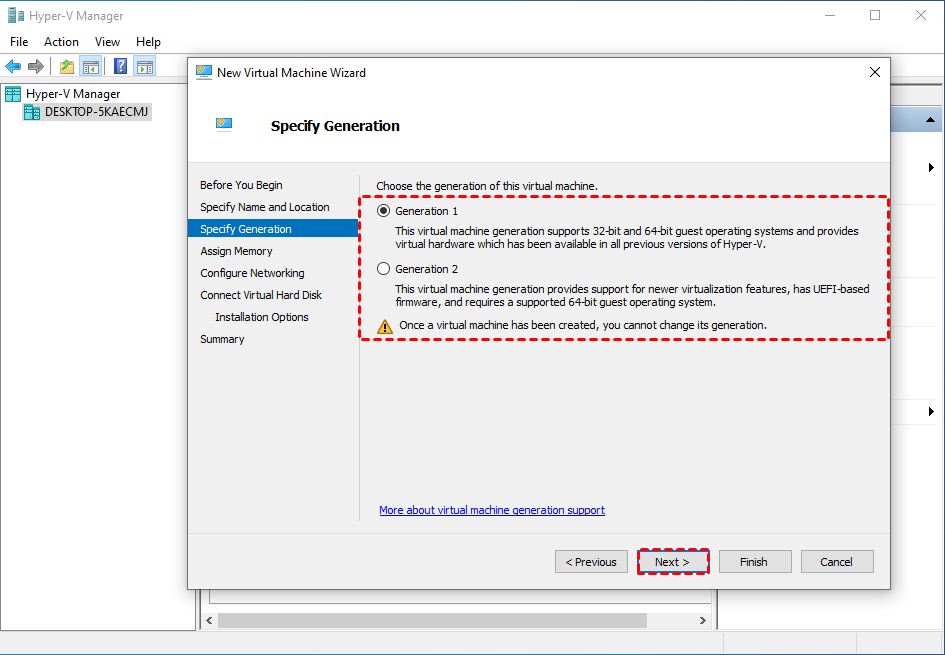
3. On Specify Generation page, select the generation your deleted VM was in. Click Next.
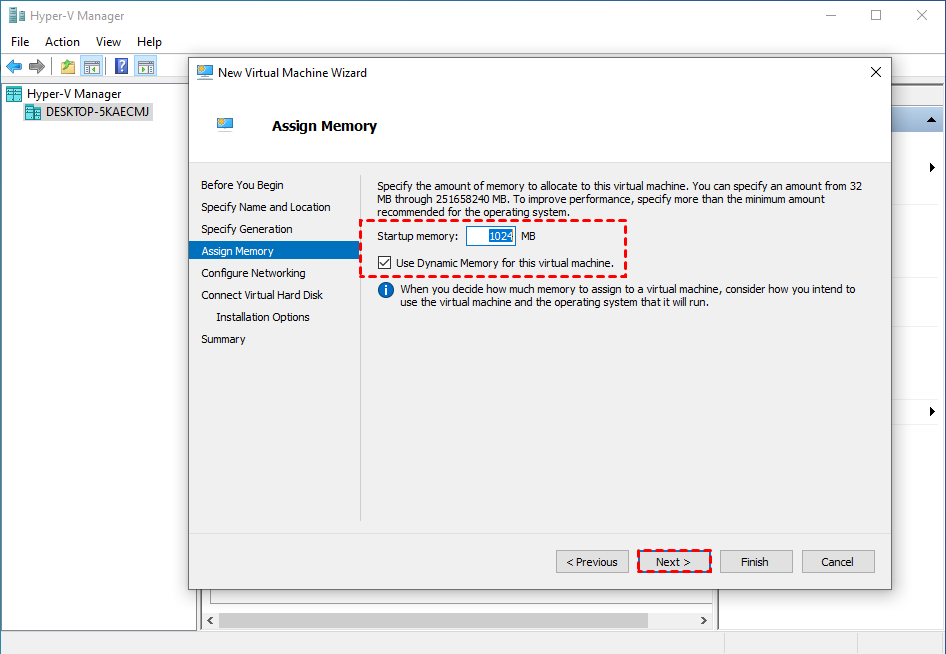
4. On Assign Memory page, specify the amount of memory to allocate to this virtual machine. Click Next.
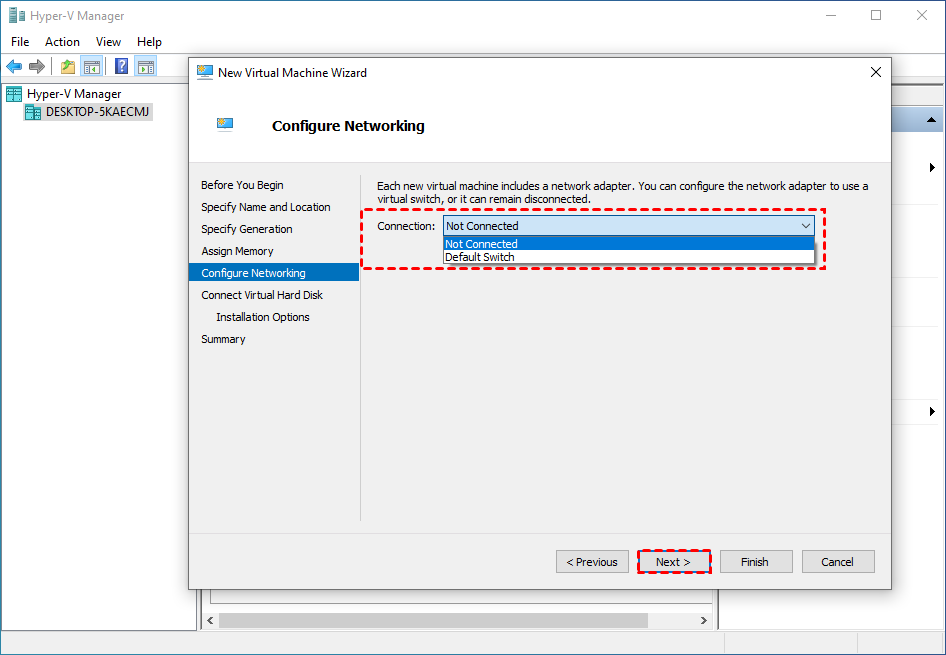
5. On Configure Networking page, configure the network adapter to use a virtual switch, or remain disconnected. Click Next.
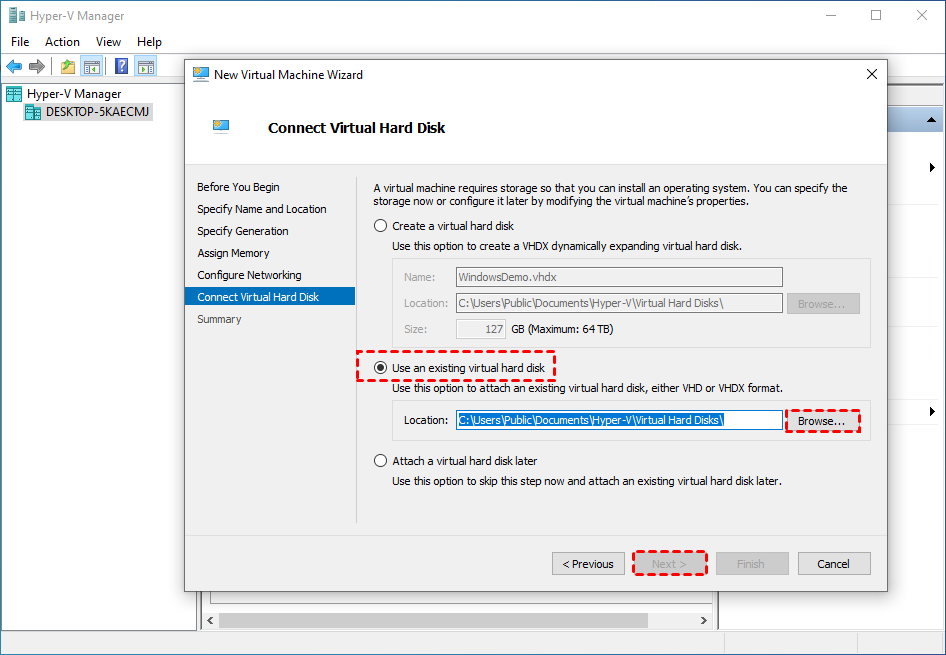
6. On Connect Virtual Hard Disk page, select Use an existing virtual hard disk option, and click Browse… to specify the .vhd or .vhdx file of your deleted VM. Click Next to continue.
7. On Summary page, review your settings and click Finish to start restore.
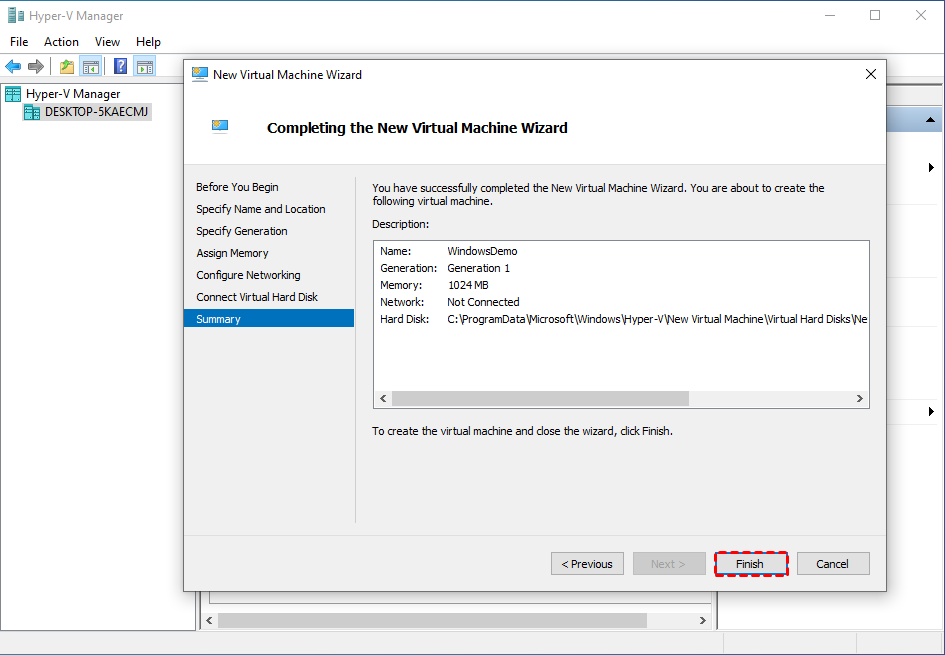
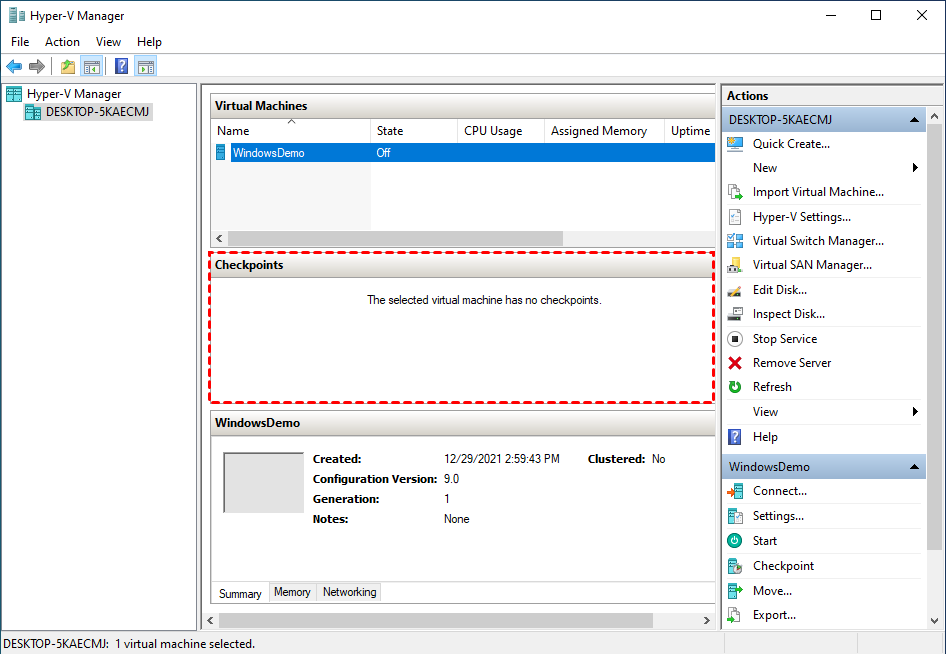
Then you will see the deleted VM is back to your Hyper-V Manager Virtual Machines inventory. However, the checkpoints created may be lost.
Restore deleted VM on Hyper-V from exported files
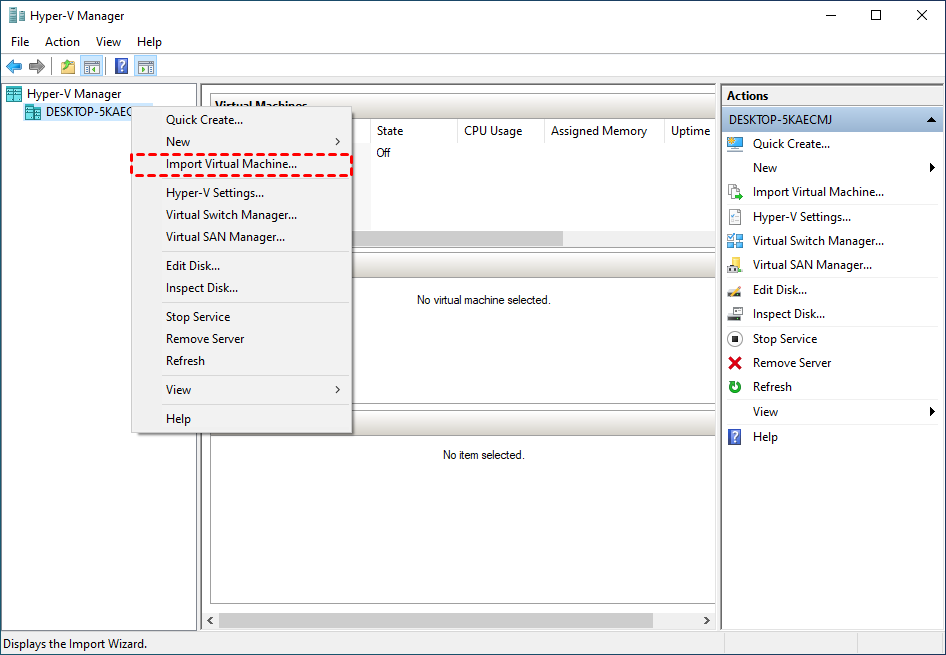
1. Launch Hyper-V Manager, right-click on the server name and select Import Virtual Machine… Click Next on the pop-up wizard.
2. On Locate Folder page, click Browse… to specify the folder containing the exported VM files. Click Next to continue.

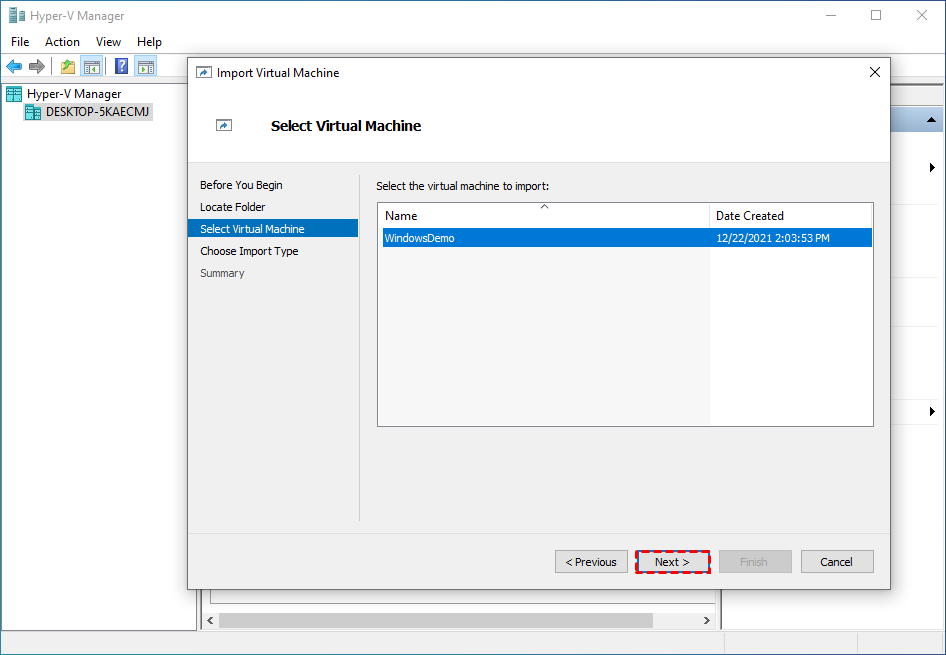
3. On Select Virtual Machine page, select the virtual machine to import, then click Next.
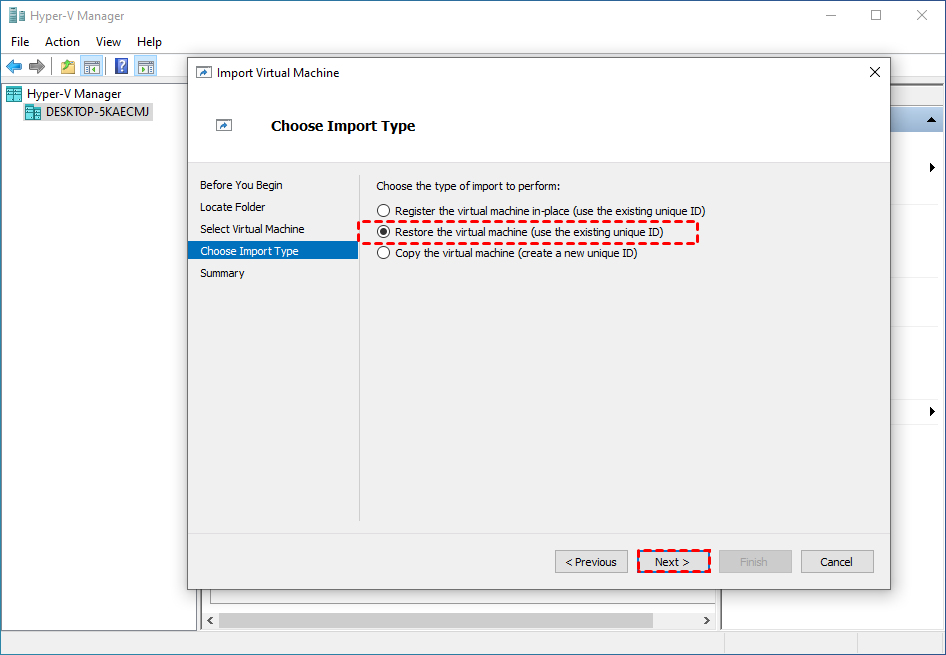
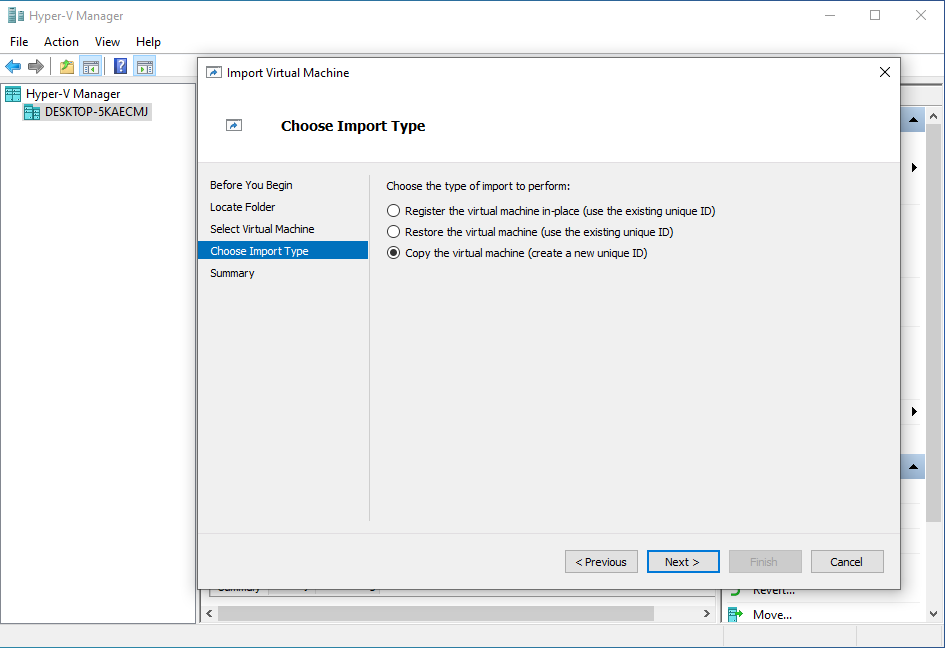
4. On Choose Import Type page, choose the type of import to perform:
- Register the virtual machine in-place (use the existing unique ID): use the exported files in-place, and when the import has completed, the export files become the running state files and can't be removed. The ID will be the same as the exported one. If the VM is already registered with Hyper-V, it needs to be deleted before the import works. Better not choose this option if the exported files are not stored in the location where you run the VMs.
- Restore the virtual machine (use the existing unique ID): restore the VM to the specified or default location, with the same ID as the exported one. When the import has completed, the exported files remain intact and can be removed or imported again. And if the VM is already running in Hyper-V, it needs to be deleted before the import can be completed.
- Copy the virtual machine (create a new unique ID): restore the VM to the specified or default location, and create a new unique ID. Which means the exported files remain intact and can be removed or imported again, and you can import the VM to the same host multiple times.
Click Next to continue.
5. Choose the second or the third option, the wizard will add 2 more pages for selecting storage.
On Choose Destination page, you can check Store the virtual machine in a different location option, and click Browse… to specify Virtual machine configuration folder, Checkpoint store, and Smart paging folder. Leave the option unchecked the wizard will import the files to default Hyper-V folders. Then click Next.

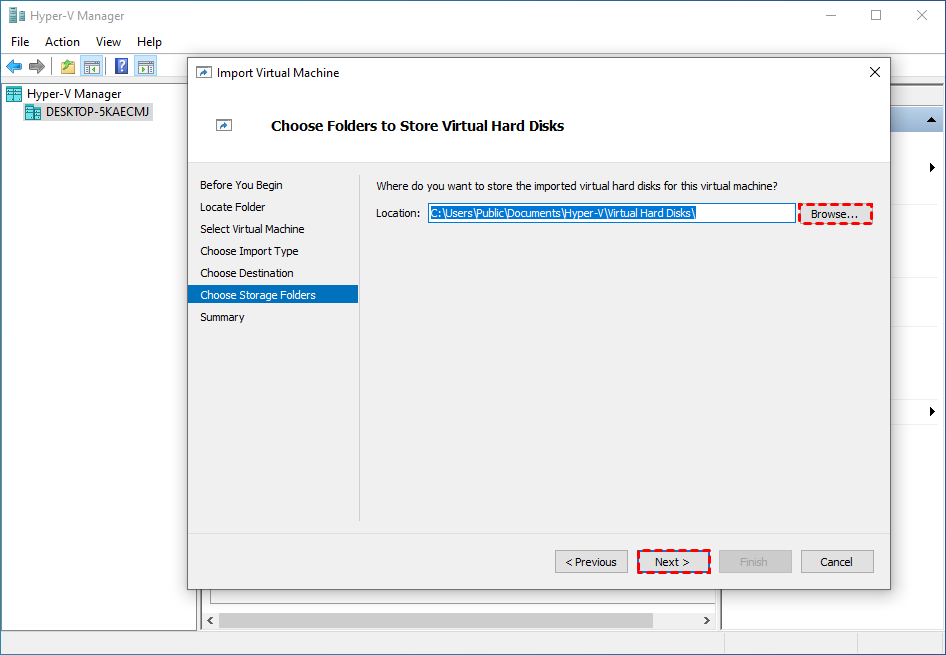
6. On Choose Storage Folders page, you can click Browse… to specify where you want to store the imported virtual hard disks for this VM, or leave the default location unchanged. Then click Next.
7. On Summary page, review the settings and click Finish to start restore.
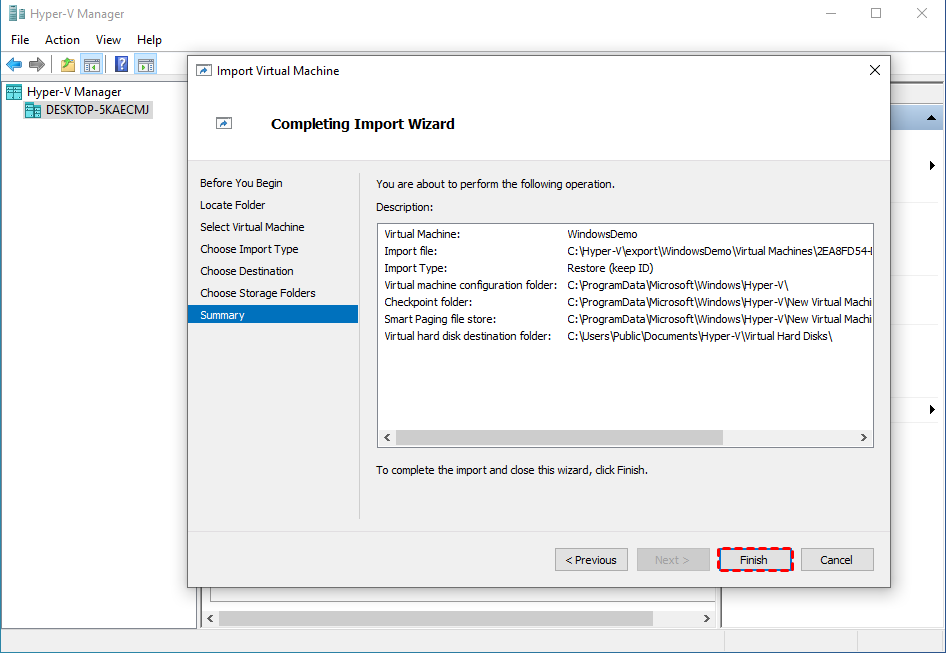
Then you can see the deleted VM is imported to the Hyper-V Manager inventory again, with the checkpoints remained.
How to fix Hyper-V encountered an error while loading the VM configuration
When importing VM on Hyper-V Manager, if you received the error report that Hyper-V encountered an error while loading the virtual machine configuration from… This is because the unique identifier of this VM is already registered on Hyper-V.
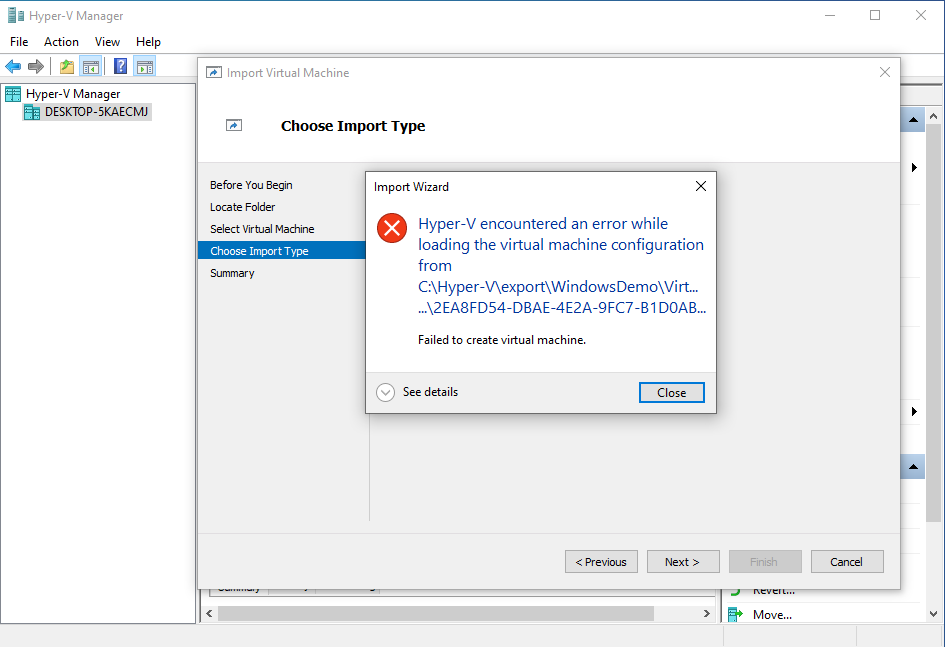
Identifier is a unique ID that Hyper-V generates to represent a VM when creating. It will be carried in the files when you export the VM, and when you import the VM files, the identifier will also be installed on your host. If you choose the Import Type as Register the virtual machine in-place (use the existing unique ID), or Restore the virtual machine (use the existing unique ID), and Hyper-V Manager detects the same identifier on your host, it will pop up this error to inform you already have the original VM, and prevent you from importing the same VM.
To fix this problem, there are 2 simple ways.
- Solution 1: Delete the original VM and re-import the VM again.
- Solution 2: Import virtual machine as normal, but in Step 4. on Choose Import Type page, select Copy the virtual machine (create a new unique ID) option, and then click Next to continue.
Summary
As a failsafe, simply deleting a VM from the Hyper-V Manager does not delete the virtual hard disks associated with the VM. There still are ways available for Hyper-V restore deleted VM. However, it may still result in partial losses.
Therefore, it is still necessary to follow the 3-2-1 backup rule to back up your VMs regularly. Independent backup files cover all your VM data, and can be stored offsite. If there is any more serious disaster, backups can be a real savior.
If you want a dedicated backup tool to help you quickly and automatically backup multiple VMs, AOMEI Cyber Backup is definitely worth a try. Except for creating tasks, administrators can also create sub-accounts with limited privileges to assign VM management tasks while avoiding human error.

