


How to Fix Hyper-V VM NO Internet on Windows 10/11 | Solutions
After enabling Hyper-V feature, only to find that the Hyper-V VM doesn’t have network access? How to deal with Hyper-V not connecting to internet? In this article, you can fix the network issue of your Hyper-V VM and local machine.
By Crystal / Updated on July 23, 2024
Case: Help, the Hyper-V VM No Internet with Default Switch
I created a new Hyper-V virtual machine of Windows 10 system and tried to set up an external virtual network using a wireless adapter in the Virtual Switch Administrator. However, when I perform this setting, the Windows 10 virtual machine is still unable to connect to the Internet. I have been trying for hours with the same result, no Internet on Hyper-V VMs. Can anyone help me with this problem?
Microsoft Hyper-V allows users to create virtual machines and execute and manage multiple operating systems on a single physical server. But in some cases, newly created virtual machines may have no Internet access, as described in the case above.
So, what causes Hyper-V Internet no and how to fix it? In this article, I will introduce how to fix the issue of Hyper-V VM no Internet and offers solutions on how to connect Hyper-V to Internet correctly. You can click the following anchor text to jump to the part you need.
Why Hyper-V VM No Internet
The problem of Hyper-V VM no Internet may be caused by the following reasons.
- DHCP server may be temporarily shut down for maintenance or misconfigured, which causes Windows-based computers cannot assign themselves an IP address from DHCP automatically.
- If the virtual network adapter does not match the Windows system of the VM, it will result in a failure to network connection. For example, if the virtual machine is installed with Windows Vista system, it can only use the legacy network adapter instead of standard network adapter. However, if your Hyper-V VM cannot access to Internet on Windows latest OS such as Windows 11/10 or Windows Server 2019, the mismatched network adapter should not be the cause of the problem.
![]()
Easily Fix Hyper-V No Internet Issue for Windows 11/10 in 3 Steps
If your Windows 11 Hyper-V no Internet access (or other late versions like Windows 10 or Windows Server 2019), you can try sharing your host network connection with Hyper-V. It is necessary to note that you need to create a new virtual network switch and specify a network adapter first before sharing the network connection in Hyper-V.
Tips: If your VMware Internet doesn't work, you can check Firewall, virtual IP address, Ethernet controller driver, etc.
Step 1. Add a New Virtual Network Switch in Windows 11
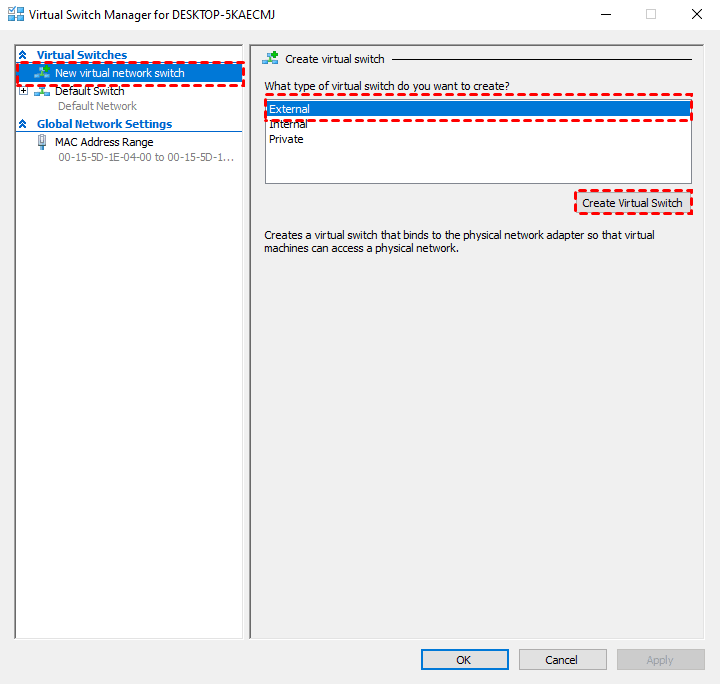
1. Access to Hyper-V Manager and shut down the Windows 11 virtual machine. Then right-click the VM and select Virtual Switch Manager.
2. In the opened wizard, click New virtual network switch >> External >> Create Virtual Switch.
3. Type a name for the new virtual network switch, and select External network >> Realtek PCIe GBE Family Controller >> Allow management operating system to share this network adapter.
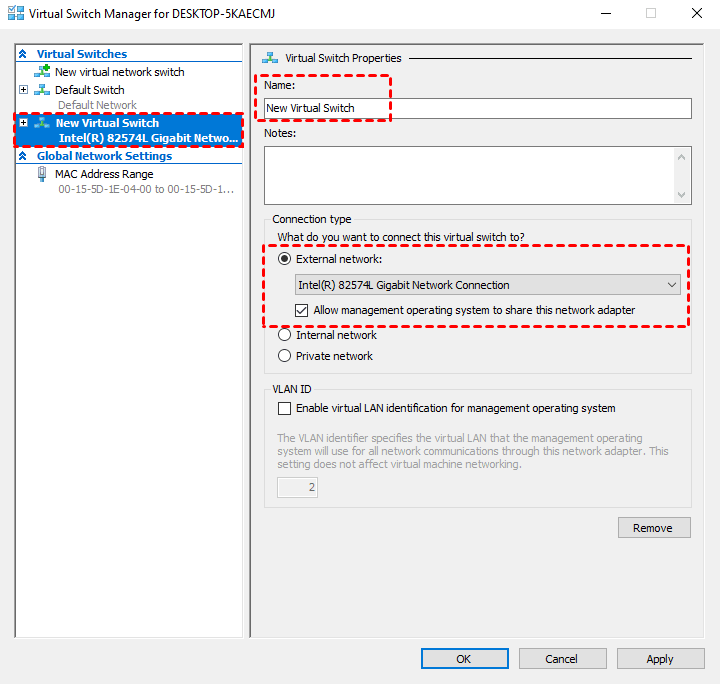
Tips: If you meet the error showing “Error applying Virtual Switch Properties changes” during this procedure, you can locate this network adapter and right-click it, select Properties >> Uncheck Hyper-V Extensible Virtual Switch.
Step 2. Specify the Configuration of Network Adapter
1. Back to Hyper-V Manager, select the virtual machine and Settings.
2. Click Network Adapter, and select the virtual switch you created. Click OK.
Step 3. Share the Network Connection in Hyper-V
1. From the desktop, click the Network icon and open the settings.
2. Click Status >> Change adapter options to find the virtual machine network.
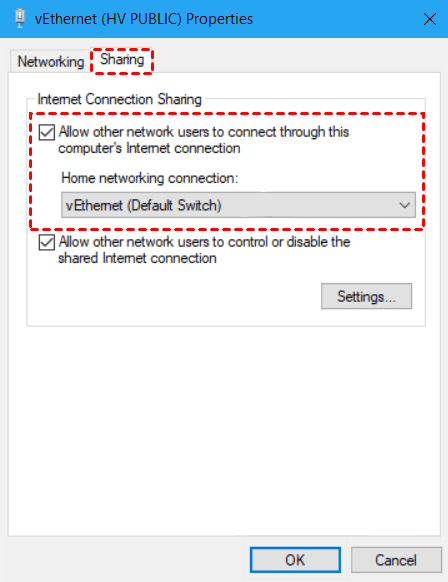
3. Right-click it and select Properties >> Sharing >> Allow other network users to connect through this computer’s Internet connect. Then from the below box, select the created network switch. Click OK.
4. Power on the Windows 10 virtual machine to check the network status.
How to Resolve the Virtual Network Adapter Doesn't Match Guest OS
As I mentioned before, sometimes Hyper-V Internet not working may also because the virtual network adapter does not match the guest system of the VM. In this case, the guest operating systems, for example, Windows 7 Starter 32-bit may require a legacy network adapter installed.
Here are the steps to resolve it:
1. Access to Hyper-V Manager and shut down the target virtual machine.
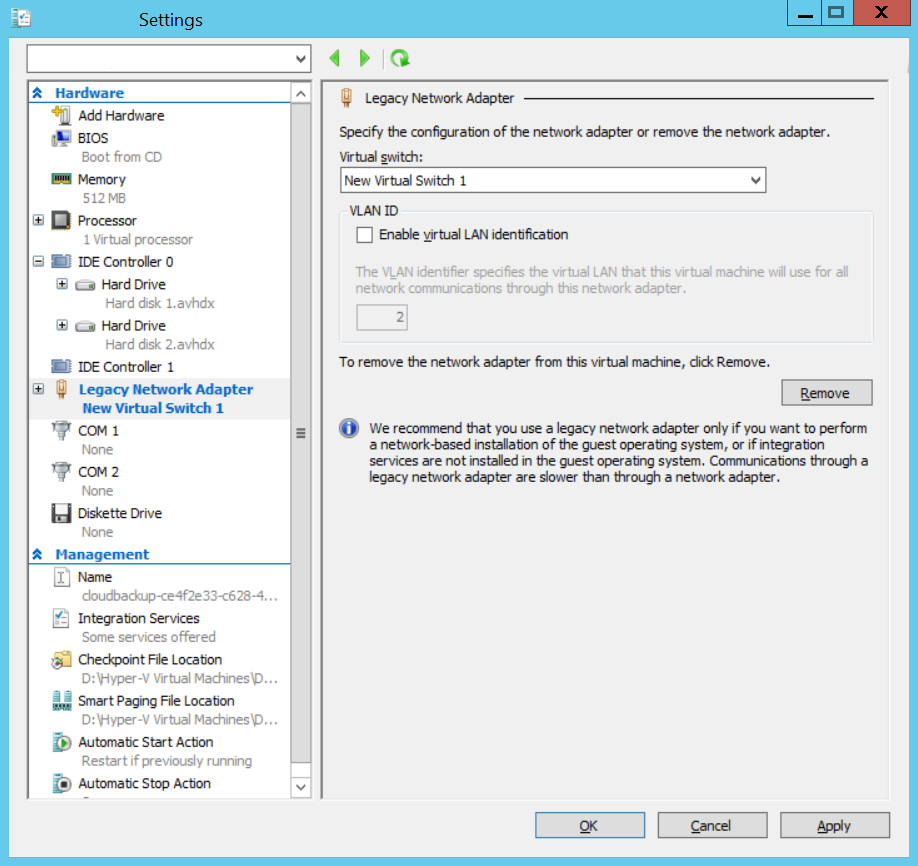
2. Click Add Hardware, and then select Legacy Network Adapter, click Add.

3.Select a virtual switch for your legacy network adapter, and click OK to save.
Updated: Fix Physical Machine Network Issue
In addition to Hyper-V Internet not working, you may encounter other problems when creating new virtual machines on Hyper-V.
After creating a virtual machine in Hyper-V, some users find that the network traffic on all computers can only be sent out through the virtual network adapter due to the incorrect priority of the network adapter, which eventually causes the Internet of the virtual machine to be normal while the local machine has no Internet. So, how to solve this problem? Please refer to the following steps.
1. Open Windows PowerShell.
2. In the window, type Get-NetAdapter, remember the IfIndex value OF virtual network adapter. Press Enter.
3. Type Get-NetIPInterface to monitor the IfIndex value, press Enter.
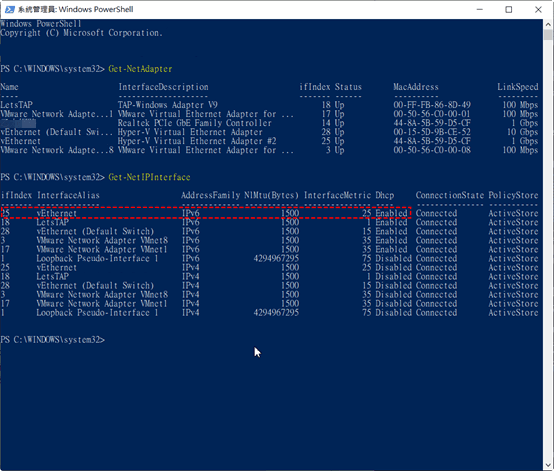
Tips: On Windows, a smaller Interface Metric value means a higher priority, so to solve no Internet on the local machine after running Hyper-V virtual machine, please lower the priority of the virtual network adapter.
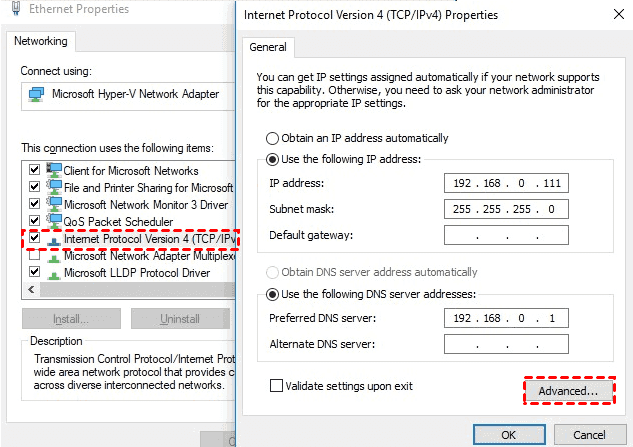
4. Press Windows+I to open Internet Settings. In Status page, select Change adapter options. Then select the Virtual Network Adapter >> Properties.
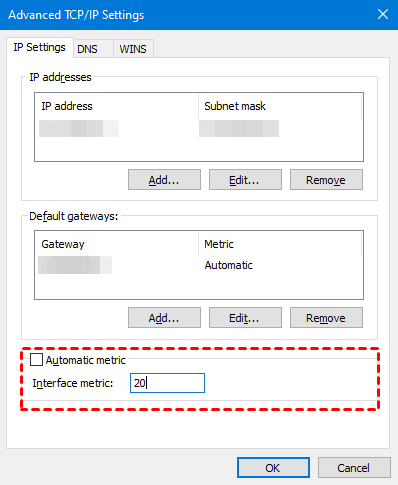
5. Select Internet Communications Protocol version 4 (TCP/IPv4) >> Properties >> Advanced >> Uncheck the Automatic metric and type a value in the Interface metric box. Click OK.
6. Back to Networking page, select Internet Protocol version 6 (TCP/IPv6) and refer to step 5 to modify the values of Interface metric.
Following these steps should help you fix the issue of your Hyper-V VM not having internet access. If the problem persists after trying these steps, further detailed analysis of network configurations and logs may be necessary.
After solving the issue of Hyper-V not connecting to internet, do not forget to back up Hyper-V VM to protect virtual machine security.
Important: Completely Protect Your Hyper-V Virtual Machines
Network error could dramatically affect your normal work and plans. Some virus could also damage your data through internet. It would be better to safeguard Hyper-V VM comprehensively. In addition, many unexpected errors may also occur during routine virtual machine works. That’s why all of us put so much emphasis on data security.
For professional data protection, it’s necessary to use a powerful Hyper-V backup solution. AOMEI Cyber Backup is a free Hyper-V backup software devoted to automating the backup process of VMs, monitoring the status and sending email notifications if there's an error. It offers you the following benefits:
✔ Automated backup: Schedule automated backups based on daily/weekly/monthly to run backup task automatically without human intervention.
✔ Centralized Management: Back up and manage VMs in a central console without installing Agents on each VM.
✔ Resilient Change Tracking: Create full backups, or perform incremental backup to capture only changed data.
✔ Efficient Recovery: Swiftly restores data within minutes, enabling you to seamlessly take over your system.
✔ Fully Compatible with Hyper-V & VMware: Backup the entire Hyper-V or VMware virtual machine including OS, configuration, application, personal data and system state.
Download and enjoy the perpetual Free Edition:
✨If you want to protect your physical machines at the same time, you can also install AOMEI Cyber Backup agent to your computers and perform centralized Windows backup.
Auto Backup for Hyper-V VM in 3 Steps
1. Download AOMEI Cyber Backup and add your devices.
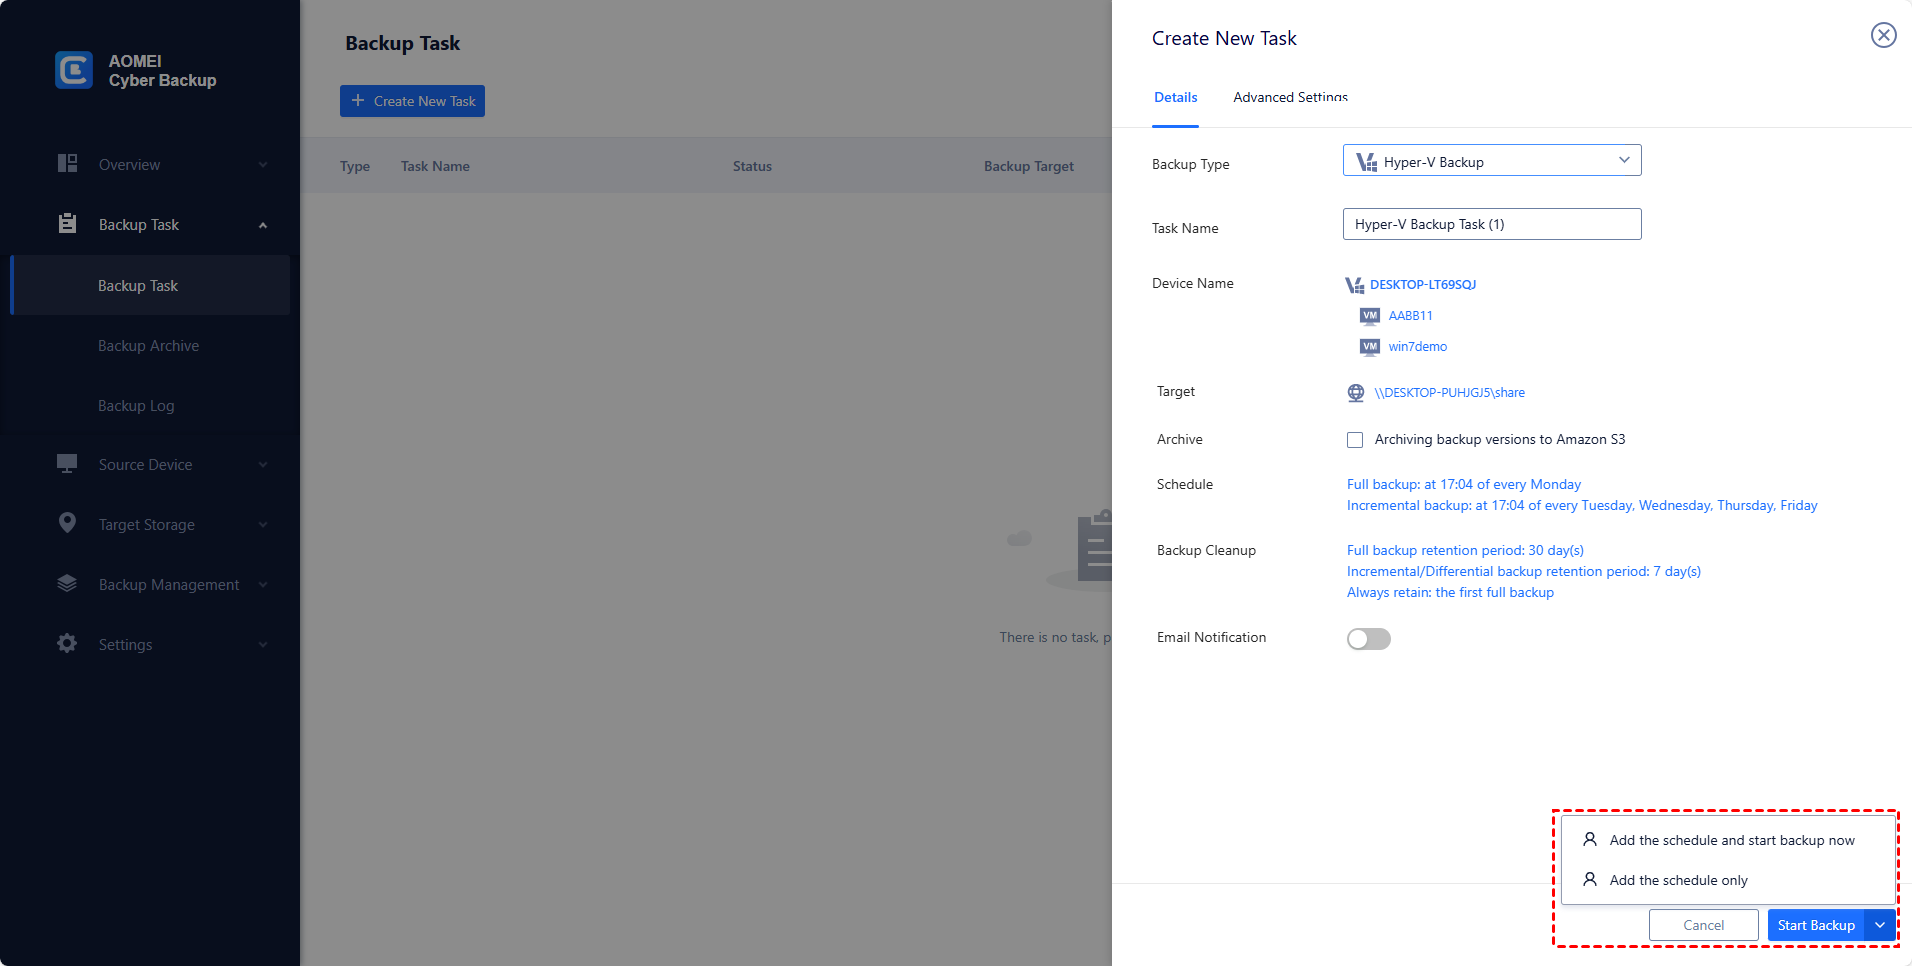
2. Create Backup Task: In backup task page, set up your backup plan.
Task Name >> Device >> Target >> Archive >> Schedule >> Backup Cleanup
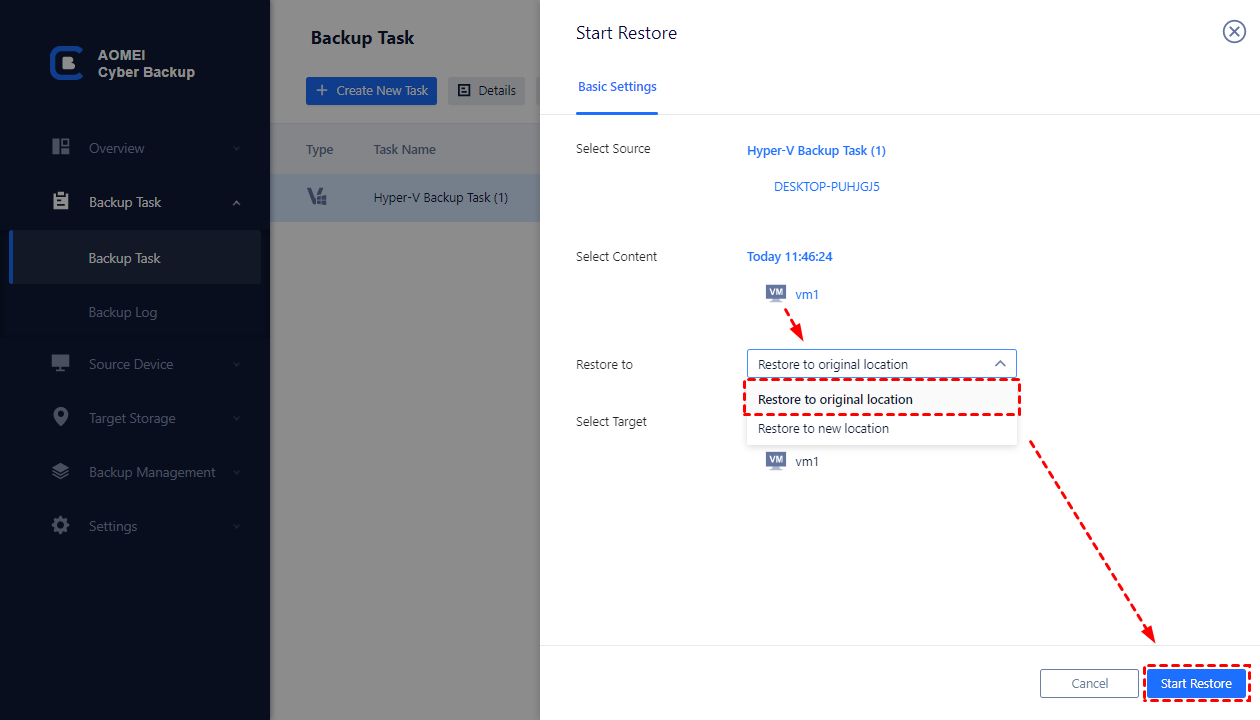
3. Click Restore to achieve fast disaster recovery that restores the virtual machine to its original location.
✤ Advanced features you may need (available in Premium Edition):
- Batch VM Backup: Batch backup large numbers of VMs managed by hosts.
- Backup cleanup: Set up a retention policy to delete your older full backups/incremental backups automatically and save storage space .
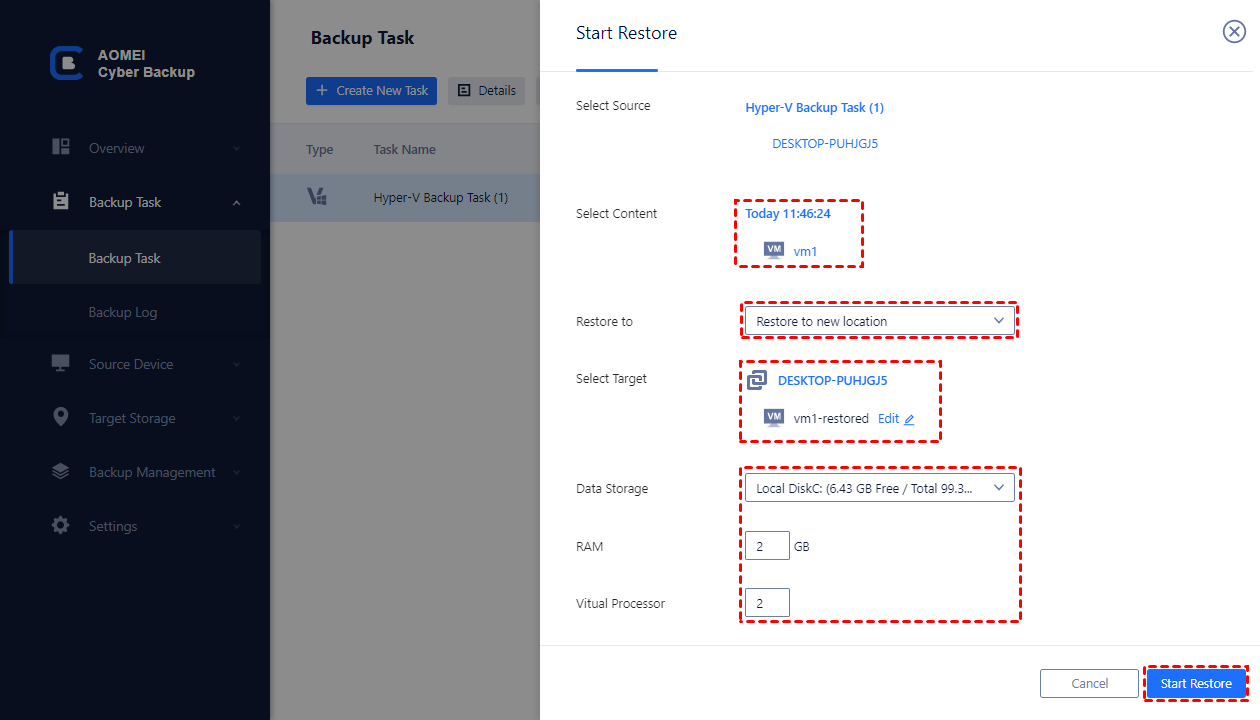
- Restore to new location: Create a new identical VM from a backup to the same or another datastore/host, saves the hassle of re-configuring the new VM.
To avoid data loss when Hyper-V virtual machine doesn't have Internet access, try the powerful data backup solution provided by AOMEI Cyber Backup to help you ensure the data security.
Summary
When your Hyper-V Windows 11 no Internet access and you are actively looking for an effective solution of Hyper-V VM no Internet, or if your local machine cannot connect to Internet in the process of running Hyper-V VM, you can try the methods provided in this article which ensures that the correct network connection for Hyper-V VM and local machine.
In addition, backup Hyper-V VMs regularly is necessary for protecting your Hyper-V VM data from such accidental loss. You can try AOMEI Cyber Backup, an effective VM backup software that supports Hyper-V in Windows 8/8.1/10/11.

