How to Use Windows Server Migration Tools and Its Alternative
How to use Windows Server Migration Tools? Detailed steps are stated in this article. In case you find the process complicated and tedious, there's also an easier alternative to share files between Servers.
By Delia Updated on August 29, 2024
What is Windows Server Migration Tools
For many companies, transferring workloads from one Server to another is a common occurrence, especially significant files/folders. Many methods and tools can be used to transfer files from Server to Server. The most common one is Windows Server Migration Tools, a set of PowerShell cmdlets.
Windows Server Migration Tools, a Windows Server built-in tool, works with Server 2003 and newer Server OS versions. Generally speaking, you can use this utility to migrate server roles, features, operating system settings, shares and other data from one Server to another.
In this post, I'll introduce how to use Windows Server Migration Tools in detail. If you find the procedure cumbersome, you can also try an easier alternative to transfer files from a Server to another.
How to Use Windows Server Migration Tools
The operation to use Windows Server Migration Tools is not simple, so I divide it into 4 parts for your reference:
👉 Part 1. Install Windows Server Migration Tools on the destination and source Server
👉 Part 2. Create a deployment folder on the destination computer
👉 Part 3. Register Windows Server Migration Tools on the source computer
👉 Part 4. Use Windows Server Migration Tools step by step
Part 1. Install Windows Server Migration Tools on the destination and source Server
Step 1. Click Start in the lower left corner of the computer. Type Server Manager in the search box and then open it.
Step 2. Click Add Roles and Features under Manage tab. Then press Next.
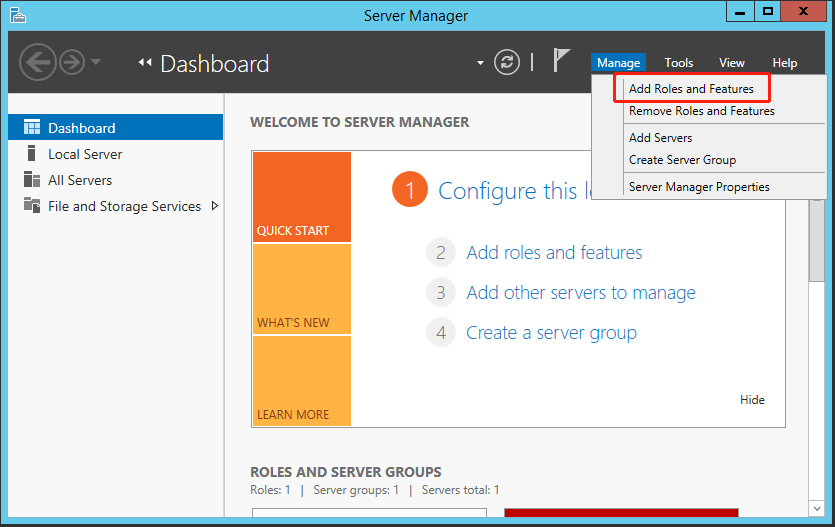
Step 3. Select the destination server. Then press Next.
Step 4. Click Windows Server Migration Tools under Features tab. Then press Next.
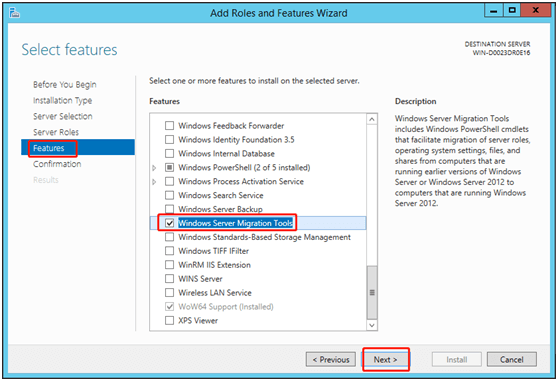
Step 5. Confirm the installation selections. Then click Install to install this tool on the destination computer.
Step 6. Use the method mentioned above to install this utility on the source computer.
Tip:
Windows Server migration tools also allow you to move Windows Server 2016 to new hardware machine with ease.
Part 2. Create a deployment folder on the destination computer
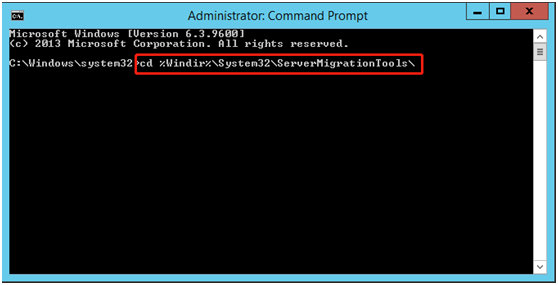
Step 1. Press Windows + X key. Then choose Command Prompt (Admin).
Step 2. At the command prompt, change to the directory in which the smigdeploy.exe tool is stored. Type the following command. Then press Enter.
cd %Windir%\System32\ServerMigrationTools\
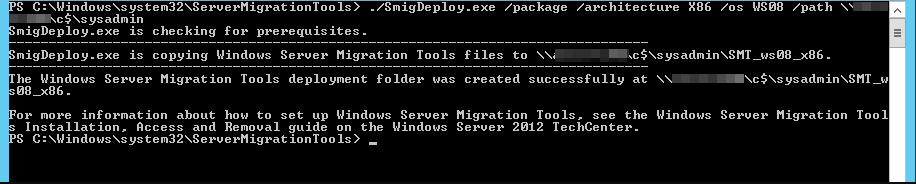
Step 3. Type the following command. Path represents the path of the deployment folder on the source computer. Then press Enter.
SmigDeploy.exe /package /architecture X86 /os WS08 /path
Part 3. Register Windows Server Migration Tools on the source computer
Step 1. Copy the deployment folder that was created by the destination computer to a local drive of the source computer. Make sure that the operating system architecture of the deployment folder matches that of the source computer.
Step 2. Press Windows logo key + X. Then select Command Prompt (Admin) to open a Command Prompt window on the source computer.
Step 3. At the command prompt, change the directory to which you copied the deployment folder in Step 1.
Step 4. Type the following command to register Windows Server Migration Tools cmdlets. Then press Enter.
.\Smigdeploy.exe

Now you have completed all the preparations. Let’s learn how to use Server migration tools.
Part 4. Use Windows Server Migration Tools step by step
✍ If you want to export the local users and groups from the source Server, you can follow these steps.
Step 1. Click Server Manager and Tools subsequently on the source Server. Then click Windows Server Migration Tools to open it.
Step 2. Run the following command:
Export-SmigServerSetting -User All -Group –Path C:SysAdminExportMigUsersGroups –Verbose
✍ If you want to import the local users and groups to the target Server, you can refer to these steps.
Step 1. Open Windows Server Migration Tools on the destination Server (Server Manager ﹥ Tools ﹥ Windows Server Migration Tools).
Step 2. Type the following command and then press Enter.
Import-SmigServerSetting –User Enabled –Group -Path C:SysAdminExportMigUsersGroups -Verbose
How to use Windows Server Migration Tools 2012? You can complete this task by using the operating steps mentioned above. Care must be taken to use this utility, because serious problems might occur if you operate incorrectly.
Although Windows Server Migration Tools in 2016/2012/2008 Server can help uses transfer data, the operating steps are complex, especially for some non-technical people. If you think this utility is difficult to operate, you’d better use an easier alternative.
Easier Alternative to Windows Server Migration Tools
AOMEI Backupper Server is a reliable alternative for Windows Server Migration Tools. It has a practical Sync feature that allows you to easily synchronize files between Windows Servers, without learning any complicated command line. And you can also sync files to network, NAS devices, and cloud drives, etc.
To save time, users can use this software to set up an automatic sync based on daily, weekly, monthly, event triggers, USB plug in. Other useful options like comments, email notification, sync the deletions in the source directory to destination, wake the computer to run scheduled task etc are also waiting for your use.
Just download 30-day free trial! Then follow the quick guide to sync files over a network. Windows Server 2012/2016/2019/2022/2025 (including R2)/SBS 2003/2008/2011 as well as Windows PC systems currently supported.
How to Sync Files between Windows Servers Step by Step
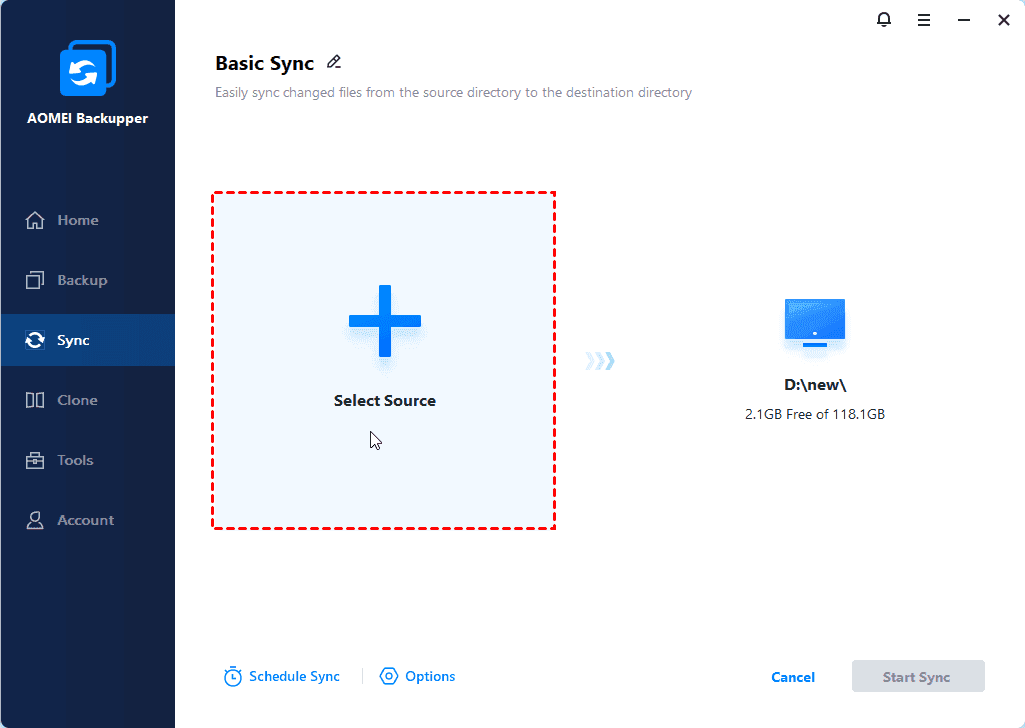
Step 1. Install and launch this utility. Click Basic Sync under Sync tab. To minitor any changes made to synced files and sync them immediately when detected, you could consider using "Real-Time Sync" feature.

Step 2. The Task Name can be modified by your needs. Click + Add Folder to select the folder you want to share. Then click OK.
Tip:
To set up the specific requirement like automatically backup files with a certain file extension, click File Filter at the right side of selected folders.
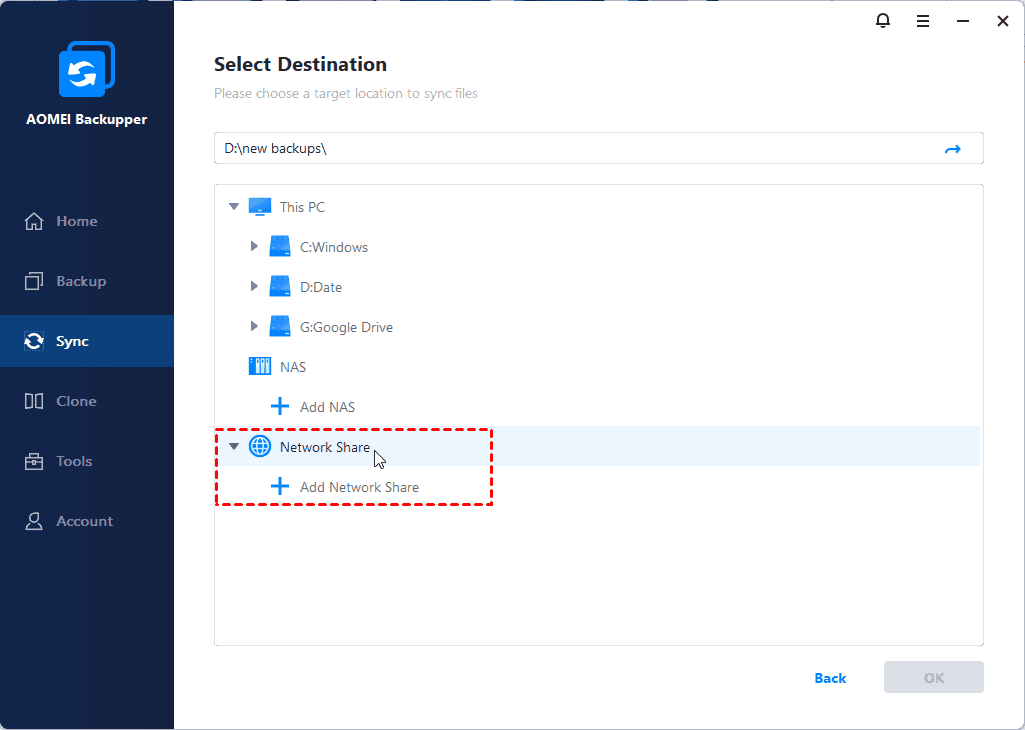
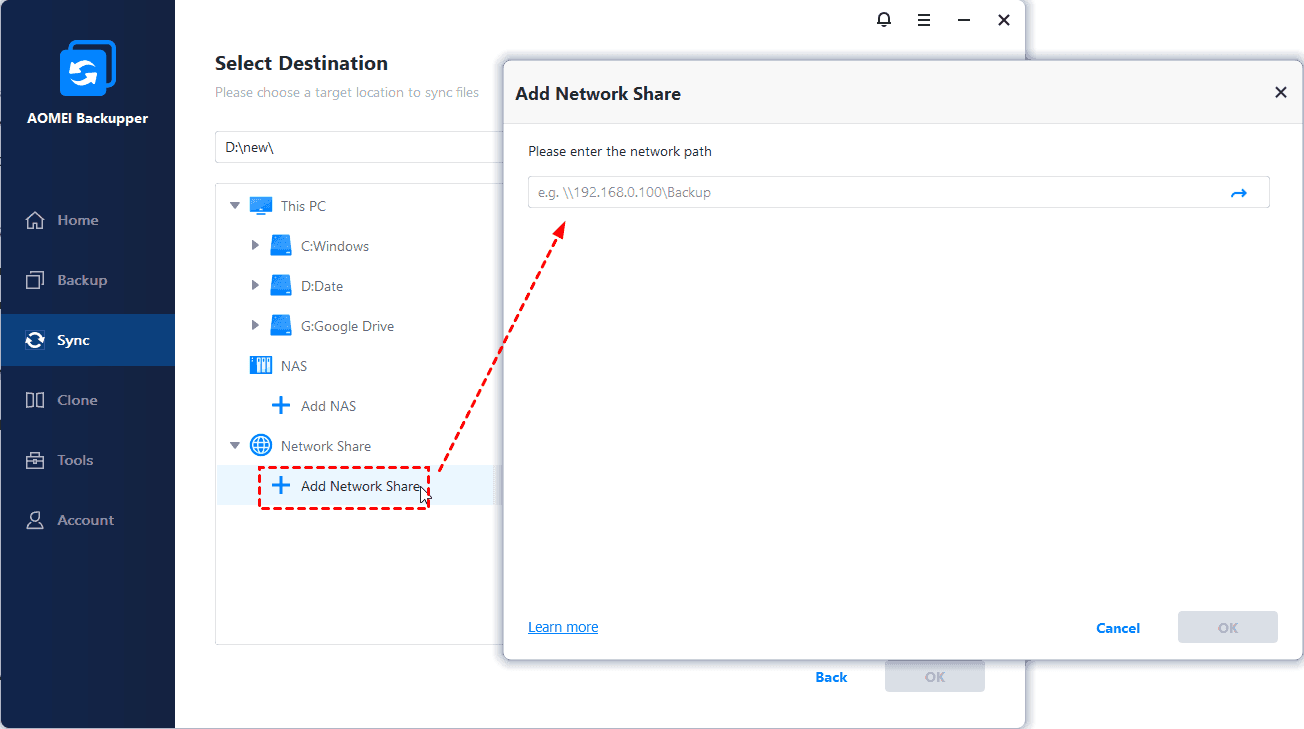
Step 3. Click the inverted triangle and Select a network location, then click Add Network Location and type network path, username, password to add destination path.
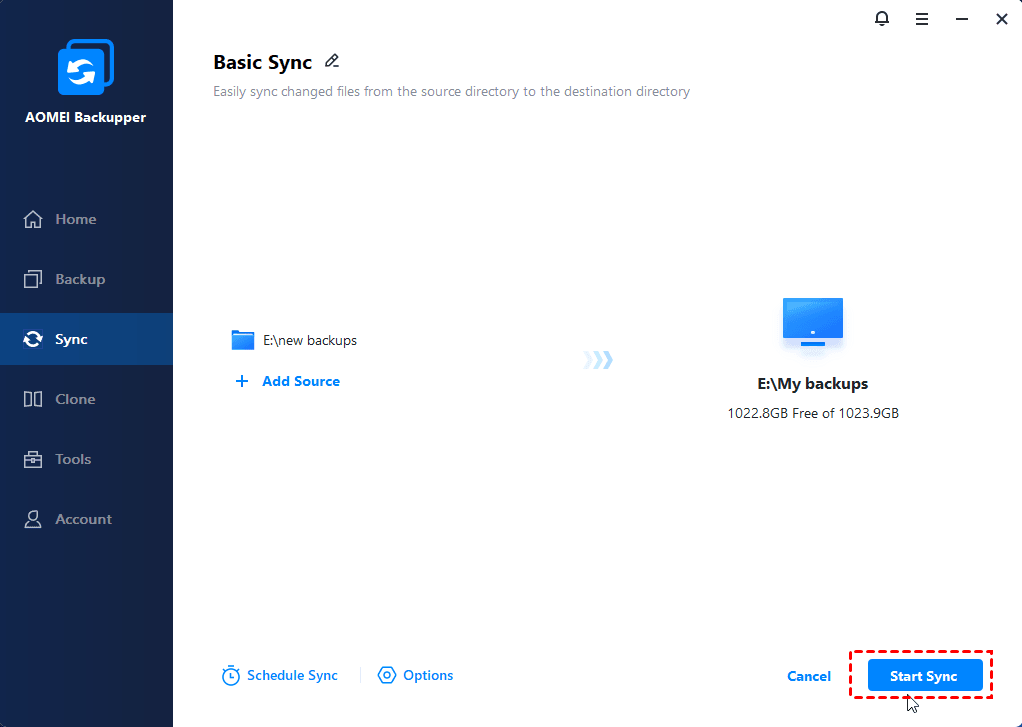
Step 4. After selecting the sync destination, you can confirm the operation and then click Start Sync to sync files over network.
✍ If you want to schedule sync files and changes regularly, there are many useful features you can use:
-
Daily/weekly/monthly schedule sync: To continuously sync files to network location, you can enable daily sync, weekly sync or monthly sync.
-
Event triggers: To sync files at a specific event, such as, System Shutdown, can help you avoid interference.
-
Wake the computer to run scheduled tasks: To sync files during off-peak hours, you can set the backup time to midnight or any other times, then it will wake your computer 2 minutes before the task start. It's especially useful for transferring large files.
-
After the scheduled task is completed: To reconfigure the operation after scheduled task, you can tick this feature and select Shut down, Restart, Sleep or Hibernate. Then, you can feel free to do what you want.

When the operation is complete, you can check the target directory to see whether the folders have been synchronized over successfully.
✎Notes:
-
If you are syncing a share folder from source directory to target directory, please re-set the share permissions of the folder in the target directory after the first sync. This is because when the network path changes, the initial settings cannot be retained.
-
Do not change the name of the source folder after syncing. Otherwise the program cannot sync it anymore.
-
The "Basic Sync" feature performs one-way file sync and ony changes made in source directory can be reflected in destination. To sync files in both directories to the other side, you would consider using "Two-Way Sync" feature.
Verdict
How to use Windows Server Migration Tools? This article shows the detailed steps for you. If you find that these steps are difficult for you, you can turn to the best alternative – AOMEI Backupper Server. This professional software enables you to transfer files from one Server to another easily.
It has a graphic user interface, which make it easy for all level of users to understand. And it has many helpful features to make this process more flexible and automatic, such as, Daily/Weekly/Monthly sync, Event trigger, USB plug in, etc. For IT technician, you could use AOME Backupper TechPlus.

