Why & How to Fix USB Flash Drive Not Showing Up in Windows 11
This guide dives into step-by-step methods to help you quickly resolve the issue. From basic hardware checks to more advanced solutions. We explore multiple approaches to regain access to your USB drive. Additionally, we’ll introduce reliable software for protecting your data and ensuring that issues.
By Sebastian Updated on August 28, 2025
USB Flash Drive not showing up in File Explorer
“I have two computers side by side. I know the flash drives are good because they work on my other computer. When I plug either of them into my main PC, I hear the "ding" that they are being detected, but they won't show up in my file explorer with my other drives. I have checked the device manager and disk manager and don't see them in there either. I have tried multiple USB ports on the PC.”
– Microsoft Community
Why Is My USB Flash Drive Not Showing Up in Windows 11?
Have you ever plugged a USB flash drive into your Windows PC, only to find that it doesn’t show up? Sometimes, you might even see an error like “USB flash drive not showing up.” This can make the files on the USB drive unreachable.
Before diving into solutions, let’s explore some common reasons why Windows 11 might not detect the USB drive:
- Incompatible file system that Windows can’t read.
- Physical damage to the USB drive.
- Outdated drivers or software.
- Problems with the hardware connection.
- Conflicting drive letters on your system.
To ensure your USB data is safe, it issuggested to create backups for USB regularly with the best free backup software.
Fix USB Drive Not Showing Up in Windows 11/10: 6 Ways
While it's hard to pinpoint the exact reason why your USB device is not recognized by Windows 11/10 computer, you can try every possible solution until it works again. Before making other fixes, it's time to do some preliminary checks on your USB flash drive to prevent the problem from being with the hardware itself:
Make sure your USB device is powered on. Some USB drives come with a power switch, and if it’s turned off, the drive won’t appear on your computer.
Test the USB on another computer. It’s possible the USB drive is damaged, so try plugging it into a different device to see if it works there.
Restart your computer. Sometimes, the issue is a small glitch or bug that can be resolved by simply rebooting your computer. After restarting, check if the drive is detected.
👉 Method 1. Check for Device Compatibility🔥
👉 Method 2. Update or Reinstall the USB Driver🔥
👉 Method 3. Assign a Drive Letter to the USB Flash Drive🔥
👉 Method 4. Check for Windows Updates
👉 Method 5. Create A New Volume for The USB Drive
👉 Method 6. Disable USB Selective Suspend Feature
Method 1. Check for Device Compatibility🔥
If your USB drive doesn't work with your computer, it won't show up when plugged in. In a Windows PC, most USB 3 devices can be connected to a USB 2 port, which shouldn't be much of a problem.
However, as technology improves, USB 3 devices may require more powerful and compatible ports to work. Check your device's instruction manual or packaging for compatibility information before trying again.
Method 2. Update or Reinstall the USB Driver🔥
Another thing you can do is ensure that your USB drivers are up to date. You can quickly update or reinstall your USB drivers to fix the USB drive not showing up issue. This works when your USB drive doesn't show up in File Explorer but shows up as unallocated space in Disk Management.
- Right-click on the Start button and select Device Manager.

- Scroll through the Device Manager tree menu and expand the Universal Serial Bus controllers section. Right-click each entry and select Uninstall device.
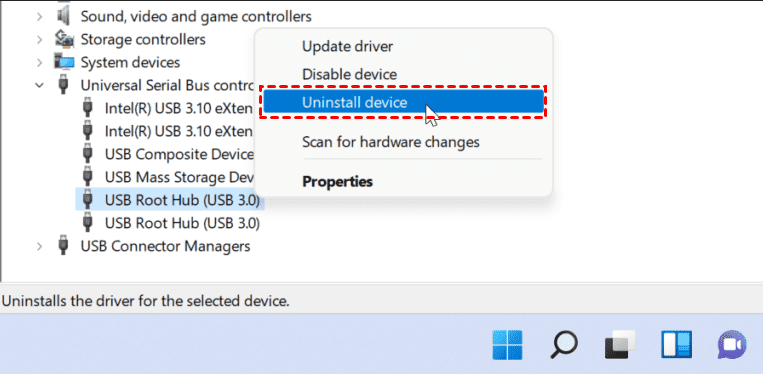
- Restart your PC, and Windows should automatically reinstall fresh drivers for that device during the reboot.
- If the USB flash drive still doesn't show up in Windows 11, you can choose to update the driver in step 2 to see if that fixes the issue.
Method 3. Assign a Drive Letter to the USB Flash Drive🔥
If the USB drive appears in Disk Management but not in File Explorer, it may be because the drive has not been assigned a drive letter. However, before we assign a drive letter, check for a blue bar on top of the drive. If so, it's likely the drive letter is causing the USB drive not to show up on Windows 11 and it can be easily fixed.
When the bar at the top of the drive is black, it means the space on it has not been allocated and you can move on to the next method to fix it. Let’s see how to assign a drive letter to the USB flash drive on Windows 11.
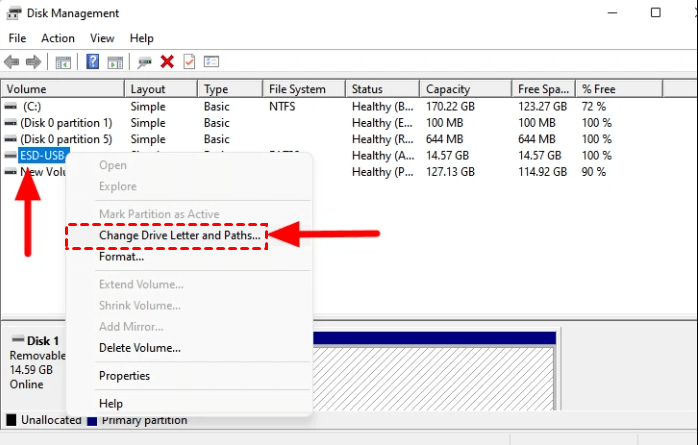
- Right-click on the Start button and select Disk Management from the list.
- Right-click on the USB drive, and select Change Drive Letter and Paths from the context menu.
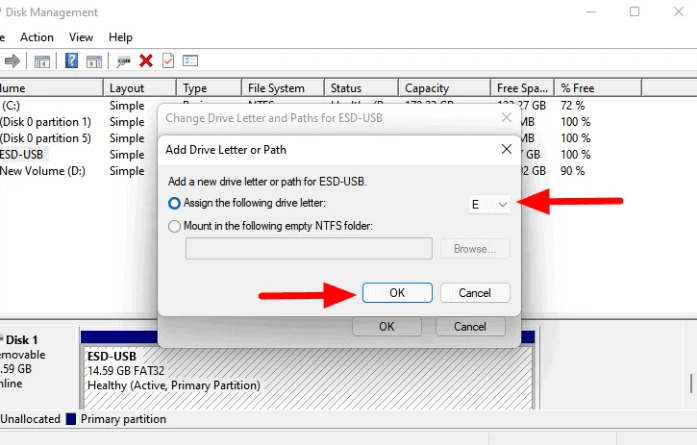
- Next, click Add to add a new drive letter or path for your USB flash drive. The available drive letter will be selected by default and you can click on OK to assign it. In case you want to choose a different drive letter, click on the drop-down menu, select the one of choice, and then click on OK.
Method 4. Check for Windows Updates
Keeping your Windows 11 PC up to date is critical. Because new Windows updates may include fixes for faulty USB ports or faulty devices, as well as general usability improvements. To check for Windows Updates on Windows 11, follow the steps below:
- Press Windows + I to open Settings.
- In Settings, navigate to Windows Update, then click the Check for updates button.
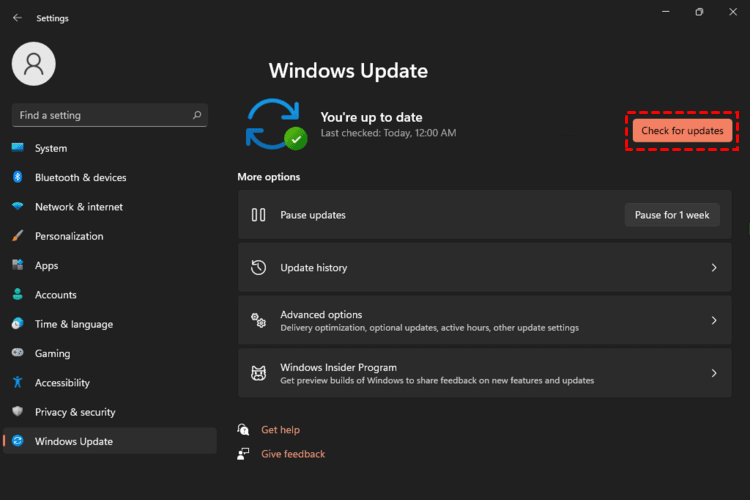
- Windows 11 will check for any available updates and download them.
- To check for driver updates, click Advanced options -> Optional updates.
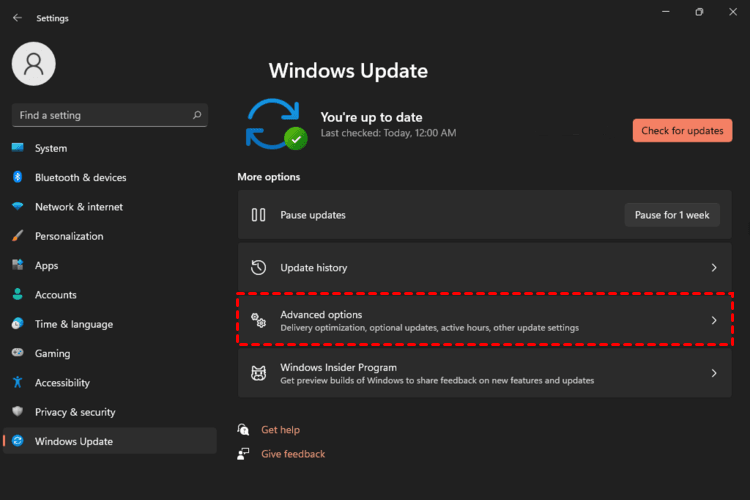
- If any driver update is available, select it and click on the Download & install button.
Method 5. Create A New Volume for The USB Drive
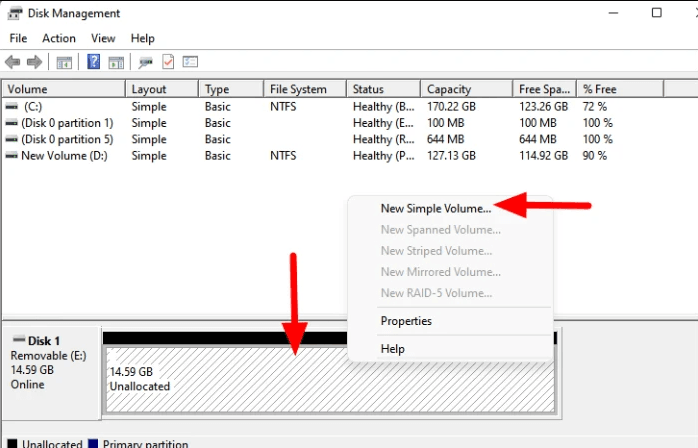
As discussed in the previous fix, if the USB drive has a black bar at the top, its space has not been allocated and may be the reason for the USB drive not showing up in Windows 11. To fix it, you just need to follow the steps below to allocate space or create a simple volume.
- Right-click on the unallocated space where the drive is listed at the bottom and select New Simple Volume from the context menu. The New Simple Volume Wizard window will launch. Click on Next to proceed.
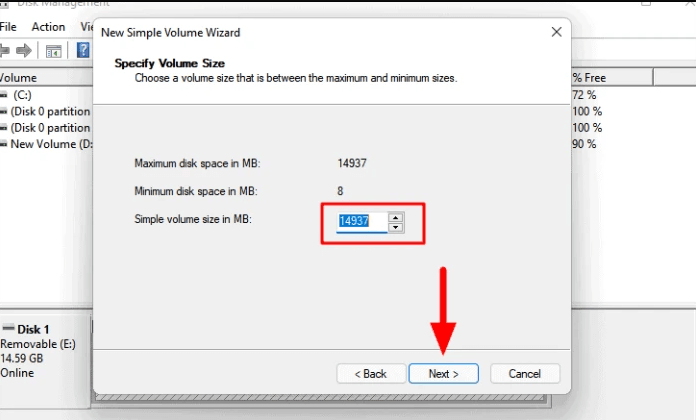
- Next, choose the maximum size for the simple volume and click on Next at the bottom.
- Now, choose the desired drive letter and then click on Next at the bottom.
- Then choose a File System for the drive and enter a Volume label for it. Click on Next to proceed.
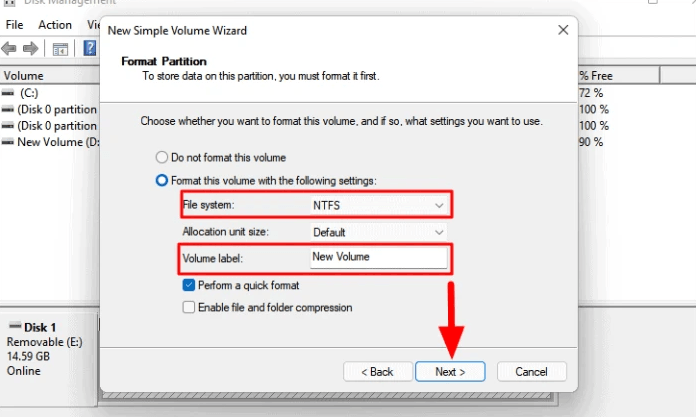
⛔ Note: If you are using a USB drive with more than 4 GB of storage space on Windows, the NTFS file system is recommended. For drives smaller than that, use the FAT32 file system.
- Finally, verify the settings that you have selected for the format, and click on Finish to apply them. Once you have created a new simple volume, the drive should appear in the File Explorer.
Method 6. Disable USB Selective Suspend Feature
If none of the above fixes work, check to see if the power settings on your system are preventing the USB drive from showing up. There is a setting in Power Options that cuts power to a USB drive when it is plugged in, so it might not show up. Follow the steps below to disable the USB selective suspend option on Windows 11:
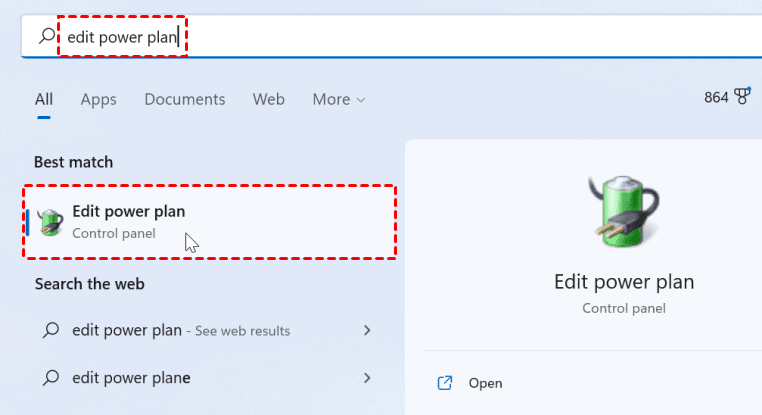
- Open the Start menu and type edit power plan. Select the top result.
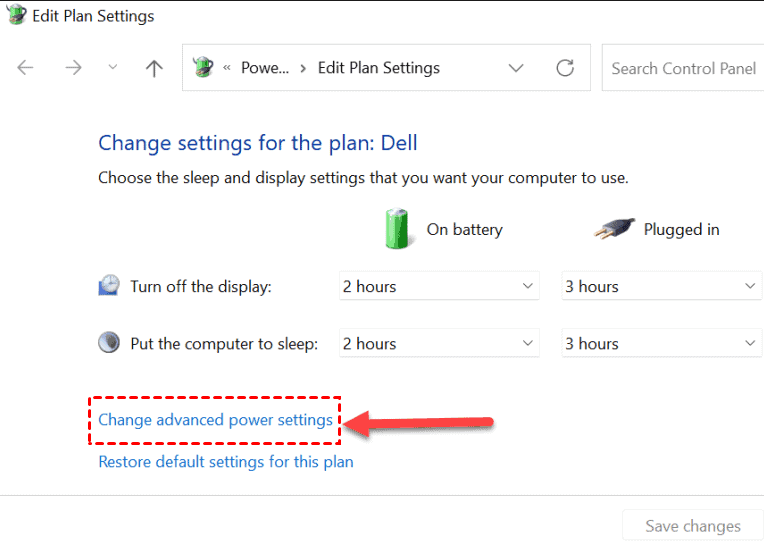
- Next, click the Change advanced power settings option.
- In Power Options, expand USB settings and change the USB selective suspend setting option to Disabled.
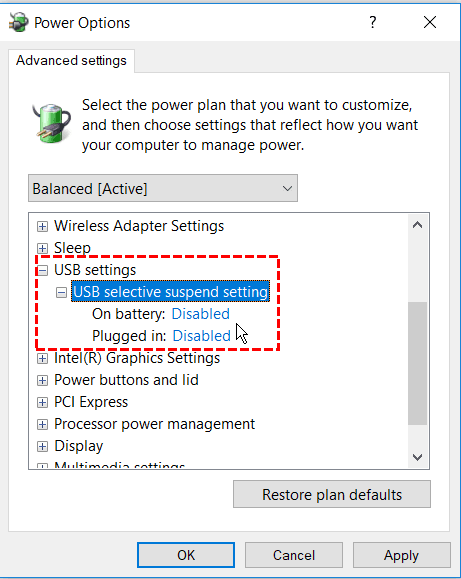
- Then click Apply and OK. Finally, restart your PC to apply these changes.
Backup USB Flash Drive Files to Prevent Data Loss
The USB not showing up in Windows 11 mentioned in this article is just one of the common problems. Sometimes you even need to format the disk before using it.
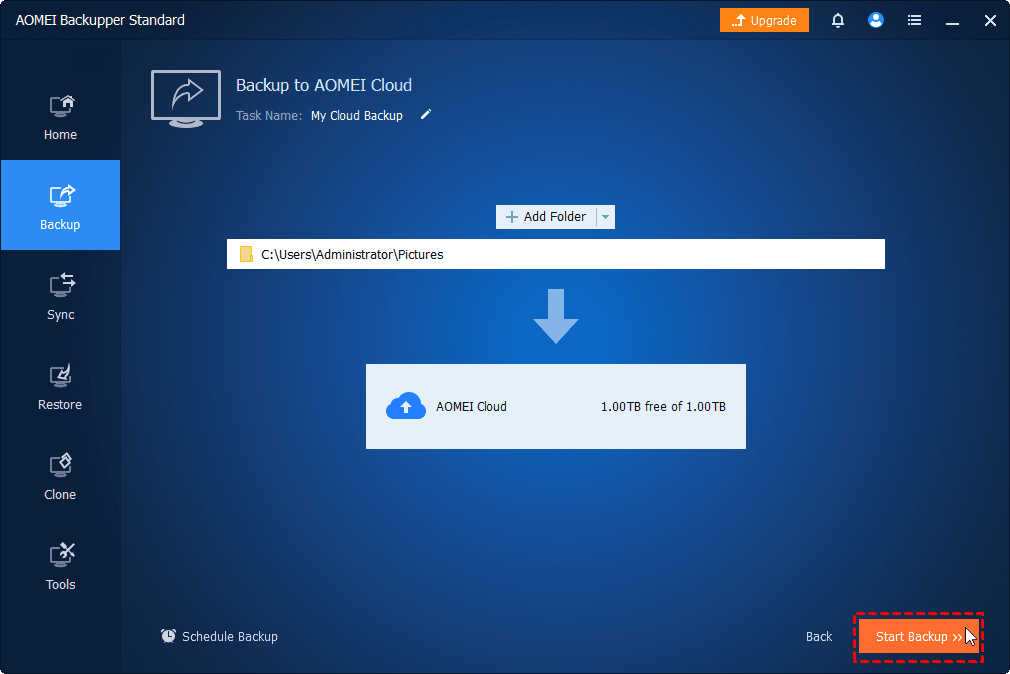
Given the high frequency we use USB, it is recommended that you regularly back up files on the USB to avoid accidental loss of files. AOMEI Backupper Standard is a free backup software to protect disks, like USB drives, local & external hard drives, Windows systems, and personal data.

- Backup and Recovery: Protect your USB files and easily restore them in case of disk failure or a ransomware attack.
- Supports Multiple Devices: Backup data from various sources, including USB flash drives, SD cards, SSDs, hard drives, cloud storage, and NAS.
- Automated Backups: Create automatic backups to save time and avoid the hassle of manually backing up files.
- Incremental Backup: Automatically back up only the files that have changed since your last backup, ensuring efficiency.
To backup specific files on your USB drive, you can utilize the "File Backup" feature. Also, you can use "Disk Backup" to create a backup image for your entire drive.

If you decide to create a cloud backup, cloud storage may be a big problem for you, since almost all cloud drives only provide you with a few GB of free cloud storage. To get enough cloud storage, try to backup folders to AOMEI Cloud, a cloud drive released by AOMEI Tech, which offers you 1TB of free cloud storage from the time you sign up AOMEI account until 15 days.
FAQ Section
Q 1: Why does my USB flash drive show up in Device Manager but not in File Explorer?
A 1: This usually happens due to an unassigned drive letter or an unrecognized file system. You can resolve this by opening Disk Management and assigning a drive letter or formatting the drive.
Q 2: Can I recover data from a USB flash drive that doesn’t show up in Windows 11?
A 2: Yes, AOMEI Backupper offers solutions for retrieving important files using backups before the problem like data doesn't show up in Windows 11.
Q 3: How can I prevent USB flash drive issues in the future?
A 3: Always eject your USB drive safely, keep your drivers updated, and ensure that your system is protected from malware that can corrupt devices.
Q 4: What should I do if none of the solutions work?
A 4: If basic troubleshooting fails, try using the drive on another system or device. In some cases, the flash drive might be physically damaged beyond repair, and professional data recovery services may be required.
Expert Tips for Preventing USB Drive Issues
-
Safely Eject the Drive: Always use the “Safely Remove Hardware” option before unplugging your USB drive to avoid data corruption.
-
Keep Your System Updated: Regularly update your operating system and drivers to prevent compatibility issues with connected devices.
-
Backup Important Files: Regularly back up your USB drive data using reliable software like AOMEI Backupper, especially before performing repairs or formatting.
Summary
If your USB flash drive is not showing up in Windows 11 or Windows 10, follow the methods in this article to resolve the issue. Once fixed, it's advisable to regularly back up your USB to safeguard your data.
The free backup software described in this article is worth checking out. It not only protects your data in an all-around way but also protects your system. You can also use it to create bootable media to help you start your computer in the event of a system crash.
Additionally, you can use it to deploy 11 Windows images by USB drive. Unlock more features on advanced editions by yourself.