How to Transfer Windows 11 from One SSD to Another SSD [2 Ways]
It’s a good idea to install Windows 11 to SSD, but after a period of use, you may want to transfer Windows 11 from one SSD to another. To do this, cloning is a much easier way than backup and restore. Follow the steps below to try it.
By Jonna Updated on August 28, 2025
🌟 Key Takeaways of Moving Windows 11 to New SSD:
|
1️⃣Connect the new SSD and initialize it 2️⃣Create a Windows 11 system image 3️⃣Restore Windows 11 Image to New SSD 4️⃣Boot Windows 11 from the new SSD |
|
|
1️⃣Connect the new SSD and launch the clone tool 2️⃣Specify the target SSD to receive the migration 3️⃣Confirm the settings and start cloning 4️⃣Boot Windows 11 from the cloned SSD |
Scenario: Migrate Windows 11 from One SSD to New SSD
I'm using a 256GB SSD that is running out of space, and want to migrate Windows 11 and programs to a larger SSD. It looks like cloning software would work, but I'm not sure how to do it and get the target SSD recognized as system drive. Any advice would be much appreciated.
There are two common scenarios for transferring Windows 11 to new SSD:
- Transfer Windows 11 from one SSD to another - After installing Windows 11 to SSD, you encounter problems such as low disk space or system crashes. You want to replace it with another SSD.
- Migrate Windows 11 from an HDD to SSD - The OS is installed on an HDD previously, but over time, you want to upgrade the HDD to an SSD due to its superiority in startup and read/write speeds.
Compared to a fresh install of Windows 11 on the new SSD, a system migration using disk cloning or backup & recovery way will preserve your data from the old disk, including all the presonal settings, apps and files. I will describe the exact steps below.
Can You Transfer Windows 11 to Another SSD?
Of course, you can migrate Windows 11 to new SSD, and it could be simply done with the right tool. To transfer Windows 11 from one SSD to another or from HDD to SSD, you can use the built-in backup utility to create a full system image of Windows 11, and restore it to the new SSD. But the process is laborious and error-prone, you need to create a system backup and a recovery drive, then perform a bare metal restore on the target SSD (see image Windows to SSD).
To reduce the hassle and increase the success rate, you can pick an efficient migration tool that offers easier transferring process. For example, the free backup software AOMEI Backupper Standard includes powerful yet easy-to-use system backup and restore features.
It is also SSD cloning software that supports you to clone data from one SSD to another for quick data migration without recovery.

- You can create system backup or entire system disk backup from one SSD and restore it to another for system migration.
- It also alows you to clone operating system to SSD directly (supported by Pro edition) without restoration.
- You can transfer Windows 11 to a connected SSD directly without installation disc or recovery drive.
You can download the free version to have a try.
💬To simplify the process further, you can upgrade to Pro edition to enjoy the system clone or disk clone feature. It eliminates the recovery step, allowing you to migrate Windows 11 directly to a smaller or larger SSD.
How to Migrate Windows 11 to New SSD via Backup & Restore - Free
System backup and restore is the conventional way to transfer Windows 11/10 from one drive to another. You can follow the steps below to figure out how to transfer Windows 11 from one SSD to another:
Step 1. Connect the new SSD and initialize it
1. Connect the target SSD. If your PC has more than one slot, just install the new SSD alongside the old one. Otherwise, you can use an USB to SATA adapter or enclosure to connect it as an external drive.

2. Prepare the target SSD. If it is a new SSD, you should be prompted for initial setup when you first use it, at which point you can select the partition style as GPT (to support Windows 11).
If it is already partitioned as MBR, you need to perform some additional steps. AOMEI Backupper can overwrite the partition style of the source disk to an unpartitioned target disk, so you can simply delete all the volumes of the target SSD in Disk Management.
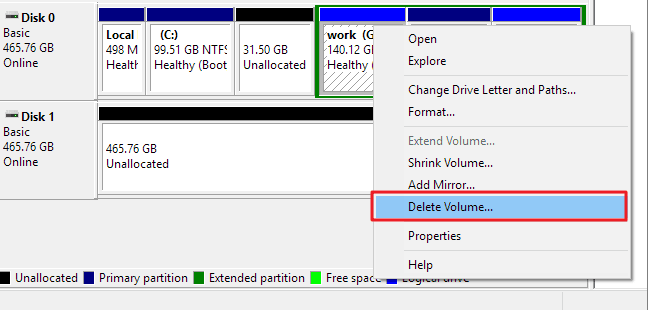
3. If there's some important data on your target SSD, you can first use its "File Backup" or "Disk Backup" feature to make a backup of it, because the restoring or cloning process will overwrite the target drive.
Step 2. Create a Windows 11 system image
1. Launch the software, navigate to Backup tab and click System Backup. If you want to image entire HDD to SSD, then choose Disk Backup to back up the hard drive.

2. The system partitions will be selected automatically. You just need to specify a destination and Start Backup.

Step 3. Restore Windows 11 Image to New SSD
1. To transfer Windows 11 image to SSD, switch to the Home tab and click on the Restore button. Then, choose the target backup task or click on Select image to restore to locate the system backup you want to restore.
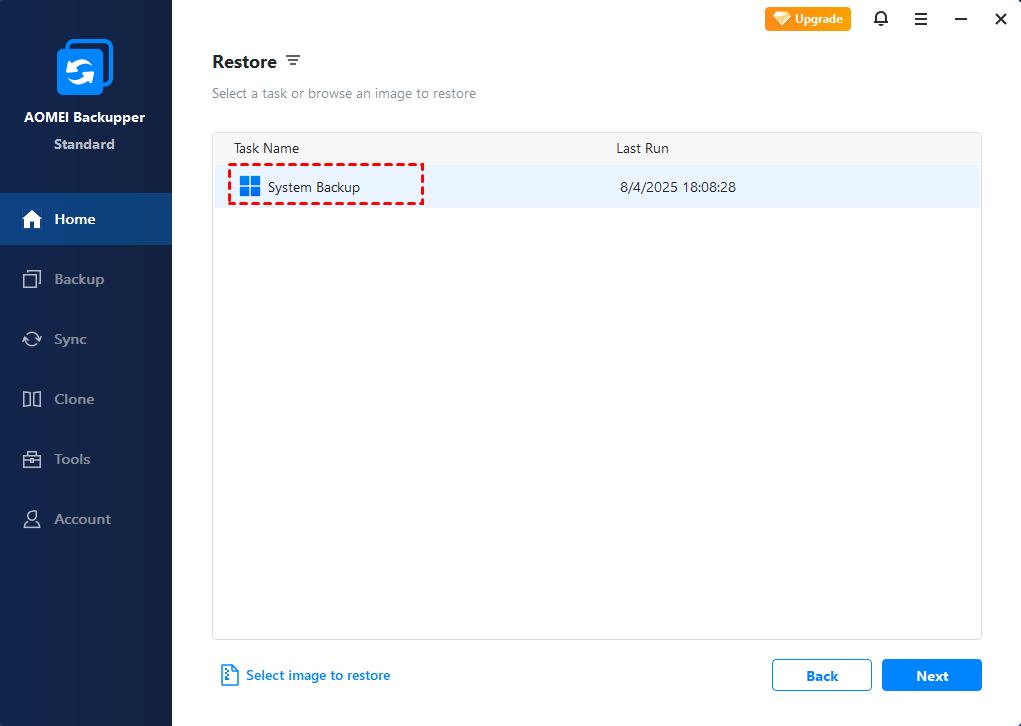
2. Select Restore this system backup > Next, choose Restore to a new Location, and select the target SSD as the destination, and click Next to continue.

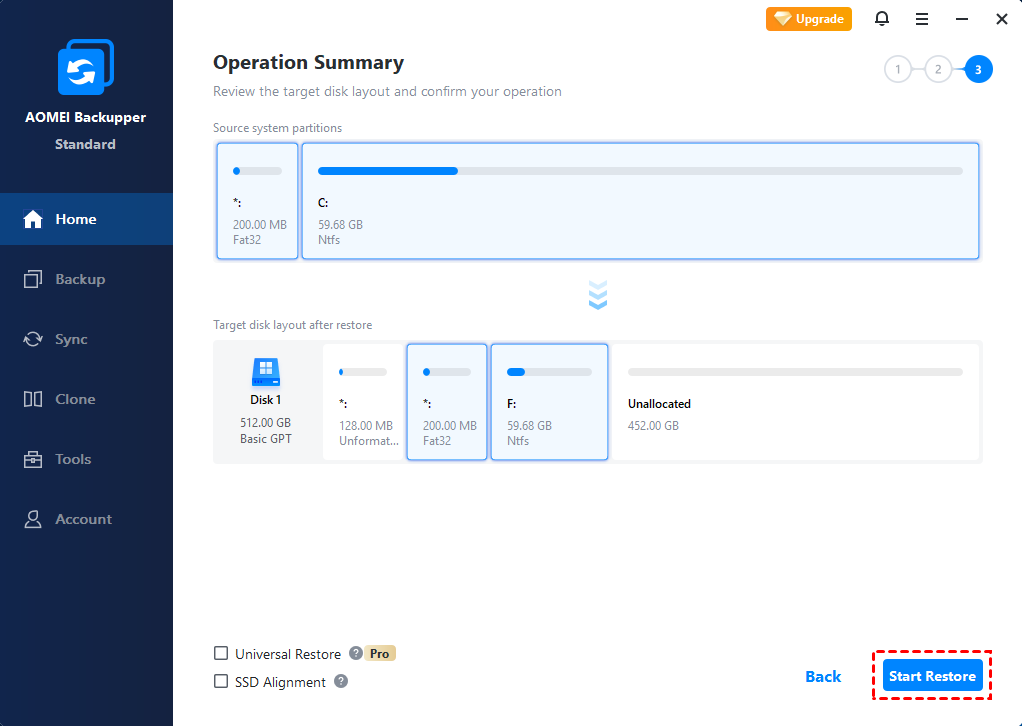
3. Then confirm the operation and Start Restore to migrate Windows 11 to new SSD.
✍Useful Options:
- If you want to migrate Windows 11 to new computer by restoring the Windows backup image to a different computer, please tick Universal Restore (supported by Pro edition) to make sure it can boot properly after restoration. And if the target computer cannot start properly, you can also create a bootable media to boot it into WinPE.
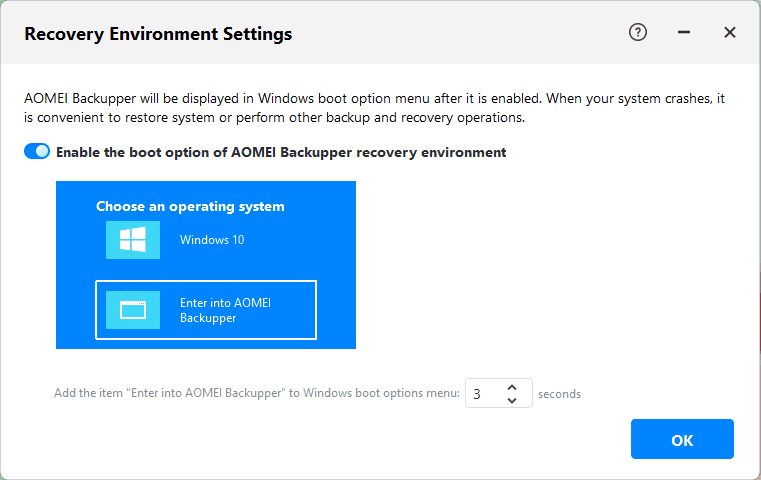
- You can also create a recovery environment to help you perform system backup restore or other backups restore operations. It can add the "AOMEI Backupper Recovery Environment" option to the system boot menu page so that you can select to start the system from the recovery environment directly to restore images created by AOMEI Backupper to a new hard drive.
Step 4. Boot Windows 11 from the new SSD
When the transfer is completed, you can boot Windows 11 from the new SSD.
It's recommended to shut down the computer completely, and replace the old hard drive with the SSD. Restart the computer and it should start from the new SSD.
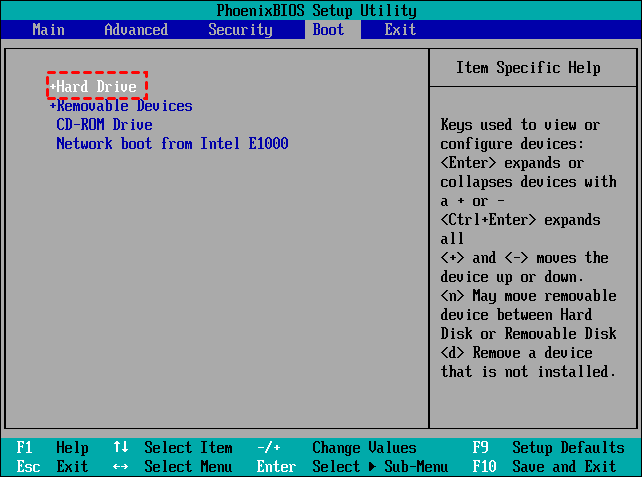
If your computer has extra slots, you can connect the old hard drive again to use it as a secondary storage drive. Just make sure the new SSD is the first boot option in BIOS or UEFI settings.
How to Transfer Windows 11 from One SSD to Another SSD Directly via Cloning - Easiest
Compared to backup & restore, system clone is an easier way to migrate Windows 11 to new SSD or HDD. Since Windows doesn’t come with cloning capabilities, you need the help of specialized cloning software, such as AOMEI Backupper Professional.
It can clone all GPT/MBR system and data disks, allowing you to transfer the whole hard drive or only the OS. And thanks to the intelligent-sector cloning technology, you can even clone Windows 11 from a larger SSD to a smaller SSD.
You can get started to move Windows to another drive with the guide below:
Step 1. Connect the new SSD and launch the clone tool
Connect the target SSD that you want to migrate Windows 11 to, and prepare it for migration. The precautions are the same as those stated in the previous method.
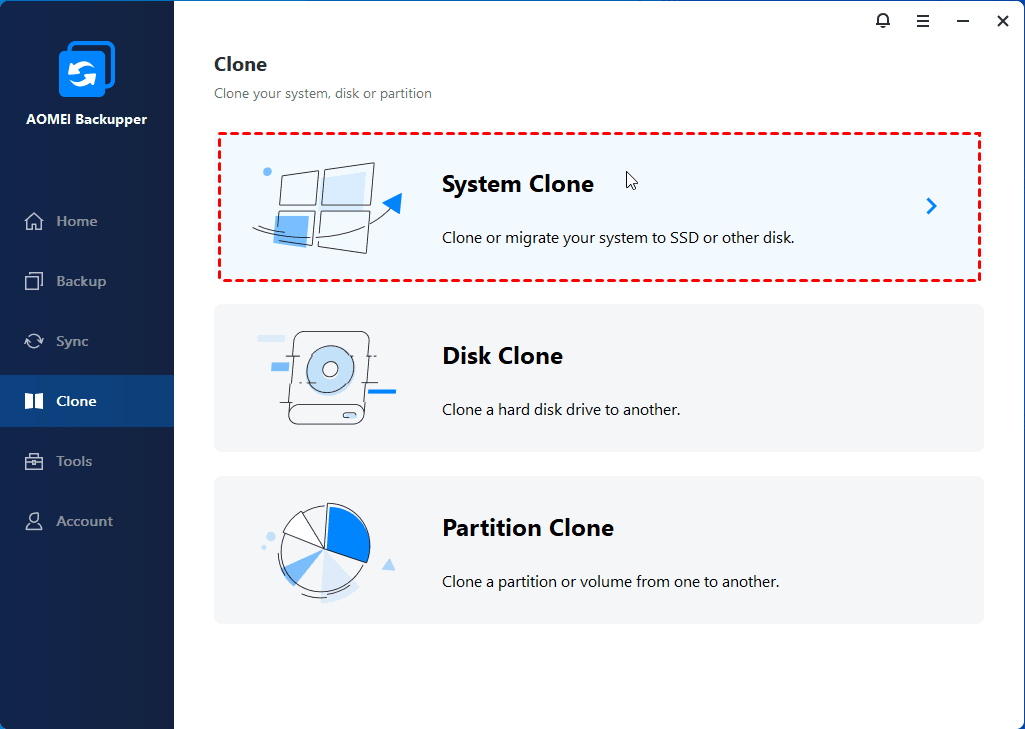
Launch AOMEI Backupper and navigate to Clone tab. Here you can find multiple option: System Clone, Disk Clone and Partition Clone. Here I will demonstrate System Clone feature to transfer OS from one SSD to another.
✍Tips: If you want to transfer the entire Windows 11 system disk, choose Disk Clone instead.
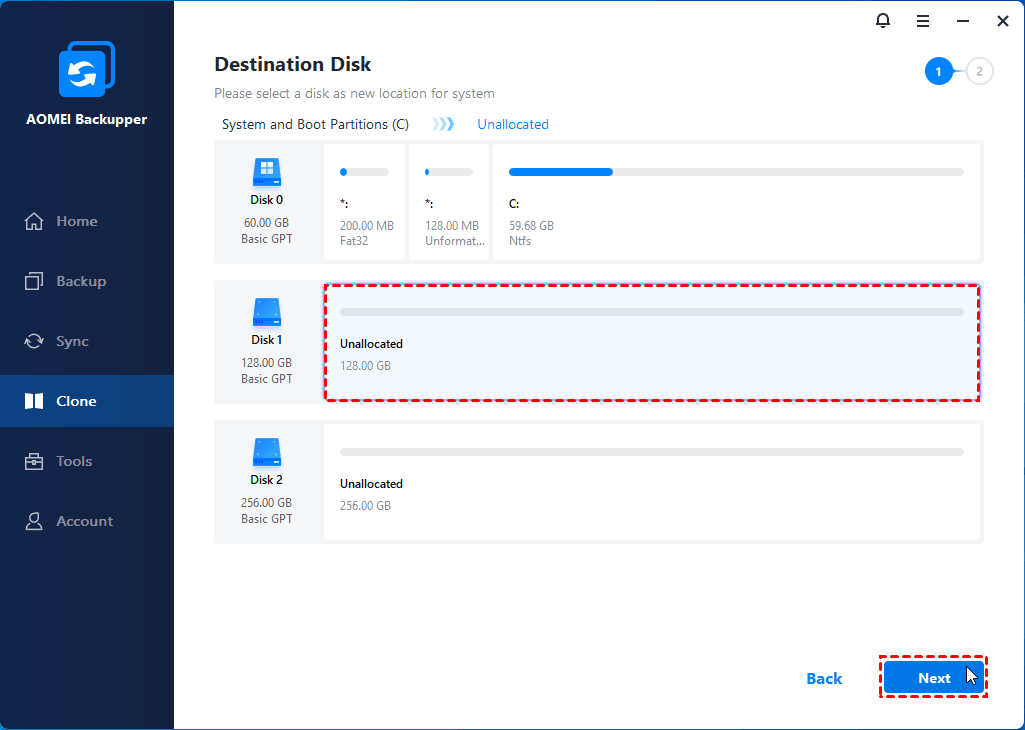
Step 2. Specify the target SSD to receive the migration
The system partitions is auto selected, so you just need to specify a Destination Disk. Choose the SSD you connected and click Next.
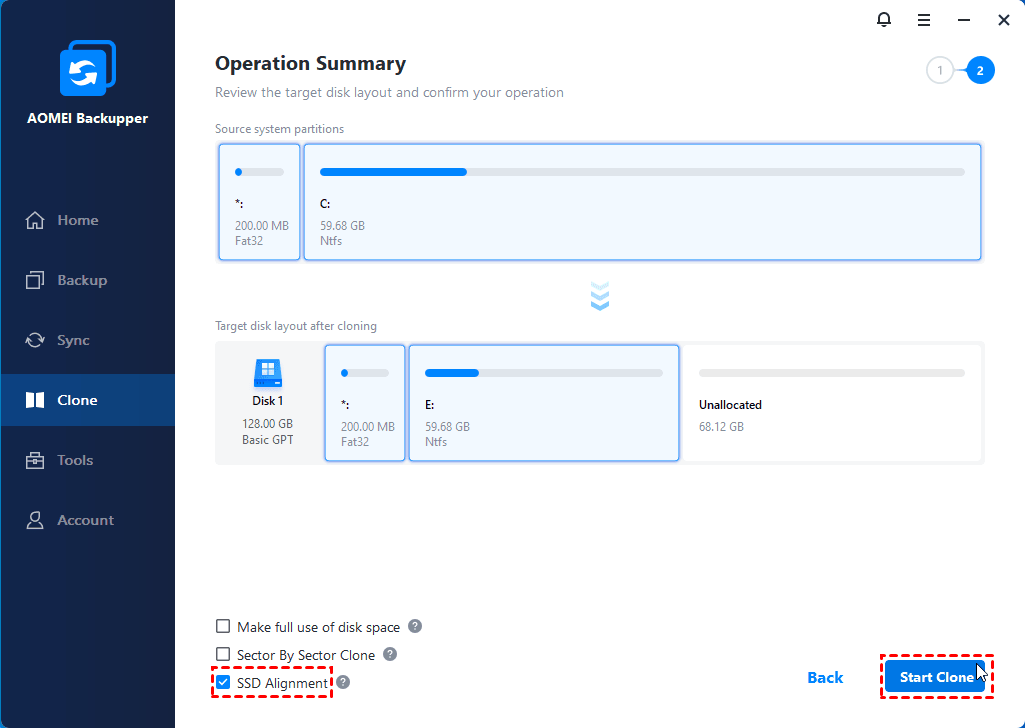
Step 3. Confirm the settings and start cloning
In the Operation Summary window, you can tick SSD Alignment to accelerate the target SSD and prolong its life span. Then, you can click Start Clone to clone Windows 11 to new SSD and wait for it to complete.
✍Useful Options
- The Sector By Sector Clone feature in Step 3 is designed to clone all sectors no matter used or not (the default mode will copy only used sectors). So it takes a longer time for cloning, and requires the target partition/disk is equal to or larger than the space of the system.
- If you want to clone system reserved recovery partition and make sure it still works on the cloned SSD, please run a Disk Clone while ticking the Sector By Sector Clone option.
- If you choose to perform Disk Clone, you can use Edit Partitions to modify partition sizes, assign unallocated space, specify drive letters, etc.
Step 4. Boot Windows 11 from the cloned SSD
After completing the system migration, you can shut down the computer to replace the SSD with the cloned SSD, and then reboot.

During startup, press the specific key (could be F2, F10, Esc, Del…depends on manufacturer) to enter BIOS, and select the cloned SSD as the first option.
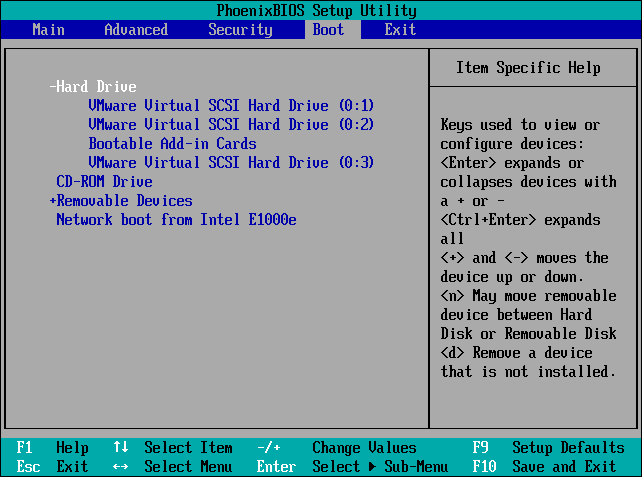
After that, you shall be able to launch Windows 11 with the new SSD. If it works properly, then your cloning is successful.
✍Tips: If you want extra storage space, you can put the old SSD back in, and use the Disk Wipe feature of AOMEI to erase data on it.

FAQs about Transferring Windows 11 to New SSD
1. Can I transfer Windows 11 to a new SSD without reinstalling?
Yes, you can transfer Windows 11 to a new SSD without reinstalling with the 2 methods offered above – restoring system image to new SSD or cloning OS to new SSD directly.
2. Will cloning my drive affect my files or applications?
No, cloning will not affect your files or applications. Everything will be copied exactly as it is on the original drive, including all your files, applications, and settings.
3. What should I do if my computer doesn't recognize the new SSD?
If your computer doesn't recognize the new SSD, try the following troubleshooting steps:
- Ensure all connections are secure.
- Check if the SSD is initialized and formatted.
- Update your motherboard's BIOS/UEFI.
- Consult the SSD manufacturer's support resources for further assistance.
Conclusion
When your computer is running out of space or underperforming, you may want to transfer Windows 11 from one SSD to another for a better experience. But how to move Windows 11 to another drive without losing data? System clone (or disk clone) is probably the easiest way to do this.
As an easy-to-use cloning software, AOMEI Backupper provides an intuitive interface to help you perform Windows 11 migration within several clicks. After the cloning, you can also use it to schedule automatic backup for continuous data protection.

