How to Put a Windows 11 PC to Sleep Mode [Detailed Steps]
How to put a Windows 11 PC to sleep? Learn 8 ways to go to Windows 11 sleep mode in this article, and 6 ways to fix your computer won't go to sleep. This article also provides ways to keep your Windows 11 data safe. Check it out right now!
By Yuka Updated on September 5, 2025
What is Windows 11 Sleep Mode?
Sleep mode is a new mode added to Windows Vista and has been gradually refined in subsequent Windows versions. After the system switches to sleep mode, the operating system dumps all data in memory to a hibernation file on the hard drive, and then cuts power to all devices.
When we wake up the computer, if there is no abnormality during the sleep process, we can directly restore all data from the memory, and the recovery speed is very fast. If an abnormal situation such as a power failure occurs during the sleep process, the data in the memory will be lost. It is also possible to recover all data from the hard disk, but the recovery speed is relatively slow.
Developed so far, Windows 11 Sleep Mode is very safe and will not cause data loss on your computer no matter what state your computer is in. Next, we'll show you how to put a Windows 11 PC to sleep, how to disable Windows 11 Sleep Mode, and how to fix a PC not going to sleep.
How to Put a Windows 11 Computer to Sleep Mode [8 Ways]
Putting your Windows 11 computer into sleep mode is a great way to save power and resume your work quickly. Sleep mode keeps your session active while conserving energy, allowing you to pick up right where you left off. In this guide, we'll explore 8 different methods to put your Windows 11 PC into sleep mode, ensuring you can choose the most convenient option for your needs. We've got you covered with easy-to-follow steps.
Way 1. Use the Start Menu
Like any other version of Windows, Windows 11 sleep mode can also be switched through the Start Menu, which is the easiest way.
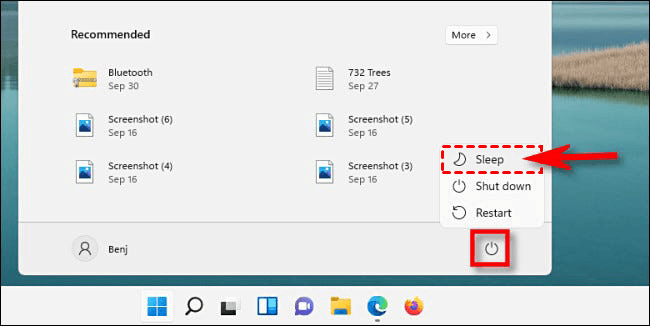
- Find the Start button on the taskbar and click it.
- In the Start Menu, click the power icon in the lower right corner, and select the Sleep option in the expanded menu to put your computer into a sleep state.
Way 2. Use a Dedicated Sleep Button
How to sleep on a Windows 11 PC? If you are using a laptop or tablet with Windows 11, you can use the dedicated sleep button or the dedicated sleep key on the keyboard to enter Sleep Mode. If you don't know, look for keys with a crescent moon logo, the word “sleep”, or multiple “Z” letters. If you're using a desktop computer, just tap the power button and it will go straight to Windows 11 Sleep Mode.

Way 3. Use the Power User Menu
You can also enter Windows 11 Sleep Mode through the Power User Menu. This method is also related to the Start button.
You can put your computer to sleep by right-clicking the Start button, selecting the Shut down or sign out option from the expanded menu, and then selecting the Sleep option.
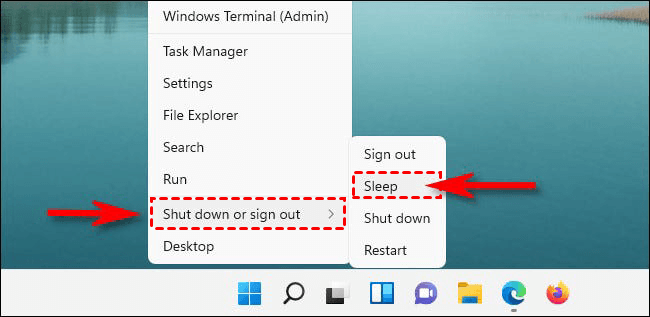
Tip✍: You can also use the Windows + X key combination to open the Start menu.
Way 4. Use the Command Prompt
In the Windows system, the Command Prompt is a versatile tool, you can use specific commands to achieve different operations. You can also use it to put a Windows 11 PC to sleep mode.
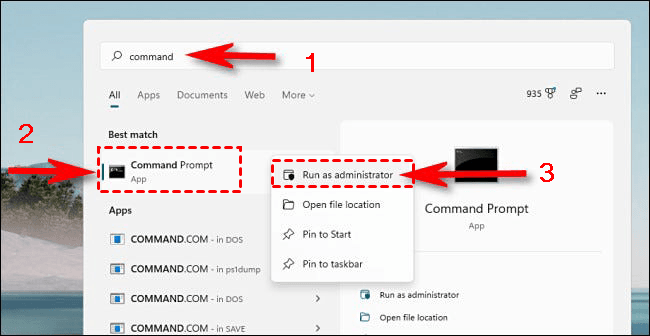
- Click the magnifying glass icon on the taskbar, open the Search box, and enter cmd. Confirm that the Command Prompt is below the best match, and select Run as administrator in the right panel.
- Type the following command in the Command Prompt window and press Enter to execute this command:
- powercfg -h off
Note✍: This command will disable Hibernate Mode. When you first try to initiate Windows 11 Sleep Mode from the Command Prompt, be sure to enter this command first. If you don’t run the powercfg -h off command, the following command will put your PC into Hibernate Mode instead of Sleep Mode.
- Then continue to type the following command and press Enter to execute this command:
- rundll32.exe powrprof.dll, SetSuspendState Sleep
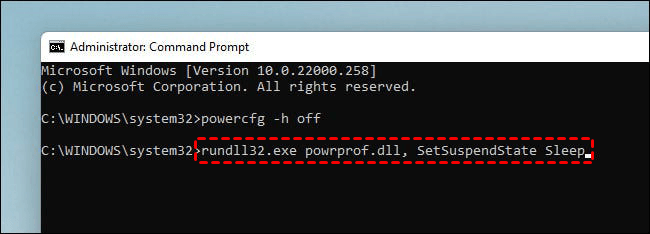
Then your Windows 11 computer will go to sleep.
Way 5. Use Sign-in or Ctrl + Alt + Delete Screen
Ctrl + Alt + Delete key combination is usually used to open the Task Manager, Shut down, and Restart. But this key combination can also be used to enable Sleep Mode, which puts your computer to sleep.
To do so, use Ctrl + Alt + Delete to open the Windows sign-in screen and click the power icon in the lower right corner of the screen. Then select Sleep in the list. Your PC will enter Sleep Mode instantly.

Way 6. Use the Shortcut Key (Alt+F4)
In addition to Ctrl + Alt + Delete, Alt + F4 is also a frequently used key combination for shutdown and restart. This method can also put your computer into Windows 11 Sleep Mode.
Use Alt + F4 to open the Shut Down Windows window, select the Sleep option in the drop-down list, and then click the OK button to put your computer to sleep.

Way 7. Use a Timer in Settings
You can automatically put your Windows 11 computer to sleep when it is idle by adjusting the power and sleep settings in the system preferences. This ensures your device conserves energy and maintains security without manual intervention.
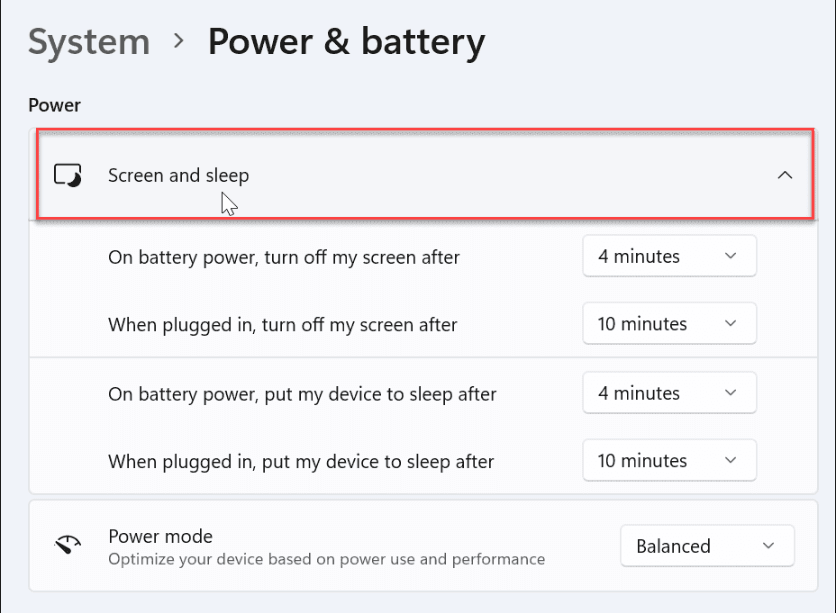
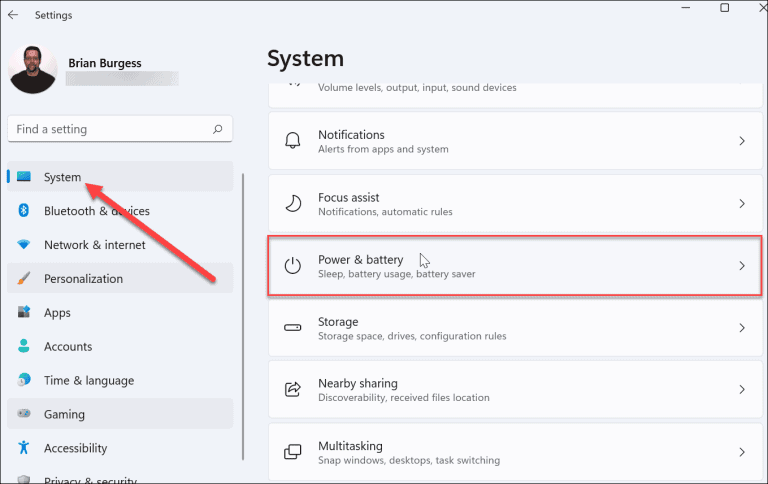
- Use the Windows + I key combination to open Windows Settings, and select System -> Power (Power & Battery on laptops).
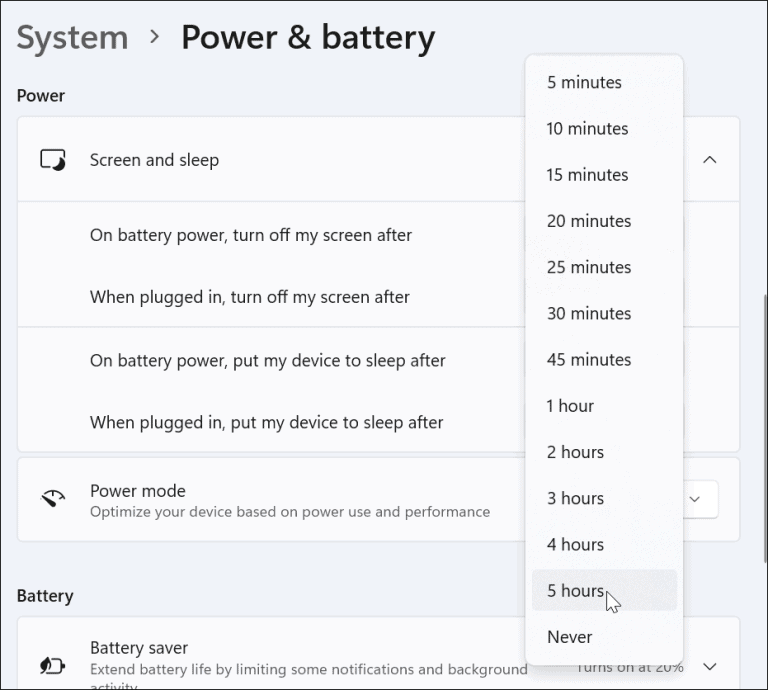
- Click on Screen and Sleep to expand it. Find the time next to “On battery power, put my device to sleep after”, and “When plugged in, put my device to sleep after”. And change the time to automatically go to sleep according to your needs, such as 5 minutes, 10 minutes, 15 minutes, etc.
- When your computer remains idle for a set period of time, it will automatically go to sleep.
Way 8. Create Shortcut and Shortcut Keys for Sleep Mode
In Windows, there is no separate shortcut for Sleep Mode, but we can create shortcuts to make it easier for your Windows 11 computer to enter Sleep Mode. If you are using a notebook computer, it is recommended that you master the creation method.
◆ How to Create Shortcuts for Sleep Mode
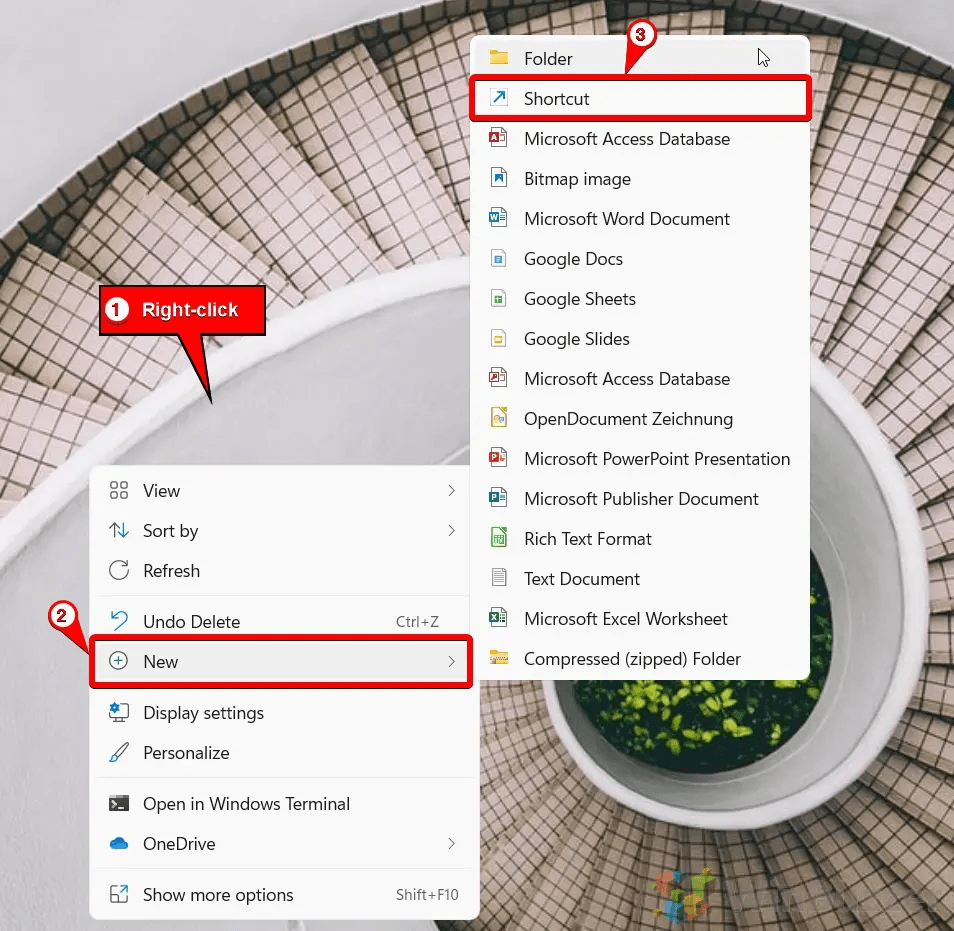
- Right-click on an empty spot on the Windows 11 desktop, and select New -> Shortcut.
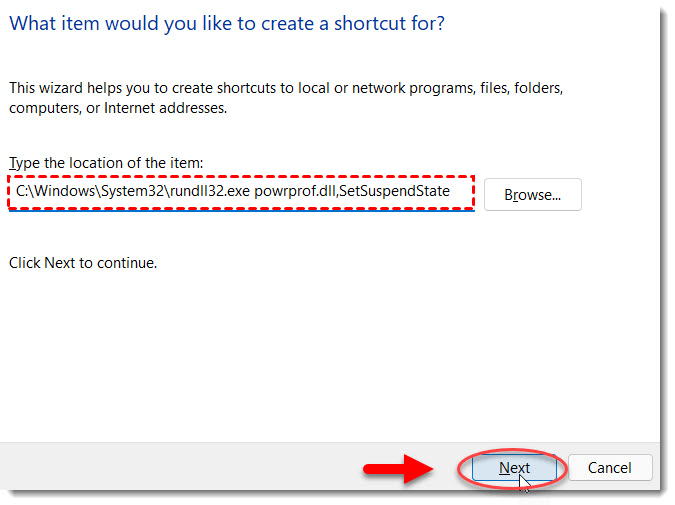
- Windows will now launch the new shortcut wizard and ask you “What item would you like to create a new shortcut for?”. To create a Windows 11 sleep mode shortcut, type the following location field and click the Next button:
- C:\Windows\System32\rundll32.exe powrprof.dll,SetSuspendState
- The wizard will now ask you to enter a name for the new shortcut. Here you can pick any name you like. Then click Finish to proceed. When you double-click it, it will work and your computer will go to Sleep Mode.
If you want to change the icon for the sleep shortcut or pin it to the taskbar, read on.
◆ Change the Icon for Sleep Shortcut
- Right-click the sleep shortcut and select Properties from the expanded menu.
- In the Sleep Properties window, navigate to the Shortcut tab and click the Change Icon button. Then click OK in the warning popup.
![]()
- You just need to select a favorite icon in the icon list and click OK.
◆ Pin the Windows 11 Sleep Shortcut to the Taskbar
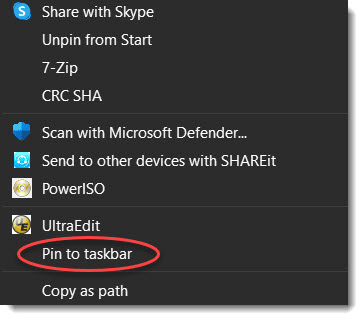
- To pin the Sleep Mode shortcut to your taskbar, right-click the icon and select “Show more options”.
- Then select Pin to taskbar to pin your Sleep Mode shortcut to your taskbar.
◆ How to Create Shortcut Keys for Sleep Mode
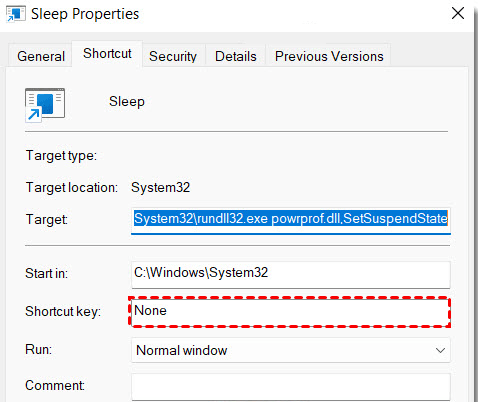
- Right-click the sleep shortcut created earlier, and select Properties from the expanded menu.
- You can see that the shortcut key is displayed as "None", now you need to click it, press the key combination you want to set (eg Ctrl + F5), and then click Apply and OK.
How to Disable Sleep Mode on Windows 11?
If you want to put a Windows 11 PC to sleep, there is always one of the 8 methods above that works for you. However, not all users need Sleep Mode, and if you don't want your computer to go to sleep, here's how to disable it. You can make the sleep mode settings into Never. Then, your Windows 11 computer will never get into sleep mode automatically.
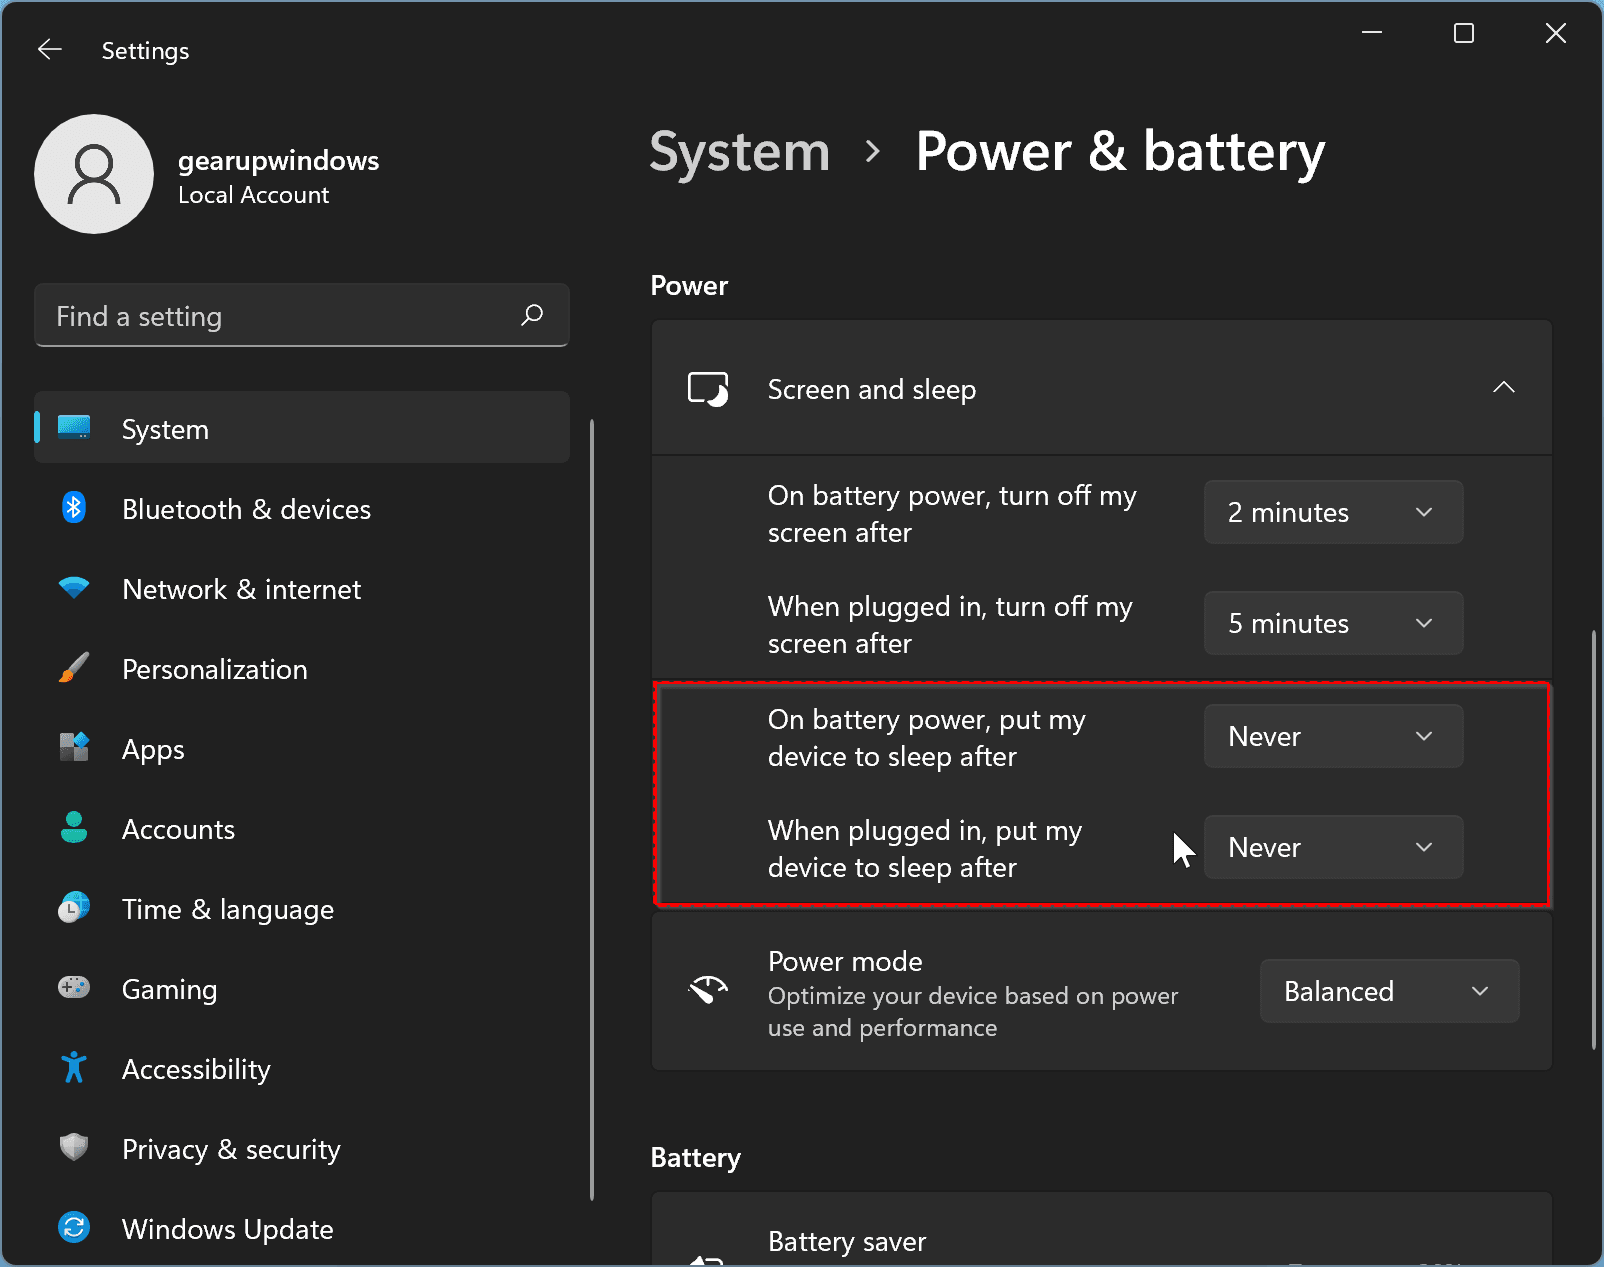
- Use the Windows + I key combination to open Windows Settings, and select System -> Power (Power & Battery on laptops).
- Click on Screen and Sleep to expand it. Find the time next to “On battery power, put my device to sleep after”, and “When plugged in, put my device to sleep after” and change the time to Never.
If you want to turn on Sleep Mode, just follow the steps above and change the sleep state to another time. Change Never to the time you want, and it will go back to the automatic Sleep Mode.
Windows 11 Computer Won't Go Into Sleep Mode?
According to numerous user feedback results, many have reported that their computers do not automatically enter Sleep Mode after upgrading to Windows 11. If you are experiencing a similar issue, there are several steps you can take to resolve it. Below, we outline 6 methods to help you restore the automatic Windows 11Sleep Mode function on your computer.
Method 1. Turn on Sleep Mode Manually
- Use the Windows + I key combination to open Windows Settings, and select System -> Power (Power & Battery on laptops).
- Click on Screen and Sleep to expand it. Find the time next to “On battery power, put my device to sleep after”, and “When plugged in, put my device to sleep after” and change the time Never to a different time.
Method 2. Disable Hybrid Sleep Mode
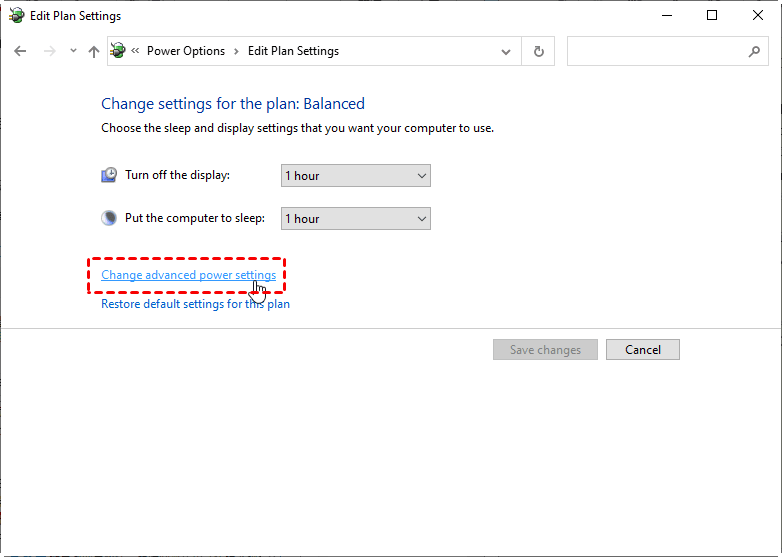
- Type Control Panel in the search box and open it. Navigate to Hardware & Sound -> Power Options -> Edit Plan Settings. In the Edit Plan Settings window, click the Change Advanced Power Settings button.
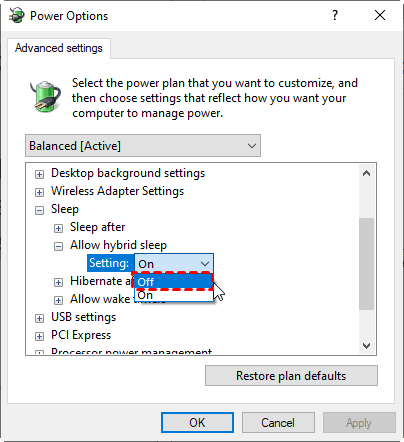
- Click the Sleep option, select Allow hybrid sleep in the expanded menu, and click Setting to change it to Off.
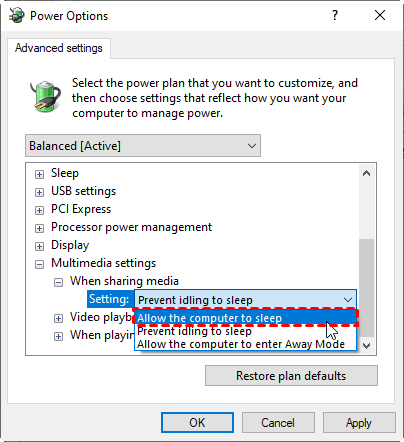
- Go to Multimedia settings -> When sharing media -> Setting -> Allow the computer to sleep, click Apply and OK to save the changes.
Method 3. Disable the Wake Timer
- Open the Power Options in the Control Panel, and enter the advanced power settings as the above method.
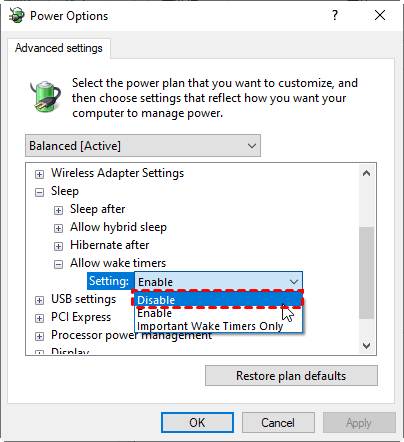
- Go to Sleep -> Allow wake timers -> Setting -> Disable, tap Apply and OK to save the changes.
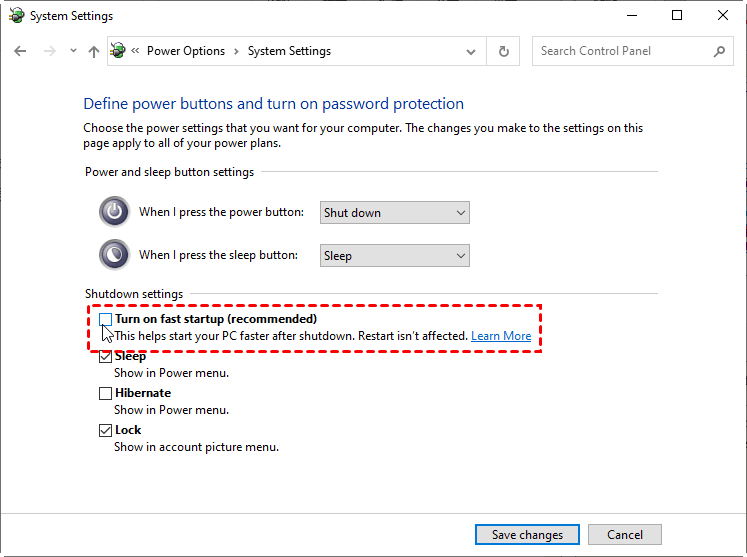
Method 4. Disable Fast Startup
Open the Control Panel. Go to Hardware and Sound -> Power Options -> Change what the power buttons do -> Change settings that are currently unavailable, uncheck the box for Turn on fast startup (recommended), and click Save changes options.
Method 5. Disconnect All Peripherals
Disconnect your peripherals such as mouse, keyboard, headset, Bluetooth, etc. But printers, scanners, cameras, etc. should not be disconnected, otherwise, it may cause your computer to stay awake for hours.
Method 6. Check Power Request
- Type cmd in the search box and select Run as administrator.
- Type the following command in Command Prompt and press Enter to execute this command:
- powercfg /requests
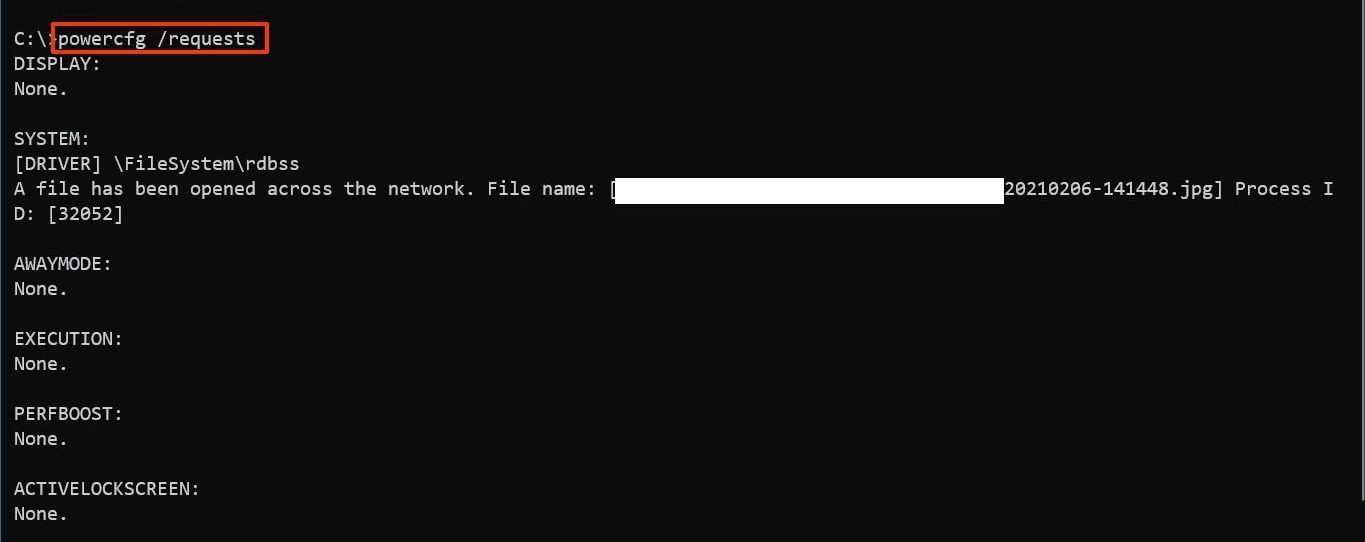
- If any problematic application is detected, find and disable the application in the Task Manager.
The Difference Between Sleep Mode, Hibernate, and Standby in Windows 11
Standby and Hibernate are modes that have been added to the Windows system very early. The main effect is to save power consumption and minimize the time for the system to return to its normal state.
In Standby mode, the power supply of the computer except the memory will be interrupted. Computer data is maintained solely by memory. When the computer is woken up, it can be directly restored to the state it was in before Standby. Fast recovery speed is the biggest advantage of Standby mode. This mode still consumes power. If there is a power outage in Standby mode, a restart is required, and any data not saved before standby is lost.
In Hibernate mode, the system will automatically transfer all data in the memory to the hibernation file on the hard disk. When the computer wakes up, the system reads the data from the hibernation file into memory and returns to the state it was in before hibernation. This mode uses absolutely no power, so you don't have to worry about power outages. However, it requires a hard disk storage space that is the same as the physical memory capacity. Also, Hibernate mode resumes slower, usually around a minute, depending on memory size and hard drive speed.
So what is the difference between Sleep Mode, Hibernate, and Standby in Windows 11? The following is a detailed comparison:
|
Project/Modes |
Standby |
Hibernate |
Sleep |
|
Power Consumption |
Memory Only |
No Consumption |
Memory Only |
|
Recovery Speed |
Fast |
Slower |
Fast |
|
Save Location |
Memory |
Hard Disk File |
Hard Disk File |
|
Data Recovery (Under Power Outage) |
Unable To Recover Data |
Data Can Be Recovered |
Data Can Be Recovered |
It can be seen that Sleep Mode basically combines the advantages of Standby and Hibernate, and is a better choice in comparison. Furthermore, the Sleep Mode is not maintained all the time. When your computer goes into Sleep Mode for a period of time without being woken up, it automatically goes into Hibernate Mode. The computer will disconnect the power supply to the memory, which can further save energy.
Backup Windows 11 to Protect Data
Problems such as sudden power failure during Sleep can result in data loss. But the computer can still restore data from the hard drive, allowing you to pick up where you left off. However, for the sake of data security, it is recommended that you back up your files regularly. AOMEI Backupper Standard can provide you with a free and professional file backup service.
AOMEI Backupper Standard is a free and professional file backup software with a clear interface and easy operation. It only takes a few simple steps to complete file backup, so you don't have to worry about losing files or folders. Next, the detailed steps of AOMEI Backupper Standard File Backup will be introduced for you. First, you need to download the software:
⚡Schedule Backup: You can set up regular backups of your system on a daily, weekly, or monthly basis.
⚡Incremental Backup: This feature allows you to back up the system partition, saving both disk space and backup time.
⚡Various Backup Destinations: You can back up your Windows system to USB drives, hard drives, external hard drives, cloud storage, and network shares.
⚡User-Friendly Interface: The software has a clean, intuitive interface that is easy to navigate.
⚡Broad Windows Support: It supports all versions of Windows, including Windows 7, 8, 8.1, 10, and 11.
- Run AOMEI Backupper Standard, select Backup in the left menu, and select File Backup in the right panel.

- You can choose to Select Source > Add Folder or Add File to select the folders or files you want to back up. In addition, you can click the pencil icon in the upper left corner to name this backup task.

- Select the destination path for the backup files. In addition to local disks, you can also backup files on NAS devices, cloud drives, external hard drives, and more. Confirm everything is OK and click Start Backup to backup files.

Tips✍: Before starting the backup, you can click Schedule, Backup Scheme, and Options at the bottom left.
✡ Schedule: When the scheduled backup function is enabled, you can choose from the following 7 scheduling modes: Daily (By Interval), Daily, Weekly, Monthly (By Week), Monthly (By Date), One Time, and Event triggers (with USB plug-in).
✡ Backup Scheme: You can choose between Incremental Backup, Full Backup, and Differential Backup, among which Differential Backup needs to be upgraded to the professional version. If you upgrade to the pro version, you can also turn on automatic cleanup backups.
✡ Options: You can comment on this backup task, enable encrypted backup, and enable email notification. To enable the encrypted backup function, you need to upgrade to the professional version.
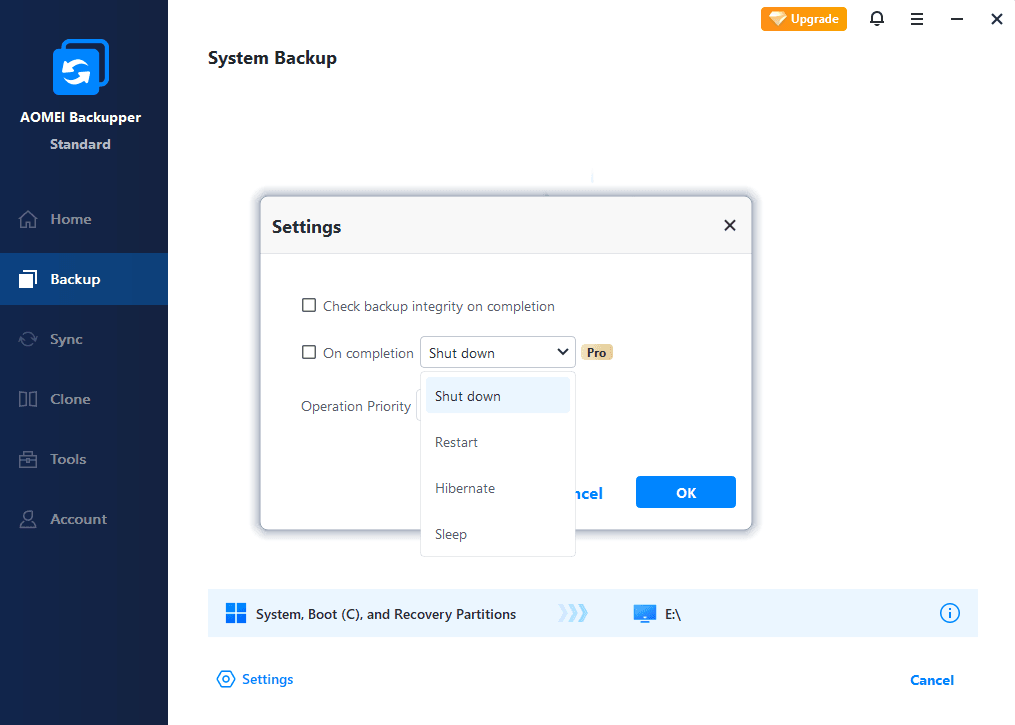
- During the system backup process, you can click the settings icon in the lower left corner to select the corresponding operation after the job is completed according to your needs. After waiting for the system backup to complete, click the OK button.
Tips✍:
✾ After the file backup is complete, you can use the File Restore function to restore the file backup image.
✾ If you only want to view the contents of the file backup and do not want to restore the file backup image, you can use the View Image feature.
Conclusion
How to put a Windows 11 PC to sleep? Through this article, you can learn about 8 ways to go to sleep. And learn 6 ways to fix your computer so it won't go into Sleep Mode. In addition, this article shows you how to disable Sleep Mode and lets you know the difference between Sleep, Hibernate, and Standby. Although Sleep Mode is very safe, to avoid unexpected situations in your files, it is recommended that you use AOMEI Backupper Standard for file backup.
Besides File Backup, AOMEI Backupper Standard has other features that may interest you. You can use the File Sync feature to easily synchronize files that have changed from the source directory to the target directory. This saves you time compared to backing up again. In addition, you can also use the Disk Backup and Partition Backup functions to ensure the safety of your computer data.

