How to Use Volume Shadow Copy in Windows 10/11 for Backup
Read this detailed post to learn a step-by-step tutorial on what is Volume Shadow Copy, how it works, and how to enable/restore/disable this tool in Windows 11/10 as well as an all-round way to backup files and folders. Get details now!
By Ivy Updated on August 28, 2025
In the following content, we will introduce you to the detailed methods on how to use Windows Shadow Copy, how to enable it, and how to disable it. You will know its benefits and how it works.
If you need an easier way to create backups in Windows, try this free backup tool.
How to use Windows Volume Shadow Copy in Windows 11/10/8/7
How to use Windows 11/10 Shadow Copy is a common concern for many users. It's not a mystery. Enabling Windows Volume Shadow Copy is straightforward. You can easily enable or disable Volume Shadow Copy and restore deleted files or folders with a few simple steps. Understanding these features can help ensure your data is always backed up and recoverable.
Situation 1: Enable Volume Shadow Copy in Windows 11/10/8/7
#1: Enable Windows Volume Shadow Copy using system restore points
Step 1. Type Create a restore point in the search box and select it. Then, in the System Properties, choose a drive and click Configure.
Step 2. In the new window, tick Turn on system protection and click Apply to enable.
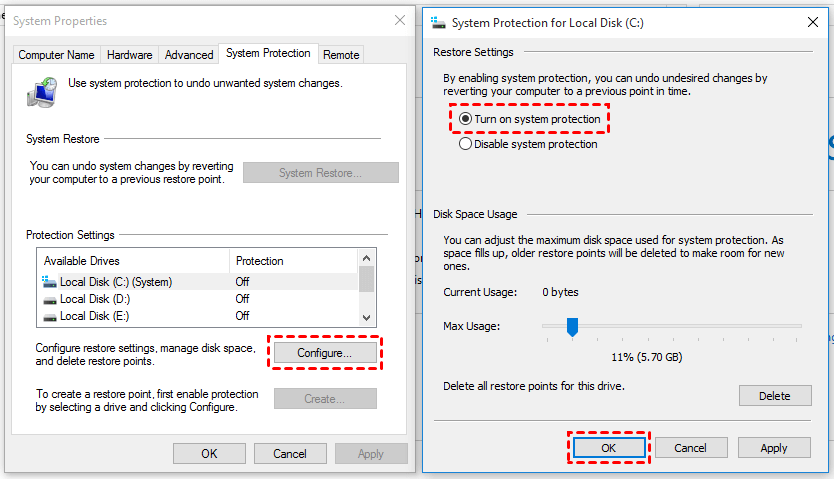
Step 3. Click Create to enable volume shadow copy in Windows 10.
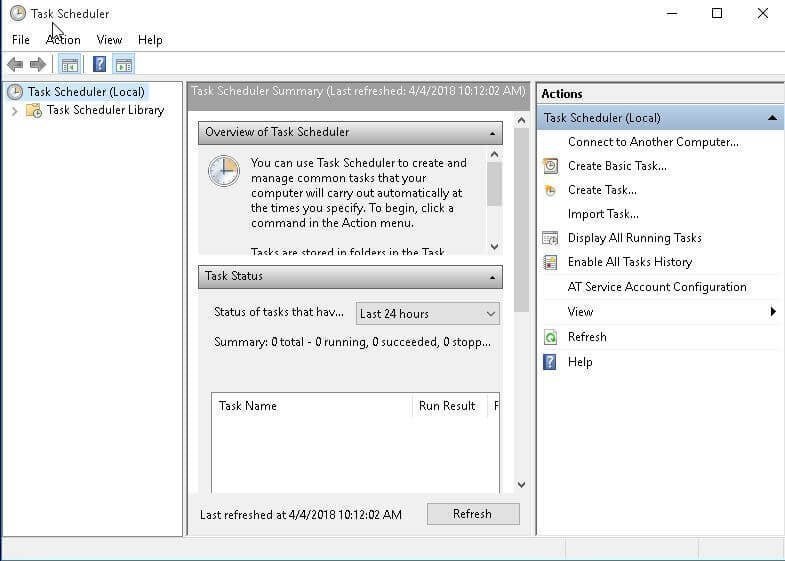
# 2: Turn on Volume Shadow Copy using task scheduler
If you want to customize volume shadow copy in Windows 10 with a specific time, you could use Task Scheduler. Learn how to enable shadow copy in Windows 10 step by step below.
Step 1. Open Task Scheduler. You can click Start, type task scheduler, and select it from the list.
Step 2. Click Create Task and then specify a name for the task (eg: ShadowCopy).
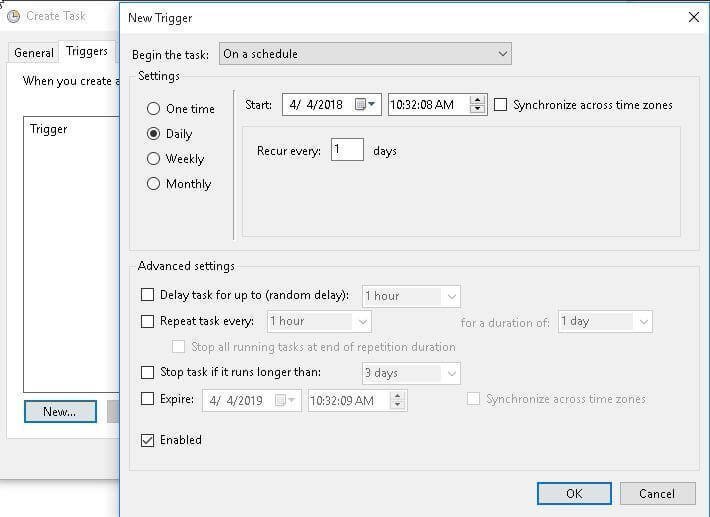
Step 3. Create a new trigger. You can click the Triggers tab and New... option at the lower location, then select one setting among one time, daily, weekly, or monthly.
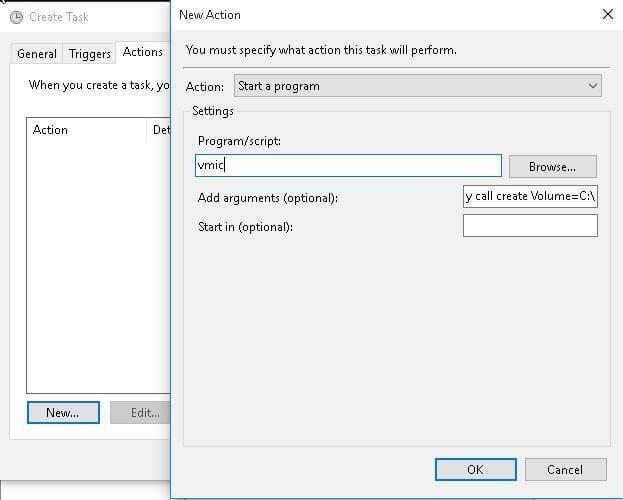
Step 4. Enable shadow copy. You can click the Actions tab and New... option, type wmic under the Program or script option, input the argument shadowcopy call create Volume=C:\ at the blank box on the right side.
When you run program items using VSS technology, you may receive a volume shadow copy error in Windows 11/10. In this case, you should go to Services and check if the Volume Shadow Copy service is started at first time. Once it stops, the volume shadow copy service will not work in Windows 11/10 and the program will fail to create a snapshot for your volume.
Situation 2: Restore deleted files or folders via Window Shadow Copy
# 1: Use the Windows Restore Previous Versions feature.
Step 1. Navigate to the file or folder you want to restore in a previous state and right-click it, then select Restore Previous Versions from the drop-down menu. In addition, you still can select Properties and click the Previous Versions tab.
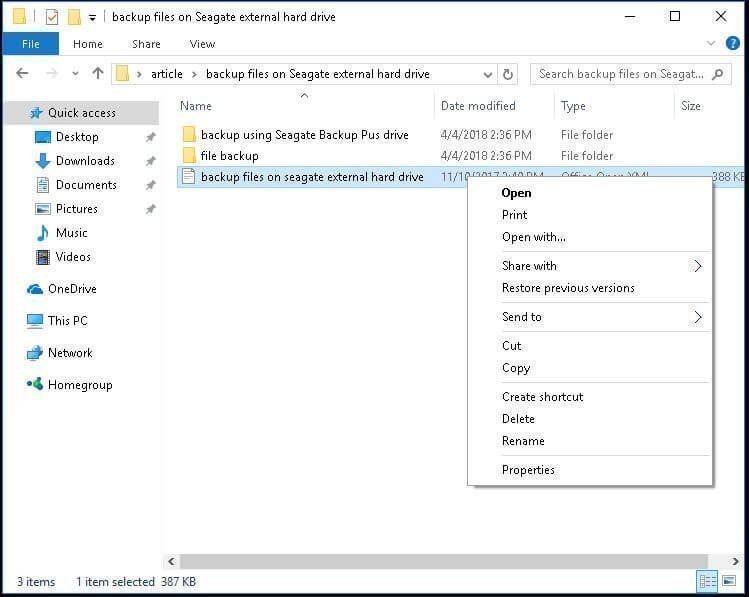
Step 2. Select the correct version of the file or folder to restore.
In this window, you can see 3 options, including Open, Copy, and Restore.
● The Open button will navigate to the location where the file or folder is stored.
● The Copy button allows you to copy files or folders to another location on the computer, even on an external hard drive.
● The Restore button gives you a chance to restore the file or folder to the same location and replace the existing version.
Tip on there are no previous versions available issue:
One of the possible reasons why you receive this error is that the volume shadow service is disabled. You can manually enable it in Task Manager by the following steps.
Right-click the taskbar> select Start Task Manager > click services at the bottom > find Volume Shadow Copy and double-click it > set the startup type as Automatic > click Apply to make it available.
# 2: Use Shadow Explorer in Windows 8/10/11
Step 1. Download the ShadowExplorer utility, install and launch it. Then, select the drive and date to restore the file or folder.
Step 2. Right-click the file or folder to restore and pitch on the Export option.
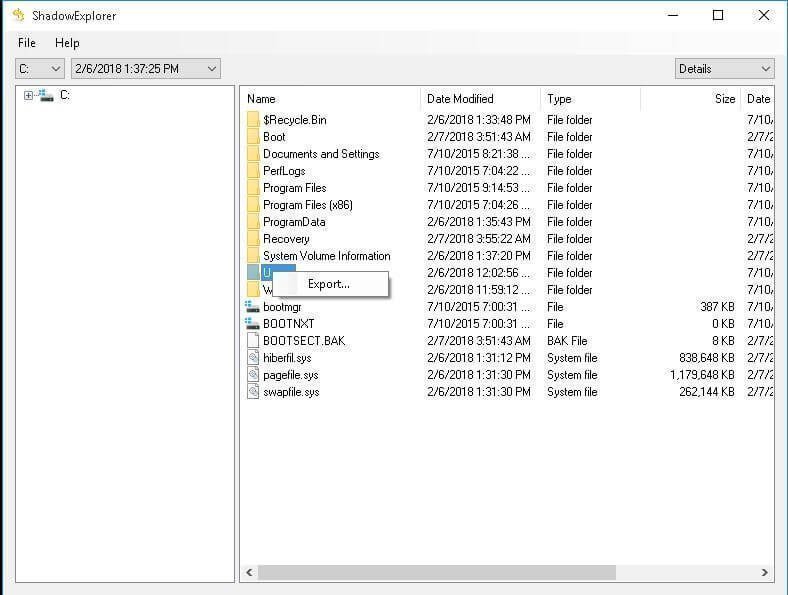
Step 3. Specify the location to save the previous version of the file or folder. Wait and check the previous file or folder.
Situation 3: Disable Volume Shadow Copy in Windows 11/10/8/7
Step 1. Go to the System Properties window by searching Create a restore point on your computer. Then, select a drive and click Configure.
Step 2. Tick Disable system protection and click Apply > OK to exit this window.
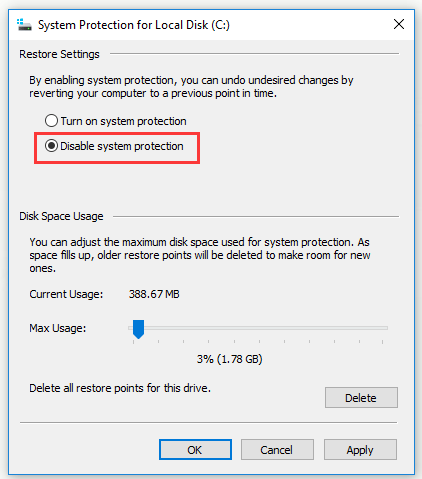
After disabling system protection, all the system restore points and their volume shadow copy will be deleted.
How to easily backup files and folders with VSS
As mentioned earlier, the volume shadow copy does help to backup files or volumes and you need to make use of a trusted and reliable backup software like AOMEI Backupper Standard. Besides files or volumes, this software also allows you to backup the system or disk per your needs.

- Enabled VSS (default): Support Microsoft VSS to backup data without interruption.
- Automatic Backup: Back up files or systems regularly, such as daily, weekly, monthly, event-triggers, etc.
- Flexible backup modes: Offer Intelligent Sector Backup and Sector-by-Sector Backup.
- Multiple destinations: Support backing up files to the cloud, NAS, external drive, or local disk.
Then, let's get started to create a file backup for your files and folders. If you want to back up a specific partition, system, or disk, please use "Partition Backup", "System Backup", or "Disk Backup" to replace it.
Step 1. Connect the storage to store files or folders you want to backup, and be sure it can be detected. Then, download this software and open it, click Backup > File Backup in order.

Step 2. Click Select Source > Add File or Add Folder to select files or folders to backup.

Step 3. Click where the arrow points and go to Add New Destination > select a path (e.g., Local Drive, NAS, Network Share) to save the files and folders.

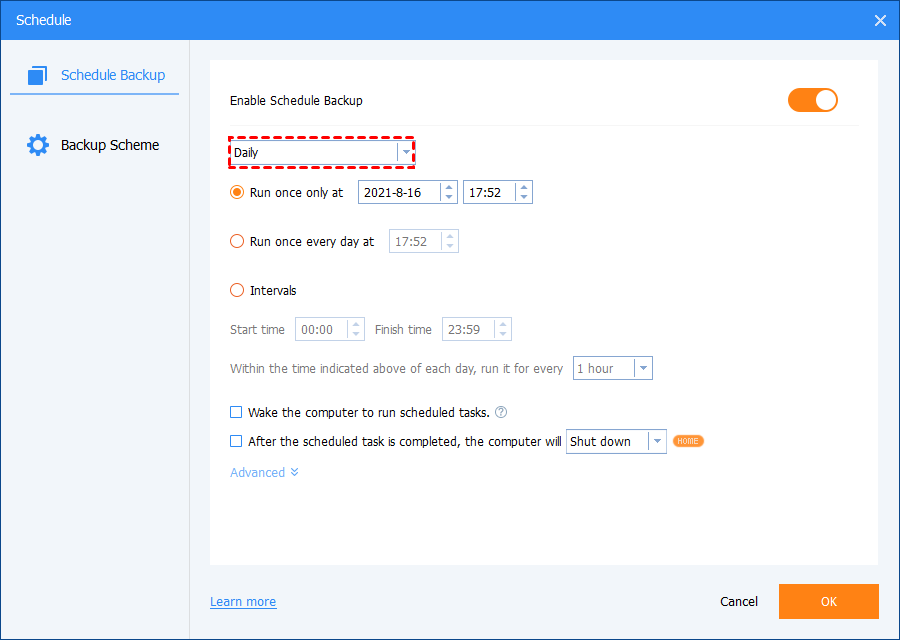
Step 4. Click "Options", "Schedule", and "Backup Scheme" to set backup settings. By default, it will enable VSS to backup files without interruption.
• Except for the mentioned features, you can enjoy more advanced features in the professional version, such as backup encryption, differential backup, backup scheme, etc.
• If you want to backup multiple Windows PCs, you can use the "Create Portable Version" tool (supported by Tech and Tech Plus editions) to create a portable AOMEI Backupper on a removable device, then use it on any target PC without installing.
Step 5. Afterward, confirm the operation and click Start Backup to backup files or folders.
What is Windows Volume Shadow Copy?
Windows Volume Shadow Copy (also known as Volume Snapshot Service or VSS ) is a technology included in Microsoft Windows. It allows you to take backup copies or snapshots of computer files or volumes, whether in use or not. It requires VSS service, VSS requester, VSS writer, and VSS provider during the process. The process can be automatic or manual.
Windows Shadow Copy can be created on local and external volumes by the Windows component that uses VSS technology. In Windows 7, you can create a shadow copy via Backup and Restore or System Restore Points. In Windows 8/10/11, you can use the File History feature.
Windows Shadow Copy also gives you a chance to restore deleted files or folders. In Windows 7, you can use the Previous Versions tab. But it was removed for local volumes since Windows 8. So, In Windows 8/8.1/10/11, you can choose to use ShadowExplorer, which allows you to look through the old shadow copies and restore files.
The benefits of using Windows Shadow Copy
Using Windows Shadow Copy offers several advantages that enhance data protection and recovery capabilities:
📌Automatic Backups: Shadow Copy automatically creates backup copies of files at scheduled intervals, ensuring you have recent versions available without manual intervention.
📌File Versioning: It maintains multiple versions of files, allowing you to recover previous versions if you accidentally overwrite or delete important data.
📌Quick Recovery: Restoring files from Shadow Copies is fast and straightforward, minimizing downtime and data loss during recovery.
📌System Integration: Shadow Copy is integrated into Windows, making it a seamless and cost-effective solution without needing third-party software.
📌Minimal Impact on Performance: Since it uses block-level changes to create backups, Shadow Copy has a low impact on system performance and storage space.
📌Enhanced Data Protection: By providing an additional layer of backup, Shadow Copy enhances overall data protection strategies, complementing other backup methods.
How does Windows Shadow Copy work?
Windows Shadow Copy works by utilizing the Volume Shadow Copy Service (VSS) to create point-in-time snapshots of your files and folders. VSS is a part of the Windows operating system that ensures proper communication and coordination among different components. When enabled, the VSS requester, typically a backup application like Windows Server Backup or third-party software, initiates the creation of shadow copies.
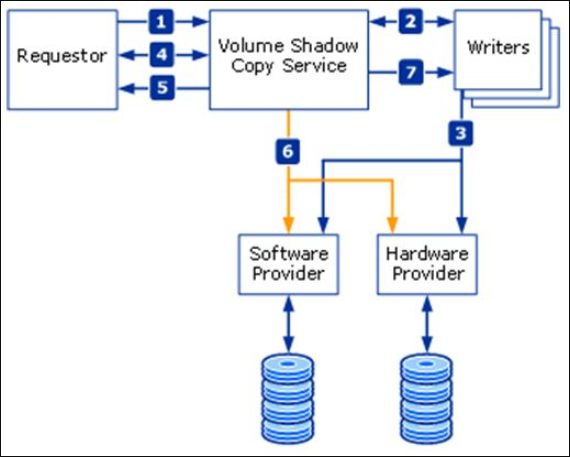
The VSS writer, often provided by line-of-business applications such as SQL Server or Exchange Server, ensures a consistent data set is available for backup. These writers are crucial for maintaining data integrity during the snapshot process.
The VSS provider, which can be software-based or hardware-based, is responsible for creating and maintaining the shadow copies. The default VSS provider in Windows uses a copy-on-write mechanism to track changes at the block level, capturing only the parts of files that have changed since the last snapshot. If you use a storage area network (SAN), a hardware provider can offload the task of managing shadow copies from the host operating system, enhancing performance and efficiency.
By integrating these components, VSS creates reliable and consistent backups, allowing users to restore previous versions of files seamlessly through the file properties interface.
FAQs about Windows Volume Shadow Copy on Windows 10/11
1. Where are Windows shadow copies stored?
Shadow copies are usually stored in the hidden System Volume Information folder located in the root directory of a drive.
2. How do I find old shadow copies?
To access previous versions of a file or folder, right-click on it and select "Restore previous versions." You'll see a list of available versions, including those saved on a backup and any shadow copies if they exist.
3. How long do shadow copies last?
Shadow copies can last for about two weeks, depending on system usage and available disk space. They track changes and allow recovery of deleted files and folders. Note that shadow copies are not created for the C: drive, U: drive, or any local drives and USB sticks.
Wrapping things up
This article helps when you want to enable Windows Volume Shadow Copy in Windows 11/10/8/7, restore or disable it. You can easily backup files with VSS with free backup software - AOMEI Backupper Standard.
With it, you can not only enjoy the advantages of VSS but also overcome its problems, such as the shadow copy may be deleted due to Volume Shadow Copy Windows 10/11 high disk usage, etc. And you can enjoy other useful features, such as daily incremental backup, image file compression, etc.
For advanced users, you can use its professional version. It is able to delete old backup images with the Backup Scheme, restore Windows backup to dissimilar hardware like different CPUs with Universal Restore, etc. Can't afford data loss? Please download this software and create a backup just in case.

