2 Ways to Mirror Image Backup in Windows 11/10/8/7
This article will show you how to mirror an image backup in Windows 10, 8, 7, using Windows built-in tools and professional Windows 10 image backup software. You will also find answers to faqs and useful tips to optimize their backup strategies.
By Jonna Updated on March 24, 2026
User case: mirror Windows 10 image backup to USB
“My computer is running Windows 10, and the OS takes up 67 GB of disk space. Recently, I bought a 128 GB USB flash drive and I would like to mirror a Windows 10 image backup. My question is how to mirror the system image to this USB. I hope someone can help me.”
A user wants to "mirror a Windows 10 image backup," which involves creating a complete system backup that includes all essential files, personal data, and installed programs. These backups are usually stored on external hard drives, USB drives, or network shares to save space and ensure recovery.
How do you mirror a system image in Windows 10?
In this section, you will learn how to backup Windows 11/10/8/7 to USB with a free Windows backup software, AOMEI Backupper Standard, and the Backup and Restore (Windows 7) software. Let's begin!
Method 1. Mirror system image backup via AOMEI Backupper Standard
AOMEI Backupper Standard is a free and professional image backup software for Windows 11, 10, 8, and 7. Within only a few steps, you can use it to backup everything on your computer, including OS, apps, files, etc., to various destinations.

- It supports scheduled backup on the basis of Daily (By Interval), Daily, Weekly, Monthly (By Week), Monthly (By Date), One Time, and Event triggers, and incremental backup to save only changed files since the last backup.
- It can easily backup system to an internal/external hard drive, USB flash drive, NAS, network share, or cloud drive.
- In case a computer fails to start, you can create bootable media (USB drive or CD) that can boot the faulty PC and perform system recovery in WinPE.
*If you upgrade to Professional or higher editions, you can enjoy more advanced features, such as differential backups. If you run a scheduled backup, you can enable Automatic Backup Cleanup to delete old backup images for space saving.
How to create a system image with free imaging Software:
Follow the steps to mirror a system image backup, and you need to do the preparations as below first:
-
Please connect the target hard drive to your computer. Make sure it is detected.
-
Download AOMEI Backupper Standard, install and launch it.
Step 1. Click "System Backup" under the "Backup" tab.

Step 2. The system and boot-related partitions have been selected as source partitions automatically. Click the destination box to select your USB drive as the destination path.

Step 3. You can click on “Schedule” to enable and select daily, weekly, or other backup frequency as needed. You can also choose backup method as full, incremental or differential under "Backup Scheme".

Step 4. Click "Start Backup" to begin system backup.
With this image backup in hand, you can restore the operating system any time you need. You can refer to: How to Restore System Image from External Hard Drive.
✎Tips:
· If you want to restore the system image to restore system image to different hardware with a secure boot, please upgrade to the Pro edition and use the "Universal Restore" feature.
· If you want to restore an image file without booting Windows, you may create a self-booting recovery environment with AOMEI Backupper in advance.
· If you are a Windows Server user, you can use AOMEI Backupper Server to enjoy these functions.
Method 2. Windows 10 mirror image backup via Backup and Restore
Before you start, connect the USB drive to your computer and make sure it can be detected.
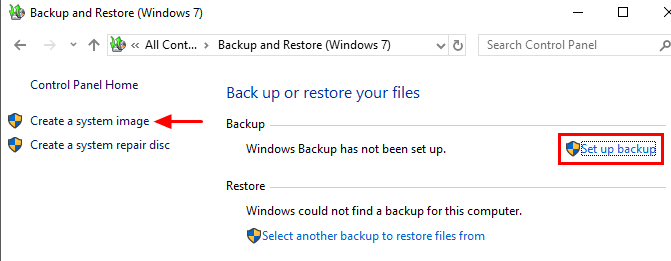
Step 1. Click Start, open Control Panel > System and Security > Backup and Restore (Windows 7) subsequently. Once you enter the backup section, you will be given options to Set up backup or Create a system image - the former is used for data recovery and the latter for bare-metal system recovery.
Here I will show you how to Create a system image as an example.
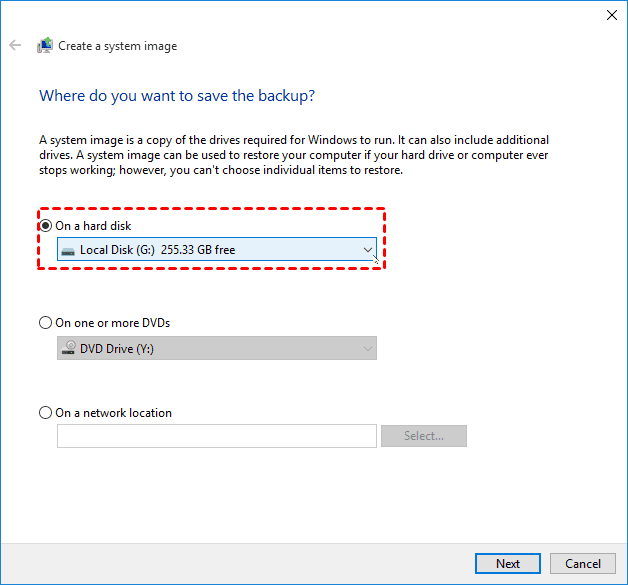
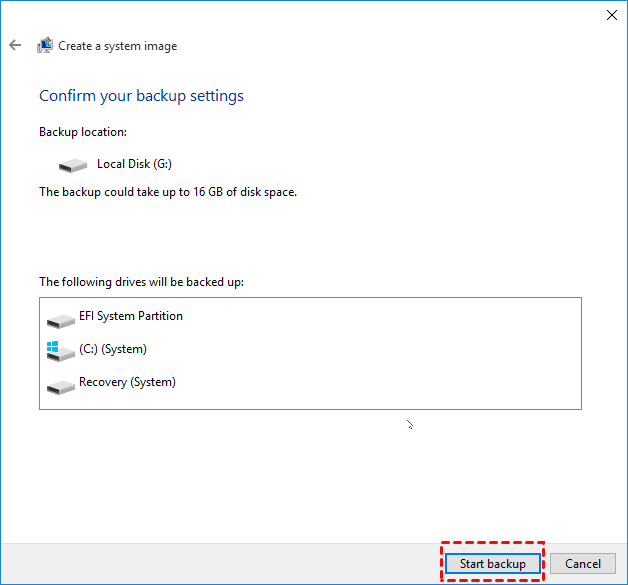
Step 2. Choose to save backup on a hard drive or network location. Here, choose your USB drive. then click Next.
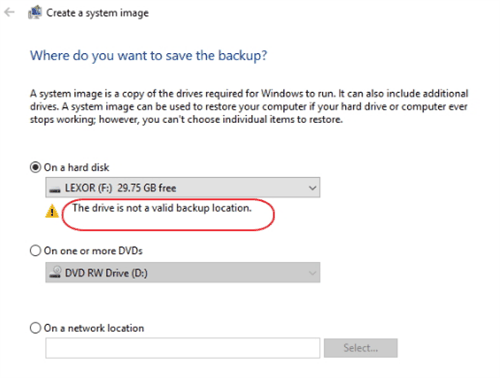
- Note: When you choose USB as the destination to create a system image, you are very likely to receive the prompt"The drive is not a valid backup location."This is because earlier USB drives didn't have enough space and weren't recognized as the storage location for the Backup and Restore feature.
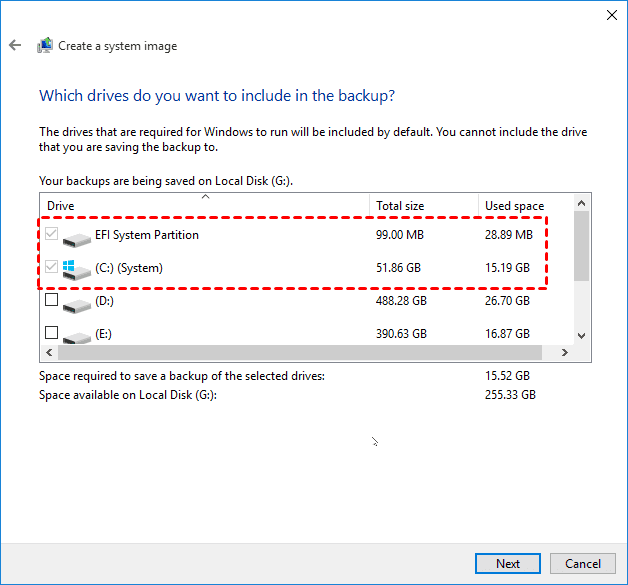
Step 3. Then choose what to backup. The system partitions will be selected by default, you can also choose additional drives as you need. Then, click Next to continue.
Step 4. Once you have chosen what you want to back up, you will be given an overview. After confirming everything you need is included, click “Start Backup”.
- Note: This is a generic approach that also applies to Windows 7, 8, 8.1, or Windows 11. However, this tool is often reported with various errors, such as “Windows Backup did not complete successfully” and “The drive is not a valid backup location”. If you don't plan to spend a lot of time and effort on troubleshooting, you can also try more stable and secure third-party software.
Plus: Backup Windows 10 image to create OneKey recovery partition
AOMEI OneKey Recovery is a reliable one-key recovery software for all Windows and server computers, which allows you to create a system image and then restore it easily and quickly.
By using this software, it will not only backup the system but also add a boot menu as well as specify a fast key (F11 or A) to access the AOMEI recovery environment. Thus, you can access this software and restore the system image by selecting the boot menu during the system startup process. In addition, this software supports all brands of computers, such as Lenovo, Dell, HP, Acer, etc.
Download the demo version to have a try!
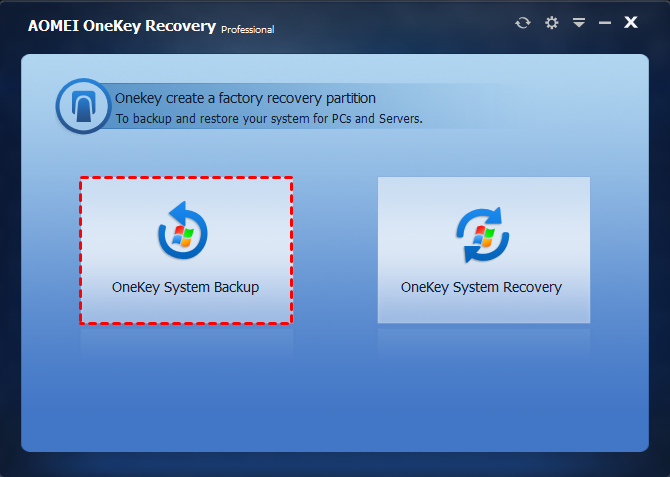
Step 1. Launch one key recovery software AOMEI OneKey Recovery, and click "OneKey System Backup".
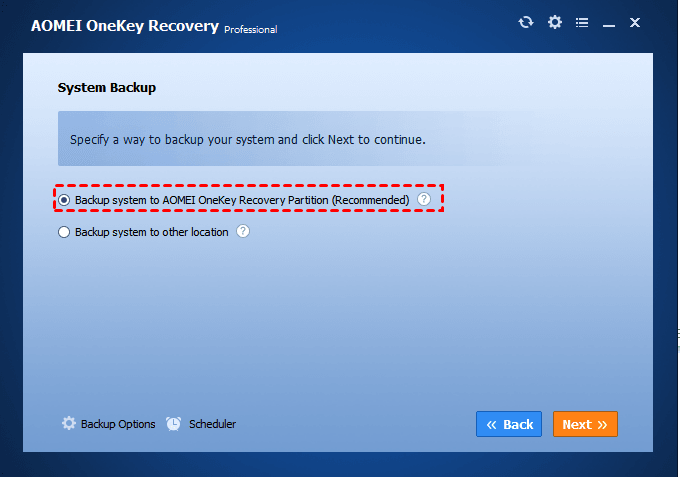
Step 2. Tick "Backup system to AOMEI OneKey Recovery Partition" and click Next. This option will create a real partition but not specify a drive letter to store the image file, which can greatly avoid any unwanted deletion.
- Notes:✎...
- If you want to set a compression level or password for the backup image, click "Backup Options" at the lower location.
- If you want to backup the system to another location, select the second option.
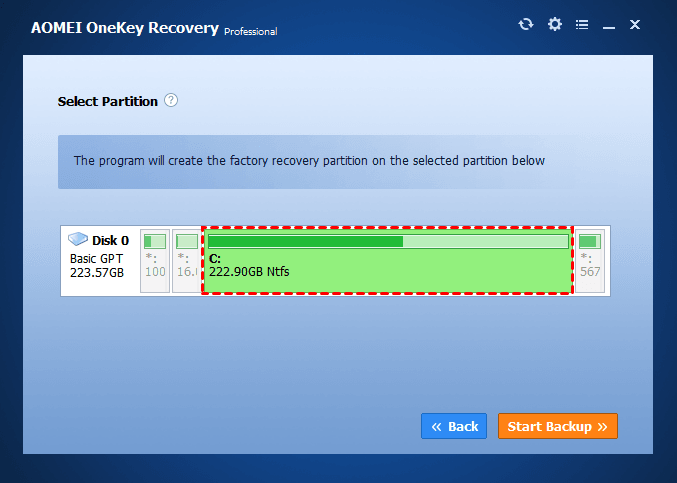
Step 3. Select a partition on the disk and click "Start Backup", and it will create a recovery partition on the right side later.
The main benefits of mirror image backup in Windows 10
Usually, people may want to create a system image backup in Windows 10 for the following reasons:
-
Protect Your Data: System errors or viruses can threaten your important files. To keep your data safe, it's essential to create a backup image of your computer.
-
Avoid Reinstallation: If you're replacing your hard drive or computer and want to avoid starting from scratch, you can mirror your system image and restore it on the new device. This is also helpful if you want to roll back to a previous version of Windows after a troublesome update, like returning Windows 11 to Windows 10.
-
Incremental Backups: Many backup solutions offer incremental backups, which only save changes made since the last backup. This feature saves time and space while keeping your backups current.
FAQs about Mirror Image Backup in Windows 10
Q1: What is a Mirror Image Backup?
A1: A Mirror Image Backup is a complete duplicate of a hard drive, capturing all files, applications, and system settings in a single image file. This type of backup allows for quick and comprehensive system recovery.
Q2: Why should I use a Mirror Image Backup instead of a regular file backup?
A2: A Mirror Image Backup offers a full-system recovery solution, ensuring that not only files but also applications and settings are restored. Regular file backups may miss critical system configurations.
Q3: Can I restore my system from a Mirror Image Backup?
A3: Yes, restoring from a Mirror Image Backup is straightforward. You can use backup software or recovery media to revert your system to the exact state captured during the backup.
Summary
If you mirror a system image in Windows 10/8/7, AOMEI Backupper is a really good choice. With its help, you can mirror a system image easily and quickly. It has helpful features like incremental backup, event triggers backup with USB plug-in, disk space management, etc., that can help you save much time and disk space.
In addition to backup and restore, AOMEI Backupper is also an excellent disk cloning software, so you can use it on some other occasions, like cloning Windows 10 installation to another drive.

