Install Windows 10 using Command Prompt (2 Methods)
If you want to upgrade Windows or get rid of system issues, installing Windows 10 from Command Prompt is a good solution. Let’s see how to do it, and don't forget to backup your system just in case.
By Ivy Updated on August 28, 2025
Need to install Windows 10 from Command Prompt
“I have a 500 GB SSD drive, I divided it into 2 drives C = 150 GB to install windows according to UFI / GPT standards, and drive D = 350 GB already contains data inside, now I want to repartition C drive using DISKPART On Command Prompt to install new windows, I already have a USB containing small Windows that can boot to use the small windows Command Prompt to delete C drive and repartition, Please show me the steps to repartition C drive according to UFI standard by DiskPart on CMD , Thanks."
Windows 7 reaches its end of life on January 14, 2020, thus it's urgent for users to upgrade to Windows 10. Because Microsoft will not provide any technical support and the Microsoft customer service, Related services and device will be disconnected in the near future by 2023 at the latest.
Microsoft users are given many ways to perform a system upgrade, but these methods usually don't work correctly, and they may bring unwanted files, settings, and apps to the new system.
Just to be on the safe side, a clean install of Windows 10 from command prompt can be your best choice, as it will remove everything from the hard drive and start from scratch. Additionally, it also helps you quickly resolve system and other issues, get rid of viruses, and improve battery life.

Before you make some changes on your computer, keep a previous backup is needed for recovery:
👉Create a Windows 10 Factory Image to Prevent Any System Failure
How to install Windows 10 from Command Prompt
For many users, system installation involves a complex process. However, if you follow the steps below carefully, you can easily install Windows 10 with Command Prompt.
Before you try any methods below, please make some preparations in advance.
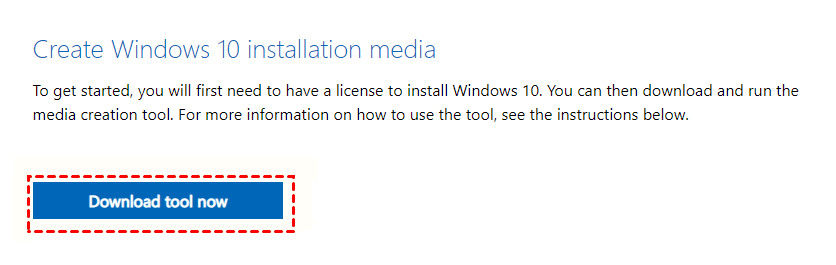
- Download Windows 10 MediaCreationTool from Microsoft.
- Mounted the ISO image and assign a drive letter for it, here take G: as an example. You can navigate to the ISO image file, then right click it and choose Mount from the drop-down menu.
Tip: If you want to install Windows 11, you can download the Windows 11 ISO or MediaCreationTool from this page.
Method 1. Install Windows 10 from CD using Command Prompt
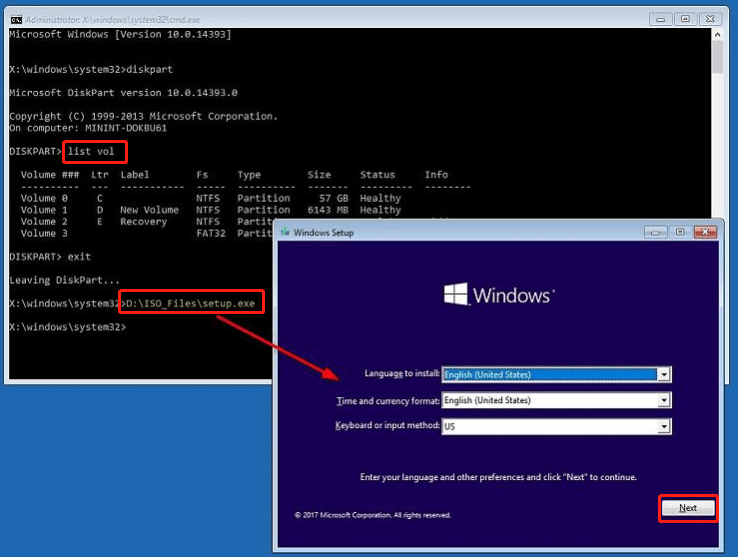
Step 1. Press the Windows logo key + R at the same time. Type diskpart in the Run box and then click OK to run Diskpart for Windows 10 install.
Step 2. Type list vol and then press Enter to find the partition containing the ISO files.
Step 3. Type G:\ISO_Files\setup.exe and then press Enter (G represents the disk number of the mounted Windows 10 disc image).
Step 4. The Windows Setup page appears. Make the selections you prefer and then click Next.
Step 5. Click Install now to continue.
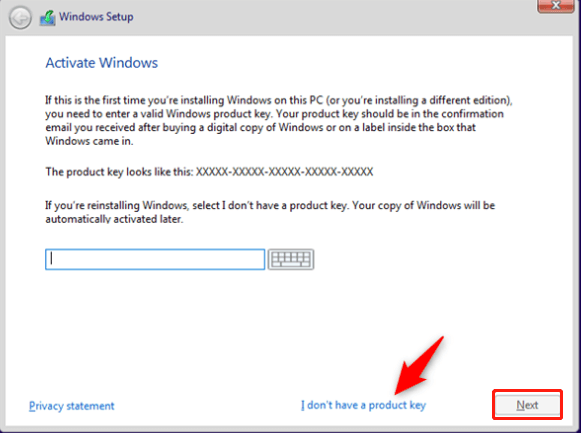
Step 6. If you're installing Windows 10 for the first time, you must enter a genuine product key. If you're reinstalling Windows 10, just click I don't have a product key. Then click Next.
Step 7. Select the Windows 10 edition you are currently using if you don't want to buy another product key for Windows activation. Then click Next.
Step 8. Tick the I accept the license terms checkbox and then click Next.
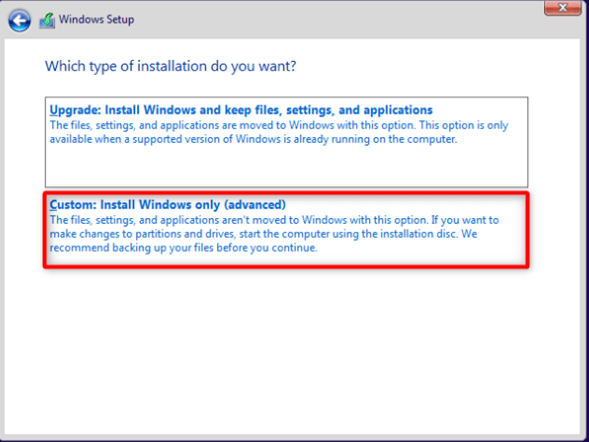
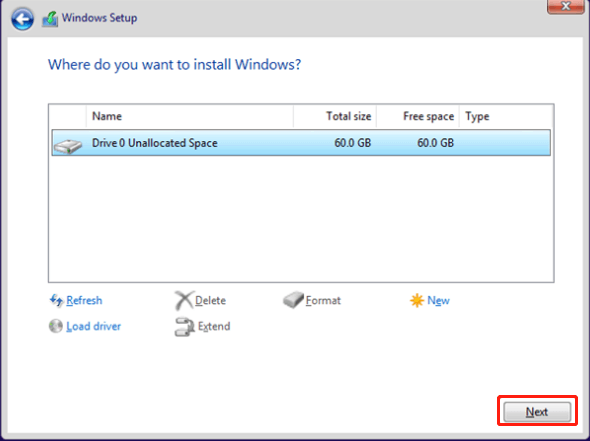
Step 9. Select Custom: Install Windows only (Advanced) from the list.
Step 10. Choose the drive or partition that you want to install Windows 10. Then click Next.
Step 11. Once the installation is done, you need to restart your computer by clicking Restart now.

Method 2. Install Windows 10 from USB using Command Prompt
Installing Windows 10 with a bootable USB can greatly reduce installation time. To create a bootable USB flash drive with the installation files, you can insert a USB (at least 4GB in size) to your computer and then follow these steps:
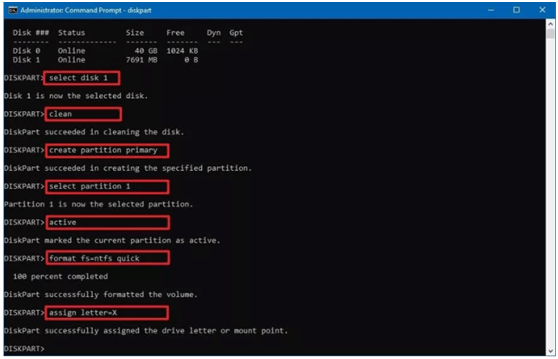
Step 1. Press the Windows logo key + R at the same time. Type diskpart in the Run box and then click OK to run Diskpart for Windows 10 install.
Step 2. Type the following commands one at a time and press Enter after each command:
-
list disk
-
select disk 1
-
clean
-
create partition primary
-
select partition 1
-
active
-
format fs=ntfs quick (or format fs=fat32 quick)
-
assign letter=X
-
exit
Notes:
* The clean command marks all the data on the drive as deleted and it will become invisible. Please be sure you want to do this!
* Remember to replace 1 with the number of the USB flash drive and change X for any available letter you want to use for your USB flash drive. They are just an example here.
Step 3. Navigate to the mounted Windows 10 ISO image and make it bootable with the following commands.
-
G:
-
cd boot
-
bootsect /nt60 X:
Notes:
* Replace G with the drive letter of your mount drive as it appears in File Explorer. It contains the Windows 10 ISO image file.
* Replace X with the correct drive letters for USB flash drive.
Step 4. Type xcopy G:\*.* X:\ /E /F /H to copy the mounted image to your USB drive.
Notes:
* /E copies all subfolders.
* /H copies all hidden files.
* /F displays all source and destination file names as it’s coping.
Step 5. Once that’s done, you get a bootable USB flash drive. Insert it into your machine and install Windows 10 in the recovery environment. Please follow Step 4 to Step 11 mentioned in Method 1.
Note: The installation process will erase everything on the primary hard drive of your computer. If you have some important files on it, you’d better backup files to an external hard drive in advance.
Create a Windows 10 Factory Image to Prevent Any System Failure
After installing Windows 10 from Command Prompt, you will get a completely fresh version of Windows. It only has the operating system and boot partition(s) or system files required to start Windows. This is the best time to create a system image for Windows 10, and the image can be regarded as a factory image.
You can also choose to install all the programs you will use in the near future first and sync files you want to protect to the fresh version of the computer, then backup all of them together. So you don't need to reinstall programs or worry about data loss in the event of a disaster.
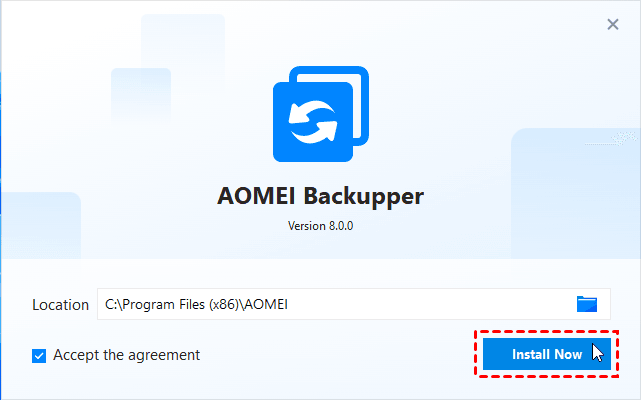
To make it, you need a Windows 10 backup utility. Many users prefer to use the built-in tool in the beginning, but later they are disappointed to find that Windows Backup keeps failing. And you may also encounter other backup and restore issues. Thus, it's suggested to use a third-party free backup software like AOMEI Backupper Standard.

- Various Destination Path: It enables you to backup system to internal/external hard drives, cloud drives, NAS devices and network with ease.
- Flexible Backup Modes: It supports schedule automatic backup based on daily, weekly, or monthly. By default, this software will enable incremental backup and backup only changed data in a scheduled task.
- Advanced Features: It also enable intelligent sector backup, normal compression, automatic splitting etc helps to make the backup image smaller.
- High Compatibility: Windows 11/10/8.1/8/7 are supported.
Here is the full guide on backing up your system. Now please refer to the below instruct.
Step 1. Install and open this freeware.
Step 2. Click System Backup under Backup tab.

Step 3. The Task Name can be modified by your needs. The related system partitions are selected by default. Select the destination path (click the PC icon) to store the system image.

Step 4. Click Schedule to enable daily incremental backup (the default option), or change it as per your needs.

Notes:
* Options: Click it to comment on this backup task and enable email notification.
* Schedule: Set the backup task to run automatically. Daily, Weekly, Monthly, Event triggers, USB plug in, etc., are free.
* Backup Scheme (advanced edition): it helps to save disk space by backing up only changed files with Incremental or Differential Backup or deleting the older backups automatically.
Step 5. Confirm your operations and then click Start Backup.

The backup process will take a while, and it depends on how much data you have. Wait patiently and you can easily restore Windows 10 system image to new hard drive or other locations through Home > system backup task > Restore.
◈ Tip on how to perform system backup on multiple computers:
AOMEI Backupper offers you a feature called Create Portable Version, which has the ability to run AOMEI Backupper from a removable device and backup your system without installing this software.

And you can also use its AOMEI Image Deploy tool to boot multiple computers over a network and restore system to multiple computers simultaneously. Dissimilar hardware restore is supported.
FAQs on installing Windows 10 from Command Prompt
1. Can I install Windows 10 from the Command Prompt without losing my files?
Unfortunately, installing Windows 10 from the Command Prompt involves formatting the target drive, which will erase all existing data. Make sure to back up any important files before proceeding with the installation. You may consider using external storage or cloud services to store your files temporarily.
2. How long does it take to install Windows 10 from the Command Prompt?
The time it takes to install Windows 10 from the Command Prompt varies depending on factors such as your computer's hardware specifications, the speed of your storage drive, and the complexity of your setup. On average, the installation process can take anywhere from 30 minutes to over an hour.
3. What should I do if I encounter errors during the installation process from the Command Prompt?
If you encounter errors during the installation process, first ensure that you've followed all the steps correctly. Double-check your commands and make sure your Windows installation media is not corrupted. If the issue persists, search for the specific error message online or consult Microsoft's support documentation. You may also consider seeking assistance from online forums or contacting Microsoft support for further guidance.
Verdict
Two efficient methods are described here to assist you to install Windows 10 from Command Prompt. You can choose one of them based on your own situation. After installing, don’t forget to protect your system by using AOMEI Backupper Standard. It is the best time to create a backup image, with it, you can restore Windows 10 to factory settings at any time.
You can also customize backup images by installing programs and adding data to your computer and scheduling the backup image to track changes you made on it. To be sure there is always space for new backups, it's suggested to customize backup settings and reduce backup image size as much as possible.
As a professional disk clone software, it also has the ability to clone disk to larger disk, clone larger HDD to smaller SSD, clone only OS, etc. For server users, you can try AOMEI Backupper Server.

