7 Methods to Fix DVD Drive Not Showing up in Windows 10
Have you encountered DVD drive not showing up in Windows 10? Read this article and learn 7 methods on how to fix DVD drive not recognize or missing problems, and an easier backup solution for similar issues in the future.
By Delia Updated on September 5, 2025
Why DVD drive not showing up in Windows 10
Despite the advent of more and more storage devices, DVDs are still used by many users to back up files and store recordable media like photos, music, or text files. But in recent years, a problem has been reported from time to time - DVD drives not recognized or detected in Windows 11, 10 or earlier OS.
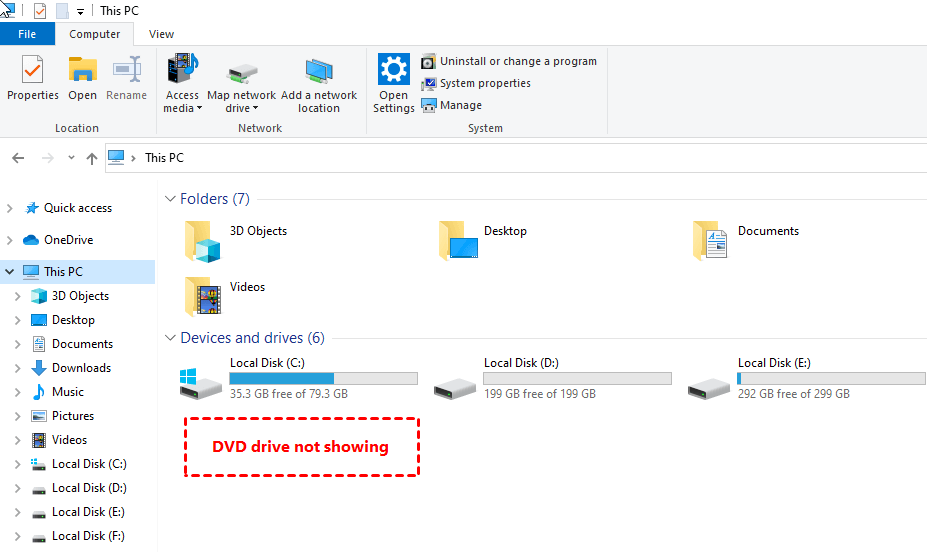
There’s nothing wrong with the hardware and it may have worked just fine not long ago, suddenly the DVD drive can’t be recognized in This PC and Device Manager, which brings huge inconvenience since replacing the DVD requires much time and money.
What causes the DVD drive not showing in Windows 10? According to the feedback from users, it usually occurs after the following operations:
📣Driver Problems: Outdated or corrupted drivers can prevent the DVD drive from being recognized by Windows 10.
📣Hardware Issues: Loose or damaged cables, faulty DVD drive hardware, or issues with the SATA port or power supply can cause recognition problems.
📣BIOS/UEFI Configuration: If the DVD drive is not enabled in BIOS/UEFI settings or if the settings are incorrect, Windows may not detect the DVD drive.
📣Registry Errors: Corrupted or incorrect registry entries related to the DVD drive can lead to recognition issues.
📣Software Conflicts: Recently installed software or conflicting system updates can interfere with the functionality of the DVD drive.
Such being the case, you can adopt some targeted solutions to solve the problem.
How to fix the DVD drive missing in Windows 10
If you have this problem, don't worry, many people have encountered the same issue and managed to fix it successfully. There are several effective solutions on DVD drive not recognized you can try to resolve the problem. Follow the 7 methods outlined below to see which one works for you.
1. Make sure your DVD drive is correctly connected
2. Updates Windows 10 to the newest version
5. Fix corrupted registry entries
7. Backup your system in case DVD drive missing again
1. Make sure your DVD drive is correctly connected
Before you do anything else, check again that your DVD drive is properly connected to the computer. This doesn't sound like the cause of your problem, but it can at least help you eliminate a possibility. It might sound silly, but 80 percent of problems with DVD drives not recognized are because the DVD drive is not properly connected.
Besides, there are actually some cases where users plugged in the wrong ports. To connect the DVD drive to the PC correctly, you can refer to the user manual of the motherboard.
If the problem still exists after confirmation, you can move to the next method.
2. Updates Windows 10 to the newest version
If you find DVDs not detected in Windows 10 right after a system upgrade, this issue is very likely to be fixed in the next update. So you can check your system to see if you’ve upgraded to the latest version. And connect it again to check if the DVD drive not recognized.
Steps:
1. Press the Windows + I key to launch Windows Settings.
2. Select Update & Security > Windows Update.
3. Tab the Check for updates button on the right pane. If there’s a newer version, install it.

3. Reinstall the DVD drive
Device reinstallation can sometimes solve the problem. Just perform it in Device Manager.
Steps:
1. Right-click the Start button on the left-bottom corner of your screen, and choose Device Manager in the menu. If you are required to confirm the administrator identity, allow it or type the correct password.
2. Click the arrow next to DVD/CD-ROM drives to expand the menu. Right-click your DVD drive and click Uninstall device. Here you can also try to update the driver.
3. Restart your PC. Windows 10 shall reinstall the DVD drive automatically after booting.

4. Remove IDE/ATAPI drivers
This method has saved many users from DVD drives not showing in Windows 11, 10. Just delete the Channel 0 and Channel 1 entries under IDE/ATAPI controllers.
Steps:
1. Launch Device Manager in the same way.
2. Choose Show hidden devices in the View menu.
3. Expand IDE/ATAPI Controllers and then right-click ATA Channel 0, ATA Channel 1, and Standard Dual Channel PCI IDE Controller to choose Uninstall device respectively. If there are additional entries, delete them as well.
4. Reboot the PC. The DVD drive will be automatically reinstalled.

5. Fix corrupted registry entries
DVD drive missing can also occur when registry entries are corrupted. Therefore, deleting corrupted registry entries in Registry Editor is a feasible solution. But to avoid serious problems caused by incorrect changes to the registry, it’s recommended to backup it in advance.
Steps:
1. Press the Windows + R key to open the Run dialog box.
2. Type regedit in the Run dialog box. Then press Enter. If you are required to confirm the administrator identity, allow it or type the correct password.
3. Enter the following registry subkey in the navigation pane:
HKEY_LOCAL_MACHINE\SYSTEM\CurrentControlSet\Control\Class\{4D36E965-E325-11CE-BFC1-08002BE10318}
4. Right-click UpperFilters in the right pane to Delete it. If it doesn’t exist, go to the next step.
5. Right-click LowerFilters in the right pane to Delete it. If it doesn’t exist, go to the next method.
6. Quit Registry Editor and restart the PC.
Notes:
-
To take this measure, you must be logged on Windows as an administrator.
-
Some apps might not work correctly after using this method. If so, try uninstalling these apps and reinstalling them with the updated version.

6. Create a registry subkey
For users who can’t find UpperFilters and LowerFilters in the registry editor, try this method instead. It’s also recommended to back up the registry at first.
Steps:
1. Press the Windows + R key to launch the Run box.
2. Type regedit in the textbox and click OK.
3. Enter the following registry subkey in the navigation pane:
HKEY_LOCAL_MACHINE\SYSTEM\CurrentControlSet\Services\atapi
4. Right-click the atapi folder, and choose New > Key.
5. Rename the new folder as Controller0 and select it.
6. Right-click the blank area on the right, and choose New > DWORD (32-bit) Value.
7. Rename it as EnumDevice1, then right-click it and choose Modify.
8. Type 1 in the Value data box. Then click OK.
9. Quit Registry Editor and restart your PC.
Notes:
-
To take this measure, you must be logged on Windows as an administrator.
-
This method only supports Windows 10 versions of 1507 and Windows 8.1/8/7.

7. Backup your system in case the DVD drive missing again
Hopefully, your problem can be fixed with one of the above methods. If so, well done, and congratulations. But just to let you know, there are a variety of reasons that can cause DVD drives not showing up in Windows 10. It's not surprising that you'll find yourself in the same or similar situation that DVD drive not recognize.
So in addition to effective fixes, a preventive strategy is also necessary. If you create a system backup in advance, you can easily restore the system to a healthy state when a problem occurs.
To realize this idea, the only thing you need is a reliable and easy-to-use Windows backup tool like AOMEI Backupper Standard. First of all, it’s freeware so you don’t need to pay for the basic functions we need here. It also provides flexible options and plans to suit your different situations. With the Schedule feature, you can even run the system backup task automatically on a regular basis.
Steps:
1. Download, install, and launch this software, go to the Backup interface, and choose System Backup.

2. Click the PC icon to select a destination directory as you like, such as local disk, external hard drives, USB, cloud drives, NAS, etc. If you want to distinguish this task more easily, edit the Task Name.

3. Click Schedule to set up a plan for performing an automatic backup, such as daily, weekly, monthly, etc. When the system crashes, you can easily restore it to a time point when everything is fine.

4. Alternatively, you can click Options or Backup Scheme to manage further settings. Then, click Start Backup.

5. When the backup completes, click OK to exit. Then you can manage the task on the Home page.

Next time you encounter a system error like the DVD drive not showing, you can click Restore under the Home tab and choose Select image to restore to find the image file you want to restore.

Other helpful features:
🔑Create bootable media: Some errors might cause the system to fail to boot at all, thus you can’t solve the problem by normal means either. To avoid this dilemma, you can create a bootable media with AOMEI Backupper Standard. When the system crashes, just boot Windows from this media and then restore the system to a normal state.
🔑Auto deletes older backups to save space: After a long time of scheduled system backup, the image files in your destination directory will accumulate to an amazing size. So if the automatic backup runs frequently, or your computer has limited space, you can upgrade to advanced editions such as AOMEI Backupper Professional, and use Scheme to auto delete backups older than x days.
🔑Auto backup when system startup or USB plugged in: In addition to Schedule based on frequency, you can also choose Event triggers after upgrading to advanced editions.
🔑Various backup and clone modes: System backup will only create an image of the system partition. You can also perform file/partition/disk backup, or even clone them to protect your important data from system crash or disk failure.
FAQs about DVD drive not recognize
1. Why is my computer not reading my DVD?
A dirty or scratched disc surface is often the main reason for CD/DVD issues when inserted into a computer. Ensure the disc is clean and check for any visible damage. Use filtered water and a lint-free cloth to gently clean any dust or smudges from the disc and try if the DVD drive is not recognized.
2. Why can't I play a DVD on my Windows 11 computer?
Some editions of Windows do not include a built-in DVD player. If you want to play DVDs on Windows 11, visit the Microsoft Store to purchase the Windows DVD Player or another compatible app. The Windows DVD Player allows PCs with an optical disc drive to play DVD movies, but not Blu-ray discs.
3. Why would a DVD suddenly stop working?
Common causes for a DVD to stop working include a dirty disc, finger marks, smudges, or small scratches. Use a soft cloth to gently clean the disc, starting from the outside edge and moving towards the center hole.
Conclusion
You can fix the DVD drive not showing up in Windows 10 with the above methods. But considering it could happen again in the future, you’d better create a backup of the system when it’s in good condition. AOMEI Backupper Standard is a good choice to complete the task easily and safely.
As a backup software with complete disaster recovery solutions, this software also helps you to solve Windows problems such as boot configuration data missing in Windows 10, SSD won’t boot in Windows 11, 10, startup repair not working in Windows 7, etc.

